Drywall is a good choice for DIY repairs. It consists of two layers and is used to level or create partitions.
Leveling material
Thanks to its composition, plasterboard has excellent performance characteristics. When used, no toxic substances are released, and the sound and heat insulation of the room increases. It is worth noting that drywall has a core in its structure, which, when wet, renders the material unusable. However, if installed correctly, it will create the most comfortable humidity conditions in the room.
What are the differences between different types of drywall
There are several types of classifications of finishing materials. According to the scope of use, it is divided into the following types:
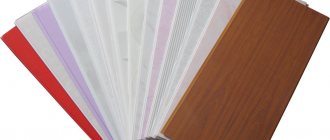
- For rooms with normal or low humidity, a standard version with a gray front side and blue markings is designed. Suitable for making partitions, leveling walls in a living room, bedroom or nursery. Designation – “GKL”.
- In the kitchen, bathroom, restroom and other damp rooms, a moisture-resistant sheet with hydrophobic impregnation and additives that prevent the appearance of fungus is used. The appearance is distinguished by a greenish tint. It bears the stamp “GKLV”.
- In places of increased fire danger, “GKLO” is used - fire-resistant plasterboard with reinforcing components made of fiberglass and clay. Can withstand open fire for up to 1 hour. It has a characteristic pink color, red numbers and letters.
- The combined “GKLVO” combined the qualities of the two previous varieties.
- "GKLF" can be attached to the external facade of the building. It is characterized by increased resistance to weather conditions and a high price.
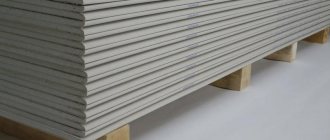
Depending on the thickness of the plasterboard sheet, it can be:
- Wall for installation of slopes and partitions, wall finishing, etc. It has the following dimensions: width 120 cm, length 200 (250, 300) cm, thickness 1.25 cm.
- Lightweight ceiling. Its dimensions are 120x200x0.9 cm and 120x250x0.9 cm.
- The most plastic arched one for creating domes, convex and wavy structures. A standard sheet 120x250x0.65 weighs 16.4 kg, which facilitates the work of the master and allows the sheet to be attached to various surfaces with a radius of 30 to 100 cm.
Plasterboard sheet can have different widths.
According to the type of edge of the main body there are:
- “PLUCK” – with a semicircular thinned one, the most common. Development of the German manufacturer Knauf. Characterized by the highest quality seam sealing.
- “PC” – with a straight (end) one, which is rarely on sale.
- “UK” - with a thinner, often found on sheets of the Gyproc company. To finish the joints it is necessary to use reinforcing tape.
Structure and individual characteristics of gypsum board types
Any sheet of drywall consists of three layers, each of which differs from one another:
- Front layer of cardboard.
- Gypsum with additives.
- Back layer of cardboard.
The back side of the sheet of material is usually made from gray cardboard, onto which all markings corresponding to the type of plasterboard are applied. It is by these designations that you can understand the purpose of this drywall.
Drywall structure
The internal filler is made from natural gypsum, and in the case of special (moisture-resistant/fire-resistant) types it contains additives that improve its properties.
The front side of the sheet is also made from cardboard, but there is a significant difference in the material. It comes in three colors, depending on the purpose of the particular type. A regular wallboard has white cardboard, moisture-resistant green, and fire-resistant red. It is this side that is external when installing the material, and is intended for further finishing by puttying.
Types of gypsocraton
The peculiarity of the front side of the gypsum board is in its manufacture. Initially, the outer layer of gypsum is covered with inner cardboard, the main purpose of which is to level the entire surface. But the outer side, which will serve as the main surface, is made from a material (cardboard) with a high percentage of cellulose in its composition.
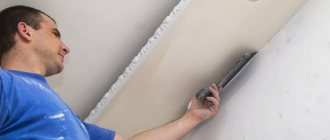
Which side should you mount drywall on?
During repairs using gypsum plasterboard, it is important to correctly attach it to the wall or frame.
Ordinary
The standard sheet must be mounted with the front side facing out.
An ordinary sheet of plasterboard is fixed with the front side.
Thanks to this installation, the following goals can be achieved:
- make the most of the benefits of drywall;
- avoid waste of materials during further finishing work;
- provide better adhesion to tiles or wallpaper.
If you place the canvas with the back side facing out, the ink may blur when puttying or applying glue.
Stains may bleed through the finish and detract from the appearance.
Moisture resistant
Moisture-resistant drywall should be fixed according to the same rules, with the light side forward. It must be remembered that this material is not intended to resist the direct ingress of water onto the surface. In this case, it loses its characteristics.
The difference between the front and back sides of a sheet
Some people believe that there are no differences between gypsum board surfaces, but this is not true.
The front side of the drywall has the following features:
- Lack of marking with basic material parameters. It is located on the reverse side, which eliminates the possibility of text bleed through during subsequent finishing with decorative putty or wallpaper. It is taken into account that for each variety it is customary to use a font of a certain shade.
Regardless of the manufacturer and type of drywall, markings are always applied to the back of the sheet - Cardboard color. The front part of the products is lighter, the back has a more saturated tone. The side edges are the same color as the main cover.
- Edge bevel. The visible part of the factory-removed chamfer is located on the outer surface. It can be of different shapes, but immediately shows the location of the sides. Such products are usually mounted on the ceiling, but they are also suitable for some areas of the walls.
Apart from straight and rounded edges, in all other cases the front side of the material can be determined by the direction of the bevel
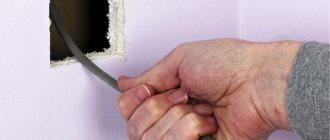
Before attaching the gypsum board, it is necessary to determine the accuracy of the location of the part. This is not difficult to do, because the differences are very noticeable, and the chance of making a mistake is minimal.
On a note! To properly attach small fragments or remnants, it is recommended to mark them on the reverse side.
Features of attaching drywall to the wall
Builders who level walls using gypsum plasterboard use the following advantages:
- ease of installation;
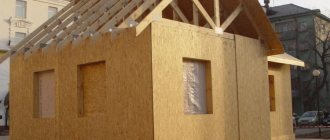
- the ability to create convex and wavy surfaces;
- ease of subsequent finishing;
- quick dismantling;
- light weight of the canvas, which does not create additional load on the floors.
Builders note the ease of installation of drywall and the light weight of the canvas.
However, the material has disadvantages:
- poor sound insulation;
- fragility when bending;
- low surface strength;
- sensitivity to stress;
- poor resistance to direct moisture.
Despite their weaknesses, plasterboard sheets are most often used to level uneven walls. There are several ways to install them:
- on a wooden crate;
- on a metal profile frame;
- directly onto the surface using glue or foam.
When performing work, the following nuances should be taken into account:
- Leave gaps between the wall and the ceiling or floor. The resulting gaps will close the baseboard and cornice.
- Leave a small gap between the panels. This will avoid cracking of the seams when the wall settles.
- Maintain a distance of 30–35 cm between the screws. Recess the caps a little and fill the holes with putty.
How to screw to a profile
After theoretical discussions, it's time to move on to practice.
Installation of drywall consists of several stages:
- determining the dimensions and outline of the sketch;
- metal frame assembly;
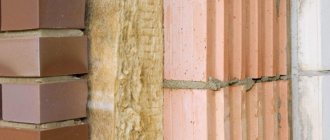
- installation of sound and heat insulation;
- installation of gypsum boards.
At the first stage, you need to correctly take measurements and draw a sketch. In the case of attaching plaster to the walls, it is enough to depict the frame on the plan. It is important that there are support strips in all corners. The distance between the remaining supports should be the same, and the profile should not fall on the edge of the sheet. This is not the easiest, but very important stage.
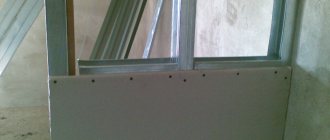
When installing the frame, it is necessary to strictly observe the level
When installing drywall on a frame, the screws should be slightly recessed into the material
For a more complex structure made from plasterboard sheets, the dimensions are taken in the same way. It is the graphic image that will clearly show how the object fits into the room and will help make the necessary adjustments.
The next step is to assemble a frame from several types of profiles:
- W – large, for the general frame;
- D – less, to form the lattice plane;
- U-shaped with smooth walls. The support profile is inserted into it end-on.
- UA – reinforced, with a thickened wall, for mounting a frame.
Choosing drywall for finishing
It is best to buy drywall produced by a trusted manufacturer.
Drywall must be from a reliable manufacturer.
In Russia it is:
- Knauf;
- Gyproc;
- "Volma";
- Lafarge;
- "Gypsopolymer";
- Rigips;
- GIFAS.
Before starting repairs, you need to determine the purpose of the sheets and the location of their installation. There are specialized gypsum boards for sale for each type. For rooms without special conditions the following are suitable:
- Gyproc “Strong” 2500x1200x15 mm;
- Knauf GSP-A 2500x1200x9.5 mm;
- "Volma" 2500x1200x12.5 mm.
Among the moisture-resistant brands, you should pay attention to the following brands:
- Gyproc “Aqua Optima” 2500x1200x12.5 mm;
- Knauf GSP-N2 2500x1200x9.5 mm;
- "Volma" 2500x1200x12.5 mm, moisture resistant.
Experts recommend purchasing moisture-resistant drywall.
The best among fireproof materials are:
- Knauf GSP-DF 2500x1200x12.5 mm;
- "Volma" fire-resistant 2500x1200x12.5 mm.
Experts recommend:
- purchase drywall from large trading companies;
- check the storage conditions of products in the warehouse;
- inspect the sheets before purchase and after delivery for damage, dryness, and compliance with the markings.
How to choose drywall
You should choose drywall based on what functions it should have. For general purpose rooms, the most ordinary plasterboard of a gray, light color is suitable. For bathrooms you need moisture resistant. Fire-resistant plasterboard will help protect residents and reduce the fire hazard of the room. There is drywall that is both moisture-resistant and fire-resistant at the same time.
Don't try to buy cheaper sheets. Sometimes when we buy expensive but high-quality material, we save due to its service life.
The best drywall is made from natural gypsum; artificial substances may contain harmful impurities.
What you need to attach drywall to the wall
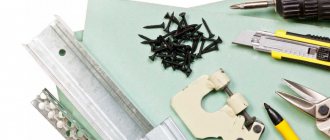
Depending on the method of attaching the gypsum board to the surface, the following tools will be required:
- building level;
- rule;
- spatulas of different sizes;
- electric jigsaw;
- sharpened knife;
- finishing grater;
- rubber mallet;
- drill with an attachment for preparing the adhesive mixture and solution;
- screwdriver;
- rollers and brushes;
- pencil;
- roulette;
- metal scissors or grinder.
To attach drywall, you need a building level.
You need to prepare the following materials and components:
- plasterboard sheets;
- profiles for various purposes and connecting components for them;
- dowels and screws;
- gypsum putty;
- primer with antiseptic properties;
- glue or mounting foam;
- serpyanka
Facial
The front part of regular wall cardboard is white, moisture-resistant is green, and fire-resistant is pink.
The front side can be identified not only by color, its texture is different - it is made of higher quality paper.
Its manufacturing technology involves 2 stages. First, an inner layer is formed that evens out the relief as much as possible, and then a very durable and absolutely smooth outer surface is glued.
Due to its chemical composition, the front part contains a significant percentage of cellulose, due to which it has high adhesion - it reduces the consumption of putty, primer and other finishing materials, while ensuring a reliable connection.
Each type of drywall is created for certain conditions
Methods for attaching drywall to the wall
Depending on the condition of the walls, one of two methods of attaching gypsum boards to the wall is used during repairs.
On glue
The frameless option is suitable for coatings made from the following materials:
- foam concrete;
- plastered brick;
- monolith.
The frameless option involves the use of glue.
All of them should not have large irregularities - maximum deviation is 20 mm.
Difficulties arise when working with wooden and aerated concrete foundations. Due to adhesion, a large amount of glue is absorbed and the strength of the structure is reduced. Do not install canvases on a freezing base.
The advantages of installing drywall without using sheathing are:
- low financial costs;
- independent performance of work without the involvement of specialists;
- installation in rooms with high humidity;
- maintaining the volume of the room;
Among the disadvantages of the method, builders name:
- the need to manufacture grooves for laying cables for electrical wiring;
- installation of additional fastenings for hanging heavy objects on the wall;
- strict requirements for sheets - it is absolutely impossible to establish deformed and beginning to collapse gypsum boards.
First of all, you need to prepare the base. To do this you need:
- Clean the wall from old finishing materials and dirt.
- Identify irregularities that exceed the permissible limits.
- Fill the depressions and knock out the bulges with a chisel.
- Prime the surface with an antiseptic.
- Install gaskets on the floor and ceiling.
First of all, you need to clean the wall of old materials.
Next, they begin gluing the gypsum boards. Start work from any angle. From it, using a plumb line or a laser level, mark a straight line for installing the first sheet. Then the following work is carried out:
- Degrease the bottom surface of the drywall.
- Mix a small amount of glue.
- Apply it to the canvas in increments of 20–25 cm.
- Press the material against the wall until completely dry.
How to attach gypsum boards to the profile
It should be taken into account that each type of installation work has its own types of fasteners, in our case these are:
- self-tapping screws for metal profiles;
- screws for drywall sheets.
The first type has two varieties: “metal-metal” and “metal-wood”. The “metal-to-metal” type is used when connecting two profiles; for this purpose, screws measuring 3.5 x 9.5 mm have a drill-shaped tip that can easily punch holes.
The correct way to attach drywall sheets to a frame
Self-tapping screws of the “metal-wood” type are used to secure the profile to a wooden structure; the end of such screws, 3.8x11 mm in size, is sharp; they do not cut through metal well, but are securely fixed in the wood.