Hello, regular and new readers!
Today I want to tell you how I did renovations at my dacha. To put it in order, it was necessary to change the double-glazed windows, which I installed with my own hands. I treated the cracks with polyurethane foam and decided to make slopes next time. Need I say that the process took a long time? At first it was a pity for the summer days, then the rains came, the cold came... I was going to finish the work only in a year. And it is not surprising that the sealant had to be changed, since it began to deteriorate under the influence of the sun and moisture. Let's figure out what the protection of polyurethane foam and how to do it correctly.
How to cover with polyurethane foam for protection
There are a lot of ways to hide the polyurethane foam so that it doesn’t damage it or interfere with its aesthetics. A common one is to putty.
This method is simple. One thing, BUT, these materials do not fit together, so plaster is applicable in 2 cases:
- If fire safety is at the forefront. Then apply a layer of plaster, which is 80 mm. In this case, use putty only with fire-fighting foam, which resists fire for 120 to 240 minutes. Although the fire inspectorate will still have complaints;
- For decorative purposes. In this case, putty is not so much protection, but as an aesthetic coating. This is the way to finish the work, making it aesthetically pleasing and pleasing to the eye.
If additional protection from mechanical stress is provided, plasterboard sheets are used. The seams between them are plastered, the foam is hidden. Then they are not afraid of damage and shedding of the plaster.
Why does foam need UV protection in the sun?
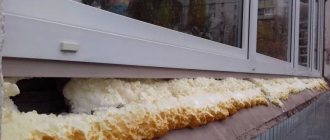
Foam best fills the space in a crack or hole or seam. If you don’t think about protection, its service life will not exceed 5 years. In the process of such improper use, it is constantly destroyed, as a result - liquid and moisture penetrate into the crack and cause destruction. And in the worst case scenario, the gap inside the wall will become a source of mold and mildew.
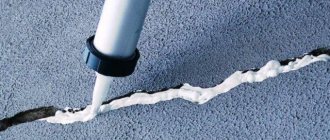
A simple way to protect it is to use regular sealing tape. But if you protect the foam on the street, the tape is unlikely to serve as reliable protection for long.
Another way is to use special mixtures (primers) that provide moisture-resistant protection. They have their drawbacks - in most cases they do not protect against ultraviolet rays - the main problem with polyurethane foam, and invariably lead to its destruction.
Other options are also used - sealants, putties, plastic, or acrylic paint. But if the excess foam is trimmed, it will not provide sufficient protection.
The protective layer for the foam prevents ultraviolet rays and creates vapor and water resistance.
Therefore, the best solution in this case is putty or plaster. Moreover, its specific type and type are not important. This method is affordable and simple - even a person without special knowledge or skills in the construction industry can cope with such work.
Choice
The recognized standard among professional polyurethane foams is the following products:
- Soudal Gun
- Penosil GoldGun
- Tytan Professional
These products have low secondary expansion, good viscosity and yield.
In addition, they do not deteriorate over time. Don’t even think about choosing a good foam, take any of these three. We once took Macroflex to install window sills, and they were so warped... So I DO NOT recommend it. If you buy something other than the three brands listed above, ruin everything and ask me questions in the comments, I won’t even answer them.
Protecting polyurethane foam with putty
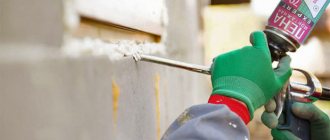
Wait until the foam has completely expanded and dried. When ready for use, it has a wave-like shape and often excess foam appears in unusual points and positions. It will not be possible to hide such fragments with plaster, so they must be removed first. For these purposes, excess foam is cut off slightly deeper into the wall in order to use putty.
The polyurethane foam should be cut no earlier than 12 hours after application, but it is better to check the drying time. They are indicated on the can.
Before applying the plaster, apply regular masking tape around the areas of upcoming work to protect the clean surface that does not need any finishing from stains. Remove the tape after the plaster has been completely applied and dried.
Which is better: heated floors or radiators?
Warm floorBatteries
Use of plastic panels
Sealing foam after installing plastic windows can also be done using other materials. One of the popular finishing materials is plastic. Panels made from it are sold ready-made. All that is required is to saw off the part to the required length and attach it to the wall. Such work will take much less time than using plaster and will not cause any difficulties for an amateur. To complete the task you will need to do the following:
- Cut out the pieces to the required size, which will be secured using a plastic strip.
- Install side panels. They are fixed at an angle of 90 degrees with respect to the window, you can make 110 degrees. For better insulation, the cracks can be filled with foam. The remaining foam must be cut off after it has dried.
- The gap between the slopes and the wall is closed using an f-shaped batten.
Installation of plastic slopes outside
An integral attribute of window construction is window sills. Read more about them in our article “Installing ebb tides for plastic windows.”
You can also read about other options for finishing slopes about their insulation, sealing and vapor barrier of seams between the window and the wall.
Protection of polyurethane foam by puttying step by step
To hide the mounting foam, any of the existing types of putty is convenient. However, the preparation process and the proportions of dilution of the mixture depend on the choice of manufacturer and specific model.
After mixing is completed, the mixture has acquired a thick, uniform consistency; it is applied to the polyurethane foam.
They make a small, protruding excess, which is then eliminated with a spatula, but you should not go too deep, otherwise you will get a notch, a depression, which will have to be eliminated again.
The excess, when it dries, is simply wiped off using sandpaper or a special construction mesh, which is used for finishing work with plaster.
Begin washing after the putty has completely dried. In this case, the chances of causing damage are minimal; moreover, apply force to erase in order to quickly obtain the desired result.
Other ways to protect polyurethane foam from the sun and moisture
It is not always practical to use putty; sometimes it is an extra waste of money. You can hide the polyurethane foam in other ways. Some of them are more expensive or cheaper than plaster, but are not suitable in all cases.
A simple and cheap method is to trim the foam and then rub it in. This method is relevant for cases where foam with a dense structure is used. This cut has an aesthetic appearance.
To make a neat cut, use not a knife, but a hacksaw for foam plastic - this blade does not tear the material. Next, after trimming the foam, it is sanded. To do this, use coarse sandpaper.
After sanding is completed, painting begins. To do this, use regular paint. It is better to prefer white or other light shades. Apply the paint in several layers, then it will become a homogeneous, flat surface, which will provide sufficient protection to the mounting foam from ultraviolet rays.
Other methods include the use of any available materials - boards or metal sheets, even roofing felt will do.
If the foam is in the shade, and aesthetics are not an issue at all, then it is left in this form. Despite the fact that moisture and air have free access to the dried foam, they will not cause damage to it, moreover, it will retain its properties. If you are not sure that the shadow is permanent, hide the foam immediately. In the future, they simply forget about this need, and when the issue becomes acute, it turns out that the foam needs to be applied again, wasting time and money on repeating the work already done previously.
What if you need to finish the slopes from the inside?
The same technologies can be used for interior work, however, in addition to plastic and plaster, you can also use drywall: it will hide the foam from view, it can be painted or covered with wallpaper. The only disadvantage of the material is that it is susceptible to moisture, so it cannot be used outdoors. Drywall is easily attached using self-tapping screws or dowels, helps create a perfectly flat surface, and is inexpensive. After the panels are installed, they must be coated with a primer for better adhesion to the future finishing.
Installation of plasterboard slopes inside the building
Please note that a wooden profile will be required to install the panels. If you have smooth walls, you don't need to use lathing. It is enough to glue the panels with special glue. This greatly simplifies the installation task.
Protection of polyurethane foam with plaster: all the nuances
When preparing the solution, you should be careful, stir the mixture thoroughly to eliminate the appearance of lumps that will spoil the aesthetics.
Depending on what functions the plaster layer performs, prepare a place for it. If it is protective, then remove the excess foam with a recess of several centimeters in order to plaster it efficiently. If the layer is decorative, then a large recess is not needed; a depth of no more than a centimeter is sufficient.
If you need to hide the foam outside, take into account that even the impossibility of moisture getting on the protective layer does not eliminate the chance of damage from other atmospheric factors. Severe frost also causes damage to plaster. You should take care of this problem in advance and purchase a frost-resistant mixture. If the work is to be done indoors, this is not necessary.
Regardless of which recess is prepared for plaster, the holes are plastered so that the layer of the mixture is at least 5 mm. If you use a smaller layer, this will lead to the appearance of cracks on the surface of the plaster and its subsequent destruction.
If the layer exceeds this value, then the plaster is applied in several stages, waiting for the initial drying of the previous layer.
Grouting is not done after the plaster has completely dried; it is enough to allow time for proper hardening.
When working with plaster, do not forget to use gloves and glasses. Dried mixture on the skin is difficult to wash off, and contact with the eye leads to serious consequences.
Don't forget to clean the tools after completing the work. If the mixture has not hardened, do this simply by washing them in water; if it has dried out, it will have to be cleaned mechanically.
Basic recommendations
If you are not sure that the foam will not be exposed to sunlight outside, the sealant must be puttied and painted. Experienced craftsmen advise adhering to some rules in their work:
- The putty mixture must be thoroughly mixed until a homogeneous thick consistency is obtained.
- To speed up the process, you can use an electric drill with an attachment or a construction mixer.
- A small depression is made in the foam under the protective layer. And the mixture itself is applied with a slight excess.
- For external work to protect polyurethane foam, use frost-resistant putty in a layer of at least 5 mm.
- The tool must be cleaned immediately after work - dried putty is difficult to remove.
According to its technical characteristics, polyurethane foam is ideal for filling joints and gaps. The service life of the material increases significantly when a protective layer is applied against UV rays. Surfaces can be treated with putty and acrylate paint, which is “not afraid” of frost and moisture.
UV protection of foam (2 videos)
Polyurethane foam is used everywhere, especially when installing windows. This is a convenient and practical material, however, it requires protection from sunlight and moisture. That is why the question often arises: how to cover the polyurethane foam on the outside of the window? There is a large selection of materials that you need to try to understand.
Options for protecting polyurethane foam from ultraviolet radiation and moisture
Despite the excellent characteristics and properties of polyurethane foam, all products in this category are destroyed when exposed to sunlight. First, the material acquires a brown tint, decreases in volume, and then gradually spills out of the joints and gaps. Polyurethane foam in the sun is destroyed by sunlight. Negative processes can last from a year to several years. This depends on the quality of the sealant, the angle of exposure to ultraviolet radiation, the thickness of the applied layer and other factors. How to protect mounting foam from the street from UV rays:
- Treatment with putty compounds. These include liquid plastic, finishing plaster with the inclusion of frost-resistant additives, window putty with the addition of liquid glass. The mixture is applied with a spatula from bottom to top along horizontal and vertical seams.
- You can paint the installation sealant with paint or treat it with varnishes for exterior use. The best way to protect a polyurethane product is an acrylate composition, which has high adhesion to installation sealants. To obtain long-term protection, the foam is first treated with putty, and then with acrylate paint.
- Mounting tape. This is a temporary measure, since the material will be constantly exposed to precipitation and temperature changes. In a hardware store, you can choose adhesive tape to match the color of the window frames or the frame of the front door. But every few months the tape needs to be re-glued.
Fire-resistant foam can be protected with a layer of plaster 8 cm thick. But the best option is to prime and paint the surface. To prevent the destruction of the polyurethane foam, a cement-sand mortar is sometimes used, to which a small amount of white grout is added to improve decorative characteristics.
Properties and varieties
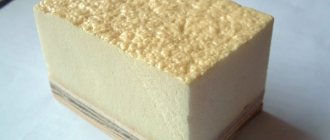
Polyurethane foam has important technical characteristics that allow the material to be used for a wide range of repair work. Long service life, convenient application and good adhesion to different surfaces are the main advantages of the composition. The product also has other useful properties:
- Primary expansion - the sealant increases in volume up to 50 times in a few minutes.
- Secondary compaction continues for some time; high-quality sealants do not shrink or form gaps.
- The substance firmly adheres to surfaces of different nature and structure - concrete, wood, cement, cinder block, brick.
Foam is used to seal cracks, seal gaps, install doors and windows, seal joints and joints. After final hardening, the polyurethane substance acquires optimal strength, density and a uniform porous structure.
Features of polyurethane foam protection from the sun
Some repair tips seem obvious, but the truth does not fade with repetition. Before you putty the polyurethane foam or tint its top layer, wait until the composition has completely dried.
Make sure that it tightly fills the entire installation opening, that there are no cracks or delaminations, violations of uniformity, etc. Deep lacunae and cracks should not be protected from the sun, but re-sealed. Most polyurethane sealants dry yellow or yellowish, this is normal.
Further, protecting the polyurethane foam from sunlight and atmospheric adversities begins at the preliminary preparation stage, namely:
- First you need to decide how to protect the polyurethane foam - putty, special tape or paint. The fact is that for putty or other volumetric protection you will need to cut a recess in the sealant; if you are not used to it, this is difficult. Paints, tape and varnishes are applied to a flat surface;
- Using a sharp knife, cut off any excess material protruding beyond the dimensions of the slope or jamb. It is most convenient to take a special shoe knife with an oblique triangular blade - then it is easier to maintain an even cut line. And don’t rush to quickly cut off the sagging. This is dangerous due to accidental cuts to hands, feet and damage to hardened foam or a brand new frame;
- After the cutting stage, the grinding procedure begins (it is not needed when puttying seams). The dried foam is cleaned with fine sandpaper. You will have to act manually and carefully - grinding mechanical devices can damage the frame, slope, door jamb, etc.
Protection of polyurethane foam: basic repair methods
Any polyurethane foam will decompose when exposed to sunlight. Initially, this looks like a darkening of the material, after which it becomes brittle and falls out of the cracks, like leaves in the wind.
More precisely, even wind is not required to destroy the sun-scorched sealant. The process of ultraviolet destruction of polyurethane foam takes from 1 to several years - depending on the thickness of the layer, the angle of incidence of its rays, the quality of the foam itself and the thoroughness of its application, etc.
Of course, even the maximum four years is an unacceptably short period of time for a major overhaul. And replacing windows, doors, installing ventilation, etc. must be no less durable than installing a shower tray - it makes sense to create comfort for decades to come with your own hands. When the preparation of the outer layer of foam is completed, we proceed to process it using one of the selected methods:
- Putty. How to cover polyurethane foam on windows? Firstly, modified finishing plaster - with the addition of frost-resistant additives. Secondly, with special liquid plastic. Thirdly, ordinary window putty with the addition of liquid glass. All compositions are applied from the bottom up with neat strokes using a regular spatula, the excess is wiped off with a sponge;
- Special mounting tape. The fastest and cheapest method of protection is also the most questionable from an aesthetic point of view. Even if you choose the adhesive tape to match the color of the frames, you won’t be able to paint over it (painting compounds will cause the tape to peel off). If you are ready to glue all the joints with new tape every few months, you can try a quick decoration;
- Paints and varnishes. It is best to choose an acrylate paint composition; it has good adhesion to polyurethane foam. The paint is applied with a thin brush, moving from bottom to top to the corner of the frame or jamb. If you want especially durable protection of the foaming sealant, you can combine putty and acrylate painting - then the service life of the polyurethane foam will be comparable to the durability of the entire house.
How to treat the surface → Room decoration → How to choose the right paint → Surface treatment technologies → Leveling and finishing the walls → Selecting and applying a primer → Removal from the surface → Stretch ceilings and technologies → Reviews and testimonials