During a major or cosmetic repair, it is very useful to know how to repair a crack in a wall, because without rough preparation, further work is useless. Even a small crack requires special attention, since over time it will increase, leading to serious consequences. When starting to eliminate a crack, it is important to take into account its width and depth, the material of the wall, since the methods and tools used in each individual case may differ. In addition, after eliminating the defect, the restored surface must be properly cared for.
Required tools and materials
To seal cracks you will need the following material:
- wood glue in the consistency of thin sour cream, mixed with tooth powder or chalk chips;
- strips of cotton fabric, gauze, medical bandage, soaked in PVA glue (they can be replaced with fiberglass tape);
- cement mortar mixed with paint prevents moisture penetration;
- lime-cement mortar reinforced with mesh;
- sandpaper for grouting;
- primer;
- sealant;
- putty mixture;
- polyurethane foam;
- plaster for finishing.
Preparation of cement mortar for sealing gaps, cracks, seams
Tools you will need:
- brush;
- brush;
- putty knife;
- construction mixer;
- foam sponge;
- gun for sealant and polyurethane foam.
Tools needed for putty
In some cases, the work will additionally require a hammer, chisel and a hammer drill with attachments.
How to repair a crack: types of mixtures
In order to choose what to cover cracks in the wall with, you need to take into account the features of the coating:
- To eliminate damage in concrete and brick walls, a cement-sand mixture and its varieties are used, but it is better to add plasticizers to it.
- To restore the coating of plastered walls, plaster and putty compounds are used, the most popular of which are cement and gypsum.
- To eliminate small gaps, acrylic-based sealants are used.
You can get rid of a small crack using sealant - Cracks in drywall are sealed with a putty mixture, and in wooden surfaces they should first be caulked, then a special wood putty should be applied.
Types of seam sealants and their use
The entire variety of sealing compounds can be divided into several groups:
| By mode of action | By chemical composition | By number of components | By place of application |
| Superficial | Acrylic | One-component | For indoor work |
| Polyurethane | |||
| Penetrating | Silicone | Two-component | For outdoor work |
| Thiokols | |||
| Silane-modified | Combined |
According to the method of action:
By number of components:
Types of sealants for seams.
By place of application:
Depending on the area of use, sealants must meet the requirements of moisture and frost resistance and be resistant to ultraviolet rays.
Sealants are also produced:
The former are characterized by increased heat resistance , but after hardening they turn into a monolithic structure, so they are not used when sealing moving joints. The main area of application is sealing fire protection of concrete structures.
Bitumen compositions are distinguished by their increased moisture-resistant properties, and therefore they are used in “wet” areas - the roof, plinth, foundation.
Bitumen-rubber sealants have increased elasticity and good adhesive properties. Unlike bitumen and silicate sealants, bitumen-rubber sealants can be painted, but cannot be used at subzero temperatures.
Depending on the chemical composition, sealants containing acrylic, polyurethane, silicone, and liquid thiokol are distinguished.
Acrylic
They are universal, but are not recommended for outdoor use. Used for sealing joints indoors. The advantage of acrylic substances is the absence of odor and the possibility of painting and plastering.
Such sealants are distinguished by vapor permeability, long-lasting elasticity and increased adhesive properties.
Acrylic sealants are not recommended for exterior use.
Acrylic compounds can be used to seal not only concrete, but also brick joints.
The main disadvantage is the need to dry completely after application. Otherwise, upon contact with moisture, the sealing ability is sharply reduced.
Polyurethane
They have increased adhesive strength, are frost-resistant, anti-corrosion and resistant to certain chemical mixtures (for example, weak acids or alkalis). In addition, they are distinguished by resistance to mechanical damage and efficiency. Manufacturers guarantee the durability of concrete joints when sealing internal surfaces.
The advantage of polyurethane compounds is that they can be used for processing expansion joints - increased elasticity allows them to be applied to moving joints.
The main disadvantage is the presence of caustic chemicals in the composition.
Silicone
They are elastic, so they are used for sealing joints in walls and floors.
Convenience of application is ensured by the special shape of the tube with a syringe. Disadvantages: unsuitable for painting, impossibility of repair.
Thiokols
The substance is based on liquid thiokol , which gives the composition increased strength properties, and therefore sealing seams has a long service life. Thiokol compositions are 2-component.
Thiokol sealants have 2-component formulations.
Such sealants can come into contact with alkalis, solvents and mineral acids, are oil and petrol resistant, resistant to large temperature changes, and are used to process butt joints between walls and floors.
The disadvantage of a short hardening time is the rapid hardening of the sealant and increased shrinkage ability.
Silane-modified
These are sealants based on polymer compounds. They do not contain solvent or isocyanate components and are environmentally friendly.
They are used to restore seams by flat spraying, forming an impact-resistant film on the surface. They are applied with a special gun, but if you need to seal the floors, you can also use a brush. In this case, it is necessary to take into account that the hardening time of the protective layer will be from 10 to 20 minutes.
They have increased adhesion and resistance to negative weather conditions, can be painted, and have a long service life.
The disadvantage is the relatively high cost, poor resistance to fungal infections.
How to dilute the solution yourself
Cracks in walls can occur both outside and inside the building. Therefore, there are two main types of mortar - plaster for external and internal work.
I. Mortar for sealing cracks outside the building
Restoring the integrity of the surface of the walls outside the building is carried out using cement mortar plaster. It is prepared as follows: use cement and sand in a ratio of 1 to 3, add PVA glue, dilute with water to a medium-thick consistency. You can use ready-made dry solutions, which just need to be diluted with water in the ratio indicated on the package.
II. Interior solution
For interior work, lime mortar is used: lime and sand are mixed in a ratio of 1 to 4, diluted with water. The consistency should be such that when thrown onto the wall, the mixture forms a dense “pancake” and not a lump.
Sequence of work to eliminate cracks
Before covering the cracks in the wall, you need to “expand” them - that is, clear them, deepen and widen them at a 45-degree angle in all directions and prime them. There are several sealing options:
- the seam on the surface can be eliminated with the same mortar used to lay the wall. You can buy the solution in a store or make it yourself. If you use a cement solution, the gap must first be moistened with water;
- Another method of sealing cracks is the use of various sealants. The advantage is based on the fact that when it dries, it becomes rubbery, and this, when narrowing or expanding, does not allow the appearance of cracks, which is impossible when using an ordinary solution. The seam is sealed using a gun, and the unnecessary amount is removed with a rubber or metal spatula. It is important to know that silicone sealants cannot be used, as they are greasy, so paint, plaster and putty do not stick to them. This method is not cheap, but justified;
- The next way to seal cracks is to use polyurethane foam. If a crack is detected not in the plaster layer, but directly in the masonry, the method used to eliminate the crack depends on the size and location.
When the gaps are very wide
When cracks of 5 mm or more in a vertical position form, angles of 45 degrees are made around the crack so that the layer of plaster is flush with the wall surface and “grabs” securely with it. After that, use a vacuum cleaner and a brush to thoroughly clean the crack and prime it. After the soil dries, the crack is “blown out” with polyurethane foam. Excess dried foam is cut off so that the gap extends several millimeters deeper than the surface, followed by covering it with a layer of plaster.
If there is a through crack in the wall, then the outer side is repaired with cement, and the inner side with plaster. This method of sealing the gap seals it so that bacteria do not grow there and so that it does not blow out.
The through gap is sealed from the inside with plaster, and from the outside with cement
When a horizontal gap appears in a brick house, foam will not correct such a situation. To prevent settlement of the building, the void of the gap must be filled with cement mortar, thereby creating support for the part of the wall above the gap. To seal large cracks, you should first put pieces of broken brick or concrete into them. When the hole is through, you need to glue a plaster mesh on both sides, then seal the gap on top with mortar.
In this case, it is recommended to use a special cement-based mixture for ceramic tiles as a binding solution. This solution is very durable and adheres well to the wall surface.
What to do if a layer of plaster is destroyed
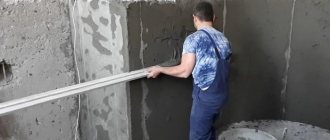
There are two main types of plaster: internal and external. They are usually cast with a thickness of 15 mm. When decorating external surfaces, a sand-cement mixture is used, and the walls inside are often plastered with lime mortar, which is softer. If you have a hygroscopic and rough surface, then it is enough to apply the plaster mixture in one layer. However, for strength it is recommended to apply it in two or three layers.
It is better to apply plaster in several layers
Spray plastering requires skill and special dexterity. In this case, the mixture for external work is prepared in the ratio: one part cement, three parts sand. To strengthen the plastered surface, a “fur coat” is thrown on, which can be made using a special machine purchased at the store. The “fur coat” is made with a solution in a one-to-one ratio of cement and sand.
For interior work, a mixture is used: one part lime, four parts sand. You can buy a ready-made dry mixture in the store - isogypsum (usually sold in paper bags). The mixture dissolves in water and the thickness of the solution should have the consistency of sour cream. Using a trowel, it is distributed over the wall: the solution is thrown on with a sharp movement so that it lies like a “pancake”. If you throw it weakly, the solution will fall into a lump on the wall and will not stick.
The plaster mixture applied in this way is smoothed with a trowel in the directions from bottom to top and to the side. After a slight “setting” of the solution, rub the plastered surface with a float using circular and spiral movements.
If you need to finish a wall of a large area, “beacons” are attached at a distance of about 1.5 m from each other (necessarily even metal or wooden planks). Installation of beacons is considered perhaps the most important stage. Their upper edges determine the surface of the layer, because the tool smoothing the plaster will move along them. They work with the surface of the areas between the beacons. Wooden beacons are then removed, but metal ones can be left, sealing them with mortar.
Various types of patterns can be applied to the base layer of the plastered surface. For external surfaces, as already mentioned, you can apply a coat that strengthens the surface layer. Internal surfaces can be primed and then painted or wallpapered.
The fur coat on the outside significantly strengthens the surface layer
There are many ways to finish masonry, but performing this work requires skill and patience. Therefore, before you start this work yourself, you should first practice.
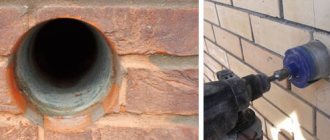
Using polyurethane foam
Large gaps in walls, for example, made of brickwork, can be sealed using polyurethane foam. The gap is first cleared of debris, filled with primer, then foam. When the polyurethane foam “sets,” it is cut to a depth of about 20 mm, and cement mortar or adhesive is placed in this gap.
Foam is also used to seal through gaps in temporary buildings.
Question:
What nuances do you need to know when using polyurethane foam to repair cracks?
Answer:
When working with polyurethane foam, you should remember that too much of it leads to an increase in the crack, and its remains should not stick out out of the gap. It is added not as a single filling, but in stages, for those areas where it is not enough. Excess foam is cut off, the gap is waterproofed, the outside is covered with cement mortar, and the inside is plastered.
Foaming a large gap between the wall and the ceiling
If the gypsum boards are cracked
The plasterboard wall cracks mainly at the seam. A problem arises when the technology for installing the metal frame and securing the gypsum board sheets is not followed. To install the sheets correctly, you need to study the rules for installing gypsum boards. Another common mistake is that the seams in the drywall are not sealed correctly. However, sometimes other cases occur, for example, a sharp temperature change in the room, severe dampness or a flood. When interacting with water, drywall is susceptible to deformation, and when it dries, it cannot be corrected. This ensures its complete replacement in case of flooding.
Typically, cracks in plaster appear in the seam area.
It is possible to eliminate a gap in a plasterboard wall using the following methods: expand it and seal it with acrylic or putty intended for plasterboard. As an option, fiberglass is glued over the seam, followed by putty, sanding and further painting or wallpapering. This method is more labor-intensive and financially expensive, but has greater reliability. It should be borne in mind that both methods are used if the metal frame for drywall is firmly attached to the wall and does not wobble.
Crack sealing method
Repairing cracks in walls is carried out using different methods, depending on the type of surface. Let's consider the details of eliminating gaps on surfaces made of various materials.
In brickwork
Repairing cracks in brick walls is carried out in different ways, depending on the size of the damage. If the width of the defect is up to 5 mm, you can get rid of it using cement mortar or regular tile adhesive. The gap is widened with a spatula or hammer and cleaned of dirt. The gap is treated with a primer, then filled with cement or adhesive mortar.
To eliminate cracks 10-15 mm wide, a cement-based solution is also used, but with the addition of fine sand. Sickle tape is glued over the repaired area and putty is applied.
In a plastered wall
Plaster can crack both outside and inside the house.
In any case, the restoration procedure begins with widening the cracks and deepening them with a spatula or a sharp knife. Next, the gap is cleaned of contaminants and primed with a deep penetration solution. When the primer has dried, the plaster mixture is placed inside the gap to its entire depth. Without waiting for the solution to dry, reinforcing tape is glued over the crack and covered with plaster. For repairs, it is recommended to use a gypsum mixture. When the plaster layer dries, it is rubbed with sandpaper for complete leveling.
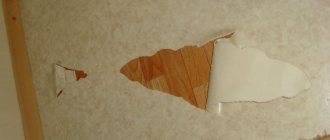
On sheets of drywall
Cracks in drywall may appear due to too thick a layer of applied plaster or a violation of the thermal regime when it dries. Vertical and horizontal cracks occur at the joints between sheets due to weakening of the metal frame of the wall or the absence of reinforcing tape.
Reinforcement with metal tape
In the first case, the cracks form a “web”. To get rid of it, you need to remove the damaged layer of plaster and apply a new one, but no more than 2 mm thick. Each layer of plaster must dry thoroughly.
In the second case, you need to carry out a number of actions:
- Use a sharp knife to widen the cracks at a 45-degree angle.
- Fill the gaps with gypsum mortar.
- Apply reinforcing tape over the filled crack.
- The surface is leveled with plaster and sanded with an abrasive mesh before applying a decorative coating.
Repairing cracks between sheets of drywall
We eliminate the cause, get rid of the crack
The most dangerous case is when the crack continues to expand. This indicates that the walls of the building or the foundation will be irreparably damaged. The problem can be radically solved only by completely rebuilding the damaged section of the building. However, if you notice the problem in time, a much less radical method will help - covering the house.
Everything is done quite simply:
- Steel corners with a 100 mm flange are installed at the outer corners.
- On crutches, at least two lines of smooth reinforcement are laid along the walls - upper and lower.
- A thread is cut on each rod: left on one side, right on the other. Nuts are screwed onto the reinforcement and welded to the corners.
- A meter from the corner, on the side of the reinforcing bars, a small parallel rod is welded so that rotation can be transmitted with a regular adjustable wrench.
- During final tightening, two people twist the bar simultaneously, gradually increasing the tension.
In this case, the cracks literally melt before our eyes, all that remains is to replace the protective plaster of the walls and base, reinforcing it with steel mesh.
An example of tightening a building along the plinth
It is possible that the markers on the crack will remain intact for a long time or the gap will constantly expand and contract, but overall not increase. This is a clear sign that the foundation is working normally, and that there were initially excess stresses in the wall material, which resulted in a crack.
To strengthen the wall in a problem area use:
- external reinforcement with carbon fiber and steel mesh;
- anchors and metal frames;
- embedded reinforcing elements along grooves;
- injection method.
It is important to close the crack and restore the strength of the structure. If the cause was improper ligation of brick rows, then it is quite possible that the only effective remedy will be a complete or partial re-lining of the wall in the emergency area.
Laying reinforcement in the grooves helps to contain further deformations
Massive reinforcement with an external frame with anchor fastening to the wall
Strengthening walls with external carbon fiber reinforcement
Repairing cracks using the injection method
To seal any cracks, it is necessary to clean it along its entire length and depth from dirt, dust, remove the layer of mortar and base material, expanding it to 15 mm or more. The resulting gap is filled with mortar, having previously been reinforced using one of the methods listed above.
In a concrete wall
Cement mortar is used to fill gaps on concrete walls. The surface is prepared, cleaned of dirt, the remains of old plaster are removed, then the cracks are carefully filled with mortar. Experts often recommend that before filling a gap with cement mortar, lubricate its internal cavity with PVA glue.
In case of large defects and through cracks, the cracks are filled with mounting foam, sealed from the inside with gypsum mortar, and from the outside with cement-sand plaster. Defects less than 5 mm wide can be sealed with sealant.
What to do if the crack is long and deep
How to repair a crack in a wall if it is deep? Slots wider than 15 mm are considered dangerous because... may cause wall destruction. If such gaps appear on the brickwork, the defective area is dismantled and replaced with new masonry. In this case, the bricks are laid in a special, interlocking way, strengthening the rows with pieces of reinforcement.
New masonry will help such a crack
You can protect the wall from destruction due to significant cracks by installing lintels or making metal reinforcement. This method is effective for monolithic concrete walls: metal corners are tightened with long bolts, sometimes it is necessary to install reinforcing belts along the entire perimeter of the room or building. The reinforcing belt is installed before sealing a crack in the wall - under the roof, above the foundation, sometimes in several rows.
Such a crack should be sealed with foam, cement, reinforced with a reinforcing belt
A wide and deep gap in drywall can be filled with gypsum plaster
How to strengthen the foundation of a building
The sequence of actions is as follows.
- Creation of a ditch around the perimeter of the entire structure. Its depth should be greater than the depth of the foundation.
- The soil is dug out from under the first foundation so that the concrete gets under it.
- Reinforcement and pouring of concrete belt. The reinforcement rods are stuck into the walls of the ditch by 15-20 cm. In the old foundation you need to drill holes for the reinforcement and weld it with the rods.
After sealing large cracks, the condition of the repaired surface is regularly monitored for several months. The video shows an algorithm for restoring cracked masonry using reinforcement.
How long does it take for the solution to dry?
You can begin finishing the wall only after the repair mortar has completely dried. Drying time depends on the material used. Gypsum plaster dries in about three days. The cement-lime mortar will need from 24 hours to two days. The cement mortar dries in 24 hours, and for facade plaster it will take only 8 hours.
When the material dries, special conditions must be created to prevent repeated cracking: air temperature not higher than +25C, absence of drafts and direct sunlight.
Finishing
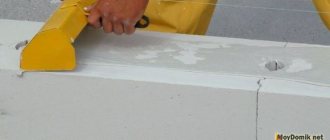
The final finishing after repairing cracks and cracks is carried out after the solution has completely dried. The dried mixture is sanded well, leveling it with the rest of the wall surface. Then the primer is applied until it stops being absorbed into the restored area of the surface. After this, you can begin decorative finishing - painting, wallpapering, applying textured plaster, etc.
Finish grout
The consistency of the finishing putty should be dense, but not too thick.
Cause of cracks
It may seem that the only reason for the appearance of cracks is wear and tear on the walls, but this is not entirely true. Deformation is influenced by a number of factors. Cracks can appear when the depth and width of the foundation is shallow and there is excessive pressure on the soil, which can lead to its mobility. This often happens with old buildings.
Problems can also arise if low-quality materials such as gravel or concrete were used to fill the foundation. For such structures, the grade of concrete must be at least M 200. The above factors are associated with violations of construction technology, but the problems do not end there. A house can sink due to rising groundwater, slope of the site, destruction of the foundation body, or soil heterogeneity.
Before reinforcement, it is necessary to prime with a deep penetration compound.
Another factor is the quality of the materials from which the walls are built, how resistant it is to loads and external influences. Cracks can appear due to their swelling, vibration or shrinkage, or too busy street traffic. Harsh weather can also cause mother-in-law to appear on the walls.
How to care for a restored wall
A wall restored after repair, first of all, must be protected from various mechanical influences - do not move furniture too close to it, hammer nails into places where cracks have been repaired, and protect it from being hit by a door.
You need to wipe the walls carefully so as not to damage the decorative layer of the coating. If the decorative coating is durable, it will be able to protect the wall from various influences that could cause repeated cracking, provided that the crack was repaired efficiently and the plaster was completely dry before decorative finishing work. Therefore, methods such as coating decorative plaster with colorless varnish, applying waterproof paint to the surface of walls, using wooden, plastic, gypsum panels, and non-woven wallpaper are used.
Controlling the increase in crack size
Videos on repairing cracks in walls
The main stages of sealing a crack in a plastered wall in a video:
You can find out what materials to use to cover cracks from this video:
The appearance of cracks on the facade of a house or inside it can be caused by various reasons: shrinkage of the foundation, improper rough finishing, disruption of the bricklaying process, the use of low-quality or inappropriate materials, and many others. It is important to notice their appearance in time and take all necessary measures to eliminate defects. A fine network of cracks in the plaster is usually not associated with the danger of wall destruction, but in any case, the process of the appearance of new gaps must be controlled, as well as the increase in their size
Sealants for joints and seams
Typically, developers simply seal the joints between the wall and the window frame with foam. Over time, it crumbles and forms cracks into which heat escapes and moisture penetrates.
Of course, such joints must be sealed. And the main feature of sealing joints between the wall and window and door structures is that the sealant will have to interact with different types of bases at the same time.
These elements are fixed and do not move much during operation, but they need to be insulated, and here it is important that the material has good adhesion to both porous and non-porous bases.
The best choice for this type of work would be a hybrid sealant based on silane-modified polymers. SMP perfectly seals joints, moving seams, both on porous and non-porous substrates. It stretches well, can withstand repeated deformation, is resistant to UV radiation, very high and very low temperatures, does not crack, and does not absorb moisture. This sealant will not be affected by ice or snow on the surface of the window. Durable and can be painted. Safe - it can be used indoors.