This method of laying out the material allows you to extend the service life of the panels, making them less susceptible to mechanical loads, makes it possible to replace failed sections without disassembling the entire panel, visually enlarges the room, and also hides unevenness of the rough foundation. Let's take a closer look at the features of laminate deck installation and talk about the advantages and disadvantages of this method.
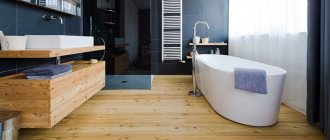
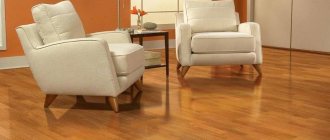
Photo by Max Vakhtbovych: Pexels
General information
Before describing the basic methods of laying laminate flooring, it is worth understanding what laminate flooring is.
Design
The laminate consists of the following parts:
- The top layer is a transparent coating that protects the previous decorative layer.
- Under the protective coating there is a paper layer with some kind of pattern, which, as a rule, imitates wood or some other material.
- Below is a central, reinforced layer of chipboard, which gives the laminate its shape and strength (read: “We lay chipboard under the laminate with our own hands”). In addition, this layer is equipped with locks that determine how the strips will be joined together.
- The lower part of the panel structure consists of moisture-repellent paper, which is impregnated with resin to give it these characteristics.
Tools needed to install laminate flooring
Laying any floor covering is carried out using a set of tools for installation and preparation of the base. The list may vary depending on the base, materials used and the customer’s financial support. Deck installation of laminate, in comparison with other installation methods, is carried out with simple, cheap and commonly available tools.
Set of tools:
Accessories for laying laminate flooring
- A wooden mallet or mallet with a rubber grip.
- Grinder, circular saw or jigsaw.
- Construction laser or simple level.
- Foam roller or wide brush.
- Graphite soft pencil.
- Metal square.
- Metal hammer.
- Construction tape.
- Wooden wedges.
- Construction hairdryer.
- Mounting tape.
- Assembly knife.
- White chalk.
- Chisel.
- Vacuum cleaner.
- Scrap.
Proper care
Parquet boards do not tolerate moisture and scratches, so it is recommended to follow certain recommendations to preserve them. Sand on shoes can easily leave small scratches on the parquet board. Therefore, you should ensure that your shoes are always clean and dry. Before entering the house, you should put a rug that will trap all the dirt and moisture from your shoes.
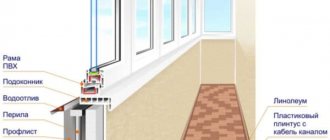
If parquet is laid on a balcony, it must be glazed to prevent sand from getting in from the street
Moreover, it does not matter at what height it is located, since a strong wind can carry grains of sand even to the level of the 4th-5th floor
Not only an abundance, but also a complete absence of moisture can cause a change in the shape of the boards. Air humidity should not exceed 50%, and the optimal temperature in the room should be 19-25 degrees.
In order to avoid damage to the parquet board from furniture, use various rubber attachments, place special pads under the legs of heavy furniture, and carpets under tables and chairs. Also try not to walk on such surfaces in high-heeled shoes.
It is strictly forbidden to do wet cleaning too often, use caustic cleaning agents, or use a washing vacuum cleaner. Before you start cleaning, you need to choose special care products for your parquet boards. These can be special brushes, vacuum cleaner attachments, microfiber mops or natural fabrics.
Cleaning should be dry and wet. Wipe this floor only with a damp cloth. Care products should be selected depending on the type of parquet board. Their advantage is that they not only clean the floor surface from dirt, but also protect it from dust, water and scratches.
Regardless of which room the parquet board is in, be it a kitchen or a bedroom, various stains may remain on it. They are not always easy to remove, so use mineral water, white spirit or a solution of alcohol and water. This way you can easily get rid of any dirt.
To care for oil-coated parquet boards, you should also follow certain rules. Such a board can dry out quickly and lose its original appearance. To do this, regularly apply a special protective agent to the floor, but at least once a month. A special oil intended for parquet boards will not allow the coating to lose its brightness and richness. Deeper work on the restoration of parquet boards should be carried out every year. Such care will extend the service life for many years and will not allow your floor to lose its decent appearance.
In this video you will find a master class on laying parquet boards.
Laying laminate depending on the existing lock
Regardless of the installation method, be it laying the laminate in a herringbone pattern, or laying the deck laminate, which directly depends on the existing locking connection, the preparatory stage will be the same in all cases.
Sequence of preparatory work:
- The purchased flooring should be left for several days in the room where it will be installed. This is necessary to acclimatize the material.
- The prepared base needs careful cleaning.
Please note that for faster and better cleaning, it is better to use a construction vacuum cleaner.
Next, you need to make sure that the base is suitable for laying the laminate. If the floor is made of wood, then between points located approximately 2 meters away, the difference in height should not exceed 4 mm, otherwise the surface needs to be leveled using an electric plane. If the boards sag when walking, they need to be fixed or replaced with new ones.
What type of fastening is it suitable for?
There are two types of fastening. The method and type of installation depends on this indicator. Each type of fastening implies the presence of a groove on one element and a tenon on the other. The only difference is their appearance and method of connection.
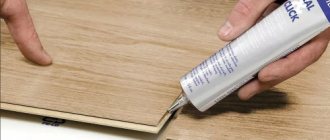
- Click . Quite a simple connection method. So named because of the characteristic sound during connection. For installation you only need the components and your own hands. Laying occurs as follows : install the first board, then bring the next one at an angle of 45 degrees, insert it into the groove and snap it into place. If necessary, you can tap the board with the back of your hand.
- Lok . The next method is somewhat more complicated than the previous one. It also assumes the presence of a groove and a tenon. Only they are slightly different. If in the first version the groove is adjusted so that the tenon fits into it easily, then this is a tight connection. Therefore, for installation you will additionally need a rubber mallet. It happens as follows : the boards are laid sequentially, then you need to precisely adjust their position, then insert the tenon into the groove and hit the board with a mallet so that the tenon fits tightly into the groove.
For the deck look, both types of locks are suitable. But locks like locks are better suited. It will be easier to lay them using the deck method, because in boards with this type of locks, longitudinal locks are first connected, then longitudinal ones.
Selection of laminate pattern
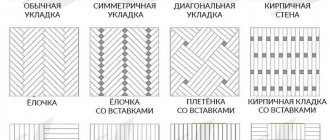
Stone tiles, leather-look laminate, wine boards, stone, with letters and images, complex patterns, imitation herringbone parquet, deck, versailles, wicker - these and other non-standard color options turn the floor surface into a real work of art and an independent element of the interior. Laminate with inscriptions, national ornaments, logos, geometric shapes, children's drawings, Chinese or Japanese characters and other types of graphics is very popular. The material allows you to create an original design for your home or office.
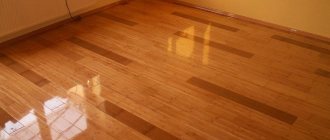
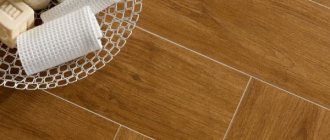
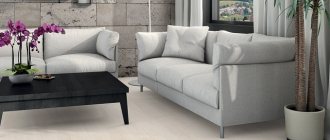
Square laminate looks impressive. This form of lamellas is chosen to imitate ceramic tiles, marble and stone, so it can be laid in the kitchen or bathroom. Manufacturers take this fact into account and produce coatings with waterproof properties - especially for rooms with high humidity. For residential premises, square laminate flooring is chosen. Laminate flooring is much easier to install, and modern production technologies make it possible to achieve a stunning resemblance to real parquet - expensive flooring models not only externally, but even to the touch give the impression of natural wood coated with varnish.
Laminate flooring for artistic parquet with a large number of graphic elements, floral patterns, rosettes and borders around the perimeter will look impressive in a large and bright room, where furniture and other furnishings do not cover the space.
Click connection
The installation sequence will be as follows:
- We measure the distances between the walls to understand how many panels are needed and how much trimming the panels will have to do at the walls on each row.
- If the rows of laminate are laid with a 50 percent shift of panels, then it is better to provide the first and last panels in the row with the same length. Thus, the finished base, due to its symmetry, will look more aesthetically pleasing and more complete.
- The first strip of laminate should be laid in the far corner. Wedges 10 mm wide are inserted between the panel and the wall.
- The panel of the next row is brought to the panel of the previous one with the side equipped with a lock at an angle of 30 degrees. To latch the panel you need to insert it and press down. The entire row is laid in this way.
- Next, the next row is laid. If the panel fits tightly, then it is knocked down with a rubber mallet.
- Such operations are carried out until the entire floor is laid.
Outer row
When we have reached the final wall during the installation process, all that remains is to lay the last row. Usually the outermost row does not consist of the entire width of the panels - all of them will have to be sawn lengthwise.
Apart from the longitudinal cut, the installation is no different. The only issue is that it is not very convenient to join due to the presence of a wall. To apply mechanical force from the wall to the edge panel, a pry bar or large chisel is well suited; they are used as a lever.
Sometimes the last row is only 1-2 cm wide. You have to saw off a narrow strip from entire panels, this happens quite often. There is nothing negative about this.
It is more convenient to first assemble the outer strip along its entire length and only then carefully insert it into the locks of the previous row
The assembled last row may need to be tapped - this is done without a hammer, by inserting a pry bar or chisel into the gap from the wall. Usually this is enough. If you still need more force, I use the clamp from the kit and a hammer.
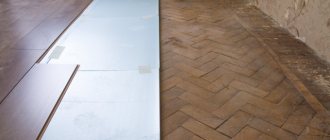
It is necessary to knock out locks at the last strip no matter how wide it is. When the strip is too narrow, it needs to be further trimmed from top to bottom (second part of the photo). Only then will the locks come together in the correct position.
It's time to end on this note. Today we did not discuss diagonal installation and installation without thresholds - in fact, there are no special differences, only nuances. Due to the resulting publication being too long, we will address these issues in future articles.
See also: Laying laminate flooring without thresholds throughout the apartment
Underlay for laminate
The substrate is first laid on a flat and clean base. It hides those 1-2 mm irregularities that are acceptable and makes the floor less “noisy”. It also serves for shock absorption and better load redistribution.
There are several types of substrate:
- Cork. Made from cork chips. It has good thermal insulation properties and absorbs sounds. Disadvantages: afraid of moisture and does not like heat. Therefore, its scope of application is rooms without floor heating, with normal importance and minimal risk of “flood”. That is, these are living rooms. Cork underlay for laminate flooring is rarely used: expensive. If they put it, it is more under the parquet board - to preserve the floor covering.
Cork is the best, but also the most expensive type of substrate. Foil is a little cheaper, and its plus is that it is suitable for heated floors
Bitumen-cork on a cellulose basis. Small fragments of cork are sprinkled on a layer of cellulose impregnated with bitumen. This underlay is a little cheaper than cork, but its main advantage is that it can be used for laying over a heated floor system. Made of polyethylene foam. It tolerates high humidity well, conducts heat poorly, is chemically neutral, resistant to bacteria, easy to use (available in rolls), and has a low price. Disadvantages: sensitive to ultraviolet radiation, quickly loses its shape, has a short service life, and does not dampen sounds well. That’s why this substrate is used under cheap laminate: their service life is comparable.
The most common backing is made of foamed polyethylene
Made from polystyrene foam. It has a fairly high density, which is why it smoothes out unevenness, holds its shape well, has good heat-insulating properties, and muffles sounds. Disadvantage: cannot be used for laying laminitis on a heated floor. The price is between cork and polyethylene, it is the most acceptable and is used most often. It is often produced in the form of slabs, sometimes in rolls. Polyurethane on foil. This type of underlay can also be used for laying under laminate on a heated floor. It has the best characteristics of all the above, as well as the best prices. But if you are going to install an expensive laminate, then this is a justifiable expense: the service life of this type of flooring largely depends on the quality of the substrate.
Foamed polystyrene - average quality and price
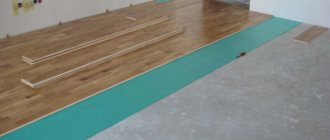
How to lay the underlay
The backing for the laminate is rolled out (laid out) along the wall from which installation will begin. In length it should cover the entire floor from wall to wall. The joint lines are aligned tightly; for convenience, they are taped with tape. Sometimes the panels are fixed with staples from a construction stapler. It's faster, but it's not a good idea to use staples - they can rub against the boards and make an unpleasant sound. The next layer is spread as needed - there is no need to cover the entire floor at once: it is better not to walk on the substrate.
Complexity or simplicity
Of course, non-traditional parquet installations - artistic, modular and others - are good in their splendor and originality. But there are pitfalls in this:
• A special attitude to the process is required. All dies should fit into place as tightly as possible with high adhesion. • Small parts are more difficult to find. Artistic or type-setting parquets are made as a single set to order with preliminary measurements. When the time comes for repairs, it is almost impossible to find and install a plank or board on your own. • Caring for such parquet flooring is more difficult than simple installation. In addition to weekly cleaning, regular sanding and refinishing is required. These procedures are also carried out carefully. • It is much easier to snag or damage a complex installation piece than a simple thick parquet board. Children and animals will take advantage of this opportunity for their own interests and games.
But the final result still depends on the wishes of the homeowners. Complexity and capriciousness pale in comparison to the beauty of some species, with which the room becomes exclusive.
Laminate flooring classes - which one to choose?
Correctly laying laminate flooring - video
The huge assortment can make even an experienced builder’s eyes run wild, not to mention those who will have to buy laminate flooring for the first time.
So which laminate should you choose?
Laminate boards are divided into service classes, which will tell us about the service life of the product, depending on the loads affecting them.
Each board must pass 18 tests (European standard EN-13329), thanks to which a particular class is assigned.
This standard divides laminate into two large categories:
- commercial laminate
- for home use
Commercial laminate is designed for service in commercial premises (sorry for the taftalogy). Thanks to their increased wear-resistant characteristics, the service life of the panels can be 10 years or more. And if you use such a board at home, the time will increase significantly.
- Class 31 - designed for flooring in commercial premises with light load. Service life - no more than 3 years. If you use it at home, the period increases to 10 years. At the moment, this is one of the most popular laminates in Russia.
- Class 32 is commercial premises with medium load. The average service life is no more than 5 years. At home, such a floor can last from 12 to 15 years. It can be used in the kitchen. The best choice in my opinion. Price-quality ratio.
- Class 33 is a very intense load. This laminate is used in public places - bus stations, dance clubs. The service life is more than 15 years, and when used at home, some manufacturers provide a lifetime warranty.
Laminate boards for home use cannot boast of such qualities. 5 - 6 years of operation for them is the optimal result. The fact is that they are made of fiberboard or MDF, which significantly reduces their characteristics. Their main advantage is their low price.
This laminate is divided into 21, 22, 23 classes. Service life is from 2 to 6 years, respectively.
Dimensions
There is a wide range of standard sizes of deck boards made from larch wood. Typical thickness varies from 25 to 45 mm. Standard width starts from 90 mm and can reach 140-160 mm. The length is also varied, from 2 to 6 m.
The most popular options for laying floors and terraces are deck board options with dimensions of 28x140x3000 mm, as well as 28x120x3000 mm. For ship decks and street terraces, construction of gangways and piers, stronger boards are used. The popular size here is 34x145x4000 mm. In decorative cladding, both the thickness and width of the products matter. Options 35x140 mm, 28x160 mm are well suited for use where aesthetics come to the fore; it’s also better not to skimp on the variety.
Laying schemes
In which direction should I lay the laminate with my own hands? There are no strict rules, but there are recommendations. To make the joints along the boards less visible, the direction of the light should go along the board. It turns out beautifully if you lay the coating at an angle. But this method is more complicated and produces more waste. You can also lay it across the light - this is also practiced, and does not threaten anything other than more visible seams.
Laying laminate relative to the window: arrangement of elements
The basic rule that must be observed when laying laminate flooring is the offset of the seams. The minimum transverse seam should be at a distance of 40 cm from the other. This way the strength of the floor covering will be greater: the boards will not come apart under load.
The minimum distance between seams in adjacent rows is 40 cm
The laying scheme of the laminate should be developed taking into account this rule. The easiest one to do on your own is shifting by half the board. Then each odd row begins with a whole, and each odd row begins with a half.
If the length of one element exceeds 1.2 m, then the second row can be shifted by 1/3, the third by 2/3 of the length (as in the photo above). It turns out to be a kind of “ladder”. In some types of laminate (expensive), the minimum offset of the rows is much less - maybe 15 cm. Then the ladder turns out to be longer.
You can lay the laminate with a “ladder”, but you need to observe the minimum permissible seam displacement. On the right is a laying diagram for a long board length and small displacement
Preparing the base
As a standard, the base is considered sufficiently leveled if the differences do not exceed 2mm. by 2 m. I’ll add on my own behalf: laminate is not afraid of more significant changes, the main thing is that there are no sharp “steps”.
If laying is done on a screed, then the latter must dry (at least 2 weeks). There is no need to seal various sinks and local potholes - this is why laminate is popular in budget renovations.
Whether the base is wooden or concrete, it must be cleaned of local deposits of putty and other dirt (which is sure to remain after rough repairs).
Particular attention should be paid to the angles where the walls meet the floor: in 9 out of 10 cases, these areas are not treated in any way during the repair process, and are written off as “being covered with baseboards.” Therefore, the corners, as a rule, have beads and are rounded. I usually walk around the perimeter of the room with an old chisel/chisel and knock down the sagging.
The floor is thoroughly swept/vacuumed. If the base is very dusty, it can be primed with a deep penetration primer.
See also: “Screed for any floor covering”
How to design difficult places
How to lay laminate flooring is theoretically clear. If you already have laminate flooring, you can practice on a small area - then it will become clearer. But there are always some problem areas in the rooms that you don’t immediately understand how to fix. In any case, there are two such areas - pipes and the door frame. How to lay laminate in these places so that you can’t find fault? In principle, this is not difficult. You need a ruler, a drill with bits, a hacksaw and pads that will close the gap at the pipes.
There's no need to do that
Connection to the door frame and threshold
In order for the laminate to lie nicely and without gaps near the door frame, it is advisable to lay it with the frame already installed. If you haven't installed the doors yet, you have time to get started while the laminate is curing. When installing the box, you need to make it a little shorter - the saw blade should fit between it and the floor. If the box is already standing, you can trim it.
How to beautifully design a joint with a door frame
When laying, the laminate is slipped under the racks, so there will be no gap. But how to design the joint between a laminate and another coating is a whole separate topic. And if the doors open onto a tiled corridor, there are additional methods for joining laminate and tiles. The simplest and most obvious is the threshold. They come in different varieties, so there are already a lot of options here. If you don’t like the thresholds at all, there is a cork compensator. It's almost invisible.
How to beautifully bypass pipes
The second difficult place to decorate beautifully is the pipe exit from the floor. We cannot live without heating and there are pipes in almost every room. Let us remind you once again: there must be a gap of at least 5-7 mm around the pipe. Having placed the board against the wall, mark the middle of the pipe with a pencil at the required distance. We measure the diameter of the pipe, add 2 cm to this value (at most 1.5 cm), we get the diameter of the hole that needs to be drilled in the laminate. It is difficult to find a drill with such a diameter, but a “crown” type attachment is possible.
How to go around pipes with laminate if they are on a short part of the board
After making a hole (or two, if necessary), draw a straight line through the center of the holes and cut off part of the board along it. We install the laminate, insert the cut piece behind the pipes. If everything is done as it should be, great. We coat the joint with glue (universal, for wood) and install everything completely. And we close the gap with overlays. They are available in wood color, white, black, and shiny. There are plastic or metal-like ones. In general, options are possible.
If the pipes are on the long side of the laminate
If the pipes fall on the long part of the laminate board, the technology changes slightly, but the essence remains the same. You just need to cut out the area in the form of a trapezoid.