No one can deny that a warm floor affects the comfort of living in a room - we walk on it every day. Today, the use of gypsum fiber board for dry screed flooring is gaining popularity. This is a durable material that replaced plasterboard, which consists of reinforced gypsum, cellulose, and additives. Due to the widespread use of floor heating systems, they often and quite rightly began to lay “warm floors” on gypsum fiber boards.
Stack of gypsum fiber boards
Laying tiles on gvl in the bathroom installation features
Ceramic tiles are one of the most common finishing materials. If there is no flat surface, tiles in the bathroom are laid on gypsum fiber board or gypsum fiber sheets. Installation can be carried out on the floor or wall, regardless of the type of coating. The sheets are securely attached to concrete, brick and other bases, which makes this material truly universal.
Laying tiles on GVL
In addition, gypsum boards differ from standard plasterboard sheets or gypsum boards in their reliability, durability, and long service life. Gypsum fiber sheets are characterized by high performance characteristics, so they are excellent as a base for laying tiles on floors and walls. By and large, installation of the material is no different from ordinary drywall, so no extra tools or skills are required.
Dismantling
The first thing you need to do is get rid of the old one. Many people, thinking about what they do first - the floor or the walls, understand this intuitively. By and large, there is not much difference, but it is more convenient to start from the top.
Turn off the power to the room and remove the chandelier. Then remove all furniture from the room. An exception may be a wardrobe, built-in kitchen furniture, or permanently attached appliances. Remove old wallpaper, starting from the ceiling. If you plan to replace the ceiling plinth, remove it too. Try to remove trash from the premises as it accumulates.
Remove the floor skirting. Lastly, remove the flooring.
Recommendations from experts
In order to correctly lay ceramics on gypsum fiber boards, you need to break down all the work into several stages. This will allow you to accurately carry out all the necessary procedures, maintain a balance between materials and use them rationally. In addition, division into certain zones also makes it possible to most effectively distribute the load across the areas of laying tiles on the floor and walls in the bathroom.
Layer of GVL sheets
- Surface preparation. Initially, a thorough inspection of the old foundation is carried out, i.e. wooden boards are checked, defects are studied and the degree of their degradation is assessed. After identifying the defects and inspecting them, a full or partial reconstruction of the floor covering is carried out. Bonding is carried out with wooden logs, if there are unpleasant sounds in the form of creaking, the voids are filled with polyurethane foam.
- Laying gypsum fiber board on the floor is a relatively easy process, however, it has its own nuances. For example, in order to reduce the consumption of building materials, gypsum fiber sheets must be laid on the floor along the bathroom, and one must not forget about bandaging. In addition, the wooden base is fastened to the gypsum plasterboard using ordinary self-tapping screws up to 20 cm. This stage ends with careful priming with a protective compound.
Laying gypsum fiber sheets
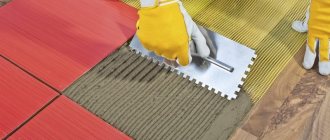
Installation of tiles on the bathroom floor is carried out using a special glue, the choice of which directly depends on its shelf life, as well as its purpose. Different adhesives may only be suitable for a particular surface, so adhesive designed for plastic will not be suitable for a wooden base. The manufacturer indicates all the necessary information on the packaging. It is worth remembering that ceramics on gypsum plasterboard need to be laid on a dry primer, and the installation equipment is used as for ordinary drywall - a hammer, usually a spatula and others.
Sealing seams. When tiling walls and floors, grouting is carried out one day after the adhesive mixture has completely dried. Grouting of joints is carried out no faster than 3 days after laying the tiles on the surface. It is necessary to take into account that in order for the glue to dry completely, it is necessary to create special conditions - minimal humidity, and also to exclude contact with water. This primarily applies to the bathroom and kitchen. Increased attention should be paid to the evenness of the seams between tiles, as well as gypsum fiber board products. It is necessary to avoid various displacements and, if a problem arises, correct them yourself. The distance between the joints of wooden rows should not be more than 20 cm. Forming a two-layer floor in the bathroom hides a very convenient and practical way to create a high-quality coating. This method is perfect for using gypsum fiber board panels, which, in turn, can be glued to each other at the initial stage. The average thickness of such a product will be approximately 20 mm. Due to the specialized fold, their installation will take a short amount of time. All this allows for installation quickly, accurately and easily.
Need to remember! To cut gypsum fiber board panels to the required size, it is best to carefully coat all the folds with special glue, and then lay the tiles on the floor surface.
Video instruction
- https://obustroeno.com/stroitelstvo/elementy-konstrukcii/poly/90013-gvl-na-pol-pod-plitku
- https://laminatepol.ru/21819-ukladku-plitki-na-gvl-polyi.html
- https://otdelkagid.ru/vnutrennyaya/pol/vlagostoykiy-gvl-pod-plitku-ukladka.html
- https://pol-pro.com/montazh-polov/ukladka-plitki-na-gvl-pol.html
- https://plitka33.ru/ukladka-plitki-na-gvl/
- https://dizain-vannoy.ru/stroitelnye-i-otdelochnye-materialy/gipsokarton/vlagostojkij-gipsokarton-v-vannoj.html
- https://MasteraVannoy.ru/plitka/ukladka-na-gipsokarton.html
- https://promzn.ru/stroitelnye-raboty/ukladka-plitki-na-gipsovolokno.html
- https://IzGipsokartona.com/montag/ukladka-gvl-i-plitki-na-nego.html
- https://sdelalremont.ru/mozhno-li-na-suxuyu-styazhku-ukladyvat-plitku-ili-net.html
- https://sovety-vannoy.ru/delaem-remont/ukladka-plitki/na-gvl-v-vannoj.html
Features of the gypsum fiber base
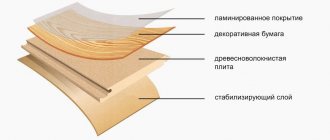
Gypsum fiber sheets are the same drywall, only in a more improved form. These coatings have a number of identical properties. However, there is a difference and it concerns the structure: GVL does not have a double-sided frame with cardboard. There are reasons for this. In this case, strength is imparted to gypsum through reinforcement with cellulose components, as well as through special additives with moisture resistance and fire resistance properties (these characteristics of gypsum fiber board are higher than those of gypsum board).
The strength of gypsum fiber board is an order of magnitude higher than that of gypsum plasterboard, and therefore gypsum fiber sheets are recommended for use when constructing a leveled dry screed base. When a dry screed needs to be done in a bathroom or toilet, then a special moisture-resistant GVLV is used.
To lay a high-quality floor with your own hands, it is important to follow the technology and have an idea of how to lay wall or floor tiles. Creating a new floor involves the following sequence of actions:
- dismantling the old coating, repairing the base;
- arrangement of dry screed made of gypsum fiber board;
- laying tiles;
- grouting joints.
It is possible to lay a sheet of gypsum fiber board on top of a wet screed. However, such work is difficult and is almost never used in modern home finishing practice.
Choice of material and quantity
We strongly recommend that you pay attention to GVL. You can use regular wall moisture-resistant plasterboard, but gypsum fiber boards will be the best solution
They are ideal for dry screeding subfloors and also have high sound insulation characteristics.
There is nothing difficult in choosing the required amount of material. Each sheet has its own area, depending on its parameters. It is also easy to calculate the floor area. You can assume that 10% of the sheets will be scrapped, and calculate how many of them will be needed.
It is important to consider that laying drywall on the subfloor is carried out in two or even three layers. If you plan to further lay the tiles, then it is advisable to take three layers, otherwise two layers will be enough
How to lay tiles on a gypsum fiber base
Floor covering work consists of several stages:
- Stage one. Prepare facing material.
- Stage two. Mark the floor.
- Stage three. Prepare the adhesive composition according to the instructions.
- Stage four. Work on laying tile floors is in progress.
- Stage five. Seam processing.
Before tiling the floor with ceramic tiles, prime the surface of the gypsum fiber sheet and wait until the composition is completely dry. Next, we take a long cord and make markings - connect the middles of short and long walls and where the intersection point is the center of the floor
Finding the center of the room correctly is important if the tiles have a pattern. In addition, the marking allows you to minimize the number of cut tiles
Installation of the first tile can begin, moving from the center of the room or from the corner.
Now that the center has been found, prepare the solution according to the instructions. Next, use a spatula to take a small amount of the solution, apply it to the glu base and spread it. After this, we go through the mixture with a notched trowel. We take the tile and apply a small amount of the mixture to the reverse side, level it with a notched trowel and place it on the base. Apply the mixture to the tiles in a thin layer. After the tiles are laid on the mortar, press and tap lightly with a rubber mallet.
Lightly tap the tile with a rubber mallet
Do not prepare the adhesive mixture in large quantities, it is better in portions so that it is enough to cover one square meter. During cladding, check the height of the surface; a level is used for this purpose. After laying three to four rows of tiles, take a half-hour break; this time will be enough for the gypsum fiber base to take the load. Maintain small gaps between the tiles; special crosses are used for this.
The adhesive mixture is removed from the seams, which comes out onto the surface of the tile during pressure. This is done immediately, because if the glue dries, it is difficult to remove it from the surface of the tile. After the floor area is covered with ceramics, the floor must dry for several days. While the tile floor is drying, make sure that there is no moisture in the room. After the glue has dried completely, the joints are grouted. To do this, you can use fine sandpaper. That's all, the tiled floor is ready for use.
If you decide to lay a ceramic floor on the gvl yourself, but are afraid to make mistakes during the work, then watch the video on how to install tiles on the gvl and other surfaces:
Electric film circuit for warm walls
When choosing an electric option for warm walls, you need to start by assembling film panels. If it is necessary to increase the heating power, rod elements are used instead of film. The finished IR panel is glued to the insulation using heat-resistant glue. The use of metallized film as insulation is prohibited: induced induction will create an electromagnetic field in the wall and can lead to undesirable consequences.
After this, the assembled structure along with the insulation is placed on the inside of the plasterboard, which can be attached to the wall in the usual way. To increase heat transfer, foil film can be laid on the opposite side of the wall in front of the IR panel.
The efficiency of the IR heating system under consideration will increase if the wall is covered with wallpaper that has a foamed polyethylene backing.
Best answers
NOT OLD YET:
If you put chipboard, then the meaning of a warm floor is lost; it will not warm up the stove. If you want to lose a heated floor, then lay chipboard. It looks like you want to lay slabs to level the floor, but you can level the floor not with a slab, but with a self-leveling mixture (dry mixtures). Then the warm floor will fully fulfill its role as a heater.
vonemugI:
wood is a very poor conductor of heat! It’s better to use a normal screed and immediately the material that you want to see on your floor.
Nick Storozhev:
nothing to do?
it:
What the hell? You don't know what to do anymore?
Haruhito:
When the chipboard heats up, it will emit vapors of some kind of crap impregnation, formaldehyde in my opinion...
Vladimir Pykov:
What is chipboard for????
Recommendations from experts
Before installing tiles on the gvl, you should determine the stages of work, which will help you lay the tiled floor faster and with better quality. Proper planning of work will help to use materials rationally. Here are some useful tips that will help you when laying tiles on roof lining.
Preparing the surface. If the floor is wooden, then inspect the boards for defects. If there are any, then get rid of them, replace rotten boards with new ones, fix loose ones, fill the cracks, and so on. If the floor is very bad, dismantle it, because on such a flooring it is impossible to lay a gypsum board sheet under a tiled floor. Installation of moisture-resistant gypsum fiber sheets will not be difficult, but there are several nuances that need to be taken into account. For example: to reduce the consumption of gypsum sheets, you need to lay them on the base along the room, while remembering to bandage them. The sheets are fastened to the base using self-tapping screws. This stage ends with priming work. Special compounds for woodworking act as primers. To lay the tiles securely, you need to use a special tile adhesive in the bathroom.
When choosing, pay attention to the service life, read the instructions and purpose. The fact is that if glue may be ideal for one surface, it is not a fact that it can be used for another surface.
Adhesive composition for laying tile floors on a gypsum fiber base
- Ceramic tiles should be laid on a gypsum fiber base using a dry primer.
- During facing work, grouting can be done a day later, after the glue has dried. The adhesive composition will dry completely in a few days, after which the seams will be rubbed again.
- The seams between laid sheets of gypsum plasterboard and the seams between ceramic tiles must be even. During installation, carefully ensure that the tiles do not move. If this happens, correct it immediately.
It is important to seal and sand the seams between the laid ceramics
Which is better?
The market offers a huge number of heating systems, and therefore it is not easy for the buyer to make a choice. A rating of electrical systems based on customer reviews and expert opinions will help facilitate this process.
So, if we talk about cable floors, the British brand Energy has good reviews. The system has a good price-quality ratio. At an affordable price, the material has good functionality and is characterized by ease of installation.
The domestic analogue is “Teplolux”. The system is based on a two-core cable 28 m long (enough to heat an area of 2.8 sq. m). The advantage is the high power of the floor, which, in turn, results in increased energy costs. Not a bad option if you can’t purchase a more expensive brand.
The leader among mid-price cable systems is the Polish manufacturer Devi. The brand's products are based on a self-heating two-core cable. The system is suitable for installation both indoors and outdoors.
If we talk about more efficient infrared systems, then floors from the Korean manufacturer Caleo deserve attention. The system is characterized by absolute self-regulation, which allows reducing energy consumption by 5-6 times after the desired temperature is achieved. Among the advantages is ease of installation, largely due to detailed instructions and the presence of a disk with a detailed description of the process in the kits.
Domestic also produces infrared flooring in the “National Comfort” line. This is a budget model with a long service life. At a voltage of 220 W, the power of the model is 150 W.
The leader among core floors is the products of the Israeli brand Electrolux. This is an ideal option for tiles - for an area of 4 square meters. m, the power of a two-core cable will be up to 600 W/sq. m. The average cost (for the specified area) is within 8,000 rubles. Thanks to the use of aramid thread-based cables in the system, high mechanical and thermal strength of the floor is achieved.
Don't miss: What is a split system air conditioner? Briefly about the main thing!
When choosing a heated floor, 2 more factors should be taken into account:
- Electricity consumption;
- Heating time.
The main components of a prefabricated screed
- Hydro- and vapor barrier layer. This material is used to separate the floors and other elements of the floor “pie”. If the ceiling is reinforced concrete, then a dense polyethylene film is an ideal separating layer. If the sheets are laid on a wooden floor, then glassine is used.
- Soundproofing and compensation gasket. This is an edge strip that can be secured with screws or glued. The material is fixed before laying the prefabricated screed around the entire perimeter of the room. Tapes are produced from isolon, basalt wool, foam and other materials.
- Leveling layer. The principle of laying a prefabricated screed from GVL is created according to one of the above listed principles.
- GVL slabs are industrial two-layer or single-layer in two layers, tightened with self-tapping screws and glued by hand.
Purchase of GVL slabs
When purchasing gypsum fiber boards, consider the following:
- for the floor you only need small-format slabs measuring 1.5x1 m, the thickness of which is 10 mm. You can also find in the markets a version of slabs with a thickness of 12 mm and a width of 1.2 mm.
- Gypsum fiber boards are laid in two layers, which means that their area should be twice the area of the room.
- do not forget that these slabs come in two types - for walls and for floors, which in turn are divided into moisture-resistant and non-moisture-resistant. The first ones go on sale with a water-repellent solution.
If you need to insulate the floor, then it will be useful for you to know that thermal insulators are divided into 3 types - polystyrene foam, backfill and fiber.
Fiber thermal insulators. These include glass and mineral wool. Outwardly, they are similar to cotton candy, but instead of sweet threads there is glass or molten granite. If you decide to opt for thermal insulators, it is better to purchase foreign-made materials, since domestically produced mineral and glass wool is not suitable for residential premises.
Thermal insulators made of polystyrene foam. They are similar to polystyrene foam and have heat-saving qualities. Long service life. But there are also disadvantages - high cost and flammability.
Backfill heat insulators. These include expanded clay sand, slag pumice, and crushed stone from slag. The downside is low heat-saving properties. Plus - low cost.
In addition, it is very convenient to use GVL material to replace the old, boring wooden floor in the country house by laying tiles on it. High-quality tile laying is done on a prepared base, the surface of which can be GVL. If the floor is without any special errors, then the gypsum fiber sheets are attached to the floor with intervals of half a sheet (the first row is laid with a whole sheet, and the second with half, etc.) With this preparation, laying the tiles is done with ordinary glue, onto which the tiles are fixed. But first the floor needs to be prepared.
It is necessary to drill holes in the wooden floor so that the process of rotting of the wooden raw materials does not begin and there is good ventilation. Wobbly and creaky floorboards are additionally screwed to the joists with self-tapping screws designed for woodworking. If the floorboards are completely rotten, replace them with new ones.
A waterproofing film is then placed on the floor to prevent moisture from penetrating the gypsum fiber sheets. Moisture in the floor can come from dirt or concrete floors.
If you need to increase the rigidity of the floor, then lay the sheets in two layers. Here, the seams of the initial layer should be located in the middle of the sheets of the next layer. The grooves - the joints of the sheets - are glued with glue, which is sold along with the sheets.
Ceramic tiles, when facing a wooden floor, are laid using an adhesive intended for tiles, which, according to the description, is suitable for gluing slabs onto GVL or GKL. Laying follows the same principles as for a conventional screed.
These floors are universal. You can immediately install a “warm floor” system when laying them. They do not emit harmful substances, and the acidity level matches the acidity level of human skin. Light weight (more than 18 kg). Easy and quick to install. The “wet process” is not used, which is very convenient during the winter period of construction and renovation. Durable: do not creak, do not bend, do not knock. Able to withstand large point loads and gravity. They serve as an ideal barrier for fire to penetrate between floors of a building. They are successfully used both in low-rise and high-rise buildings.
What do we choose for modeling walls and floor insulation?
GVL or gypsum plasterboard for walls are chosen based on the goals set. For simple alignment, either option may be suitable. For various elements, such as arches, niches, columns, shelves, plasterboard is used because of its flexibility to change shape. It is also possible to use a modern option - decorative plasterboard, which has a very good appearance, does not require puttying, and retains its qualities for 10 years.
For external work - decoration, insulation of the building - exclusively gypsum fiber is used, as it is durable, frost-resistant, and moisture-resistant. It is also better to make functional partitions from this durable sheet. For the floor, only GVL can be used; it is placed on the main cement coating, and covered with linoleum or laminate on top.
The choice of a particular material also depends on the degree of need for sound insulation and fire resistance. GVL in this regard has higher performance than gypsum board.
Technology of working with GVL
- Preparatory work stage
- GVL installation work
- GVL cladding works
Modern finishing work today cannot be imagined without gypsum fiber sheet (GVL). The popularity of this finishing material is due to a number of its advantages, such as environmental friendliness, strength, fire resistance, affordable cost, and simple installation. Laying gypsum fiber board on any surface, as well as tiling it, makes this surface perfectly flat, giving an aesthetic appearance to any room. Therefore, this type of finishing work is most widespread. The technology for working with GVL consists of several successive stages.
Types of drywall and their color markings.
Additional recommendations from professionals
Many years of professional experience shared by specialists indicate that some manipulations should be done in a certain way, and not in any other way. After all, the secret to successfully creating a high-quality floor lies precisely in such nuances.
Tying GVL sheets together will provide them with greater resistance to stress. Fixing with self-tapping screws will allow you to hold on better; Before laying the tiles, the gypsum fiber flooring is kept indoors for about 3 days, and only then covered with a primer; When buying tile adhesive in a store, be sure to find out its capabilities regarding gypsum fiber; Laying tiles begins only on a completely dry primer. They do this using a hammer, beacons and a spatula.
In this case, all the rules described above are taken into account.
These are all the nuances that you will encounter in your work.
Advantages of this type of heating
Insulating walls with “warm electric floors,” like any heating, has its pros and cons.
Disadvantages of electric heating:
- It is not possible to place furniture near heating walls. It will prevent the spread of heat, in addition, hot air will have a negative effect on the products, which will ultimately shorten the service life.
- You cannot hang a picture or TV on such a surface, as this could damage the heating elements.
- Large heat losses occur. After all, the wall is heated, on the other side of which there is a street, resulting in unnecessary consumption of thermal energy.
- Shifting the dew point deeper into the wall. In winter, condensation will accumulate, which will lead to freezing, and this will accelerate the process of destruction of the walls.
- Increased electricity consumption.
- Destruction of the finishing - the service life of wall coverings will be significantly less than on walls without heating.
As you can see, there are many disadvantages, although one cannot help but mention the positive aspects of such heating:
- located vertically, so dust will not spread throughout the room;
- will free up space in the room that is occupied by standard radiators;
- cost-effectiveness in terms of installation - installation is inexpensive compared to installing another heating device;
- creates an excellent thermal effect;
- fights fungus and mold;
- does not dry out the air, since there are no open elements that burn oxygen;
- heating of the room occurs more evenly;
- does not spoil the interior of the room.
Since, with electric wall heating, the heating method is radiant, you can save money by setting the temperature level in the room 2 degrees lower, which will not affect the level of comfort.
Another important point is that if a wall separates two rooms in an apartment, then if there is heating on it, both rooms will be heated.
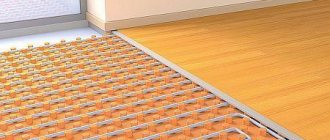
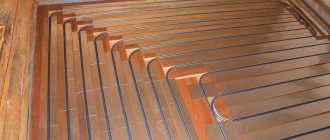
We lay pipes for the water floor system
This can be done in two ways. Their differences lie in the design of the channels for placing pipes. As a rule, installation technologies based on modules or rails are used.
For the first option, you should buy special ready-made chipboard modules. Recesses are already cut into them at a certain distance from each other. These intervals depend on the expected heat transfer of the system.
Modular installation of water heated floors
The kit of such a modular system, as a rule, includes everything necessary: the modules themselves with grooves in them, metal plates, fasteners and pipes. All that remains is to assemble the structure in accordance with the diagram supplied with the product. However, flooring in a modular manner is not cheap. Therefore, many prefer an alternative - the budget rack and pinion method.
It does not involve installing channels in chipboard sheets, but stuffing slats. The planks are cut from boards or plywood. The spaces between them must be equal to the thickness of the slats, since in the formed grooves the pipes, the outer diameter of which is 17 mm, must not only fit freely, but also not be destroyed by the displacement of the wood. The width of the guide strips depends on the distance between the pipes in the structure being manufactured. So, with the “snake” method of laying pipes with a pitch of 300 millimeters, a 22 mm plank should have a thickness of 278 mm.
Rack laying scheme
Preparatory work stage
Preparing the room and working surface is the first priority stage of work. Preparing the premises includes work on dismantling existing equipment, removing furniture, dismantling old coverings (paint, whitewash, linoleum and other types). The working surface (walls or floor) should not have large defects in the form of cracks, crevices or voids. The screed must be strong and have no detachments. The surface must be level and clear.
If the floor is concrete, it is cleaned, leveled and covered with plastic film. If the floor is wooden, it is treated with an antiseptic. Wooden floors are susceptible to rotting processes and the formation of fungi and should be protected as much as possible. Next, the tree needs waterproofing. Therefore, roofing material should be laid on a wooden base, then reinforcing mesh and cement screed. Both ordinary film and bitumen mastic can serve as a waterproofing material.
GVL can be laid on both wooden and reinforced concrete structures, observing the features of each technology.
For this work you will need the following basic tools and materials:
Tool for working with drywall.
- Hammer.
- Self-tapping screws.
- Polyurethane foam.
- Knife for cutting GVL.
- Hacksaw.
- Tile cutter
- Screwdriver.
- Putty knife.
- Primer.
- Grinding devices.
- Level.
- Rubber hammer.
- Roulette.
- Marking cord.
- Construction stapler.
Floor installation with GVL
After you lay the tape, you will need to cut off its excess - the top edge of the edge of your future floor. The next step is to place a vapor barrier substrate on the film (polyethylene) ceiling, with each strip being placed on top of the previous one, overlapping.
On the surface covered with film, you should carefully scatter expanded clay, the fractionation of which is no more than 0.5 cm. Use a level to set the guides. Your task is to level the floor.
Then we compact the expanded clay
We do this especially carefully if the thickness of the expanded clay exceeds 10 cm, paying great attention to places near doorways, walls and corners
The first layer of GVL is mounted from the corner closest to the entrance. After you have laid the first layer, you need to apply PVA glue or adhesive mastic. The next layer is laid on top of the first only in the opposite direction!
This assembly implies that during the installation of the top layers, parts of the GVL floor should be secured with fasteners and glued along the folds.
The fixing step for sheets is no more than 30 cm. If your sheets are more than 1 centimeter thick, then you will need a screw with a length of 1.9 cm. We chose slabs with a thickness of 1.2 cm, then for work you will need self-tapping screws 2.3 cm long cm.
When installing the base floor, pay attention to the following: when gluing the gypsum boards, you need to get rid of excess glue protruding at the seams and near the walls. If you decide on laminate or carpet, then all seams and joints will have to be puttied
So, the second layer has already been laid, fixed and puttied, now the surface itself should be primed
Before purchasing a primer material, we advise you to pay attention to combining it with the adhesive substance you have chosen for laying the screed
Features of work
Trims for tiles
When installing a tiled floor, do not forget about the corners for tiles - trim (these are special plastic corners that can be purchased at any construction and hardware stores). With their help, there will be no problems with laying tiles.
We should also not forget about the difficulty in performing some finishing work, namely, corner laying of tiles. For beginners in construction and installation work, the classic method of laying joint to joint is suitable, where the tiles, if necessary, are cut off. However, it will not be possible to avoid all the difficulties even with this technique, since corners with trimming of 45 are common, and therefore you cannot do without a special machine - a tile cutter.
If you study all the intricacies of the classic technology of laying tiles, the process will go much faster, and even such issues as laying corners and turns will not raise so many doubts.
Video on the topic: Laying tiles in the bathroom on drywall with your own hands
Selection of questions
- Mikhail, Lipetsk — What discs should I use for cutting metal?
- Ivan, Moscow - What is the GOST for rolled sheet steel?
- Maxim, Tver - Which racks for storing rolled metal products are better?
- Vladimir, Novosibirsk — What does ultrasonic processing of metals without the use of abrasives mean?
- Valery, Moscow - How to forge a knife from a bearing with your own hands?
- Stanislav, Voronezh — What equipment is used for the production of galvanized steel air ducts?
Solutions and mixtures for installing tiles on GVL
Mixtures for laying tiles are divided into 3 types:
- cement mortar;
- cement-adhesive mixture;
- solution based on powder glue.
The use of each solution has its own restrictions. It is better to plant paving slabs on cement mortar, while mixtures with the addition of PVA glue or based on dry glue are used for laying tiles indoors. For laying tiles, you should not use cement, the quality of which will be lower than 300. Component ratio: 6x1x25.
To create a cement-adhesive mortar you will need:
- sand;
- cement;
- PVA.
Laying tile slabs on cement mortar with gypsum fiber board without glue will not ensure proper contact. It is better to use coarse sand; before starting the procedure, you need to rinse it and clean it of pieces of clay, shells and other debris, and let it dry completely. Otherwise, when sifting through a sieve, the wet sandy mass will pass through heavily and clog the sieve holes, sticking to the grid.
A solution based on dry glue is used for laying tiles on any surface - walls, ceiling or floor. The main thing is to follow the ratios indicated on the pack of dry mixture to prepare the adhesive solution. The mixture-based solution is used for the following group of finishing materials:
- ceramic tile;
- porcelain stoneware;
- cotto;
- clinker.
When choosing a dry powder for mixing an adhesive base for laying tiles, you need to pay attention to several nuances:
- shelf life of the composition;
- characteristics;
- what surface it works with (despite the fact that the adhesive is suitable for tiles, it must also adhere well to the surface).
Finishing nuances
Remember that due to the built-in heating system, decorative finishing materials. Applied to the walls, they will be used less. For example, wallpaper on a wall that has an electrical system built into it may fall off after a few months. And if the heating is built into the walls of the bathroom, you need to be especially careful in choosing the adhesive composition so that after the first season the tiles do not crumble. Only plasterboard material can instill peace of mind regarding finishing - nothing happens to it.
So, all that remains is to decide whether there is a need to heat the walls and choose the right system.
GVL installation work
Stages of laying gypsum boards on the floor
After all the preparatory work has been carried out, the remnants of the old coating have been removed, cracks have been sealed, defects have been eliminated, the wall or floor has been treated with a primer, you should proceed to the stage of laying gypsum fiber board.
Laying gypsum fiber sheets on a wooden floor, wall or ceiling has its own characteristics. So, when laying on the floor, it is necessary to file the doorway due to the rise in floor level. In addition, it is better to first remove the wooden floor and make a screed. If it is not possible to remove a wooden floor, then removal of rotten boards will be a prerequisite.
One of the installation options is as follows: GVL sheets should be laid on tile adhesive, secured with self-tapping screws around the perimeter, while adhering to the following parameters: sheet thickness 10-12.5 mm; screws 30-40 mm; step between screws - 40 cm; The depth of fastening of screws is 2-3 mm. Fastening the sheets with self-tapping screws will eliminate cracks. After a day you can move on to the next stage.
Another option is to install gypsum fiber boards using metal guides (profiles). As an alternative, you can use a wooden frame made of slats, but the metal profile is more durable and reliable. The distance between the guide strips should be 40 cm. For structural strength, you can also use a plaster mesh secured with glue and staples. Features of frameless wall cladding with gypsum fiber sheets include maintaining a certain width of the gap between the sheets (5-7 mm), sealing the joints with a special gypsum putty, and using a special glue for gypsum plasterboard.
Where and how are film systems used?
In order for the decision to use an infrared film floor to be well-founded, it would not hurt to get acquainted with its approximate technical characteristics:
- film width – 0.5-1 m;
- film roll length – 50 m;
- material thickness – 0.2-0.4 mm;
- power consumption per square meter of material – 25-80 W/h;
- operating temperature of the surface of the heating element is 30-50 degrees.
Film flooring can be successfully used as the main heating of an apartment or house, but it is necessary that at least 70% of the floor be covered with this material. Unfortunately, in areas with cold winters, this heating method cannot cope with the increased load.
Here, the infrared floor can only be used as an additional method of heating the room.
Another interesting application for infrared heated floors is emergency heating. Pipe ruptures in frosty weather are not too rare.
If the central heating system for some reason fails, but electrical energy is supplied to the house, with the help of heated floors it will be possible to maintain, if not a comfortable temperature in the living quarters, then an acceptable temperature for normal life and protection from hypothermia.
A profitable area of application for infrared heating systems is heating office premises and outbuildings. The system will have virtually no effect on the size of the room, and it can only be turned on when necessary. This is also one of the best options for installing bathroom heating.
The tiled floor will always be warm, and the air in the bathroom will warm up to the desired temperature, which will make water procedures as pleasant as possible. Infrared flooring can be laid not only under the floor covering, but even in open areas, but in this case special protection will be required.
Technology for arranging a tiled floor on a dry GVL screed
The first step is to study the condition of the original floor. The old covering is dismantled. And the base is checked for defects. If the base is wooden, the boards are evaluated. They are either completely replaced or strengthened by additional fixation to the joists. Large gaps are sealed with polyurethane foam.
Next, the GVL slabs are laid.
Features of laying GVL:
- Laying sheets along the room with dressing will significantly reduce material consumption;
- The fastening elements for sheets to a wooden base are self-tapping screws, which are screwed in increments of 20 cm;
- Priming gypsum fiber board sheets after installation is a mandatory procedure. The primer will help retain the putty and provide better adhesion to the tile adhesive;
- The displacement (otherwise known as the spread) at the seams of the gypsum fiber sheets is clearly monitored when subsequent rows are formed. It should be within 20 cm when combining two rows;
- The use of specialized GVL sheets (the so-called floor covering elements), glued together during the production process, is very convenient when forming a two-layer floor. The thickness of such plates is 20 mm, and a special rebate at the ends allows you to significantly speed up and facilitate the installation process. Before laying tiles on sheets of this type, they are cut to the required size, the folds are glued and only then the sheets are laid on the floor surface.