Recently, clothing with various prints has become very popular. It perfectly reflects the character and personality of its owner. The most widespread application of designs on T-shirts, but it is not necessary to stop only at this part of the wardrobe.
You can decorate any textile product:
- hats;
- sweatshirts;
- raglans;
- bags;
- windbreakers, etc.
Such products will not only complement your favorite look, but will also become a creative gift.
What fabrics are suitable for batik
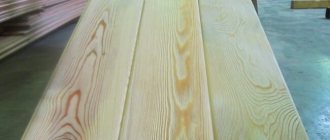
You can paint both a finished item and a piece of fabric. When looking for material for batik, you need to pay attention to its appearance and physical properties - density, smoothness and weave of threads. This will determine how the paint spreads and is absorbed. The optimal choice is a plain flowing fabric with a smooth surface and a plain weave of threads.
There are two main styles of classic batik - cold and hot. Since one of the stages of hot batik is boiling, only those materials that do not deform during heat treatment are suitable for it - cotton fabrics, viscose or linen. In addition to the above, the cold batik technique allows you to work with wool and natural silk. There are also designs on synthetics, such as polyester, but this is an extremely unpredictable material, and it is better for beginners not to take risks.
Stripes and chevrons
The easiest way to brand clothes is to sew special chevrons and stripes on them. This is how, for example, military or other service clothing is issued. We will not talk about the technology for making chevrons here, but we will talk about how chevrons are attached to clothing.
Today two main methods are used:
- The chevron is sewn to clothing using thread. This method is suitable if the chevron or stripe is not planned to be replaced or removed for a long time. This is how, for example, university jackets or club jackets are decorated.
- Velcro. In this case, halves of a textile fastener, cut in the shape of a chevron, are glued onto the clothing, in places intended for stripes or chevrons, and the chevrons themselves are made with Velcro on the reverse side. The Velcro chevron holds very tightly, and it is very difficult to accidentally tear it off. But replacing it is not difficult.
What colors are used in batik?
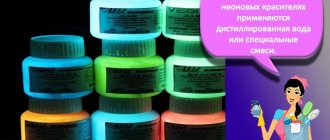
To draw on fabric, you need special paints; they come in two types: acrylic-based and aniline-based. Acrylic designs are fixed in the final stage using a hot iron, and aniline designs are treated with steam in a special autoclave for fixation. However, thrifty craftsmen have already adapted to steaming products in buckets and steamers. When treated with steam, the dye penetrates deeply into the fibers, giving a uniform color and completely preserving the structure of the fabric. Working with aniline dyes takes more time and requires preparation and certain skill. This is pro level.
Acrylic paints are affordable, water-soluble, wash-resistant, and dry quickly—great for beginning artists. Such materials are classified as “hobby” materials. They come in matte and glossy, with increased fluidity for painting on silk, for working on thick fabrics and leather - marked “Textile”. They can have different effects - velvety surface, fluorescent, metallic, pearlescent. Some paints are marked “for light fabrics” - it is also better to listen to such manufacturer’s recommendations.
Choose acrylic paints for fabric
To prevent the colors from spreading uncontrollably across the fabric, you need to “lock” it in closed lines. To do this, use a contour (reserving composition) - a special thick paint in a tube with a thin spout. When applied, it impregnates the fibers of the fabric and prevents the paint from spreading beyond the line. Contours can be regular, with a 3D effect, pearlescent, shiny glitter and others. For silk, a separate type of contours is used.
Choose a contour for the fabric
Masters advise not to mix paints from different manufacturers and different series in one work - the chemical compositions of the dyes may conflict with each other. To avoid getting lost in the maze of jars, pay attention to a few points:
- type of fabric;
- color saturation;
- variety of colors and contours;
- the need for special effects;
- additional compositions - for example, the French company Pebeo offers solutions for dimming brightness, for thickening paints and a special reserve for protecting a large area of the surface from paint.
Mehendi - Indian cultural heritage
Painting the body with henna patterns is called the “mehendi” technique. But very often this technique is used for dyeing fabrics. The only limitation is that dyed textiles should not have contact with moisture, since henna is an unstable plant pigment.
Therefore, this technology is excellent for creating Indian panels, home decorations, elements of celebrations and ceremonies.
Historically, the mehendi technique can be performed in four styles:
- Arabic (there is no clear pattern of application, predominantly floral patterns predominate);
- African (ethnic patterns are used. The most popular elements of Afro patterns are geometric shapes;
- Indian style is one of the most complex. It always occupies a large area and involves a complex design, which is often based on an elephant or Indian symbols of fertility;
- European. Innovative approaches to pattern formation combine various oriental elements into one whole.
The most popular is the floral print (it has no restrictions on application or specially designed patterns). This could be an element of oriental painting or a pattern reminiscent of Arabic embroidery.
Secrets of the mehendi technique:
- successful mehendi painting directly depends on the correctly prepared mixture for applying the design;
- The main component of the coloring solution is henna (an affordable product). An alternative to henna can be basma or iodine solution.
In most cases, “mehendi” is used as a means of decorating the body, but there is no limit to perfection when natural fabrics take on elements of patterns from technology.
«]
© 2022 textiletrend.ru
Fabric painting techniques
We have already mentioned the main directions - hot and cold batik . In addition to these, there are three more interesting techniques for creating patterns on fabrics.
Airbrush. Paint is applied to the material using an airbrush. The color intensity is determined by the distance from the nozzle to the fabric and the duration of exposure. The work does not require contours, but stencils are often used to create clear boundaries.
Knot painting (shibori, tie-dye, plangi). The basic principle is that the fabric is completely dyed, except for those places that you have previously protected. Paint is prevented by many tied knots, clothespins, and threads, into which buttons, twigs or other elements can be added to create an original pattern. Sometimes the process is repeated - after dyeing and subsequent unraveling of the knots, new ones are tied in other places and painted in the next color.
Free painting. The fabric is moistened with water and a design is applied to it using a brush. There are no contours, so the colors can mix freely with each other. The degree of moisture in the fabric determines the “watercolor” quality of the design.
Suitable clothes for painting
How you can draw on fabric at home is a popular question, there are many options.
You can paint with acrylic paints anywhere. The main thing is a clear understanding of whether this item will be worn every day: clothes painted with acrylic paints are prescribed to be washed exclusively by hand.
However, the original pattern can be used to decorate both trivial T-shirts and exotic caps, sweatshirts and even pants. It is important to apply the pattern correctly; sometimes special equipment can be useful.
Jeans with a painted pattern
How to transfer a drawing
There are many ways to transfer images from paper to fabric. The most convenient option is if the fabric is thin, and the outline of the design on the paper is made with bold lines of saturated color, then you can simply place the design under the fabric and trace it. But if you draw on thick fabric or are unsure of the steadiness of your hand, try the following methods.
Method 1
Stretch the fabric, place carbon paper on it, and place the design on top. Carefully trace the contours of the design - the imprint will remain on the fabric. Used for light and dark fabrics - choose a carbon copy of the color that will stand out more strongly on your material.
Method 2
Make slits along the contour of the design with a stationery knife, leaving small bridges so that the design does not fall apart. Place the resulting stencil on the fabric and draw along the slits with a soft pencil or chalk in a color contrasting with the material. Carefully remove the drawing and complete the outline by sketching the gaps.
If the drawing is simple and monochromatic, and you are confident in your accuracy, you can immediately use a brush with paint instead of chalk.
Method 3
Take a thick needle, place the design on a soft surface and make many point punctures along the contour. Then transfer the paper to the secured cloth and sprinkle it with crushed chalk or pencil lead. Spread the powder over the surface using a cotton pad, pressing down slightly. Remove the paper and a dotted outline of the design will appear on the fabric.
Method 4
The original drawing must be on tracing paper. Trace it on the reverse side with a wet pencil or chalk, then carefully apply it to the fabric and iron it several times with your hand.
Method 5
With the help of light. Secure the fabric to a hard sheet of glass, plexiglass, plastic, or other material that allows light to pass through. Place the sheet on two stands (for example, two stools), between which a lamp is installed on the floor, pointing upward. Turn on the light and trace the drawing with a pencil or directly with an outline.
If you have a little experience and simple drawings, transferring the image may not be necessary - many people draw directly on the fabric.
Practical advice
Prewash. Factory impregnation of new fabric prevents the absorption of paints and the design may be damaged. Before starting work, be sure to wash the material, dry it, iron it, and only then start drawing.
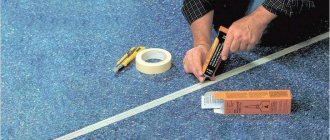
Fabric tension. Before starting work, make sure that the fabric is securely fastened to a hard surface - it is best to take a sheet of plastic, plywood or board. For fixation, you can use push pins, paper clips, paper clips, and even regular clothespins. The main thing is that your workplace does not move when transferring the image from paper and in the process of applying the outline and paints.
Substrate. If you are applying a design directly to a finished product, such as a T-shirt, it is important that there is a backing between the layers of the fixed product - this will prevent paint from getting onto the back side of the product, where the design is not intended. The backing can be the entire sheet of plastic or plywood on which you mount the product, if size allows, or an additional insert made of a similar material or simply plastic film.
Water. Pour the water for diluting the paint into a stable, heavy glass or jar and place it slightly to the side, out of reach. You should not use plastic cups, they are unstable, they can easily be turned over and ruin the work.
Rags. It’s good to have an absorbent rag on hand - wet and dry for blotting brushes, wiping your hands and table while working. Be careful not to let a drop hang on the brush—one single blot can irrevocably damage the product. Pay no less attention to the cleanliness of your hands - sometimes it seems that the paint just gets on them by magic.
Brushes. The choice of brush depends on the type of design, the quality of the fabric and your personal tastes. In batik you can use a very large assortment of tassels, as well as foam rubber and cotton swabs. It is advisable to choose brushes with a long handle and even, neatly laid bristles. To draw small details and work close to the contour, you will need thin brushes; to paint large surfaces, you can use round and flat brushes.
Please note that the brush should not be left in water with the tip down for a long time - it may become deformed. When finished, wash the brush with a drop of dishwashing detergent and dry with the tip facing up.
Select paint brushes
Contour . When applying the contour, hold the tube at an acute angle to the fabric and do not change the speed of your hand movement - then the line will be even in thickness.
Consolidation . Carefully read the instructions on jars of paints and contours - each manufacturer may have its own drying time and method of fixing. Following the rules will help you avoid ruining your work.
Ideas: what things can be painted
Traditionally, silk scarves, stoles, shawls and dresses were decorated using the batik technique. Since the art originated in Indonesia, its native motifs are flowers, plants, birds and landscapes.
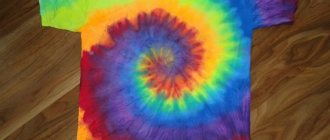
For a “test of the pen”, you can take a plain cotton T-shirt and design it using the shibori technique - you will get a bright summer design in the form of a spiral with diverging rays. A frame from your favorite cartoon would look good on a children's sweatshirt - such drawings have a clear outline and large shapes, they will be easy to work with.
After practicing on small items, you can paint a decorative pillowcase or bedspread for the bedroom, wall panel, tablecloth or curtain. The color and motifs of the work will depend on the style of your interior.
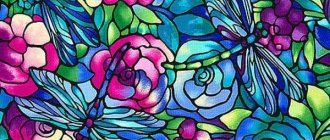
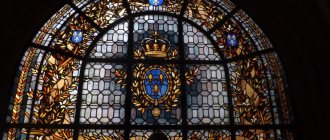
If you look for outline drawings for batik on the Internet, you can safely add to them templates for stained glass painting - these techniques have a similar principle.
We wish you successful experiments!
Cross-stitch
The technique of cross stitch on knitted items involves the use of several types of cross:
- Italian.
- Bulgarian.
- Simple cross.
Italian
Bulgarian Simple
As a guide : it is recommended to make each cross over two loops and three rows of stockinette stitch.