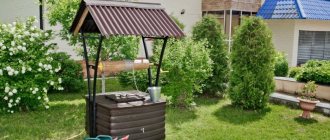
If you, having completed all the work around the house and on the property, found a place for a gazebo and installed it, are looking for something else to do, and a spark of creativity burns in you, then we advise you to pay attention to the so popular rock gardens. Try hiding one of the Japanese-style stones in the garden, try making a stone path or an Ai-Petri mountain range. Everything is at the mercy of your imagination, and coloring the stone will only contribute to its growth.
How to paint stones? This is not so much a question as a whole science!
Basic Rules
- Select smooth stones with a dense texture, such as pebbles, for painting.
- Wash and dry the stones well.
- Before painting the stone, you need to apply a layer of primer made of PVA glue and water in a 1:1 ratio. This process will ensure the paint is applied evenly.
- For painting, use acrylic paints, but if you don’t have them, replace them with gouache.
- Use brushes of different sizes.
- Cover the painted stone with acrylic craft varnish; if you don't have it, use clear nail polish. This action will extend the life of the craft, protecting it from weather conditions, and also give it a beautiful shine.
Colored crushed stone in landscape design
Crushed stone painted in different shades goes well with decorative garden plants, making the landscape more diverse. Mulching with crushed stone prevents the growth of weeds. Placers of multi-colored pebbles retain their attractiveness all year round. In cold weather, when there are no flowering plants and greenery, colored crushed stone, forming bright spots of color against a generally dull background, acts as the only decoration of the garden.
Areas of application of colored crushed stone:
- creation of ground images, logos;
- protection of the soil surface from drying out and washing away;
- delimitation of different zones from each other, for example, flower beds from a concrete path;
- filling up paths near the house;
- decorating flower beds, flowerpots with plants;
- decoration of garden pools and fountains.
Colored crushed stone solves a very important problem: it covers areas of bare soil. If you do not do this, then dust and sand from areas of land will constantly fall onto clean paths and other landscaping elements, disturbing their appearance. According to the rules of landscape design, all “patch” of bare soil must be covered with a grass lawn or covered with gravel. Crushed stone, unlike a lawn, does not require watering or mowing, and does not depend on seasonal weather fluctuations. That is, it is more universal.
Strawberries
You will need: pebbles, acrylic paints in red, black, white and green, a simple pencil, brushes, PVA glue, craft varnish.
Master Class
- Dilute PVA glue and water in a 1:1 ratio, this will be a primer.
- Cover the half stones with primer and wait until it hardens.
- Apply primer to the other half of each stone and wait until dry.
- Cover the halves of the stones with red paint, wait until dry and paint the rest.
- Draw leaves with a simple pencil and color them green.
- Apply small black stripes over the entire surface of the strawberry and wait until dry.
- Apply small white stripes next to the black ones and wait until dry.
- Cover the strawberries with varnish and wait until dry.
Strawberry pebbles are ready! I recommend watching this video!
How to draw on rocks. DIY
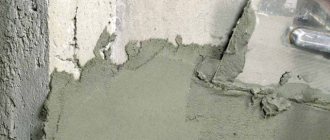
Plaster painting
If desired, gypsum materials can be given a completely unimaginable look, including imitating naturalness (for example, wood).
Various technologies of toning, coloring, and “aging” are used here. Marble tinting. A well-dried gypsum product is impregnated with heated drying oil or shellac-rosin alcohol solution. The impregnation adheres well, without streaks, creating protection against moisture. Gradually the dried primed surface becomes similar to aged marble.
Thanks to tinting, gypsum decor easily imitates marble
Wax tinting. An impregnation is used, consisting of wax dissolved in turpentine (gasoline) with a slight addition of yellow oil paint. After the impregnation dries, the surface is rubbed until glossy.
Ivory-like tinting. A soap maker, nitro varnish and a little yellow oil paint are used. The surface is given a matte finish by rubbing with talcum powder.
Patination. Various shades of brown or brown-green are selected and mixed with other substances. It is recommended to paint in three layers, and in the recesses the treatment is usually carried out with a mixture of a more viscous consistency. The technology of applying the dye is also important here:
- the first layer is lighter, after which it is lightly sanded and wiped with acetone;
- the second layer – the coloring mixture is darker and thicker;
- third layer - to give it a matte finish, a little wax is dissolved in the paint.
The following additives will help to shade or enhance the imitation: bronze powder, talc and chromium oxide, graphite powder, sienna, ocher, umber, soot, green cobalt, lead or zinc white. These are all semi-professional methods of painting gypsum-based materials. Traditional plaster paints are available for sale.
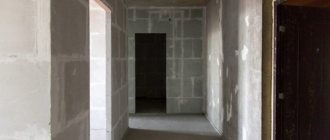
The most commonly used paint mixtures for interior work are acrylic water emulsions or dispersions. After drying, they create a durable protective film that protects the base from moisture. In addition, all water-based paints are environmentally friendly, which means they can be used inside any premises, including residential ones.
When making decorative brick or stone based on gypsum, the working solution is tinted. For this, various powder pigments are used. Tinting the mortar makes it possible to obtain finished bricks that are uniformly colored throughout the entire structure (then operational defects will be less noticeable).
To create an imitation of texture (veins), paints of several shades of color are used. And a finishing varnish coating will help increase the protection of the surface of gypsum brick or stone (after all, gypsum is quite fragile by nature).
Experts advise not to delay painting gypsum finishing elements, as the adhesive properties of the materials deteriorate over time. If this happens, then it’s a good idea to use a primer, and only then paint. The primer will also increase the strength of the gypsum base and create some protection against moisture penetration.
Construction plaster offers unlimited possibilities for original interior decoration. Widespread availability and ease of use have made the material very popular. And having in your arsenal paints, miniums, varnishes, gold leaf and other pigment substances, you can achieve real palace luxury.
Family of Pebbles
You will need: a large stone for the base, small oval stones, moisture-resistant superglue, black and white acrylic paints, craft varnish.
Master Class
- Glue oval pebbles in a vertical position to the large stone.
- Paint eyes on each pebble using white paint.
- Wait for it to dry.
- Draw the pupils of each pebble using black paint.
- Wait for it to dry.
- Apply varnish to the painted areas and wait until completely dry.
The family of pebbles is ready! I recommend watching this video!
STONE PAINTING | MASTER CLASS | YulyaBullet
House on a rock
You will need: a round triangular stone, acrylic paints in purple, dark blue, white and yellow, a black marker, a brush, a simple pencil, and craft varnish.
Master Class
- Make markings with a pencil, drawing doors, windows and roof.
- Paint the main part of the house purple.
- Paint the roof dark blue.
- Paint the windows yellow.
- Paint the doors and roof line white.
- Trace the outlines of the windows and doors with a black marker.
- Draw trees and flowers at the bottom of the house.
- Wait until completely dry.
- Cover the craft with varnish and let dry.
The house on the rock is ready!
Ideas
Gypsum stone, after being treated with paints, allows you to achieve original decor and beautiful effects . Using conventional compositions, you can achieve non-standard coloring options, repeating even palace finishes in an ordinary apartment or house:
Painting decorative stone allows you to diversify the appearance of the room and make it match any option of expensive materials, such as marble, bronze, gilding and tiles.
Ladybug
You will need: a stone of a suitable shape, a simple pencil, acrylic paints in black, white, red and orange, a brush, varnish.
Master Class
- Draw the markings with a simple pencil, as shown in the photo.
- Outline the markings with black paint.
- Paint the sides white.
- Paint the cow's body red or orange and let it dry.
- Draw black stripes in the center.
- Paint the sides orange and let dry.
- Color the rest of the stone black and draw dots.
- Paint the wings and face with white paint.
- Wait until it dries completely and coat the craft with varnish.
The ladybug on the stone is ready! I recommend watching this video!
Master class on painting stones
Cute panda
You will need: a flat stone, a simple pencil, a brush, acrylic paints in black, white and green, craft varnish.
Master Class
- Draw a white oval.
- Mark a cross with a pencil.
- Draw the panda's head and ears.
- draw the muzzle, eyes and front legs.
- Color the ears, eyes and paws black.
- Draw the lower body and legs, then color it black.
- Draw a twig in the paws and grass, then color it green.
- Emphasize the outline of the panda with a simple pencil.
- Wait for the paint to dry, then varnish.
Cute panda on the stone is ready! I recommend watching this video!
Drawing on the stones
Frog
You will need: a stone of a suitable shape, acrylic paints of green, yellow, brown, white, black and gold, a brush, a simple pencil, and craft varnish.
Master Class
- Mix green and yellow paint to create a light green tint and paint the top and sides of the stone, then let dry.
- Paint the bottom of the stone white.
- Draw the paws with a simple pencil and color them light green.
- Draw the tip of the ponytail in the form of a small drop, then wait for it to dry.
- Draw the legs and face with a simple pencil, then outline with black paint.
- Draw a semicircle above each eye with a pencil and draw 2 lines along the back, then outline with white paint.
- Paint the area around the mouth and feet with white paint.
- Paint spots on the frog's body using brown paint
- Paint the eyes gold.
- Create highlights using light green paint.
- Wait for it to dry and coat the craft with varnish.
The frog on the stone is ready!
How to paint crushed stone without a concrete mixer?
If it is impossible to use a concrete mixer, crushed stone can be painted manually. Usually a small amount of material is painted in this way, but if necessary, any volume of crushed stone can be processed manually. The only inconvenience in this case is that you will have to paint in portions, and the process will take more time.
- rinse the material with water from a hose under high pressure (it is better to soak heavily contaminated raw materials in soapy water in advance, and use a stiff brush when cleaning);
- lay out to dry on a tarpaulin or other suitable material;
- place dry pebbles in a mixing container and add paint in an amount equal to 1/5 of the volume of crushed stone;
- mix the mass thoroughly with a shovel until the color is uniform;
- spread the gravel on a fine-mesh mesh in an even thin layer to dry.
If you need to paint a small amount of crushed stone, then after washing and drying it, lay it out on a tarpaulin and apply paint from a spray gun. The stones should lie in a thin layer. After one side has dried, the stones are turned over with the unpainted side up and the procedure is repeated.
I hope the recommendations given are quite enough for you to do the work yourself. However, the following video will help you gain a deeper understanding of the painting process.
Source of the article: https://samodelino.ru/landshaftnyj-dizajn/kak-pokrasit-shcheben.html
Adorable hedgehog
You will need: a stone of a suitable shape, acrylic paints in white, light brown, grey, black and red, a brush, and craft varnish.
Master Class
- Paint the surface of the stone so that the center is light gray and the edges are dark gray.
- Draw a light gray muzzle.
- Draw the nose, the border of the muzzle and the needles in black.
- Mark the transition to the neck with light brown paint.
- Draw a bag with a knot with white paint and draw a muzzle with black small strokes.
- Draw the needles in a chaotic order in black.
- Apply white and light brown strokes to the needles.
- Paint the bag white and add black strokes.
- Draw the paws, eyes and mouth in black.
- Draw red dots on the bag.
- Wait for it to dry and coat the craft with varnish.
The charming hedgehog on the stone is ready!
How to paint material for mulching or decorating an area with your own hands?
Painting crushed stone yourself at home allows you to save a lot of money. The cost of small colored crushed stone ranges from 19 to 30 rubles/kg. This means that you will have to pay a decent amount for decorating flower beds or filling paths. At the same time, the price of simple crushed stone of fraction 5–10 is about 1000 rubles. per cubic meter. This difference in costs is a strong argument in favor of making colored crushed stone yourself. This operation can be carried out manually or using mechanisms.
The choice of method depends on how much gravel you need to paint. If you do everything correctly, then, literally, in a couple of days you can get the right amount of beautiful and cheap material, and with a small volume of crushed stone, the whole job can be completed in a day.
Necessary equipment and tools
List of tools for painting:
- shovel;
- mesh with small cells for drying crushed stone after washing and painting;
- a spacious container, for example, a bathtub that has fallen into disrepair;
- protective gloves;
- bucket;
- paint sprayer (for painting a small volume of material).
Owl
You will need: a stone of suitable size and shape, a simple pencil, gouache, varnish for crafts.
Master Class
- Cover the entire stone with white paint and wait until dry.
- Draw eyes, feathers and wings with a pencil.
- Mix black and white paint, then paint the owl's body.
- Paint the feathers black and wait until dry.
- Outline the eyes using black and white paint.
- Color the pupils red and orange.
- Draw white feathers on the face.
- Paint the feathers with white and wait until dry.
- Paint the nose with black paint.
- Use black lines to highlight the border of the owl's face and wings.
- Wait for it to dry and coat the craft with varnish.
The little owl is ready! I recommend watching this video!
Tutorial gatto su pietra | Tutorial cat on stone | Painting | Tutorial draw | Disegno su pietra |
What is crushed stone, what does it come in and where is the best place to buy it?
Crushed stone, or crushed stone, is pieces of hard rock. They are formed as a result of crushing large stone blocks of various origins. Crushed stone is an irreplaceable building material. It is used when laying the foundations of buildings, to strengthen road surfaces and embankments, and as a filler in concrete structures.
There are several types of crushed stone:
One of the varieties - gravel - has a rounded shape, which is formed as a result of grinding off sharp corners during prolonged contact with water. Crushed gravel is mined mainly on the sea coast and in river beds.
crushed gravel
Depending on the size of the pebbles, crushed stone is divided into fractions. When choosing crushed stone, the following parameters are also taken into account:
- radioactivity;
- strength;
- size and shape of grains;
- frost resistance;
- water absorption capacity.
The optimal fraction of crushed stone for designing paths is from 5 to 50 mm. To fill flowerpots with plants or flower beds, you should take smaller crushed stone, with pebbles ranging in size from 5 to 10 mm.