Many people try to equip their summer cottage with everything they need, including a well. The construction of a well allows you to always have clean water both for drinking and for watering plants. But the arrangement of this structure is one thing, but here’s how to decorate them, because this element should become the main decorative accent of the entire site. Therefore, wells in a dacha and their decoration, photos of which are collected in a selection, will force you to take a design approach and come up with something original, unusual, and unique. For its cladding, you can use a variety of materials, from bricks to flowers. Of course, this matter can be entrusted to professionals, but they often demand a lot of money for their work. Therefore, it is worth learning to do it yourself.
Material requirements
Almost any material can be used to finish a well, the main thing is that it gives it a beautiful appearance and also protects it from negative influences.
Features of finishing material:
- for decoration you can use wood, natural or artificial stone, brick, flowers;
- if wood is used for their finishing, then you should give preference to hard varieties that can withstand various negative influences;
- the material must have high wear resistance;
- to improve quality, it is better to cover the material with plaster or paint after finishing;
- the main requirement is that the base of the material must withstand high levels of humidity.
But in order to choose a good material, it is worth considering the properties of each type in more detail. In advance, you can see photos with finishing options for various bases.
Step-by-step instruction
Making a high-quality house structure requires a careful approach. To do this you need:
- make a drawing of the house for the well with exact dimensions;
- choose the right material that will fully meet the desired characteristics;
- select a working tool according to the selected materials;
- carry out preparatory work, manufacture all the parts and assemble them into a single structure.
Perform antifungal and anti-corrosion treatment.
Types of finishing of a well in the country
A variety of materials can be used to finish a well. It is worth taking a closer look at the characteristics of some of them.
Brick
Brick is often used to finish a well. Any brick can be used. A simple silicate with a red color is perfect. The red brick cladding gives these products an unusual look and makes them a striking object in a summer cottage. Ceramic bricks are also often used. Brick with a ceramic structure is a universal material with which you can veneer a ready-made concrete shaft head or build a completely brick shaft head.
Advantages of ceramic bricks:
- high strength;
- dense structure;
- high resistance to various mechanical damages;
- presentable appearance;
- buildings made from a brick base can last a long time;
- The use of different colored materials will create a unique design for the product.
However, this material absorbs moisture, so in order for it to last for a long time, it is better to treat the entire surface with special hydrophobic varnishes after laying. If this is not done, then after a while the ceramic material will begin to crack, and eventually it will simply collapse. The brick cladding method is simple; for greater clarity, you can see a photo with the complete laying procedure.
Features of brick wells:
- To work with your own hands, you need to purchase a brick with a solid structure. Then it can be placed lying down or on the edge;
- Typically, do-it-yourself facing brick laying is done in a round shape. This cladding method allows you to save the amount of consumables;
- usually the thickness of brick walls does not exceed 25 cm;
- to improve properties, the surface must be plastered;
- It is advisable to iron the cladding; this will increase the service life of the cladding. To do this, cement is rubbed into the not completely dry plaster.
Tree
Wood is a traditional material used for finishing mines. Using this material you can make a variety of decorative finishes. Even in ancient times, a well pillar and head were made from it. And with the help of carvings they made various patterns and drawings that decorated the support post and the roof.
Do-it-yourself wood finishing has some important features:
- Wood cladding is often done with your own hands due to the fact that this material is quite easy to work with;
- as a result, you can get beautiful designs that will stand out against the general background of the entire summer cottage. But at the same time, their design will harmoniously fit into the style of the dacha;
- If a structure made from a wooden base is made with your own hands, then it is worth remembering that wood is quite difficult to withstand the effects of dampness. Therefore, before starting finishing, the wood must be treated with a special product that contains antibacterial components;
- in order to create a unique design, the structure is made of wood elements in the form of a log house. Additionally, you can make carved elements;
- Sometimes wooden wells are additionally covered with siding or clapboard sheathing. But this method is quite expensive and labor-intensive.
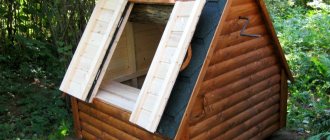
Many professional builders recommend additionally constructing protective houses with full roofs over shafts made of wooden cladding.
These roofs will serve as excellent protection and will give the entire structure a unique design and style. You can see what wooden wells look like in the photo. There you can also see their design in the form of houses.
Stone
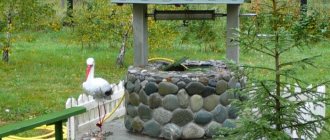
The use of stone for finishing wells in the country is the most popular basis for cladding. The result is a beautiful, stylish structure that has good wear resistance.
Features of the stone finishing of the well:
- Various types of stone are used for cladding - natural or artificial. Regardless of this, a mine with a stone base always looks very unusual;
- for their cladding, you can use small pebbles, as well as larger cobblestones;
- It turns out beautifully when the stones are all selected according to shape and color. It is enough to lay them out around the shaft. It is better to fasten with a special glue for tiles or bricks;
- if the stones chosen for finishing the shaft at the dacha have different color characteristics that have visible differences, then some kind of design or ornament can be made from them. In this case, you can show your imagination and create your own unique design;
- In addition to the well, you can lay out a path of stones. This design will give the dacha style and shades of antiquity;
- a roof can be built over the shaft. It is mounted on supports from the side. The roof can be pitched or gable. Additionally, the top can be covered with metal tiles.
How to make a beautiful well from stone lining? Look at the photos with design options, they will help you decorate this element in your dacha in a stylish, original way.
Flowers
In addition to finishing, the well can be additionally decorated with other decorative elements. Various flowers are especially often used for decoration. It looks beautiful when the mine is buried in flowers of different colors. This decoration can be created with your own hands.
Features of decorating with flowers:
- usually the roof of the mine, as well as the foot and nearby area are used for decoration;
- additionally bright, colorful flowers can be placed in hanging flowerpots;
- in order for the well to seem to be buried in a flower garden, pots with lush flowers of different colors can be placed at the base;
- Additionally, you can make small protrusions on the sides of the cladding and place flower pots on them;
- For planting, you can use varieties that bloom one after another. As a result, the first beautiful flowers will bloom, they will create a beautiful view of the mine, and will highlight it against the general background of the entire summer cottage. After the first flowers fade, others will bloom next. As a result, colorful flowers will delight the eye almost the entire season;
- It is convenient to use weaving flowers. As they grow, they will completely entwine the well in a circle, and the beautiful flowers will create a bright design.
Wood, stone, and cement can be used as lining for flower wells. Additionally, you can use soil, sand, and pebbles to create a multi-level platform or alpine slide.
Plastering and painting
After the well is finished, the final stage must be completed - plastering and painting. Plaster is especially often used when laying bricks. The walls between the lower and intermediate frame of the shaft are plastered. Cement mortar is used for plastering.
The features of the plaster are as follows:
- For plastering, you should prepare a mixture of cement. It should have a consistency similar to sour cream;
- the solution is applied at a time. You need to apply from top to bottom, leveling with a trowel and smoothing with a trowel;
- to obtain a smooth, even surface, beacons made of wooden slats are installed on the sides; their thickness should be 50-60 mm;
- after the first strip is plastered, it is necessary to rearrange the beacons, fill the second strip in a circle with the solution again, and so on;
- if the shaft is made of wood, then plaster is usually not done. If the need suddenly arises, a mesh made of a metal base is installed on the surface. It will be the basis for containing the solution;
- then lowers the structure. During the lowering process, it is imperative to control the entire process. It is imperative to lay the grip of all rings and plaster them;
- at the end the bottom is cleared of dirt. A gravel-sand mixture is poured. This is done in cases where water comes from below.
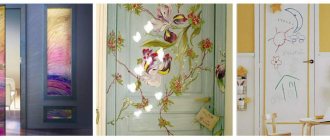
In addition to plastering, the front part is sometimes painted. Typically painting is done for wood cladding. The wood can be varnished. Additionally, you can use different colors of paint to create drawings and patterns. Do-it-yourself mines with painted elements of different colors look beautiful. You can also use paint for stone structures; special coloring mixtures should be used for them.
Main components
The dimensions of the well house depend on the diameter of the upper ring. They are selected in such a way that the distance from the outer edge of the ring on any side is approximately 10 cm. This is necessary for installing heat-insulating material. In terms of height, the size is selected that is most convenient for a person.
The structure of the house consists of the following elements:
- the structure frame can be made of wooden beams or metal profiles;
- installation of gates for manual lifting of water;
- fastening the door of the house, it is advisable to equip it with a padlock;
- placement of insulation material and finishing.
When and how to prune roses in autumn for winter: tips and step-by-step instructionsA decorative cart is a beautiful option for landscape decoration, see options and ideas on how to make a cart with your own hands (photos and videos)
- A beautiful decorative mill is a way to decorate your site in an original way without much effort, see how to make a mill with your own hands!
Metal parts are coated with an anti-corrosion coating. The roof is made gable using roofing material.
Interesting finishing ideas
If you still haven’t decided how to finish the well, then perhaps some design ideas will help you in your choice.
Chalet style
If a house on a summer cottage resembles a chalet house, which are usually located in Switzerland, then a mine in the same style will look beautiful. Usually stone is used for its finishing. You can use artificial or natural stone. In addition to it, you can also make a path from a stone base. What does a chalet style well look like? Look at the photos, you can see design options in this style.
Country style
Everyone has probably seen the Russian well. It is made of a wooden frame, it also has a swing, a canopy or a so-called crane.
Characteristics of rustic wells:
- The log house has a log structure. Its shape is quadrangular; the corners can be joined without or with a remainder;
- sometimes, to give an unusual look, it is cut into five, six or eight corners. For the construction of these structures, a rounded log is used, with the help of which you can build a neat structure;
- The frame can be installed around a concrete ring. The space between the log house and the wooden caftan can be filled with small pebbles or expanded clay.
In order to create a real rustic style, you can additionally install various ethnic components:
- carved posts to support the roof;
- openwork cornice;
- roofing made of shingles or straw;
- cart wheel as a handle for the lifting drum;
- wooden tub instead of a bucket.
Oriental style
If your garden or summer cottage is decorated in an oriental style, then the well should also be decorated in an oriental style. Therefore, when creating the design of the entire structure, you should give preference to elements of the oriental type. The eastern well must have a canopy. Often the canopy is decorated with various oriental amulets - figurines, mythical creatures. The head should be made of large stone or wood.
The roof must be covered with metal tiles with a soft base, it must have raised corners - a pagoda. The design must have a wooden bucket.
Conclusion
The interior of any site consists of little things, and a well is far from a little thing. Now you know ways to improve your well and how to do it efficiently. Watch the video in this article and don't forget to improve your source of drinking water.
Did you like the article? Subscribe to our Yandex.Zen channel
December 10, 2016
Wells and wells, Finishing materials
If you want to express gratitude, add a clarification or objection, or ask the author something, add a comment or say thank you!
Creating a house
The mines with the house look unusual. Often such structures are used in summer cottages. The house is very comfortable. It protects water from heating in summer and from freezing in winter.
To build a house you will need tools and materials:
- edged board with dimensions 100x25;
- wooden beam 100x80;
- hinges for doors;
- bitumen or roofing felt mastic;
- flat slate;
- screws, nails;
- hacksaw for wooden base;
- electric jigsaw;
- plane;
- bayonet type shovel;
- water level;
- tape measure;
- simple pencil.
Any woodworking tool is suitable for building a well house.
To do everything correctly, strictly follow the instructions:
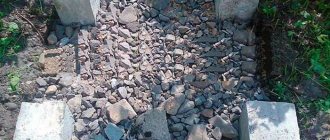
- around the mine you need to level the soil, fill it with a small layer of pebbles 5 cm high;
- then water the pebbles and tamp them down;
- then we assemble the frame from edged boards. How to assemble the frame, you can see photos with options for its assembly. The frame posts must be placed on a flat surface, we nail the boards of the lower and upper trim;
The frame diagram clearly shows the places where the upper and lower trims are attached to the racks
- all boards must be secured with screws so that they hold firmly;
- then we also connect the other frame posts;
- the assembled parts of the frame need to be installed around a concrete ring, we assemble it together;
- Next we make the rafter system. You can see how to assemble it in the photo;
Connection diagram of the rafters with the upper frame trim The distance between the sheathing elements must be the same
- We connect all the rafters using fasteners and hardware;
- after complete assembly, you need to build a door, insert it on special hinges;
- we perform lathing, strengthen the rafter system;
- then we install roofing felt on the bitumen mastic;
- install flat slate;
- At the end we cover everything with boards.
The base and frame of the house are practically hidden under the roof, and the door is located above the base, above ground level. A well
on a summer cottage is a necessary structure. Its presence will provide constant water for drinking, as well as for watering plants. It is important to decorate it beautifully. To design the cladding, you can use a variety of materials - brick, stone, wood. The main thing is to do everything correctly, stylishly, unusually, brightly.
Design features
If you wish, you can easily make a house for a well with your own hands. It might look like this:
A simple shield with a visor. This design will protect the water shaft from possible contamination, but the bucket and top of the lid will collect dust. In winter, water may freeze here.
Hanging house. It is fixed to the upper edge of the last ring, protecting the water shaft and bucket from possible contamination. In winter, the lower part of the upper ring may freeze.A house that protects the entire outer part of the well. It is the most effective design, completely protects the well shaft and water-lifting mechanism from possible contamination.
Each person decides independently which option he needs.
Design selection
Before you make a house for a well, you need to decide on its design compliance. There are several options:
- in appearance and finishing material used, it can copy the main building;
- may have a separate, eye-catching exterior;
- There are a huge number of varieties of such solutions, each of them has its own advantages and disadvantages.
All that remains is to choose the right decor for the well, which will become a real decoration of the entire yard. This will rationalize the area of the yard and give it an improved aesthetic appearance.Each person makes a decision independently, everything depends on his imagination and achievement of his goal.
Installation process
All work performed during the installation of natural stone is carried out using a specific set of materials. To begin installation, you should use the following kit:
- Adhesive composition for ceramics, used for exterior decoration.
- A level that ensures even installation of each part.
- A tile cutter that cuts artificial stone quickly and conveniently.
- A spatula that allows you to apply the solution to the surface.
The principles of installing artificial stone on a well house are very similar to installing natural agglomerate.
Cladding of concrete walls
The simplest way to finish the above-ground part of the pool is to cover it with clapboard over a wooden frame. To determine where to attach the boards, you need to measure the outer diameter of the neck and calculate the circumference using the school formula L = 3.14 x D. Then divide the result by 6 and plot this arc length on the wall of the well the same number of times, using a tape measure.
- At the marked points, attach 6 vertical planks to the concrete walls with dowels, after cutting off their corners.
- Nail the lining boards to the frame horizontally so that their ends meet in the center of the planks, as shown in the photo.
- Cover the lining joints with wood or metal strips.
As a result, you will get a nice hexagonal structure that needs to be coated with an antiseptic, primed and painted or varnished twice. For details of the assembly process, watch the video:
Another popular method of exterior cladding is to build a log frame, which will require laying a small foundation around the pool. After all, wood is contraindicated in direct contact with the ground. The logs are sawn and laid using traditional technology, after which they are processed and painted in the desired color.
Laying
The work of lining a well with natural agglomerate is quite simple. The procedure has several features:
- For work, you can only use concrete mortar that is not exposed to climatic and weather factors.
- Concrete should be applied in a thin layer. If the mortar is laid out too thickly, there is a possibility of the tiles peeling off.
If you take into account these features of installing natural stone, you can line the well quite quickly.
If the water is still frozen
If it so happens that the insulation was not carried out in advance, or the insulated well froze when the temperature dropped, what to do in this case? Check the degree of freezing of water in the well. The fact is that when the groundwater level is below the freezing level of the ground, the water is covered with an ice crust, and underneath it remains in a liquid state. In this case, breaking the crust with a crowbar will not be difficult, and the collection of water will resume. If the water still freezes, you just have to wait for it to thaw. At the first signs of warming, dig a pit and insulate the well using one of the methods listed above, and the water will begin to melt.
Preparing the well for winter is necessary to avoid unpleasant problems in the spring. The article describes tips on how to quickly and efficiently insulate a well. They will help you navigate the necessary material and sequence of actions. .
Source
We insulate the outer ring
Ideally, the insulation of a well should be taken care of at the time of its construction. But modern technologies make it possible to provide heat even after the structure is ready. The most vulnerable part of the well is the outer ring; the wind blows from outside and snow falls. To eliminate this shortcoming, consider a cover for the well hole. Do not use metal for this purpose; make a cover for the well from plastic or wood; they retain heat and are not susceptible to icing. Insulate the outer ring of the well using polystyrene foam or polyurethane foam. To do this, dig a pit around the well 0.5 m deep.
To insulate a well with polystyrene foam, the width of the pit is 20 cm. Clean the concrete rings of the well from dirt, glue foam blocks around the perimeter. Treat the cracks with foam. Install the top row in the same way. Treat the surface of the foam with plaster to protect it from sun exposure. Cover the top with paint to avoid getting wet. Fill the pit with earth and compact it.
To insulate a well with polyurethane foam, a pit width of 10 cm is sufficient. Place wooden blocks evenly around the well rings in increments of 30-40 cm, and install steel formwork on top of them. Fill the resulting voids with polyurethane foam. When the insulation has dried, dismantle the formwork and apply plaster and paint over the structure. Cover the remaining width of the trench tightly with soil.
When to start construction
When choosing a construction time, the following nuances are taken into account:
- A permanent frame can be constructed no earlier than one year after the formation of the shaft. This is explained by the fact that when digging, the soil structure is disrupted and voids appear in it. Over the course of a year, the earth becomes compacted, and the free space around the rings disappears. A blind area built on dense soil will not sag or become covered with cracks.
- To protect the well in the first year after construction, a temporary structure is used. A trench 20-30 cm deep is dug along the perimeter of the well. The soil is compacted and the bottom is covered with plastic film. Clay is laid on top of the waterproofing material. To prevent slipping, wooden boards or boards are installed. This design will maintain water quality until a permanent blind area is built.
- You need to choose the right time of year. It is recommended to begin construction work in early autumn or late spring. The soil has optimal moisture; it does not dry out or become wet. Digging dry or wet clay is inconvenient. In hot weather, concrete must be watered so that it gains strength and does not crack. When choosing the construction time, the climate of the region is taken into account.
Thermal insulation work
They are necessary if the well is used all year round. At low temperatures, the water inside may freeze. It comes from soil layers located much below the freezing line. In the middle zone, ice binds the top layer of soil, penetrating to a depth of about a meter. Everything below is out of his reach. Streams gushing from the depths warm the air they come into contact with and the walls, creating a warm microclimate inside. If you install a hatch on top, the microclimate will be easier to maintain, however, external buildings do not completely solve the problem. Comprehensive measures are needed.
Wooden structures do not need protection - they can be used all year round. Wood retains heat perfectly. But the reinforced concrete well must be closed. Let's consider the scheme of its insulation in more detail.
Insulation scheme
Examples and description of work
The construction of the aib summer resident consists of the following elements: an octagonal base, a round hatch for a bucket, and a mechanism for a gate on bearings. The house is covered with a soft decorative roof and has a forged handle. Birch was used, soaked three times with an antiseptic. At the bottom there are plastic legs 3 cm high. The house is installed on paving slabs.
After a year of operation, a forum member notes the following shortcomings of the structure:
A wooden house is best made from oak; alder, larch, elm, and pine are also suitable. Other types of wood tend to be short-lived, and some can cause a bitter taste or unpleasant odor in the water. Any material for construction must be straight and dry, free from mold and wormholes.
Galina Mikhailovna talks about the technology of gluing stone to the well ring. Mix cement grade 500 with sifted sand and water in a ratio of 1:3:1 (one part is a 500 g container), add 150 g of PVA glue. Glue natural flat stones, previously soaked in water, onto this mixture. Also moisten the surface of the ring well with water. Remove any remaining solution with a wet cloth.
Alex EMG built a stone mill over the well with a larch floor, half of which opens. The blades are fixed above the door.
The ring was also decorated with stone by Karapuz. The material was glued to the base with the following composition: 1 bag (25 kg) of tile and stone adhesive mixed with 1 bag of M300 dry mixture (50 kg) and added 10 kg of M500 cement. The solution was applied to the ring, the stones were placed on it, covering the seams and immediately wiping the stones. For an 80 cm ring, 4 kg of river stone and about 2 sq.m of pink stone were used.
The castle and the well must be allowed to settle. The next year, after the soil has settled, you can concrete the area, combining it with tiles.
Kate and her husband erected a new hexagonal frame on the site of an old well house. We used laminated veneer lumber with a cross section of 150x100 mm. The beams in the corners were cut to the bone, the corners were fastened from the inside with steel corners, and the joints from the outside were covered with slats. They installed a door. The roof sheathing was made of clapboard and covered with soft tiles. The cockerel weathervane gave the house a complete look.
Tradesman built the structure in the style of a tea house. The width of the building is 50 cm.
The mill house of forum member irusya8 is made on two levels. There is a generator at the top, since there are power failures in the village house, and a well at the bottom.
To add a structure to the well, Steelman purchased two 150x50 boards 6 m long, four packs of lining, a pack of flexible tiles, corners, screws, two 50x50 bars, two hinges, 10 metal plates 40x120.
I made a base, fastened it with metal plates from below, and reinforced it with internal jibs. To be able to place the bucket, I secured an additional board. Then I assembled the frame and trimmed everything with a jigsaw. I made a hole for the shaft and an entry hole for it. I made a cut under the holes with a jigsaw and drove a bent metal plate into it with a hammer. Thus, the gate lay on two plates, and not on wood, and therefore rotates well and does not creak.
I placed the superstructure on the well and covered everything with clapboard. I covered it with tiles and sawed the door right along it. I secured the handle, corners and hung the hinges on self-tapping screws (they are used to secure corrugated sheets). It is planned to put a canopy on the roof and a bar on the door to prevent rainwater from getting into the well. At the bottom of the well, the owner will cover it with clapboard and tie it with two metal strips.
Senin designed an outdoor sink in the form of an over-well house. The frame of this small architectural form is assembled from the remains of beams, lining, beams, metal tiles and secured with self-tapping screws. The outside of the frame is covered with 13 cm blockhouse. The use of a jigsaw and a screwdriver significantly speeded up and made the work easier. The sink was made in three days.
Based on materials from participants of the “House and Dacha” forum
Source
Why is a blind area necessary?
The blind area is arranged for several reasons. The first thing the owner thinks about is how to ensure access to a source of water regardless of the weather. You don’t want mud squelching under your feet or getting tangled in the grass. A level area around the well will eliminate these problems. In addition, it gives the building a beautiful finished look. The second reason is functional. The top of the well is covered with a lid to prevent leaves and dust from getting in. But it also needs protection at ground level. A special threat is rain and melted spring water. When they are mixed with drinking water, it becomes cloudy and tasteless. Additionally, there is a high probability of pathogenic bacteria entering, which then affects the residents. The blind area is necessary because adds beauty to the structure, creates convenience in using the well, and protects the health of everyone who consumes water from the source.
Gate installation
Another detail that you can’t do without if you get water with a bucket is a well gate, designed for winding a chain when the water rises. The material used for it is usually a thick log, often oak, since oak wood is one of the most durable. We make the length of the gate 4 cm shorter than the distance between the posts, and sand its surface. Then we make a wire wrap at the ends of the gate and drill holes 5 cm deep and Ø 2 cm strictly in the center of the log. Based on preliminary markings, we drill two holes in the pillars and install a gate adjusted to the length above the well using cap screws Ø 10 mm (photo 6).