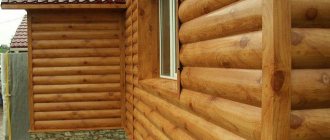
A block house is one of the types of lining; it can be wooden, metal or vinyl. Its installation is quite simple, but in order to get an excellent result when performing these works yourself, you need to know the technology and sequence of their implementation, as well as follow the recommendations of specialists.
It is always better to use other people's experiences and learn from their mistakes than to make your own.
Methods for attaching a block house. Stages of work with tips and explanations
A professional approach to the installation of a block house, as in the video posted on the page, will be the key to the successful completion of the task.
Let's comment on the video of the block house installation for the article. This is a unique material that can be used as exterior and interior decoration, but it is surprising that the installation technology does not differ significantly. What to look for when choosing a material
Coniferous trees are used for production, mainly spruce and pine. You can distinguish them by color and relief. Spruce in cross-section has a light color and thin, evenly distributed fibers; there is also a large number of knots. Pine is a slightly reddish or yellowish wood with distinct grain. Storage of the material is allowed in a room closed from external precipitation without heating, but always with good ventilation. At the same time, if you have not yet started installation, it is advisable not to remove the packaging. Make sure that the manufacturer supplies you with a packaged block house, this affects its quality. We'll talk about how to attach a block house below.
Notes before starting work
- Initially, you need to purchase the required volumes of material and leave it in the place where the work process will take place so that the lining undergoes acclimatization. If you plan to finish the facade, then place it under a canopy in the yard for several days.
- Wood finishing should be done only after the house has stood, i.e. has shrunk and will not be subject to deformation.
- Before installing the sheathing, we recommend treating the walls with antiseptics (for wood), eliminating all unevenness and potholes (plastering and priming).
- We also recommend pre-treating the block house with special compounds for fire protection and protection against parasites. Marilka, if desired, should also be applied before installation.
Lathing
As you can see in the video of the installation of a block house, in order to avoid future accumulation of moisture, you need to waterproof the surface. This is a mandatory moment to eliminate possible troubles: damage to the fastening of the sheathing, changes in the properties of the wall material, etc.
Next, install the sheathing, which will help ensure an even and neat finish. Often, wooden slats (bars) are used for this in increments of 30 to 60 centimeters. The sheathing can also be made from galvanized profile, although it will be more expensive and more difficult to adjust. Before installing the sheathing, it is recommended to mark the wall of the house using a plumb line, level and string (you can use fishing line). Secure the initial plank with a stretched twine, and align all subsequent ones both vertically and horizontally, using the same materials.
A few words about insulation
If you are planning to pre-insulate a building, then pay attention to the following points:
- For a wooden house, it is quite possible to limit yourself to sealing: seal the crowns, caulk, use wood sealant.
- The sheathing is installed on top of the vapor barrier.
- Insulation (ecowool, polystyrene foam, glass wool, basalt fiber, etc.) is placed between the slats and sheathing, so the thickness of the slats depends on the thickness of the insulation layer (calculated based on the heat loss of the building).
- Wind and moisture protection is attached to the insulation layer with a stapler.
How to attach a block house
There are several ways to secure a block house:
1. Using screws (self-tapping screws), the main material is attached to the sheathing. There may be several options: recess the head of the self-tapping screw into the groove of the block house, tighten the screw at an angle of 45 degrees, pre-drill a hole for the self-tapping screw with a drill and screw it until it stops, and then close the resulting recess with wooden plugs on glue.
2. Clamps can be used as alternative fastenings. They are inserted into the grooves of the lining and then fixed with self-tapping screws.
3. You can also use nails.
To emphasize the color, you can paint the material with varnish at the final stage, which will give the visual effect of using natural wood.
In the video of the installation of a block house posted in the article, you can see the entire work process live, which will make it possible to complete this task on your own. But it is better, of course, to entrust this matter to an understanding professional, who is not the first to encounter this kind of finishing of a country house. If you are confident in your abilities, then additional knowledge in this area will never be superfluous, but on the contrary will help you implement your plans with maximum speed and economy.
Room decoration ideas
Today there are many ideas for using a block house in the interior. This material is often used in combination with bright paint or decorative plaster and wallpaper. Cladding with natural stone and finishing with panels will allow you to make high-quality repairs that you won’t have to think about for many years.
Wooden panels placed on one of the walls in the bedroom look especially beautiful. Thus, the sleeping area acquires an interesting design, combining style and utility at the same time. Wood fills the room with a pleasant aroma and creates an excellent environment for relaxation. A corner covered with a block house looks unusual in the bedroom interior. In order not to disturb the unity of the image, it is recommended to decorate the ceiling with boards. An interesting decor option can be obtained by decorating one of the bedroom walls with a block house and the other with clapboard.
If you need to create a Provence style, then it is best to use natural wood panels for interior decoration in the apartment, giving preference to light shades. In this case, the installation location for them can be not only a wall, but also ceilings or furniture. Thanks to the play of colors and the use of boards of different textures in the rooms, it is possible to create an environment that will resemble a merchant or noble house.
The living room is considered the face of the owners, so its design should be appropriate. To fill this room with chic and beauty, it is enough to cover the walls and ceiling with expensive wood. It is advisable to choose panels that imitate the natural pattern of an array in the form of knots. At the same time, one wall looks good covered with wooden panels, while the others are decorated with decorative plaster. This idea allows you to avoid monotony in the interior and fill the space with natural motifs.
The design of the corridor or hallway also occupies a special place in the interior. For these rooms, you can combine a block house with lining for wall cladding. The result will be an interesting transition in lines and colors. If the corridor and hallway are small, then you need to choose light shades of panels. Both brown and gray colors are suitable for this. If the area of these premises is large, then it is recommended to decorate them in a country style and try to use the maximum number of colors in the cladding. A combination of wooden panels with metal, stone and glass is also allowed for cladding the walls of the corridor.
The block house has also found its place in kitchen decor. For this room, you can choose boards of different colors. Kitchens in Provence and Catri styles look especially elegant. The block house is installed on walls, ceilings, partitions are made from it and all surfaces are painted with warm colors. An original solution would be to treat the boards in an antiqued manner, after which they will become rough and cracked. If the kitchen is decorated in the “Russian hut” style, then its interior can be diluted with artistic painting.
In the interior of the bathroom, it is important to create a feeling of coziness and comfort, therefore, when covering the walls and ceiling, you need to choose the right color of the block house. Chocolate, white, gray, beige and tar-black shades of wood will look good in the bathroom
In this case, the decorative finish should be supplemented with carvings and patterns. In addition, cool or neutral shades can be used in the bathroom interior. It is best to install the block house in this room on one of the walls, and also decorate the washbasin area with paneling
It is worth paying attention to the fact that the color of the furniture, ceiling and flooring should be in harmony with the wooden panels
You can learn more about the block house for interior decoration from the following video.
Installation of blockhouse work algorithm
To maintain ventilation both below and above, it is necessary to leave gaps of about 5 cm. The distance between the boards is 1 - 3 mm, so that in the future the surface does not warp under various external factors.
- In the block house, holes are drilled using a drill for subsequent fastening.
- The block house is fastened using screws or self-tapping screws to the vertical sheathing. If you use screws, then after attaching them you need to seal the holes using a wood plug coated with glue.
- When connecting a block house along the length, a corner connection or a connection using a strip can be used. Installation of corners requires more attention and effort, but with corner joining it looks more neat.
- After installing a block house made of wood, the surface must be treated with primer and secured with a layer of varnish or colorless paint. Once the surface is completely dry, it can be sanded using sandpaper to remove any raised wood fibers. Upon completion, coat again with varnish or paint.
This video instruction for installing a block house inside a house will help you more accurately understand the technology:
https://youtube.com/watch?v=zdKk9Q628XE
If you follow the above work plan, it is not difficult to install a block house with your own hands, and the achieved result will always please the eye. The positive side of doing it yourself is also the price of installation. You won’t have to pay for doing the work yourself, which won’t lead to unnecessary waste.
Blockhouse in the bathroom
Creative wood recycling is an increasingly popular trend. For example, you can decorate a bathtub with a blockhouse impregnated with waterproofing media, buy wooden sinks and a shower cabin with an imitation wooden tray to create a style.
- Although it is known that water is the enemy of wood, surprisingly pure wooden bathtubs and sinks are produced.
- They won't necessarily be ruined, just a little cleaning precaution is enough.
- By using natural and special products to care for the material and avoiding the use of chemical detergents, they will remain as new for a long time.
- They will look especially stylish with a blockhouse of the same color, creating a feeling of completeness and unity.
For the bathtub and especially the hallway, materials that remain from the exterior decoration of the house are suitable. They can be tinted in a different color, etched or bleached, or complemented with wooden mosaics. Blockhouse is a favorable material for combining with other types of wood products.
Be sure to choose timber for your home that is impregnated against fire and for waterproofing.
After installation, it is worth applying a special or simple parquet varnish so that the interior decoration of the blockhouse will last longer and please the eye with its unbroken appearance and unique pattern of veins and knots.
How to choose a high-quality block house and related materials
If the final decision has been made to install the block house with your own hands, then it is necessary, first of all, to approach the issue of selecting and purchasing materials with full responsibility. Not only the complexity of installation, but also the aesthetic and technical characteristics of the “log house” and its durability will depend on this in the future.
Let's take a closer look at this issue.
1. The block house must have good mechanical and technical properties. Typically, a large and well-known manufacturer strictly monitors these indicators and will not allow material with a large number of cracks or rotten knots for sale. It is known that a little-known company selling block houses may try to hide rotten or moldy boards under plastic packaging
Here it is important to carefully study the contents of the package, visually inspect and make sure there are no defects
Advice. If you look closely at the annual rings of a block house, you can determine the density of the wood: the denser the rings are, the denser the tree.
2. A block house designed and manufactured specifically for a given building, in accordance with its architectural design, will significantly speed up and simplify the installation. Leading block house manufacturers usually provide this service, so it is better to discuss this issue in advance and save time.
It should be noted that depending on the purpose (interior or exterior decoration of the building), it is necessary to choose different thicknesses of the block house. To create an interior, the thickness of the element can be from 20 to 24 mm, and for cladding the facade you will need a board 40-45 mm thick. This is due to the fact that the external finish not only serves an aesthetic function, but also serves as a good heat insulator and sound insulator.
3. When installing a block house, you will need to install good heat, sound and vapor insulation. To do this, it is necessary to purchase insulating materials. Boards or mats containing staple fiberglass or mineral wool have excellent sound and heat insulation properties. They also have good fire resistance
To protect the walls of the house and the insulation from dampness, it is important to use a good vapor barrier. Vapor barrier can be made from glassine, perforated film
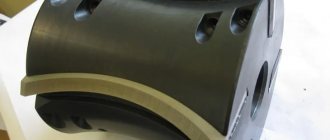
4. In order to install a block house yourself or with the hands of a specialist, you will need the most common tool. Since the main fasteners for fixing the panels are self-tapping screws, you will need a drill/driver for installation. Special mounting clips - clamps - are widely used as fasteners for block houses.
The design of the clamp is a carbon steel plate, which has holes for fastening and a tongue for engagement with the groove of the block house
It is important that the height of the tongue is more than 6 mm. Galvanization ensures good corrosion resistance of the clamp throughout its entire service life.
Claymer for fastening material
Installation of the block house panel using clamps allows for greater reliability and avoids deformation of the material. Self-tapping screws and nails can damage the wood and ruin the appearance of the finish, and their heads must be carefully masked. At the same time, the clamps ensure the tightest possible fit of the planks while they remain under the cladding. Another advantage of mounting clips is their low cost.
Installing a high-quality block house with your own hands is impossible without using a power saw, jigsaw or, in extreme cases, a hand saw. These tools will help you get a neat cut. For a smoother cut, you can use a sander.
Furniture and plumbing
Furniture today is given special importance. It is an accent of the interior of any room in a private home. It is these elements of interior design that indicate the desired style and hint at the well-being of the home owners. The priority is an emphasis on functionality. Any item in the interior composition of each room in a log house should be as useful as possible.
This is expressed in the presence of transformation systems and compactness. Manufacturers provide different models taking into account the design features of the premises. For example, for bay windows you can order special sofas that can occupy a rounded wall as tightly as possible.
Bedside tables have been designed for bedrooms and living rooms. They feature good functionality with minimal dimensions. Even for the bathroom, you can choose products taking into account the layout features. There are corner and straight bathtubs on sale, options for one and two users, and seating products with different bowl shapes. The streamlined shape allows for safe operation of the premises.
Wooden sinks for private houses are chosen to be lightweight. Stone countertops are undesirable here: they will create a large load on the foundation. Toilets can be equipped with a microlift or heated. The presence of a frame installation will contribute to the reliability of fastening the products. A metal heated towel rail will be a useful purchase. It doesn't weigh much, but it brings organization to the room.
Varieties
A block house can be made of metal and wood. Let us examine in more detail what characteristics these types of finishing materials have.
Wooden
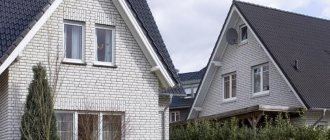
First, it’s worth considering what is good about cladding a house with wooden coverings:
- Such materials have a natural and expensive design. Buildings decorated in this way look cozy and welcoming.
- A wooden block house is an environmentally friendly material. It contains no dangerous chemical compounds. Even at high temperatures, such cladding will not emit harmful substances.
- A block house made of wood is a wear-resistant material. It is not easy to damage or break. He is not afraid of shocks and mechanical damage.
- High-quality panels are not susceptible to mold and mildew.
- The block house boasts excellent sound and waterproofing characteristics. In addition, such material will retain heat inside the house.
- Installation of wooden panels is simple and affordable. Even an inexperienced home craftsman can handle it.
The main disadvantage of a wooden block house is that it must be regularly treated with antiseptic agents. If such measures are neglected, such material may rot, lose its brightness of color and become a haven for wood parasites.
In addition, many consumers include its high cost as a number of disadvantages of a wooden block house.
For interior finishing, thinner lamellas with a thickness of 20-24 mm are used. Such coatings can only be used as decorative design elements. They are perfect for interior decoration because they are thin and do not take up excess space.
The block house is made from various types of wood and is divided into several classes.
- "Extra". Such finishing materials are of the highest quality. They have a pleasant smooth surface without the slightest defect. A block house like this is expensive because it undergoes complex processing.
- "A". Materials of this class may have small knots, minor mechanical damage, and darkened areas on their surface. In some places such a board may be uneven.
- "IN". A class block house may have cracks, knots and other noticeable defects.
- "WITH". Products of this class often have serious damage, noticeable cracks and knots.
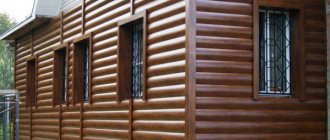
Metal
Now it’s worth familiarizing yourself with the positive characteristics of a metal block house:
- this material is not subject to deformation even when exposed to low and high temperatures (from -50 to +80 degrees);
- metal block house is a durable material. It can last more than 50 years;
- such material is not afraid of sunlight and precipitation;
- metal block house is an environmentally friendly and safe material;
- it is not flammable;
- its installation is also considered quite simple;
- such finishing material does not need to be regularly maintained using expensive products;
- a metal block house can be laid on foundations consisting of any materials, but most often the floors of the house or the pediment are sheathed with this material;
- Such panels are inexpensive, especially when compared with natural wood coverings.
The only and main disadvantage of a metal block house is its impressive weight. That is why you can purchase such material only if the walls of the house are strong enough and reliable. There is a lightweight alternative to this material - an aluminum block house. However, it is less durable. It can be easily dented and damaged.
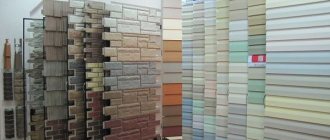
Material selection
You can get attractive and high-quality cladding only if you choose the right material. For interior decoration of rooms, a block house is chosen from both coniferous and hardwood.
The former contain a large amount of resins and essential oils, which provides a natural antiseptic effect. In addition, they bring the unique aroma of a coniferous forest into the house. Usually they use spruce, which has a large number of knots, which creates an interesting pattern. Pine pleases with its attractive amber-golden hue; a room decorated with this material looks warm and cozy.
When choosing a coniferous block house, you should remember that it is not suitable for rooms with high temperatures (bathroom, sauna, steam room), since resin begins to release when temperatures rise. When heated, it can cause burns.
Hardwood is no less popular. It is necessary to choose varieties that demonstrate strength, resistance to rotting, and warping. These include oak, aspen, and linden.
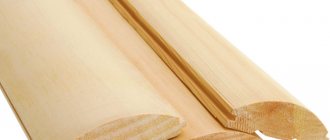
As for appearance, a block house can imitate timber or logs. The first one forms a square in cross-section, the second one – a circle. A log block house allows you to imitate the surface of natural log walls and looks very original.
For interior decoration, panels with a width of about 8-10 cm are usually selected, while for external cladding - wider options, that is, 20 cm. However, this is not a mandatory rule, and if necessary, you can choose a wide block house for the room .
The standard length of the material ranges from 2-6 m; it should be selected based on ease of installation and design features. So, with the help of long and thin light strips you can visually make the room larger. The cost of the material depends on the length parameter - the longer the bar, the more expensive it is.
As for the thickness of the material, 2 cm will be enough for indoor use. In general, the planks can have a thickness of 2-4.5 cm.
Having decided on the size and appearance of the panels, it is necessary to find out what class they belong to, since this largely determines the quality of the products.
Panels belonging to the “Extra” class are distinguished by premium quality. They have no knots or internal pockets and are cut exclusively from the middle of the trunk. As a rule, such finishing is used in luxury premises, and its cost is high.
Panels of class A and B demonstrate quite high quality. They have a small number of knots and darkening, but at the same time they are suitable for finishing, look neat and noble, and have a more affordable price.
There is also class C material, which is not suitable for use as a finishing material.
Preparatory work: installation of sheathing, insulation, wind protection
Before you begin attaching the wooden block house panels, it is necessary to correctly carry out some preparatory operations. First of all, if the cladding is subsequently covered with some kind of paint and varnish material, it is necessary to paint the joints of the panels (groove and tenon) before installation, so that over time, as a result of temperature fluctuations, unpainted elements do not show through. It is best to finish a wooden house a year after construction, since after assembling the log house, the structure of the house must be stable. It also needs to be caulked well, even if insulation will be used for cladding.
If you need to insulate a wooden house, it is better to choose insulation based on mineral wool or fiberglass. You should not use polystyrene foam, as it is very flammable.
Before installing a block house to the wall of a brick or block house, it is necessary to eliminate all major surface defects. All wooden material intended for installation must be kept for some time in the conditions under which it will be used in the future, but it must be protected from precipitation.
It is important to remember that when cladding a wooden house, no additional vapor barrier is required, but the wood must be treated with an antiseptic to avoid the appearance of fungus and mold. This also applies to sheathing boards.
To ensure that the cladding of the house is smooth and beautiful, the sheathing is installed strictly vertically using a plumb line. Sometimes horizontal-vertical sheathing is used, especially when additional insulation is needed and polystyrene foam or mineral wool slabs are laid between the load-bearing racks of the sheathing. In this case, the thickness of the insulation should not exceed the thickness of the sheathing strips. The optimal lathing pitch is fifty to sixty centimeters. Metal sheathing is stronger and more durable, but also more expensive.
Membrane fastening
A hydro-windproof film (membrane) is fixed on top of the insulation.
Advice from the “façade designer”
Try to choose film marked NG (non-flammable). It has good performance in all respects and meets fire safety standards.
The counter-lattice, directly to which the blockhouse panels are attached, is installed on top of this film. The air gap formed between the outer cladding and the insulation boards improves sound and heat insulation. This ensures natural ventilation. The ventilation gap is especially important when installing a metal block house, so that the metal, when heated by the sun, does not create a “sauna” effect in the room.
Cladding a house with wide block house panels significantly enhances the protective properties of the facade and looks more advantageous, but costs more. The cost of the material is also affected by the type of wood from which the block house is made. Based on the presence of various defects (knots, chips, cracks, etc.), wood is divided into classes: extra, A, B, C. Pine panels are cheaper than larch or cedar.
Fastening
The first step is to install the frame for future cladding. The surface for mounting the clamps must be perfectly flat, so when attaching bars and beams, be sure to use a level or laser pointer. Tips before installing the frame:
- Wood must be treated with an antiseptic solution, which will protect it from rot, mold and pests;
- Metal profiles can be taken the same as when installing drywall, i.e. CD, UD, CW and UW;
- If the paneling is done in a damp room (bathroom, sauna, etc.), then a waterproof film must be installed on the frame, which will protect the base from destruction due to moisture.
How to install clamps and how to attach them to the lining:
The tongue of the clamps is so thin that it does not interfere with the further installation of the lining. But at the same time it has excellent rigidity and does not deform when sheathing. After finishing the work, no additional actions are required (putting fasteners, priming, etc.), with the exception of coating the lining with antiseptics on the outside.
If installation of several layers of lining or a solid board is required, then not an ordinary bracket is used, but a so-called House block. It is more durable and wider, its tongue height can reach 10 mm.
Video: using clamps
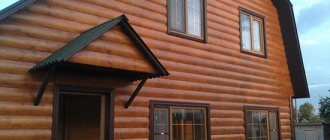
Why choose a block house for the facade
Today, the block house is popular among professionals and home craftsmen. How to attach this material will be described in more detail below.
If you still doubt whether to choose such cladding for your home, then you need to pay attention to the positive characteristics, including:
- the ability to insulate the facade and waterproof the walls of the house;
- short period of work;
- non-exposure of the material to ultraviolet radiation;
- the possibility of finishing not only walls, but also gables, as well as building plinths;
- the ability to install a block house on walls made of any material, be it stone, concrete or brick.
Among the wide variety of modern finishing materials in stores, there is also such as a block house. How to attach this material? Before starting work, it is imperative to familiarize yourself with the technology. You can do the installation yourself, and in the end you will be able to get a cladding that will not lose its original color over time.
Due to the fact that the material is attached using curtain façade technology, moisture does not accumulate under the finishing, which could cause mold. Among other things, such finishing does not place a significant load on the foundation and walls of the house, which cannot be said about material made from natural wood or metal.
Accessories and tools
Well-established manufacturers of metal block houses supply the following components with finishing panels:
- internal corner;
- outer corner;
- docking strip;
- starting profile bar;
- J-shaped profiles;
- platband with slope;
- finishing or finishing strip.
System of block house components
Siding components
To install the trim yourself and get not only attractive, but also durable cladding, you will need the following tools:
- construction meter or tape measure;
- water or laser level;
- drill and screwdriver;
- construction plumb line;
- metal scissors;
- pliers and hammer;
- galvanized self-tapping screws and disc dowels with a spacer rod system;
- construction stapler and staples;
- construction tape.
For the convenience of working at different heights, you will need to use a stepladder and ladder, as well as scaffolding.
Blockhouse installation
Before starting work, we recommend that you familiarize yourself in detail with the material, “block house, installation according to all the rules” and watch a video on installing a block house with your own hands:
https://youtube.com/watch?v=YEKi4kMHYfk
Advice from professionals will undoubtedly help you avoid many common mistakes for beginners and perform the job at a higher quality level.
Decorating a house with a blockhouse with your own hands starts from the very bottom row. Unlike other wall panels, the blockhouse is mounted only in a horizontal position. The clamps are attached to the sheathing with self-tapping screws, and the first plank is inserted into the legs, with the groove down. This is necessary so that moisture does not subsequently accumulate in the recess. The groove of the next one is put on the tenon of the first board. If self-tapping screws are used when attaching the block house, then recesses are pre-drilled for them in the upper and lower parts of the board. The distance between fasteners should be no more than 400 mm. It is recommended to screw the screw into the tenon at an angle of 45°.
|
To decorate the shiny metal head of a self-tapping screw, you can use several methods:
- make plugs from the remains of the blockhouse boards, which are attached to the holes with PVA glue. In this case, you will have to cut off the protruding parts and sand the resulting irregularities flush with the wall panel;
- You can purchase special wooden plugs for self-tapping screws. It would be especially appropriate to use them for interior decoration. The plugs will also have to be “seated” with PVA glue;
- The least expensive and simple method is to make a kind of wooden paste based on sawdust and PVA glue. After filling the holes with the resulting mass, it is allowed to dry and sanded. The attachment points with this method resemble wood knots and may differ slightly in color from the main shade of the wood.
Decoration of corners
If you are decorating your house with a blockhouse with your own hands, then the greatest difficulty will be in decorating the corners. You can purchase special decorative elements: an outer corner and a “boat” (inner corner). The disadvantage of their use is that the baseboard data will touch the convex surface of the block only at the highest point. Due to this, quite large unclosed gaps will remain.
This method is useful for both internal and external corners of the house. If desired, the visible part of the beam can be rounded, giving it an oval shape for greater decorativeness.
It should be noted that often companies producing blockhouses carry out precise cutting of the material for their clients, according to the architectural design. In this case, thanks to cutting on high-precision technological equipment, the work of cladding the facade with a blockhouse with your own hands is greatly simplified.
Installation of platbands
Window and door openings are usually decorated with special boards - platbands. If earlier the platbands were always made in figures and were often decorated with carvings, inlays or paintings, now this detail performs a utilitarian rather than a decorative function. First of all, the platbands perfectly cover the cracks, blocking the path of cold air, dust and precipitation.
According to their appearance, modern platbands are divided into:
- flat;
- semicircular;
- curly.
Depending on the mounting method, you can choose overhead or so-called telescopic platbands. The latter have a special shape with protrusions that fit into the slots of the door or window frame.
However, if you want to revive traditions, you can also find carved platbands in the traditional Russian style on the market, which will undoubtedly give your home a certain originality.
The use of lining is quite extensive
Both outside and inside.
And indeed, as a finishing material, block house is used too widely.
Judge for yourself:
- Not only the exterior of the house, but also the interior is filled with such products;
- the material is used for cladding walls in garages, sheds, bathhouses and even gazebos. This looks especially impressive when the buildings follow each other, forming a single complex;
- Trimmings from block houses can be used for the construction of blind fences with horizontal and vertical laying of material.
The installation process is simple, but with character
Claymers as fasteners.
When deciding how to attach a house block to a wall, we recommend that you carefully read this section, since the instructions presented are universal for installing this material on any type of wall.
So let's get started:
- It very rarely happens that the house itself is built of timber, its walls are perfectly smooth, and the installed material will only emphasize its evenness. In practice, everything looks quite banal. The walls have already begun to sag, the curvature is noticeable to the naked eye, and if the walls are made of wood, then it is high time to treat this wall with antiseptics, having previously covered the cracks with wood putty. We believe that inspecting the wall and repairing defects in the wood is a preliminary stage;
- Next, we install the sheathing of wooden beams vertically for horizontal installation of the material and horizontally so that the fastening of the house block is carried out vertically;
It is better to do external fixation with insulation according to the scheme.
the prepared beams are aligned and fastened in increments of 50 - 60 cm; it is important to maintain a flat plane, which can be checked with a level. The beams themselves are fixed to the wall using U-shaped fasteners, which make it quite easy to set a single level of the wall structure;
the features of the block house itself allow you to assemble the entire construction set quite quickly due to the presence of ridges and grooves in each lamella
The slats are installed horizontally. Thus, an imitation of the assembly of walls from cylinders occurs. Design solutions that install the material vertically are allowed, but this is a development for saunas, baths, certain small fragments in the interior to highlight a certain fragment or architectural detail;
Wall covering process.
The wall set can be started from the ceiling to the floor, or it can be carried out from the floor to the ceiling. It all depends on your desire and assembly skills. Ventilation gaps are left between the wall and the ceiling, as well as the floor, to allow the walls to breathe
This is especially important in saunas and steam baths. The gaps will be covered with baseboards and decorative corners
Types of fastening and clamps
Self-tapping screw into a tenon.
Let's start with the clamps, since there are fewer possible mounting options.
We have:
- the material can be fixed with nails, however in this case there are a number of restrictions: only thin material up to 21 mm is fixed with nails and only in the body or in the ridge, but more on that later. In fact, the collection of material already begins from the bottom up;
- Fastening a block house with self-tapping screws is the most common technique. There are no restrictions on injection sites, methods of starting and continuing installation. The only condition for the screws themselves is that they must have a protective coating. Galvanizing or anodizing is perfect and will protect the wood from the effects of ordinary metal that is prone to corrosion;
- fastening the blockhouse with clamps. A clamp is a special metal plate that has a platform with a fastening bracket that secures one of the adjacent parts of the groove. This technique involves starting work from the top down, although the clamps are easily fixed to the beam with your own hands using a screwdriver.
Now it's time to talk about how to fix a blockhouse, since there are plenty of techniques out there.
Namely:
tenon fastening Thus, the latch runs at an angle to the block house. The head of the clamp is slightly recessed, and the groove of the next element closes the connection, it is not visible;
Fixation is permissible in the body.
groove mounting
Although we have already paid attention to this type of fastening, nevertheless, the latch passes through the inner wall of the groove, is recessed into the material, and then closed with a lower fastener. This is a top-down assembly, this technique is applicable for clampers;
through fixation
As a rule, this type of fixation is acceptable for the final plank, when trimming the material removes the grooves or tenons and this fragment is fixed all the way through the body. In order to hide the caps of the connectors, they are recessed into the material, the entry points are sealed with putty, followed by sanding.
The result of our work.
https://youtube.com/watch?v=zdKk9Q628XE
Characteristics of a wooden block house
There are three main parameters by which this type of cladding is chosen. A block house may differ in size, grade and type of raw materials used.
Dimensions
The thickness of the wooden panels of the block house varies from 22 to 60 mm, width - from 90 to 195 mm, length - from 140 to 6000 mm. As a rule, for facade decoration it is best to use panels with a thickness of 36 mm, a width of 142 mm and a length of 3 to 6 m. For interior work, thinner and shorter types of block houses are used.
When purchasing such material, it is worth considering that in fact the dimensions of the finished product may differ slightly from those declared. This depends on the characteristics of the raw materials.
Grade
The grade of a block house directly depends on the material from which it is made. Each type of wood must meet certain indicators, which determine its quality. There are 3 main varieties, each of which has its own characteristics.
| Variety | Bitches | Resin pockets | Non-through cracks | Through cracks |
| Grade A | No more than 1 piece. for every 1.5 m | No more than 2 | No more than 2 | No |
| Grade B | No more than 4 pcs. for every 1.5 m (diameter up to 2 cm) | No more than 2 | No more than 2 | No |
| Grade C | Not limited | Acceptable diameter up to 6 cm | No more than 10% of the panel length | No more than 5% of the panel length |
There is also a block house made of extra-class wood. The presence of any flaws in such material is excluded.
Types of wood
Block house panels are made from both deciduous and coniferous wood. It can be linden, black alder, larch, cedar, spruce and pine. The last two types are used most often. They are affordable, attractive in appearance and easy to use. At the same time, spruce and pine are characterized by high resin content. Because of this, the service life is reduced and there is a need for processing with additional materials.
Products made from larch are distinguished by increased moisture resistance, high strength and a wide range of colors. It is especially suitable for decorating the interiors of residential buildings. The disadvantage is the high cost of raw materials.
Alder is ideal for cladding buildings located in areas with high humidity. A humid environment gives wood strength and, accordingly, increases its service life. In addition, alder has a very interesting texture.
Linden stands out noticeably among its competitors. Panels made from this wood are smooth, without splinters or resin pockets, and have a pleasant milky tint. Due to its low thermal conductivity, a linden block house is often used as insulation inside a house or in a bathhouse.
The leader among all materials is cedar. This is a durable, moisture-resistant, non-resinous type of wood that is suitable for cladding any premises. Cedar panels do not crack or deform. The sheathed surface looks elegant and expensive.
Types of blockhouse for interior decoration
When choosing a blockhouse for the premises in which renovations will be carried out, you should pay closer attention to the size, grade and appearance. The wooden panels used for interior decoration are an order of magnitude smaller, that is, the width of one board is approximately 9 cm, but there are other options for every taste
Such parameters present the room in a favorable light, visually expanding it. If you decide to use wide panels, this can spoil the impression, as they visually reduce the space and in some cases create discomfort.
Dividing the material into categories:
- Extra class. There are no cracks, unevenness or scratches on the finishing surface. Mainly used in quite expensive houses and luxury hotel complexes;
- Grade A. Due to its high-quality performance, this option is usually used for processing residential and business premises;
- Grade B. This type of wood already has noticeable defects on the front side. As a rule, this material is chosen for arranging steam rooms and dressing rooms;
- Grade C. It has a rather unprepossessing appearance, so it is more suitable for utility rooms - storerooms and basements.
On the market you can often find combined types of panels, for example, AB or BC. Before making your final choice, you should familiarize yourself with the storage conditions of the panels. If the place where the panels are located does not comply with the norms and standards accepted in this area, this may affect the installation of the blockhouse - the wood may split or become warped.
Fastening the block house to the frame
Having made and secured the sheathing to the walls, the main process of cladding the house begins. When starting to install a block house with your own hands, you need to remember that, regardless of the material, it is laid only horizontally, from bottom to top.
Wooden panels
Installation of wooden panels is the most difficult and expensive. The following methods of fastening the board are mainly used:
- Fixing the board with a clamp ensures a strong connection of the board using the tongue-and-groove system. The clamp is a metal strip, one side of which is inserted into the groove of the panel, and the other side is screwed with a self-tapping screw to the sheathing joist. The gap between the boards caused by the clamps is sealed with a special paste that imitates the color of wood;
- The second method of fixation is performed with nails or self-tapping screws. They are carefully driven into the “tenon” of the board and nailed to the joist;
- A similar method of fastening a board into a “tenon” with a nail or self-tapping screw is done at an angle of 45°. This option is characterized by increased strength of material fixation but requires additional skills. Due to inexperience, you can break off the “thorn” and ruin the panel;
- The through fastening of the blockhouse is done with nails or self-tapping screws. A hole is drilled through the panel and fixed to the joist so that the head of the fastener sinks into the wood. It is convenient to make a “sink” for the cap using a countersink. You can make your own countersink from a drill sharpened at an angle of 90° or 120°. The hole is hidden from above with a wooden plug, which is then sanded;
- The outdated type of panels without a tongue-and-groove system is fixed through through holes or with a special adhesive indoors.
To hide the joints in the corners of the log house, grooves are cut out for the panel boards. A simpler option involves attaching decorative slats to the top with glue. A beautiful connection is obtained by sawing the edge of the board at an angle of 90°. The finishing of door and window openings is done with a variety of platbands.
Metal panels
A good option for wall decoration is metal siding in the form of panels made to resemble a blockhouse. The panels are usually installed outside to decorate the building. They are fixed to a frame made of a metal profile with stainless self-tapping screws through longitudinal holes. Insulation made of mineral wool or polystyrene foam is placed between the sheathing elements. A vapor barrier film is stretched over the top and only then the panels are installed. Finishing corners and hiding all joints is done with additional additional elements.
Advice from the “façade designer”
If you like the vertical direction of the cladding, then a metal house block will be the way out of the situation. It can be mounted not only horizontally, but also vertically.
Plastic siding
A type of plastic material for a blockhouse is made in the form of siding. A wide range of acrylic and vinyl panels makes it possible to arrange them when facing a house. Plastic siding is fixed in the same way as metal panels - with stainless steel screws into special grooves that are located on the purchased panels.
Choose those panels in the manufacturing process of which special materials that do not support combustion were used.
For external wall cladding, a temperature gap of about 2 mm is made between the siding elements. It protects the material from splitting during thermal expansion. This is due to changes in weather conditions. The siding is loosely screwed to the sheathing, maintaining a gap of 1 mm. The presence of numerous gaps in the cladding negatively affects the insulation of the building. Using plastic sheathing under the siding will help avoid this.
The plastic profile will be deformed due to temperature changes along with the siding. Therefore, they can be rigidly fastened without maintaining any gaps. To hide the gaps between siding elements, additional elements are used. By following the instructions, you can easily make the lathing yourself, insulate the walls and install the block house yourself.
How to properly mount outside
Although installing a block house is not difficult, there are still some nuances when installing panels made of wood, metal and plastic.
Wood
First, a sheathing is created on which a wooden house block is attached; work begins from the bottom and gradually moves upward.
To fasten the panels, you can use self-tapping screws, nails or clamps. The individual elements are connected to each other by a tongue and groove, which ensures their tight fit.
The difficulty of performing such installation arises when designing window and door openings; the work must be done carefully so as not to damage the wooden planks.
To extend the service life of such finishing, it is necessary to treat it with antiseptics and protective coatings every 5-6 years.
Metal to the wall
In this case, a galvanized profile lathing is used, which is cheaper than wooden bars.
The individual panels are connected to each other using self-tapping screws, screwed into special mounting holes located in the upper part of each element.
During operation, the panels will expand, and to prevent their deformation, the fastening is not made rigid.
A feature of the installation of these elements is the need to use additional elements. This material does not require additional processing and its installation can be carried out at any time of the year.
This material is similar in installation method to a metal house block. Here, too, the panels cannot be tightly fastened; a gap of 1-2 millimeters must be left between them, since when the temperature changes, the plastic changes its size.
The self-tapping screw or nail is not tightened to the end by 1 mm; this will be enough for the thermal expansion of the material.
As you can see, there is nothing complicated in installing a block house, and if you have the necessary tools and basic skills, then everything can be done with your own hands.
Wood species used for cladding
Natural block house is made of wood. The most common breeds I use are:
- Pine. The most common type of wood in our country. It is light in weight and has a relatively clean structure. Various defects, blue discoloration, and resin pockets are often encountered.
- Larch. Dense wood with expressive texture. It is relatively heavy and resistant to mechanical stress. Prone to geometry changes when stress increases during drying.
- Spruce. Relatively light and soft breed, characterized by a large number of knots. Of all the conifers, it is the least used.
In addition to conifers, there is material from deciduous trees:
- Birch. The densest and heaviest. Easily releases and absorbs moisture. Durable, easy to process and polish.
- Alder. The wood is clean and relatively soft. Relatively resistant to atmospheric moisture. There are few defects and flaws. The weight of alder panels is light.
- Linden. Clean and light wood with low weight. It is characterized by low density and softness. Requires careful handling and mandatory prompt application of a protective coating.
When purchasing, you should pay attention to the type of wood from which the block house is made, since each type of wood has its own characteristics that you need to know about. For example, conifers contain a certain amount of resin, which to some extent preserves the material, slowing down the accumulation and removal of moisture
Hardwood, on the contrary, quickly gains or easily releases moisture, but this continues until the time of final aging. If the material is immediately coated with a protective paint layer, the aging process of the wood slows down, but contact with moisture also stops, preserving the structure of the material in its original state.
IMPORTANT! To protect wood, a thick surface layer is not as important as deep impregnation of the wood with materials such as drying oil or special impregnating oils
Their composition may be incompatible with some types of varnishes or paints, which should be taken into account when choosing a topcoat.
Advantages and disadvantages
Brushed blockhouse
Block house is a building material of natural origin, so the main advantages follow from this:
- Non-toxic. High environmental friendliness is explained by the fact that wood can be dried and processed with mechanical tools. Additionally, no impregnations are applied that could harm a person.
- High thermal insulation properties. Although block house cannot be used as insulation, the material is still an excellent insulator, which makes it possible to close cold walls.
- Additional sound insulation.
- Easy to install. Thanks to the well-thought-out design, installation does not cause any complaints or particular difficulties. The main thing you will need is to set the level correctly initially.
- Lightness of the material.
- Nice appearance. There's no arguing with that. There is no artificial backing or texture here.
- Good combination with other finishing materials.
The negative aspects include:
- High degree of flammability. In order to reduce the likelihood of fire, it is necessary to treat the finished lining using special compounds.
- Susceptibility to deformation. Even a small impact during installation or operation will leave a dent.
- Insufficient vapor permeability. In the absence of well-designed ventilation, mold and mildew can form underneath.
How to decorate a house with a block house - step-by-step diagram
Step 1: Measurements and calculations
We measure the walls that are lucky enough to have a block-house outfit. Depending on the chosen material, we take into account installation costs and cutting costs - they usually range from 10-15%. Be sure to measure all corners, window and door openings - we will have to purchase decorative trims and corners for them.
Directly on the walls themselves it is worth drawing a diagram of the future frame. Because The installation of the block house is carried out horizontally and from top to bottom, the frame will consist of vertical bars. You can install special fittings on them or simply fasten the material with screws (depending on the design of the block house). At the same stage, the required amount of insulating materials is assessed - their installation will be “tied” to the same frame.
Step 2: Install the frame and insulation
For a frame for a heavy block house, bars with a cross-section of 5x5 cm will be required; for metal panels, bars of smaller dimensions are acceptable. Work on finishing the base with stone or its imitation should be completed by this point and wait until the mortar reaches a decent strength. Insulation and filling of the blind area can be done both after and before work on the block house.
On a straight, extended wall, two vertical frame posts are installed in opposite corners, with a distance of 20-30 cm from the corners. Their installation must be very precise - both level and vertical. These racks will be basic; they define the entire plane to be decorated. A string is stretched between them, and the next bars are mounted according to its position, with an interval of 1 meter. Fastening to the walls is carried out with anchor bolts, in increments of 40-70 cm.
If the wall height is more than 3 meters, it is necessary to attach the racks to each other using wooden jumpers and self-tapping screws. After fixing and measuring the accuracy of the assembled frame, all racks are treated with antiseptics. The influence of atmospheric humidity and precipitation should be foreseen in advance.
Step 3: Installation of block house panels
The block house is easily installed on a precise and durable frame. It is enough to choose a nice day for such work, things will go easier and faster. And moisture at the panel joints will be harmful, especially for a block house made of wood and fiberboard. If the walls need insulation, it is carried out precisely at this stage of work with reference to the finished frame.
The first lower panel is mounted exactly horizontally, checking the level with reliable instruments. The work is carried out from the bottom up along the entire wall, bypassing window and door openings. The options for attaching to the frame bars are different, but joining all the panels in the grooves is a prerequisite for the quality of the finish. The panels should be cut according to the mounting locations, using hacksaws and saws (manual cutting is more accurate). The last thing to do is decorate corners, joints, window and door openings.
Lathing is next
Now the sheathing is installed. In theory, you can do without lathing. But they rarely do this.
The purpose of the lathing is to level the wall and create a gap for laying the insulating layer.
The most popular type of construction for a block house is vertical sheathing. The boards attached to it create an imitation of rounded logs.
Much less often, the horizontal type of sheathing is used as a basis. Relevant for a narrow block house such as lining. Mainly used in baths and saunas.
To ensure the base is level, do the following:
- using a level, stretch the fishing line horizontally along the long wall;
- first stretch it from above and then from below;
- in the corners, using plumb lines, pull and align the fishing line in a vertical position;
- Perform the same procedures on the remaining walls and all corners.
The first plank of the sheathing is mounted along a stretched vertical line. The following elements are then aligned horizontally and vertically.
The standard lathing pitch is 60 cm. But if this is an area with strong wind loads, the pitch should be reduced to 30 cm.
The sheathing itself is made of metal profiles, as well as wooden slats. Wood is better suited for a wooden house. If it is properly processed, then in terms of performance characteristics, a wooden sheathing will not be much inferior to a metal one.
Self-finishing technology
Specialists are hired to decorate the house, but to save money you can do it yourself. When covering a room with a block house yourself, you must follow the following rules:
- Before starting installation work, wooden boards must be left in the room for several days. This is done to reduce the moisture content of the material.
- The board must be fastened along the guides.
- When attaching panels, they should be installed so that the tenon is on top and the groove is on the bottom. This installation allows you to minimize the entry of dust or dirt into the grooves.
- When installing, you need to leave a small gap between the floor and ceiling, which will serve as natural ventilation.
- The panels should also have a small gap between them. If moisture enters or temperature changes, this arrangement will prevent deformation of the material.
- Galvanized materials should be used as fasteners to avoid rust stains.
Preparing the block house
Before installing a block house in any part of the house, you need to wait some time so that the new beams go through the process of adaptation to the climatic conditions in which they will be located. The tree's susceptibility to natural decomposition makes it a good breeding ground for many insects and various forms of microflora. An important stage of preparation is the impregnation of wooden elements with antiseptic agents, which can significantly increase the resistance of wood to biological damage. Treating wood with a fire retardant increases the material's resistance to fire and mold.
Assembling or installing the frame
The complete assembly of the frame can be divided into five stages. During installation, some of the listed steps can be skipped in cases where there is no need for additional insulation of the room. Let's look at the installation steps:
- A vapor barrier material is attached horizontally to the wall. To fix it, you can use nails, but it is more convenient to use a construction stapler.
- Sheathing bars are attached on top of the waterproofing. It is also recommended to install the first layer of sheathing in a horizontal position.
- Thermal insulation material is installed in the cells of the sheathing.
- After the insulation, the waterproofing layer is installed again.
- At the last stage, the second layer of sheathing is fixed, which is now in a vertical position.
When installing, be sure to fix it level, since the block house will be installed on it.
Installation
The panels are mounted from the bottom corner in a horizontal position, along a pre-assembled sheathing. To fix the board, gluers are used; they are attached with self-tapping screws to the frame. A sheathing panel, which is positioned with the groove down, is inserted into the fastener tabs. The next board is placed with a groove on the tenon of the bottom panel. This procedure is repeated until the entire wall is finished.
If you refuse to use gluers and use self-tapping screws as fasteners, installation begins with preparing the seats for them. The fastening step is approximately 40 cm, and the self-tapping screw is screwed into the tenon with an inclination of 45 degrees. To give an aesthetic appearance, the fastening material is masked.
Finishing the corners is the most difficult. At this stage, when carrying out work, special elements are used to design internal and external corners. However, they do not always allow you to completely hide all the cracks, so for masking they use planed timber, which is attached before the sheathing begins. This design allows you to fix the boards of the block house directly to the timber and gives the cladding an aesthetic appearance.
Decoration methods
To give the surface of a block house improved properties and the required color shade, special impregnations that contain pigments and oils are used. Acrylic, alkyd, oil – these are the bases used for painting materials. Glazing paints, absorbing into the wood, cover it with a uniform layer and do not create smudges. They enhance the natural beauty of the patterns. Painted timber stands out noticeably against the background of untreated boards.
In addition to glazing compounds and various impregnations, wood paints are used. They are made on a water basis. Organic and synthetic solvents are also used. Paints have their drawbacks that should be considered when using them inside the home. They hide the natural structure of the wood and emit an unpleasant odor. To paint timber, colored and clear varnishes and stains with a rich range of shades are also used.
Completion of installation. Decoration of corners
The rounded cross-section of the block house makes it difficult to tightly install parts at corners and at joints.
It is possible to join panels end-to-end, but this method requires careful sawing of the parts using special equipment. And the tight fit of the parts at the corners will not allow them to compensate for natural deformations during temperature fluctuations and will lead to the formation of internal stress on the board.
When installing yourself, it is recommended to use ready-made joining strips and corners, which hide the joints and perform a decorative function. They are secured with special adhesive mixtures.
As a variant of the connecting corner element, a 50 by 50 mm beam is used, the outer part of which is decorated with a rounding.
If self-tapping screws or nails are used for fastening, their heads on the outer surface of the block house are hidden under plugs (plugs) made of wood or plastic, which are chosen to match the wood and attached with PVA glue.