The outer corner of siding has its own nuances during the installation process. Not everything is as simple as it might seem at first glance. Basically, the installation of the outer corner for all modern types of siding is the same. The main thing is to know how to do it correctly. The outer corner for siding is installed according to certain rules, in strict accordance with the instructions.
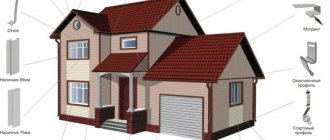
Scheme for installing external corners and starting profile.
First, the outer corner must be cut to a certain length. This is where the process of installing the outer corner of the siding begins. There are a number of installation features. Let's look at them using vinyl siding as an example, because... This type is the most common today.
Characteristics and purpose
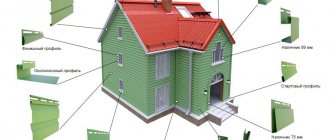
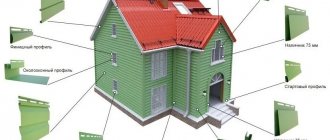
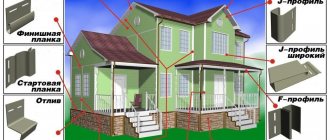
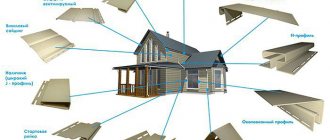
Profiled strips for siding panels are represented by the following main types of extensions.
Starting profile strip
It is necessary to take into account the fact that such an initial siding strip must be installed across the sheathing frame. There must be a rigid type of base underneath. On a wooden frame, such an element can be represented by a perforated corner or strip, and on a galvanized version of the CD sheathing - by a UD profile. The proprietary version of the ventilated façade subsystem has a base provided by the manufacturers.
Finishing profile strip
Installing the latest siding trim panel involves using a finishing strip that clamps the edge of the cut trim sheet. This version of the profile, like the starting strip, is fixed across the sheathing frame and needs to strengthen the base. To obtain the required rigidity during the installation process, the same method is used as for the initial profile.
Installing the latest siding trim panel involves using a finishing strip that clamps the edge of the cut trim sheet
Internal and external profile corner elements
Fastening this type of plank is done arbitrarily. As in the case of using a finishing profile strip, this fastening allows the element to freely contract and expand under temperature changes. This type of profile is also produced for the installation of basement siding panels that imitate natural finishing materials.
J-Trim profile strip and J-shaped profile chamfer
J-Trim profile additional elements are used at the end of the design of the facing space, and the installation site is protruding structures on the surface of the walls, as well as in the absence of a transition of siding panels at the level of one plane.
Window profile or window strip for siding
A near-window or slope version of the plank is usually installed in areas that need to cover narrow recesses. Such areas are most often observed on window and door slopes. Screwing such a profile is carried out in any order.
A near-window or slope version of the plank is usually installed in areas that need to cover narrow recesses
H-shaped profile strip
H-shaped profile or connecting type of profile strip for finishing siding panels is used when joining siding panels along the length. This version of the plank is mounted along the sheathing frame under the siding panels. For this element, additional horizontal profiles are installed on the sheathing frame in increments of 40 cm. Fastening is carried out in any order.
Platband and hanging profile strip
Platbands or a wide version of the J-shaped profile are used, as a rule, for decorative purposes and are installed when transitioning from one type of siding panel to another or as a beautiful frame. The element is assigned arbitrarily.
Video description
How to finish a window with a profile platband or J-profiles is shown in the video:
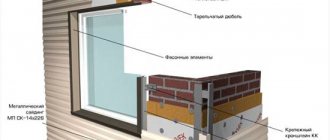
When the window is located in a recess, near-window strips are used, which combine both the platband and the slope. The installation principle is the same, but first, a finishing strip is attached along the edge of the window frame (a J-profile can be used instead), into which a slope cut to the required width is inserted. And the plane of the casing is attached to the frame through nail holes.
Installation diagram of near-window profiles Source vseprosiding.ru
See also: Catalog of companies that specialize in materials for finishing house facades.
Siding Installation Guide
Installing vinyl siding yourself is done in a few simple steps. Work in accordance with the instructions and everything will definitely work out.
The first step is to determine the starting point
Inspect the building before starting finishing work. Consider where you will start attaching the panels. If the house already had cladding, you can install a new coating in accordance with the placement features of the previous finish. In the case of new buildings, the starting row of panels must be fastened so that they overlap the upper edge of the concrete base of the house.
Draw a straight marking line for installing the starting horizontal row of panels. A plumb line and a marker will help you with this.
Second step – installation of accessories
In the process of finishing your home with vinyl siding, you will need to install a variety of additional accessories such as flashing elements, corner panels, starting strip, etc. Professionals recommend starting finishing work with the installation of accessories.
First of all, place the corner elements. There should be a small gap of about 5-6 mm between the top of the corner of the building and the cornice.
Third step - attaching the starting strip
It is very important to place the starting strip perfectly level - the quality of installation of all subsequent panels directly depends on this. Previously, you drew a horizontal marking line on the walls of the house
Set aside a distance upward from this line equal to the width of the starting bar and draw a second straight line.
Attach the starter strip to the wall using screws or nails. The siding panels have factory mounting holes. Drive the fasteners into these holes. Leave a gap of about 1-1.5 cm between adjacent panels.
Fourth step - insulation of window and door openings
Prepare panels for finishing the openings - strips, flashings, casing elements, overlays. Strips near doors and windows should be joined at 45 degrees - it’s more beautiful.
Fifth step - installation of facing panels
Once all accessories are installed, proceed to attaching the main panels. Perform finishing starting from the starting strip, gradually moving from bottom to top.
Insert the siding panel into the starter strip. You can do this easily, because... the panels initially have factory joining fasteners. Do not insert the panel “tightly” - it should be able to move slightly with temperature changes.
Cover all planned sections of walls using the same pattern. Fasten the panels with nails or self-tapping screws every 40-45 cm. At the joints of individual panels, leave a gap of 0.5-1 cm.
Attach panels around openings and pipes last. You can buy special cladding elements for difficult areas or make the corresponding holes yourself.
Step six - installing the top wall edge
Finally, all you have to do is finish the upper wall edges. Be as careful as possible at this stage of work. At the top of the walls, profiles should be placed as you did when lining the space around the openings.
Only whole strips of siding can be used under the roof. Planks can only be cut for placement on gables.
To lay the last row, use a finishing overlay or a special J-profile.
Thus, there is nothing difficult about installing vinyl siding yourself. Now you know the main stages and provisions of the technology for performing this cladding. To make the job as easy as possible and the finished result to be of the highest quality, please read these additional important tips.
Vinyl siding installation technology has important nuances
Good luck!
Video - DIY vinyl siding installation
Metal or vinyl siding are considered the most reliable materials for performing exterior insulation work. They will not only protect the surface of the house from atmospheric influences, but will also allow the installation of additional materials for thermal insulation inside.
In addition, all work can be done with your own hands, following certain instructions.
Structural features of the walls of a frame building
The walls of a wooden frame-panel or panel building are a multilayer structure, the basis of which is racks. The space between the racks is filled with a thick layer of heat-insulating material, after which the whole thing is sheathed with some durable material.
So:
- On the inside, these are often gypsum fiber sheets, and on the façade side, either multi-layer plywood or OSB boards are used as cladding. These materials give the frame additional rigidity and are an excellent basis for almost any type of finish.
Frame house wall structure
- The photo above schematically shows what layers the wall of a frame house is made of. As you can see, the insulation is hidden deep in the structure, so the absence of sheathing under the outer skin will not harm it in any way. In addition, polymerized wood materials are more resistant to moisture than concrete or brick, therefore, they are not afraid of condensation.
- As you know, OSB boards (OSB) are a composite material consisting of two main components: wood chips and polymer resin. This is an analogue of particle board, only with improved physical and mechanical characteristics. As for plywood, in its production they use adhesives based on melamine-formaldehyde resins, and they protect the wood not only from moisture, but also from rodents.
Facade cladding with OSB boards
- In addition to these materials, glass-magnesite (SML) sheets and cement-bonded particle boards (CSP) can be used for external cladding. All of them have excellent moisture resistance and are an excellent basis for installing siding. Due to their rigid structure, these materials are used for major renovations of old wooden buildings, especially since they have low thermal conductivity.
- Therefore, when installing siding using a frameless method, composite sheets can replace not only the sheathing, but also the insulation. Also, when using them, there is no need to install a windproof membrane. Accordingly, the price of facade cladding also decreases somewhat.
As you can see, this installation method has its advantages. Our instructions are designed to help you master all the intricacies of doing it yourself.
Installation of H-profiles
H-profiles are designed to visually highlight the joints of siding panels. This is usually done for decorative purposes, and places for placing H-profiles should be selected in advance in accordance with the general architectural and design idea.
The H-profile is installed vertically, and its installation is in many ways similar to the installation of corners - with the difference that these profiles are located on the facade of the house.
Experts recommend fixing the H-profile, like all vertical elements, from top to bottom, and drive the first nails as close as possible to the upper edge of the mounting hole, and the rest, with an interval of 200-400 mm, in the center of the holes.
If the profile length is insufficient, the two elements are joined with an overlap according to the same principle as corner profiles.
To attach H-profiles, you can install two additional sheathing strips or change the direction of the sheathing from vertical to horizontal in this place. The second option is simpler, since in this case there is no need to precisely adjust the location of the laths to the width of the profile.
Installing siding trim
Once all the tools are prepared, you can start working. You can be sure that there is nothing complicated in this process.
It is only important to follow the instructions and be extremely careful
You need to start by preparing the surface of the walls of the house. Be sure to remove all uneven surfaces and get rid of old paint and plaster. In general, the surface should be as clean and smooth as possible.
The next stage concerns laying the sheathing. It will simultaneously hold both the siding itself and part of the plank. The lathing is made of wood or metal (in particular aluminum). Insulation and insulating fabric or film are placed inside the sheathing.
Then comes the installation of the cladding. Here you will need to install the starting strip and corner elements. The finishing profile for siding is installed last.
So, when the penultimate element remains, it is necessary to prepare the finishing strip. To do this, you need to measure the length of the gaps in the sheathing and saw the planks. In order to save material and time, you can not cut into small parts, but install one large strip under the cornice. But there is a possibility that the installation will not be smooth.
Now you need to install the finishing strip itself. This is done with ordinary screws or nails. The holes in the plank should point downwards. Castle - up. The screws should not be tightened all the way. It is better to leave a gap of 1 mm. Fasten at intervals of 5-6 holes.
The distance from the penultimate part of the siding is measured and cut to the required length with an increase of 3 mm. The end that will be inserted into the lock, using perforated pliers, holes are made with a distance of 5 cm. Now you can fix the last part into the lock of the finishing profile.
That's the whole process. Installation work in a vertical position is carried out in the same way.
Installation of horizontal siding
Installing horizontal siding panels on a solid wall is quite simple. The entire row consists of full-size panels, and only the outer ones have to be cut if they do not fit the width of the wall.
However, there are few blank walls in modern houses. More often on the facades of buildings there are openings for windows and doors. And if a whole number of panels do not fit in a row adjacent to the opening, then they need to be trimmed and overlapped horizontally.
Basic rules for cutting siding are described in the “Tools Required” section. However, there are some peculiarities with this connection of panels. For example, the cut should be as neat as possible, and a circular saw with a plywood cutting disc is best suited for this.
You can also use a grinder with a cutting wheel, better known as a grinder. At the same time, to cut vinyl panels, you need to install the grinder disk so that it cuts with the back of the teeth. For other materials (especially harder ones), this cutting method is unacceptable, as it can be dangerous.
You can cut two panels at once with an electric saw or grinder, but the disc must pass through both. When the air temperature is low, you should cut more slowly.
If cutting is done with metal scissors, then you do not need to close their cutting edges to the end. This will help avoid ragged edges.
You need to saw or cut the vinyl siding panel in a certain direction - starting from the lock and ending with the counter hook. Locks and counter hooks on joined panels must be cut at the same level.
When cutting panels, safety precautions should not be neglected. All work must be carried out wearing safety glasses.
When joining panels, nail strips are cut as shown in the figure - to ensure a 25 mm overlap and a double temperature gap.
Base finishing
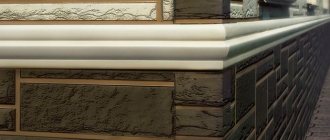
Base siding differs from wall siding in its greater thickness and strength, as well as shape: these are not long lamellas, but wide and short panels with jagged vertical joints that repeat the spacing of the elements on the front surface. The facade panels are connected to each other vertically “tooth-tooth”, the ends are hidden in the grooves of the corner elements.
Base siding panel Source torgbest.ru
Due to its large width, the basement siding noticeably expands not only in length, but also in height, so it must be provided with free movement in all directions, leaving a small gap between the rows.
As usual, installation of basement siding begins with attaching the starting profile and corners. Installation is carried out in rows from left to right. The first panel is cut off from the left edge, the next one is joined to it. The last element ends on the right edge; its length should not be less than 20 cm.
Purpose of fittings
The starting bar serves as a starting point. This is where siding installation begins. The starting profile is the top part of the panel with a latch lock. The finishing strip is the final stage of installation of panels and additional elements. The strip is installed on all horizontal cuts. They cover the last strips at the top and bottom of the openings and areas under the roof.
Internal and external corners serve the same function. They are used for joining panels in corners. The fittings are used to hold and connect cut joints of vinyl panels at internal and external corners. J-profile is used to complete all vertical edges. It is used to frame openings and support soffits. The plank is also used to design inclined lines at the junction of the wall and roof on the pediment.
It is shaped like two J-strips joined together. It is used to join strips of siding. It is used when the panel size is not enough to cover the entire length of the wall. Two J-straps can be used as a replacement, but they will not provide a sealed joint.
Soffits are used for arranging ceilings and cornices. It comes in two types: solid and perforated. The ceiling is hemmed with a continuous soffit. Perforated strips are used in cases where it is necessary to provide ventilation.
Platband is used to decorate windows and doors. It is used when the openings are on the same plane as the walls. It resembles the J-profile in shape, but has increased dimensions.
If the windows are recessed into the facade, then different fittings are used. It's called a window profile. Essentially this is the same trim, only with the addition of a vinyl shelf that replaces the slope. The low tide is used as the lower plane of the slope. They are also installed above the base.
Installation operations
Installation of the initial strip is carried out as follows:
Determine the lower reference line. To do this, a horizontal line is cut from one of the corners at the level of the base. If the walls of the building have sagged, start from the lowest mark of the base. The height deviation between the beginning and end of the line should be no more than 1 mm. Fasten the starting strip, corner guides, trims and H-profiles
It is important to know how to fasten. Horizontal guides are screwed (nailed) at +5 cm from the broken line
Work is carried out from the center to the edges; vertical elements are attached from top to bottom. It is necessary to leave temperature gaps ranging from 6 to 12 mm between the mating edges. After installation, check the level: each strip must hang strictly horizontally, and it must move freely along the fasteners within the boundaries of the sockets. The panels are installed directly: the finishing siding is hung (see photo).
The finishing siding is attached to the sheathing profile with nails made of non-ferrous metal or anodized steel. The strict choice of fastener material is due to the fact that rust stains on the front panels are unacceptable. The type of fastening elements depends on the material of the sheathing. The panels are nailed to wooden slats with aluminum nails, and screwed to the metal profile with self-tapping screws. The optimal fastener diameter is 3 mm.
The panels are installed from the bottom up from the starting strip. Each panel is fixed with a given step
It is important to follow the manufacturer’s recommendations on how to attach the product to the profile or panel slats:
- When fastening horizontal sheets, the fastener must be in the middle of the fastening groove.
- Vertical elements are nailed at the top, the screw (nail) is located at the upper edge of the fastening cutout; at other points - in the middle.
- There should be a gap of 1 mm between the cap and the panel (see photo).
When laying each row, the requirements for maintaining thermal gaps must be observed. There should be a free space on each side of the horizontal sheet - 6 mm to the nearest adjacent edge of the vertical panel and 12 mm to the horizontal one. Nailing siding directly through plastic is prohibited. If such a need arises, use a punch to lengthen the mounting hole to 12 mm.
Siding installation is carried out with continuous control of the laying angle. The horizontal installation is checked on every second - third row.
When installing strips in the area of window openings, the siding is cut in such a way as to ensure that the panels do not adhere tightly to the trim (see photo). If the window and the wall are located in the same plane, platbands are not installed. In this case, the starting and finishing profiles for siding are hung along the outer horizontal boundaries of the window opening, and ordinary cladding elements are attached to them, respectively, on top of the window opening, and below. Siding can be trimmed if necessary. The material is secured using mounting holes, which are cut with a special punch at the required height.
Final operations
The finishing panel for siding at the edge of the roof is attached using a finishing profile, J-channel or other finishing element. Installation of the finishing strip for siding is carried out as follows:
- the desired profile is fixed at a given height;
- measure the distance between the locking elements of the bottom panel and the final profile, subtract 3 mm;
- the ordinary panel is cut to the required level;
- the sidewall sheet is perforated with a punch at intervals of 0.2 m, the resulting tongues are bent outward;
- engage the last panel from bottom to top.
After facing the main planes, they begin finishing the prominent elements and pediments.
Boxes are made over the protruding parts using connecting elements for external and internal corners. The order is carried out taking into account the manufacturer's requirements. The design is completed with a finishing strip for siding.
The order of finishing the pediments. The upper triangular part of the perimeter wall is sheathed with J-panel. They are fastened in the same way as vertical planes: first of all, install the top screw under the edge of the mounting cutout, then the rest - in the middle of the slots. Installing the finishing strip for siding on the gable has a peculiarity: it is attached with a screw through the front surface to the rail or profile.
Let's move on to siding installation
Only at first it may seem complicated:
- All siding is removed to the street before work begins. You can store the material on the balcony if there is no insulation yet.
- To obtain dimensions in accordance with temperature, the material must be kept in such conditions for at least 2 hours.
Thanks to this, the panels will not be deformed in the future.
Installation of drainage systems
So:
- Drains (see) are fixed to the wall, in its lower part. They must be level in a strictly horizontal plane.
- Compared to other parts, drain strips are almost the most rigid. That’s why it’s easier to set them according to their level.
Panel installation
The starting slats are attached to the drain strips themselves:
- Next, they attach the first panel themselves.
- Other elements are installed on it. The top lock of the previous panel is fastened into the bottom lock of the next one. The top panel is attached to the sheathing with self-tapping screws.
Last steps
There is no need to attach them to each other:
- The siding panels should not rest tightly against the inner and outer corners. The panels themselves should be slightly shorter than the distance between the corners.
- The gap can reach up to 10 millimeters throughout the year.
- The panels will swell if there is no such gap.
- The roof overhang must also be covered with siding.
- You can use scraps of panels; there are usually quite a lot of them left.
- But it is better to use special panels that have perforations.
The fastening can be vertical or horizontal.
- For fastening, “latches” are usually used, but a tongue-and-groove system is also allowed. The lower edge of the previous one snaps into place with the adjacent panel. The upper part is nailed to the wall.
- Edged board is the most popular material for creating sheathing. Usually purchased in size 100 by 30 millimeters. Often a beam of 40 by 50 millimeters is taken. If the installation is horizontal, maintain a step of 30-40 cm.
- Bars are installed at all corners of the house and window openings. It is on these bars that the window siding is then mounted.
- The slopes themselves can be finished with plastic panels. In the upper and lower zones, where the siding is located, bars are also installed.
- Galvanized nails are also suitable for fixing. They are driven only into special technological holes, right in the center.
Installation of corner elements
The external and internal corners of the building are designed using special corner elements. If the length of the corner profile is greater than the height of the wall, and the house has a flat or sinking base, then the profile should be cut at the bottom so that its length exceeds the height of the corner by 3 millimeters.
The corner profile is applied to the corner of the building so that its upper edge is 1-3 mm away from the roof eaves. It is then fixed with two nails or self-tapping screws through the upper mounting holes on both sides of the corner. The profile should be secured along the upper edge of the holes.
The next nails are driven in from top to bottom in increments of 200 to 400 mm in the middle of the mounting holes.
To improve the aesthetic merits of the cladding, you can trim the bottom nail strips of the corner profile in advance so that they do not protrude from under the siding during thermal expansion.
When the wall of the house is higher than the length of the corner profile, two corner elements have to be joined together. In this case, usually the lower profile is mounted entirely and first, and the upper one is cut to the required length, taking into account an overlap of 25 mm.
At the bottom of the upper element, nail strips are also cut off, and it is this part without strips and shaped elements that is overlapped over the lower profile.
When trimming, you need to keep in mind that the cut part must be longer than the full size of the gap to compensate for thermal expansion (from 2 to 9 mm depending on the weather in which the installation is carried out).
The result should be an angle spaced 1-3 mm from the cornice or soffit and protruding down 4-6 mm from the bottom edge of the initial profile.
A protruding plinth and other protruding architectural elements and structures on the corner of a building may prevent the corner element from being installed in the standard manner. In this case, the profile should be trimmed a little more so that it does not reach the obstacle by 1-6 mm. The same method is used when facing verandas, where the already laid floor may be an obstacle.
The internal corner is mounted in the same way as the external one.
Briefly about the main thing
If the owner of the house decides to decorate the facade of the building with siding, he needs to pay due attention to the additional elements. The future appearance of the entire building depends on the correct installation. But the most important thing is the installation of the starting profile.
If it is not installed perfectly straight, this will subsequently manifest itself in the curvature of the panel arrangement. Or the latter will not be able to fit correctly with the corner elements. And all the work will need to be done again. Naturally, after complete dismantling.
Ratings 0
Installation
Based on professional experience, we can say that the selection and purchase of the necessary additional parts for siding is only part of the whole process, the basis of which is their competent installation according to the instructions.
Here you cannot do without special skills, otherwise the result of the work may be disastrous. After becoming familiar with the technology of cladding buildings with vinyl planks, you can perform decorative cladding yourself.
Additional parts for siding are intended for the final decorative finishing of the facade and give it a finished, neat look. Siding accessories may vary in configuration and color depending on the brand. Their sizes may also vary, despite the fact that most manufacturers adhere to generally accepted standards.
Installation features
As mentioned earlier, there are several main types of additional elements for facing strips, which are attached to the facade at different stages of installation.
Before installing the main panels, fix the starting profile. It is nailed or screwed to the frame with self-tapping screws. Next, the first sheet of siding is adjusted to fit it.
The side panels are closed using a J-Trim strip, and window and door openings are decorated with a special profile, which is also used for lining minor recesses. If it is necessary to join plastic panels along the length, use a connecting segment (their dimensions are the same), and an f-profile is suitable for securing the spotlights.
The components for vinyl material are similar to similar accessories used when working with other cladding panels, but they may differ slightly from each other. For example, when finishing the base, a wider starting strip and a corner segment are used. You can order accompanying extensions up to 6 meters in length for metal panels.
Even if we are dealing with a flat façade plane, it is recommended to install decorative strips on a metal profile. A similar design made of wooden beams is more difficult to implement and less effective.
Unlike galvanized sheathing, it requires additional treatment with antiseptics.
Advantages of lathing
The main advantages of the frame are:
- the ability to visually align the walls of the house;
- ventilation façade equipment;
- insulation of walls, which will have a positive effect on the indoor climate and help save on heating costs.
For siding sheathing, the correct choice would be a profile with a cross-section of 2.7x6 cm with special sides, which act as a kind of stiffening ribs. When installing the base, it is necessary to take into account the dimensions of the main cladding elements. To fix the planks to a wooden frame, ordinary self-tapping screws are sufficient, and in the case of a brick or concrete wall, you cannot do without dowels.
The heavier the finishing material, the smaller the distance between the metal profile should be. According to the standards, the pitch between the lathing slats is 0.6 and 0.4 m for vinyl and metal material, respectively. The frame slats are installed perpendicular to the fixation of the decorative cladding.
Preliminary work
Before buying material, you need to decide not only the color and relief of the finishing panels. It is necessary to take all measurements and decide exactly how the facade will be faced: vertically or horizontally, with a highlight of the plinth or a solid canvas, how the openings, eaves overhangs and other elements of the building will be designed. In addition, the need to insulate walls and install sheathing is taken into account.
Before covering an old house, it is advisable to remove the previous wooden paneling, if any, or make sure that it is in good condition: there are no rotten, fungal or cracked boards, replace them, foam the seams. This is done if it is decided to install metal siding or vinyl panels directly on the wall without insulation and creating sheathing. But the walls must be treated with antiseptic and water-repellent agents.
It would be more correct to first cover them with moisture-resistant plywood or OSB boards, or even better - to mount a frame for fastening the cladding, which will become a reliable load-bearing base and create a ventilated space under the siding.
Frame made of metal profile Source the-master.ru
The sheathing is attached in a direction perpendicular to the panels: standing up if the siding will be mounted horizontally, and lying down if vertically. The step between elements is at least 40 cm.
However, insulating the walls will require changes to this scheme. First, a frame is made for the thermal insulation material, taking into account the width of the roll or insulation boards. And after fastening it and installing a wind-hydroprotective membrane on top of it, a load-bearing frame is created in the chosen direction and with the required pitch.
Sheathing diagram with insulation Source files.builderclub.com
Advice! If the pitch of the first and second battens does not coincide, the first (for insulation) can be fixed perpendicular to the main (bearing) one.
All existing openings must be framed around the perimeter, taking into account the angle of the slopes. As a result, the installed sheathing should level the walls and create even vertical planes on which the siding will be laid.
