How to properly putty walls under wallpaper. Preparing the walls
The walls are put in order so that they are even, and then wallpaper can be hung on them. But the fact is that their initial condition may be so bad that it may be premature to think about how to putty the walls, since first you need to repair deep holes in them, then plaster them, and only then proceed directly to putty. Therefore, I highly recommend that you first read my article The procedure for preparing walls for wallpaper, which clearly presents a plan for working with walls, and putty is just one of the stages.
Puttying of walls is carried out in 3 cases:
- After removing old wallpaper, when the walls are relatively smooth and it is not important for you to level (plaster) them.
- After plastering the walls, when they are strictly vertical and ready for further processing.
- When in some places you need to repair small chips on the wall.
Let's go in order.
Removing paint from wallpaper
It often happens that paint gets on the wallpaper during renovation and, accordingly, it needs to be wiped off. The question arises: “How to do this?” There are modern ways to ensure the safety of your coating, but do not forget about folk remedies.
The first method, the most proven, is the use of acetone. We dilute the chemical - undoubtedly, its abilities will decrease, but it will not have a strong effect on the destruction of the canvas. When working with acetone to remove it, we recommend wearing a protective mask. This is due to the high content of toxic substances that have a detrimental effect on the human body.
Why putty the walls?
Why do you need to putty the walls at all, you ask? Well, I took off the old wallpaper and put up new ones. Or I lined the walls with plaster and also hung wallpaper on them.
The fact is that the walls, in any of the above cases, are quite rough, and the wallpaper on them will lie worse than if we had previously puttyed the wall. Wall putty is a fine leveling with millimeter precision. The good thing about putty is that, on the one hand, it is firmly attached to concrete or plaster, and on the other hand, new wallpaper fits perfectly on it.
Preparatory stage for removing wallpaper?
The process of removing wallpaper is messy, so you need to mentally prepare for it in advance. In addition, it is possible that the old plaster will begin to crumble, and water will fly in different directions. Therefore, it is very important to properly prepare the room for this type of work:
- there should be a minimum amount of furniture in the room so as not to get it dirty;
- if you can’t remove all the furniture, then you need to move it to the center of the room and cover it with a protective film - it will protect it from dirt and dust;
- the floor should also be covered with film, and to prevent it from being slippery, you can throw unnecessary newspapers or cardboard onto its surface;
- the baseboards must also be covered with a film, which is secured with masking tape;
- if you plan to remove old wallpaper using water, then you need to disconnect all sockets and switches from the electricity in advance, but it is best to stick a film on them;
- a damp cloth is placed at the threshold of the room to prevent dirt and dust from spreading throughout the apartment;
- It is advisable to prepare all the tools that will be required during work in advance.
All these instructions will help to significantly save time and effort before starting to apply the plaster. In addition, they will prevent dirt and dust from spreading to other rooms and keep the furniture in good condition.
Which putty is better to putty walls under wallpaper?
First of all, you need to decide on the type of putty you will work with. There are a lot of them in stores, and it is especially difficult for a beginner to navigate such a countless number of options offered. To make it easier for you, I will talk about one of the popular materials from Weber Vetonit, which I myself constantly use:
Let's make the following estimate. The walls of your house are not the same. Some are load-bearing thick walls facing the street. In cold weather, such walls can freeze very much. And there are interior walls that live at a relatively constant temperature. For these cases, Weber Vetonit has the following options:
- Weber Vetonit VH - when hardened, this putty is resistant to low temperatures.
- Weber Vetonit KR is just a putty for dry rooms.
I have a separate article on how to work with Vetonit putty.
Getting rid of dirt and debris
After completing the first stage of preparing the walls for wallpapering, you need to thoroughly clean them of debris and dirt - use a vacuum cleaner or a broom with water. During the cleaning process, you may find cracks and falling plaster - these defects must be removed. If the crack is small, then it is simply covered with putty. If the crack is too wide, proceed as follows:
- clean the crack from dust/dirt, and if necessary, widen it - all falling off fragments of plaster must be removed;
- moisten the crack cavity with water;
- Apply putty to it and smear it thoroughly, trying to align the crack in one plane with the entire surface of the wall. Remember: when sealing cracks, the movements of the spatula with putty must be made in the vertical direction.
How to determine the required volume of putty
After determining the type of putty, we need to calculate how much we need to take? Usually, on the back of putty packages everything is described in great detail. It would be better to go to the store and read this information directly on the bag. The fact is that all materials are different and it will be difficult to say the exact quantity, but an approximate quantity is possible!
How many times to putty the walls under the wallpaper
It is very important to evaluate how much you have prepared the wall before applying putty. If after plastering the wall is perfectly smooth, then of course one layer is enough. If you haven’t plastered the wall, but are trying to remove unevenness and small differences on the wall using putty, then the consumption of material will be completely different. Typically, the thickness of the putty ranges from 1 to 3 mm, in some places up to 5 mm - no more. Therefore, in the worst case, if you are going to smooth out unevenness up to 1 cm, then in any case you will need to lay the material in 2 layers.
For example, I just had such a case without plaster, when I spent 15 kg of Weber Vetonit KR putty on an interior wall 3.5 meters by 2.5 meters, with a total area of 8.75 meters.
How to putty walls for painting
If you plan not to glue wallpaper, but to paint the walls, then in this case they should be literally polished. In this case, first, with regular putty, unevenness and roughness that may exist after plastering are removed. Then, when the first layer has dried, the wall needs to be sanded, vacuumed, primed and a second layer of finishing putty applied in a very thin layer. The work turns out to be quite complicated in terms of labor costs, but perfectly smooth walls are worth it.
Taking into account the above, you just need to measure the area of the walls that are to be puttied, estimate the thickness of the layer of putty that you are going to lay, decide whether it will be one layer or two and, based on the material consumption indicated on the packaging, calculate how much putty you need to buy.
When making repairs, you need to remember an important thing: Where and how to store dry building mixtures in the apartment. Sometimes, especially if you live in an apartment in which you are renovating, see How to renovate the room in which you live, it is better to purchase building materials in parts.
Calculation of the amount of paint
So, the next question is calculating the amount of paint consumed. How to calculate the amount for wallpaper? Here you should take into account the type and type of wallpaper.
After analyzing the properties of all paints and types of wallpaper, you can set the following consumption rates, which will help calculate the amount of consumables:
- for oil paints, the consumption is as follows: for a smooth surface 150 grams per square meter, for a rough surface 160 grams;
- looking at enamel, it can be noted that its consumption ranges from 110 to 130 g/m2;
- with water-based paint, using 1 liter, you can treat 7-11 m2, and it is usually applied in several layers;
- in the case of acrylic dyes, an average consumption of 1 liter per 7-9 meters can be noted.
Source
Where to buy putty
My experience tells me that it is better to buy putty in large construction hypermarkets. Why? Because all construction materials, like food, have an expiration date. For example, putty in the form of a dry construction mixture, if the packaging is not opened, may have a shelf life of 12 months, 18 months, etc. from the date of manufacture. Some dry building mixtures have a shelf life of only 6 months. Therefore, in large construction hypermarkets the likelihood of purchasing expired materials is much lower than in dubious warehouses for half the price.
Always check the date of manufacture. You cannot work with expired putty - this will ruin all your work.
A little about wallpaper material
Wallpaper is a kind of decoration for a room. Fashionable wallpaper trends change as often as clothing fashions. Just have time to change. So I re-pasted the wallpaper and seemed to freshen up my life.
Guests arriving immediately compliment the rejuvenated apartment, but all that was needed was to change the wallpaper. But not everyone will like the update process itself. There is a lot of hassle with stripping old walls and preparing them.
Is it possible to wallpaper paste old wallpaper? So is it possible to save time, lighten labor and decorate your home? And by doing all the work yourself, you will also receive economic benefits.
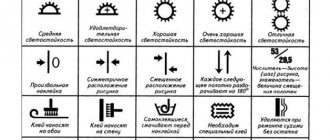
Types of wallpaper
The modern market offers us the following types of wallpaper.
Paper
They are well known to everyone. Paper wallpaper is easy to apply and relatively easy to remove.
Acrylic
They have a paper base and low strength. It is very easy to glue if the surface is smooth and even.
Vinyl
Also made from paper.
Wallpaper-silkscreen
Consist of intertwined silk threads. They are distinguished by good durability and the ability to wash them.
Velor
Designer wallpaper, however, is highly saturated with odors and dirt.
Non-woven
The most durable and dense.
Washable
Common in areas with an increased risk of contamination (kitchens, hallways, baths).
Photo wallpaper
Printed paintings, landscapes and other images are the theme of photo wallpapers.
How to prepare walls for putty. Primer
Always, before you are going to putty the walls, you must first prime them, see the article: How to prime walls.
If you apply putty to a concrete wall, it is better to prime the wall 2 times. If you have just plastered the wall, you can prime it once before applying putty.
In any case, you need to look at the general plan for working with the walls, which I mentioned above.
Getting rid of unevenness
Take a closer look at the prepared walls - do you see irregularities, holes, “potholes”? You definitely need to get rid of them so that the wallpaper lays on the surface flawlessly. There are only two methods that can be used to level the walls:
- plastering - the process requires skill and some experience, and may take several days;
- installation of drywall - financial expenses will be required, but the installation process is simple, within the control of every person and takes little time.
If you are installing drywall, then prepare putty and reinforcing tape in advance - this will need to be used to treat the joints/seams of the drywall.
If you decide to plaster the walls yourself, watch this video review: a master class on plaster is conducted by a specialist:
Whatever is chosen for leveling the walls, the next stage is primer, and it should not be ignored. When applying the primer solution to a cleaned and leveled surface, a thin film is formed - it serves as a factor in the strong adhesion of the wallpaper to the walls. Before priming, you need to clean the places where the putty was applied - this can be done with fine sandpaper manually.
It’s only after all the work mentioned above that you can prepare directly for wallpapering. But first you need to select them, and at the same time select the glue.
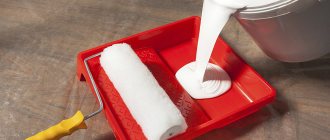
How to properly dilute putty and putty walls
If we use ready-made putty in a jar to putty the walls, then we open it and immediately get to work.
If we use dry mortar to putty the walls, then we need to prepare a putty solution. To prepare the solution we will need:
- Container for preparing the required volume of dry construction mixture.
- Steelyard for weighing dry construction mixture.
- Container for the prepared solution.
- A measuring stick for pouring the required amount of water.
- Drill with installed mixer.
In what proportion should I cook? You need to read the back of the dry mix packaging. For example, for the putty I’m talking about, 25 kg of dry construction mixture requires 10 liters of water.
IMPORTANT!
Putty is not plaster. You can prepare a lot of it at once, because the prepared mixture can live for about another day. Plastering, if we remember, will take place in 20 minutes. starts to freeze. Therefore, estimate how much solution you are willing to put in over the next 24 hours.
Then everything is simple. If, for example, you decide to pour 6 kg of dry construction mixture, then for these 6 kg you will need 2.4 liters of water. We do the calculation according to the rule of proportion:
25 kg = 10 liters
6 kg = X liters
X = 6*10/25 = 2.4 liters of water.
For those who have forgotten the rule of proportion or want to see where mathematical calculations are used in repairs, I suggest looking at the article: Repair and mathematics.
So,
- Pour the required amount of dry mixture from the bag into the bucket.
- Pour the required amount of water into the container for preparing the solution.
- Pour the dry mixture from the bucket into a container with water to prepare the solution.
- Turn on the drill with the mixer installed and begin mixing the dry mixture with water.
You need to stir for about 3 - 5 minutes until the putty gives the appearance of thick sour cream. Then you need to let the solution brew for about 15 minutes and stir again (not for long).
The solution is ready. You can use it.
Required Tools
The set of tools depends on the chosen method and the conditions for gluing old canvases. Sample list:
- sharp spatulas;
- container with water;
- detergents;
- roller, set of sponges, rags;
- gloves to protect hands;
- large bags for garbage;
- ladder.
In difficult cases, in order to peel off old canvases, you will need a knife and a “Tapeten-Tiger” device. The design includes knife disks that allow you to peel off the top layer of wallpaper. A steam generator and an electric drill with a special metal brush attachment will help remove paper coatings.
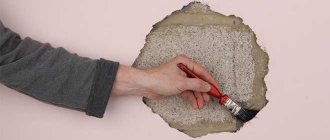
How to putty walls with your own hands
You need to start putting putty on the wall from one side and move in the opposite direction. The puttying process consists of using a trowel to spread the mortar onto the wall, and then using a spatula to move it left and right, up and down. When spreading the putty on the wall, you need to apply pressure on the spatula. It is necessary to ensure that you do not put an excessive amount of mortar on the wall so that smudges do not form. If you still put more than necessary, disperse this part of the solution along the wall where there is not enough putty applied.
When you run out of solution, prepare a new portion and continue working.
The skill of puttying does not come immediately, it needs to be trained. But I'm sure you will succeed. After applying the putty and dispersing it, literally after a few moments the putty may form smudges in some places. To remove them, you need to run the spatula over this area again.
What is the best spatula to putty on walls? If the area of the wall being processed is large, then it is better to immediately learn how to work with the largest tool. In hard-to-reach places, use a medium or small spatula.
Why do you need a small rubber spatula?
It happens that in the process of work, you accidentally leaned on the wall, poked the sharp end of a spatula into the newly applied and leveled mortar, or just suddenly a hole formed on the wall in a certain place. Then you take a rubber spatula, dip it in putty and carefully apply the latter to the damaged area. In this case, it is not convenient to use a large spatula, because having eliminated a defect in one place, by pressing a little harder, you can create a new problem in another place with the sharp end of the spatula, so it is better to use a rubber spatula.
The rubber spatula is elastic and allows you to apply very small portions of putty to problem areas, without destroying what you have already done with such difficulty.
IMPORTANT!
Try not to accidentally get dirt and especially hardened pieces of cement or plaster into your putty solution. The fact is that if this happens, then in the process of applying the solution and dispersing it with a spatula along the wall, an accidentally falling pebble under the pressure of the spatula will make a furrow in the wall, which will have to be repaired immediately. It is also important that the spatula is not rusty, otherwise it will leave dirty marks on the wall. If you took out your spatula and saw traces of rust, then take a look at my article on how quickly you can revive the tool.
That is why the container into which you pour water to prepare the solution must be clean, and there should be no remains of hardened cement or plaster pieces floating there.
Plaster
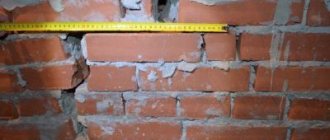
You need to first check the plane using a long level or a rule: if there are significant unevennesses, the easiest way is to use a plaster solution. This also applies to areas where the plaster has been chipped off. Cement mortar is suitable - it hardens more slowly, or gypsum mortar, which sets much faster.
Instructions for carrying out work:
- Prepare the plaster solution, it is best to do this using a mixer. Apply to the wall with a trowel or wide spatula, spreading evenly and performing initial leveling.
- The best rule is to tighten the mixture and make it flat. Select its width according to the situation, but we must remember that it is difficult to work with a tool of more than one and a half meters.
- You need to press the strip to the surface and move it to remove excess mortar and leave a flat surface. If necessary, add the composition and go through the rule again.
- Small unevenness and damage can be repaired with a spatula of suitable width.
- After initial drying, you can sand the surface with a foam float to remove sagging and streaks.
You need to let the plaster dry completely - this takes from several days to a week or even more.
Surface priming
After removing the old coating, the walls need further processing. Regardless of what the next stage of work will be, you need to prime the surface, which will allow you to:
- Reduce wallpaper glue consumption;
- Increase the service life of the finishing coating;
- Give the surface uniformity;
- Improve adhesion.
Select a primer that matches the wall surface. Acrylic is intended for putty and plastered walls, alkyd for wooden ones. The primer is applied using a construction roller; in the corners you should use a brush. After the first layer has completely dried, apply the second. Walls coated with primer are smooth and slightly sticky.
When can you glue?
It is recommended to cover the walls with decorative material only after completing all of the above work, which includes:
- eliminating visual elements on the surface;
- primer;
- plaster;
- putty.
Once the walls have a perfectly flat surface, you can begin gluing.
In addition to preparing the surface, it is also necessary to observe the temperature regime - it should not be lower than 5 degrees Celsius. Before gluing, you need to tightly close the windows and doors in the room to prevent drafts.
Preparing the surface for gluing is not a very difficult task, as it may seem at first glance, but it must be done. The main thing for this work is to use high-quality material, show attention and patience.
The need for ground work
There are a number of reasons why it is imperative to prime the walls. These include:
- By impregnating the surface with a primer, it will be possible to obtain a binding element. The surface to be pasted will be free of dust and will stop crumbling.
- This will prevent the appearance of mold and mildew.
- The primer will fill microcracks on the surface of the wall, making it much stronger.
- The primer increases the level of adhesion.
The primer material is best applied to the surface to be glued using a roller. Hard-to-reach places can be treated with a brush. If the composition is absorbed by the wall, another 2-3 additional layers are applied.