Initially, you should understand the reasons why it falls off in order to prevent it from falling off again in the future.
This is often caused by incorrect technology for applying plaster to the surface. If the renovation work was carried out by a construction crew, getting them to redo it will be problematic and, most likely, you will have to do it yourself.
Another reason for plaster crumbling may be the poor quality of the material used. To avoid such a problem, you should purchase building materials only from trusted stores.
The cause of material peeling can also be a dusty surface, which occurs even at the preparation stage. For example, this can be facilitated by mixing the solution near the prepared area.
Ceiling plaster
Currently, hardly anyone uses cement-sand mortar to plaster the ceiling. For this purpose, various mixtures are now produced, which dry faster and are much easier to work with.
Ceiling preparation
The ceiling needs to be cleaned
- If you are thinking about how to properly repair the ceiling, then first take care of cleaning it from old plaster . We are talking about complete cleaning, because this is correct and the layer of finishing material will adhere well.
- You can knock down old plaster in different ways and for this you can use an axe, bush hammer or hammer drill. In some cases, even a short spatula is enough and the old layer is removed, freeing the concrete slab. After removing the unnecessary covering, sweep away the dust from the ceiling with a broom or brush.
- After upholstery, indentations may appear on the surface of the flow, because the concrete floor may crumble in some places, for example, along the edges or in places where the chandelier is attached. These corrosions must be repaired with a solution of plaster mixture , after covering with a layer of primer. You also need to seal the cracks at the joints of the slabs and let it all dry.
Lighthouses and plaster
Prime the ceiling with a paint roller
- We are looking at how to repair the ceiling with our own hands and before you start applying the mixture, you need to apply a layer of primer and let it dry . It is convenient to prime the surface with a paint roller and you can even use a long handle to do the work from the floor.
To install the beacon, make a path from the plaster mixture
- After the primer has dried, you can begin installing the beacon profiles . Beacons come in different thicknesses, from 6 to 10mm, and which one you choose depends on your preferences. The thicker the profile, the stiffer it is and the less it will sag, but, on the other hand, such a profile is more difficult to level.
Advice. Be sure to ensure that all beacon profiles you purchase do not have kinks. It is impossible to straighten a beacon with a fracture and will have to be thrown away!
- We stir a small amount of plaster mixture so that we have enough to install the beacons. It’s better to make it a little smaller and then mix it in, because you won’t be able to use it until the guides dry out, and you’ll have to throw away the excess solution.
Small cracks
Sealing small cracks is not a lot of work, but it requires thoroughness. Even if only spot puttying is required, it must be done competently, without neglecting the details and not limiting ourselves to masking imperfections.
The sequence of actions is as follows:
- Anything that crumbles, chips, or peels off must be carefully removed. In some cases, until the concrete layer is exposed. The edges of the crack must be perfectly clean. Here you will need to actively work with a spatula or even a wire brush. Remove dust with a dry brush.
- The prepared, cleaned surface is moistened with water. Spraying is preferable to brushing.
- Application of gypsum mixture. It will not stick to a dry surface due to low adhesion, which is why it is necessary to moisten the repaired area well. The putty is applied with a small spatula along the entire length. The movements are smooth, with pressure. The main thing is that the putty fills the entire crack. It is advisable to avoid it falling on the floor; it is difficult to remove dried material, so there is no need to take a lot of it on a spatula. The finished mixture contains PVA, which makes the composition quick-drying. Therefore, when working with him, you cannot hesitate.
- The putty layer must dry for at least 24 hours.
- Leveling the surface until smooth. For this purpose, a skin or a grater is used.
If the cause of cracks is falling off plaster or peeling of paint material, it is practiced to seal the defects using primers. Before applying the putty, the cleaned area is primed in 1-2 layers (the first layer must be completely dry). The best choice is a deep penetration primer. It is required for wet rooms and ensures the quality and reliability of the putty fastening.
Applying plaster to the ceiling
In the event that you are not repairing a crack, but a large part of the ceiling
, the solution should be applied in one layer.
To do this, you will need a special formwork board
, which should be slightly longer than the width of the surface being repaired. It is better to paint such a board so that the solution does not stick to it, or even better, lay a layer of plastic film between the board and the solution.
The solution is applied to such an area that the formwork board completely covers it, and is pressed with the board. To support the formwork board, two spacer boards are used, which should be slightly longer than the height of the room. Spacer boards are installed between the floor and the formwork board, supporting it on both sides.
Poorly prepared base
Before applying a new layer of any coating, it is necessary to very thoroughly clean the base of the surface being treated from old material.
This could be old wallpaper, plaster, putty, a layer of paint, or some other things. All this should be carefully stripped to the maximum; you should not leave anything from the old coating.
Sometimes it is allowed not to completely cover the old layer if it sits very firmly.
If this is not done, then the following happens - new plaster is applied to the walls according to all the rules, but since it lies on a shaky foundation, it begins to fall off, peel off, crack due to vibrations, etc.
What to do
When the plaster falls off, everyone has one basic question - what to do? First of all, check if there are any other places where this happened. If it has fallen off in only one place, you can get by with local repairs, but if many such problem areas are found, more serious work awaits.
The best option would be to completely redo the entire applied coating. Yes, this is both time-consuming and expensive, but only this option will guarantee that later you will not be faced with an unpleasant surprise again.
In some cases, when the area of damage is small, it can be eliminated locally. You will need to remove the old coating around the damaged area and reapply it. Upon completion of local restoration, it will be necessary to repaint the entire area of the damaged area so that it does not differ in color from the rest of the ceiling.
Repair technology
Stains, lumps of swollen material, cracks - all this will have to be eliminated if you want to get a beautiful ceiling at the end of the work.
The easiest way is with small cracks - they are slightly expanded with a spatula and filled with a solution specially developed for this purpose, sold in hardware stores. It has the words “crack filler” in its name. After the crack is filled with it, the surface is rubbed and leveled into the same plane as the rest of the ceiling. If the damage is more serious, you will have to tinker.
In all places where defects were found, the old coating is removed with a regular spatula. When determining the area of damage, the area around it is tapped. A dull sound indicates that detachment has occurred in this place as well. The entire damaged area is removed, extending about two centimeters onto the hard surface.
The surface is cleaned either down to concrete or to a depth of one centimeter, provided that the base is held firmly. If this is not the case, then it is worth cleaning right down to the concrete.
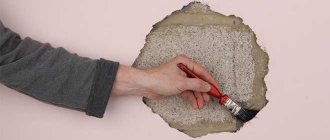
Priming the cleaned surface will be the next step. The soil is selected based on what material will serve as the base and the humidity of the room. Betonkontakt is suitable for concrete; for other materials, a different primer will be required. The strength of subsequent layers depends on its quality and compliance with the material of the surface on which the primer will be applied, so you should not save money here.
After the primer layer has dried, you can begin to eliminate defects. As a rule, several layers are applied. The starting mixture is applied first. It has a coarser structure, but allows you to get a thicker layer on the surface.
Quite often, instead of the starting mixture, the composition that was previously plastered on the ceiling, diluted to a more liquid state than usual, is applied.
For lime coatings, it is lime mortar that is used, and for cement plasters, only cement mortar is used.
The base is moistened with water, and about five millimeters of liquid solution is applied to it. When it has thoroughly set, a cross is made on its surface - crosswise, with a spatula or trowel. This is necessary for better adhesion of the finishing coating to the applied layer of solution. You can make several passes with this mixture until the desired thickness is achieved.
After the starting layer has set, the final, finishing material can be applied. It is applied in a thinner layer, usually not exceeding five millimeters. After application, the surface is rubbed with a special felt float until a uniform surface of the repaired area is obtained.
The restored part is ground in such a way that it forms a single plane with the undamaged areas.
If the plaster has dried out during the repair process and is not rubbing well, it can be lightly moistened with water from a spray bottle.
When the surface has been restored, you should wait until the area dries and carry out the final painting.
Common mistakes when painting the ceiling
Common mistakes when painting a ceiling relate to the quality of preparation of the base surface, paint preparation, choice of application tool and painting method. Most often, defects appear due to the use of thick paint. Your mistakes in this case:
- high concentration of glue in paint;
- thick layer of coloring composition.
Correction of defects will also be necessary in case of poor preparation of the base surface:
- the paint comes away from the base due to the presence of dirt or particles of wax mixture on the ceiling;
- efflorescence appears when applying paint to a very wet base;
- rubbing occurs if you paint without a preliminary primer or over old paint;
- Irregularities and veins on the ceiling appear if the cracks are covered with gypsum and a high-quality primer is not applied.
It is equally important to follow the painting technology and know in which direction to paint the ceiling. Otherwise, the following problems will arise:
- stripes and stains appear if the coloring composition is not mixed before use or if the brush (roller) is pressed unevenly;
- if the direction of painting is violated, streaks from the tool will be visible (the first layer is painted perpendicular to the windows, and the second - parallel);
- folds appear when using too thin or thick paint;
- Unstrained compounds result in bumps and unevenness (we will tell you later how to correct unevenness on the ceiling after painting).
Add water to the mixture
Many people add water to the finished solution, seeing that it has begun to set or is losing consistency.
This is wrong, since the properties of such education are already different from those that are necessary for work.
By adhering to simple rules of work and avoiding these mistakes, even a non-professional will be able to properly repair his home.
Do you know what mistakes cause fresh plaster to fall off the walls? Share your experience in the comments.
Did you like the article? Subscribe to us in Yandex Zen. By subscribing, you will be aware of all the most interesting news. Go and subscribe.
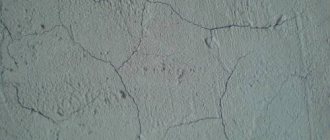
Causes of crack formation
Crack formation can be caused by various reasons. On surfaces made of different materials, cracking appears under the influence of various factors.
So, a crack in a plasterboard ceiling can occur due to the following:
- A common reason is due to a violation of the technology for installing wooden sheathing. Due to the fact that wood is subject to deformation and changes in linear dimensions due to changes in temperature and humidity, a small gap must be left from the end of the batten to the wall. If this is not done, the frame will deform and the ceiling will crack.
- If sickle tape was not used when filling the seams between the plasterboard sheets, the solution will become covered with a fine network of cracks over time. It is especially important to reinforce seams in new buildings, which will still shrink.
- Sometimes frequent changes in humidity and temperature in the room lead to cracking of the ceiling.
Tools and materials
Before sealing the ceiling, prepare everything you need for work. Depending on the complexity and scale of the operation, different materials and tools will be useful:
- vacuum cleaner;
- spatulas of any size;
- ladder;
- spray bottle with clean water;
- primer;
- putty;
- paint grater or sandpaper;
- knife;
- dense polyethylene film to protect floors and furniture;
- PVA glue;
- brush and roller for applying primer;
- headdress;
- gloves;
- glasses;
- solution container;
- brush with metal bristles;
- scrap of cotton fabric;
- polyurethane foam;
- screwdriver and hammer;
- sealant;
- serpyanka or painting mesh.
Separately, it is worth mentioning how to cover up cracks in the ceiling. If the work will be carried out in a room with high humidity, then it is better to choose acrylic putty. For rooms with a normal microclimate, cement or gypsum mortar is suitable.
What to do?
If the cement-based plaster has come off from the aerated concrete, then you need to completely clean it off and reapply it.
First, it is advised to finish the walls inside the room, and only then finish the facade.
The plaster may come off due to constant changes in humidity. You need to find the source of the increase or decrease in humidity and correct it.
If this happened due to a mixture of poor quality or an old composition, then you can only completely remove the old finish and apply a new one.
The problem should be carefully studied; perhaps this was due to subsidence, which appeared due to the fact that the plaster preparation time specified by the manufacturer was not followed. Then just redo everything.
When applying the mixture in hot weather, it is necessary to slow down the drying of the walls. To do this, they are moistened from time to time.
But if cracks do occur, then the walls are rubbed with mortar or gypsum dough. If the gaps are too large, they are widened, cleaned, moistened and plaster is applied.
Try placing paper tape over the peeling plaster area. If the tape breaks, you will have to start all over again.
Sealing cracks in plaster has its own algorithm of actions, filled with some subtleties that require careful study.
Subtleties of sealing cracks:
- It is advised to buy a mixture of the same brand that was used previously.
- You cannot work at air temperatures below +5°C and at humidity levels above 80%.
Restoration work
Plaster repair also involves removing stains from the wall surface. They appear during operation and can be caused by grease, soot or rust. It also happens that the stains formed before the finishing work. In this case, you will have to solve this problem before you start gluing wallpaper or laying tiles. Restoration work is as follows:
- For greasy stains, use a two percent hydrochloric acid solution. The entire surface with stains is treated with the composition until they disappear.
- As for rust stains, copper sulfate or a two percent solution of hydrochloric acid will help to deal with it.
- If the stains are deeply ingrained into the plaster and cannot be cleaned, then you will need to seal the area with dye or white.
Advice! Whatever surface you're cleaning, it's important to clear it of dirt and dust first. Only after this other manipulations are performed.
The restoration of the surface under the tiles requires special attention. The procedure is as follows:
- using a rubber mallet, tap the surface of the wall. This is the only way to identify a peeled or poorly fixed area;
- When the area is found, you need to knock harder so that the tile falls off. If it is not removed in this way, then you will have to act radically - break it. The process requires accuracy: the tile is broken from the center so that the adjacent one is not damaged;
- If after removal there is a strong layer of plaster left, then it is not necessary to knock it down. The new tile should be glued more securely using a special glue;
- when the plaster falls off, the area is cleaned, primed and plastered again. After drying, a new tile is glued.
Step-by-step instructions for eliminating defects
Dismantling old plaster
You can repair a wall with fallen pieces of plaster yourself. The work is not difficult. You just need to follow the instructions. Alternatively, you can completely remove the layer and apply a new one. But it is more profitable to plaster the damaged areas. It all starts with an inspection. It is important to identify areas that need repair. You will need a wooden mallet. You will have to lightly tap the wall. If a dull sound is heard, then the train has moved away.
Then the sequence is as follows:
- After the inspection, you need to remove the old plaster. We do not touch the places where it holds well.
- Next, the seams are cleaned if it is brickwork. The surface is cleaned of debris and dust.
- A primer is applied to the wall. It is needed for better grip.
- After the surface has dried, the wall is slightly moistened and the solution is applied. If a large part of the wall has peeled off, you will have to use beacons and a rule. This is the only way the surface of the wall will be perfectly flat.
- For minor damage, the plaster is removed in the shape of a square or rectangle. The area is processed according to the previously described method, and the recess is filled with the prepared composition. It is important to adhere to the proportions so that the mixture has the correct consistency.
- Another restoration option is restoration with corks. In the right places, a hole is drilled to the base, primed, filled with mortar and plastered.
Note! For wooden walls, use limestone mortar. However, it is not suitable for wet surfaces. It is better to resort to a cement mixture. It is recommended to treat corners with gypsum plaster, as it sets faster.
Why do walls crack after plastering?
If you cover a wall with a plaster composition without following the technology, it will definitely crack:
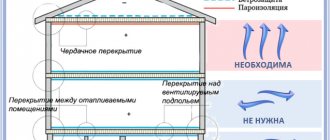
- Aerated concrete is vapor permeable, which is why the plaster applied to aerated concrete must also be vapor permeable. It is even better if it has stronger vapor permeability than aerated concrete, otherwise steam will accumulate in the coating and it will crack.
- You also need to remember that finishing must be done in one day. Otherwise, the next day the air temperature and humidity will be different, they will change the conditions for the mixture to solidify, and the wall will crack.
- If moisture gets on and under the plaster during work, it may crack.