Painting plasterboard walls and ceilings is a popular method of surface finishing, as there is a wide selection of paints that differ in texture and composition. But before applying the finishing layer, the surface must be perfectly flat. In this case, you will need to putty the plasterboard sheets. Not everyone knows how to putty drywall for painting, but the process is simple. Even a beginner can cope with the task if he follows all the technology.
Tools and materials
Before starting work, you need to prepare the following devices:
- putty knife;
- paint bath;
- grater;
- sharp painting knife.
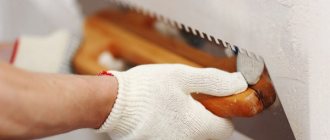
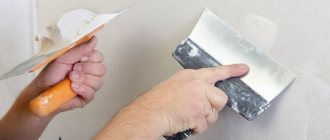
The main thing in this matter is the spatula. Without it, do-it-yourself drywall putty for painting is simply impossible. Its width should be 50-60 mm, then it will be possible to work out the joints and crevices, since a lot of putty will be required. To reinforce and putty seams, you need to take a wider tool. To apply the finishing putty, use the largest spatula up to 500 mm wide.
The tool must have a perfectly flat surface. Otherwise, the applied composition on drywall will form an uneven surface, making it visually unattractive.
Also, the spatula must be completely clean, free of dust and other contaminants. Preparing drywall for painting requires a certain order of work. Below we will consider this process in detail and step by step.
Key points in preparing plasterboard walls for painting
What else you need to pay attention to when carrying out preparatory work if you plan to paint it yourself:
Tools for painting drywall
- Apply paper tape to the corners and other areas near the painting area where you do not want paint to come into contact. This will allow the work to be carried out more accurately.
- Do not use tape on textured surfaces where it may not adhere well and paint may bleed underneath it.
- Remove electrical outlets and switches from walls that will be painted. Cover the floor with newspapers or plastic sheeting to protect it from paint drips.
- Cover doors, windows and furniture that cannot be removed from the room with protective material.
- Make sure that all the necessary materials and tools for the upcoming molar work are on hand and place them in the center of the room if possible.
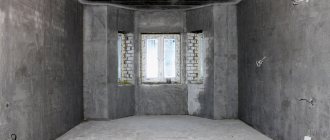
Room prepared for painting
The photos and materials presented on this page provide instructions for preparing drywall for painting.
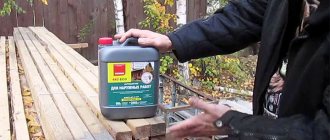
Application of primer
For better adhesion of the putty to the plasterboard surface, it is necessary to apply a primer. It is applied only to a dry and clean base, so all dirt and dust must be removed before preparatory work. You can use a vacuum cleaner and a slightly damp cloth.
The primer composition should be prepared according to the instructions, poured into a container and applied to the surface using a roller or brush.
There are two types of primer for treating drywall – for dry and wet rooms. If the treatment is carried out in the bathroom and kitchen, then you need to prime the drywall before painting using a product for rooms with high humidity. It is important that the primer contains antibacterial substances that will protect against the development of mold and fungi.
The following reasons for using a primer composition can be identified:
- Improves adhesion of materials.
- When removing wallpaper, a primer will allow you to do this without harming the gypsum board. If you glue wallpaper directly onto sheets of drywall, you won’t be able to replace them without damaging the material.
- The paint will be absorbed much less, making it possible to apply paints and varnishes to the surface evenly without causing stains.
What is the difference between preparation for wallpaper and painting?
Although the plasterboard sheets are quite smooth, if the putty is of poor quality, joints, screw installation points, and incorrectly placed corners are visible. Even thick wallpaper cannot hide such defects, and when painted they become even more noticeable.
Putty for different types of finishing differs in requirements for surface quality:
- Under thick wallpaper or wallpaper for painting, fiberglass, decorative plaster made from materials of coarse fractions, it is allowed to apply putty with minor defects. Subsequently, they will be disguised under a layer of finishing.
For painting, thin wallpaper, thin-layer decorative plaster, the surface must be perfectly flat and smooth. Preparation requires more time and materials. You may need to apply at least 3-4 coats and sand each one very carefully.
In Europe they use their own line to indicate surface quality Q1-Q4. The lowest category Q1 is used when laying panels, tiles and other piece facing materials. Q2 is suitable for textured coatings, Q3 for matte paints, thick wallpaper. Maximum smoothness is characterized by Q4 surfaces, which are prepared for materials with a fine structure, semi-matte and glossy coatings.
Puttying joints
When processing plasterboard walls, it is important to carefully work out the joints between the sheets. On the sides there are special chamfered recesses, which are used to fill the joints with putty and reinforcing tape. In this case, it is especially difficult to putty a plasterboard ceiling for painting. It is quite inconvenient to do such work with your arms raised above your head, when the material may fall on your face.
If, after cutting the sheets, the chamfered edges are cut off, and the joints are straight and without indentations, then you will need to create these indentations yourself, using a knife or a special finishing plane.
Procedure:
- Using a well-sharpened knife along the entire joint of the sheets, it is necessary to cut the extreme part at an angle.
- You can go over the gypsum base with a plane in advance so as not to do this work locally.
- After these steps, a small depression should form. It will go along the entire joint.
- You can use a simplified joint preparation scheme by cutting the edges of the sheets forming the seam at an acute angle. But then it will be impossible to use a reinforcing mesh, therefore, the sealing of the seam will not be so strong.
Aligning plasterboard ceiling joints
To ensure a high-quality application of a layer of putty on a gypsum board ceiling before painting, it is necessary to seal the joints. To do this, you must follow a certain order:
- Use a brush to remove dust from the ceiling.
- Plasterboard sheets that do not have a factory edge are cut at the joints at an angle of 45 degrees.
- Cuts are made along the entire length of the joint using a painting knife.
- Mix the starting putty and apply it to the joints and places where screws are screwed in, performing criss-cross movements.
- Next, the areas where the plasterboard profiles are located are sealed.
- The surface is left to dry the putty.
- Then a primer is applied. It should be remembered that the primer increases surface adhesion and prevents moisture absorption. The best option for gypsum boards is an acrylic-based primer.
- After the last layer has dried, apply sickle tape to the corners and seams between the plasterboard sheets. In this case, the seam should run in the middle of the tape.
- The entire surface is leveled with putty, and after it dries, the treated areas are sanded.
Seam reinforcement
Finishing drywall for painting includes the process of reinforcing the seams. To complete this job you will need sickle tape. It is made self-adhesive and is sold in narrow rolls. Seam reinforcement is carried out in two ways:
- Serpyanka tape (or fiberglass) is fixed right before puttying. You need to start gluing the serpyanka from the very top of the ceilings. It is carefully unwound and pressed tightly against the surface of adjacent plasterboard sheets. The joining seam should go straight down the middle of the tape.
- The mesh is embedded in the newly applied layer of putty using a narrow spatula. Experts consider this method preferable, since the reinforcing mesh will be located in the middle of the putty layer, so it will do its job more efficiently. As a result, puttying of drywall for painting will be done with the highest quality in all places.
How to calculate the required amount of mixture?
First you need to know exactly the area of the surface to be finished (it can be easily calculated; for this you need to look at the exact dimensions of the plasterboard sheets indicated on the label and add up all the numbers).
The amount of material will depend on the degree of complexity of the work, that is, the more defects, roughnesses and irregularities, the more putty and time it will take to apply it. There is a general formula that will help determine the required amount of mixture and it is calculated by multiplying 1 kg of putty (+100 g) by 1 square meter of wall or ceiling surface (provided that they have been previously primed). The formula is suitable for calculating dry mixtures. If a gypsum-based mixture was chosen for finishing, then you do not need to add 100 grams to it. There is an even more economical option - adhesive putty, you only need 500 grams per 1 square meter.
Choosing putty for seams
For high-quality sealing of joints, it is important to buy a suitable putty composition. All mixtures can be divided into two large types - base and finishing products:
- Basic compounds are necessary for deep leveling of the surface and for repairing large defects on the wall: cracks, chips. Their main advantage is that when producing a putty mixture, coarse-grained components are used as filler. Thus, a strong bond is formed between the filler and the binder component. This will allow you to apply the composition in a thick layer of up to 5-7 mm. The surface to which the base coat has been applied will be rough and rough.
- Finishing mixtures are used for final leveling of the surface. They contain a fine filler, as a result of which the treated surface becomes smooth and is suitable for finishing decorative processing.
Is it necessary to putty drywall before painting with both types of putty? It is necessary, but only in the case of joints. For all other areas, finishing putty is suitable, since the gypsum board has already created a smooth coating for us.
To putty the joints between sheets of drywall, you only need basic putty compounds. This mixture has increased strength, so it is able to reliably seal the joints between individual sheets of material.
To make basic products, cement is used as a base, and coarse quartz sand is used as a filler. The resulting composition can be used in rooms with high humidity, since cement, after hardening, is not afraid of dampness.
You can purchase basic putties with polymer and gypsum base. They cannot be used in damp rooms, since gypsum is hydrophobic and swells, cracks and deforms when in contact with water. Polymer mixtures can be moisture-resistant, but there are some that can undergo deformation under the influence of moisture.
How to paint drywall?
All that remains is to choose the color and type of paint to be used. You can immediately put aside all oil paints and enamels - they are quite toxic, and therefore painting
using them on walls after puttying in a residential area is extremely undesirable. However, even without them there is plenty to choose from.
- Water-based and water-dispersed paints. They remain leaders in the class because they are the most affordable in price and allow you to give the walls almost any shade: dyes are added to the snow-white base until the desired tone is obtained. In addition, they provide the opportunity to give the surface both a glossy shine and a matte dullness.
- Acrylic paints. More resistant to moisture, available in both gloss and matte, but more limited in color range. In addition, they are more expensive than the previous position.
Both options are suitable for painting permanently damp areas such as bathrooms. What did you use to paint the drywall after finishing the plaster?
Finishing a room with plasterboard sheets is an excellent option for lovers of beauty, practicality and reliability. GKL have many advantages, they are environmentally friendly, easy to install (which allows you to work alone), inexpensive, and they are very smooth, flexible and plastic, but is it necessary to putty drywall? Definitely, yes, because it cannot be left without finishing due to its unpresentable appearance and visible joints, which means that it will need to be finished with decorative plaster, painted or covered with wallpaper. Drywall will need to be plastered before painting, otherwise the paint will lie unevenly and highlight all the imperfections of the surface being finished. Is it possible to paint drywall without putty?
You can do without putty if the repair needs to be completed as quickly as possible, but any specialist will never advise skipping this stage, because during subsequent repairs, removing the old material, for example, wallpaper, will lead to damage to the plasterboard sheets, therefore, in addition to the new finish, you will have to change all the sheathing, but paint the bare drywall
absolutely not recommended.
Treating seams with putty
Before you properly putty the drywall for painting, you will need to finish the seams. To complete this work, you will need a container for diluting the composition and a spatula.
Procedure:
- Gypsum and cement compositions are sold in the form of dry mixtures, but polymer ones are ready for use. The reason is the very complex technology for diluting polymer drugs and the need for strict adherence to it.
- To obtain a solution of the required consistency, the dry mixture is combined with water in the proportion indicated in the instructions. Mix everything using a drill with a mixer attachment.
- To obtain a solution of the required consistency, you can add water to the container. It is important that the finished mixture resembles thick sour cream - it is plastic and at the same time viscous. Then you can avoid smudges after applying putty to the wall. It doesn’t matter how the drywall was prepared for painting, because the wrong consistency of the solution will ruin everything.
- Apply the solution using a spatula. Make sure that its width is wider than the groove formed by the edges of the drywall sheets (50 cm on each side).
- You need to start work from the floor, moving the tool from the bottom up. It should be pressed firmly against the sheets to avoid the appearance of lumps and sagging.
- If it was not possible to avoid their appearance, then you need to remove them urgently, otherwise the solution will harden and this will be much more difficult to do.
Tools you'll need
Tools for painting and plastering works
Brushes. There are many varieties, sizes and types of brushes on the market. Their main purpose is to paint hard-to-reach places.
Rollers. Working with a roller is considered faster and more productive. To get the best result, its work should be combined with brushes.
Spray gun. A universal product for painting surfaces. Its only drawback is its high cost. If you have the opportunity to rent it, don't miss your chance. You will reduce your nerves and time.
Spatula. Designed for working with putty and covering bumps, cracks and uneven wall defects.
Drill. With the presence of special attachments, it makes it easier to stir paints and mixtures for painting drywall.
Buckets. Necessary container for diluting mixtures and paints.
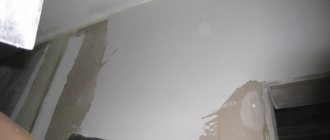
Applying finishing mixture
As soon as the base composition finally becomes solid, you can move on to the final stage. Let's figure out how to properly putty drywall for painting.
Finishing putty is designed for finishing immediately prior to painting. To make it, gypsum or polymers are used. To prepare the composition, you must also follow the manufacturer's instructions.
To work with finishing putty, you will need 2 types of spatula - wide and narrow. Using a narrow tool, it is convenient to take the solution from the container, and you need to distribute it evenly over the surface to be treated in a thin layer with a wide spatula. Next, the mixture should be distributed over the entire plane of the wall in a thin layer with sweeping movements.
You need to start work from the top corner so that drops of solution do not fall on the already treated surface. When the finishing layer hardens and dries, you need to go over it with sandpaper to eliminate minor imperfections and completely prepare the drywall for painting. Before painting, apply a primer, and you can cover the surface with any paint and varnish compositions.
There are situations when it is not possible to apply putty onto drywall perfectly the first time. To verify the quality of the work done, you can take a table lamp or flashlight, turn off the light and illuminate it from the side, at the smallest angle of incidence of the light rays. In this situation, the smallest defects will be noticeable. If there are any, you can remove them with sandpaper, and if the defects are significant, you will have to apply another layer of putty.
However, don’t be too upset, because when checking in this way, even professionals can see “shortcomings”. You can learn how to putty a plasterboard ceiling for painting in the video below.
Recommendations from professionals
In some cases, you can get by with a smaller amount of work and only seal the seams, corners and recesses from self-tapping screws, rather than applying putty to the entire surface of the gypsum board.
Experienced experts advise doing this in the following cases:
- If high quality drywall was used, perfectly smooth, without defects;
- GCRs must be of a light shade, otherwise bare darker spots will show through the paint;
- If you plan to use thick or textured paints.
At the same time, priming the entire surface cannot be abandoned. This type of preparation has important tasks: protection from moisture, fungus and mold, improving the adhesion of paint to the base, reducing the consumption of finishing materials.
If you do not have experience in finishing work, then it is better to choose paint in matte shades - it does not emphasize the flaws of the base as much as glossy ones. The thicker the composition, the fewer layers will need to be applied and the less noticeable minor irregularities will be.
It is necessary to prepare plasterboard structures for painting in any case. The work consists of several simple steps, so you can easily do it yourself. Compliance with the sequence of work is of great importance for the result; you should not neglect any of the finishing stages, only in this case the walls and ceiling for painting will look beautiful and retain their attractiveness for a long time.
Nuances at work
To get a good result from the work done, you must adhere to the following recommendations:
- Plasterboard puttying for painting is carried out at temperatures from +5 to +30 degrees.
- Avoid direct sunlight when leveling.
- To prevent the putty from forming cracks after application, it is important to follow the work technology. A common mistake is an incorrectly prepared solution.
- Cracks can form when applying the mixture in a layer of more than 1.5 mm at a time. Only the use of a primer at each stage of work will allow for a thin application.
- Be sure to wait until the putty has completely dried before applying the next layer.
- Do not allow drafts in the room.
Well, in addition to following all the technology for applying the material, its high quality remains important, so purchase putty only from trusted manufacturers.
Procedure for painting drywall
The main requirement when painting plasterboard sheets with your own hands is compliance with the general order of work. This algorithm has the following form:
- carrying out work to prepare the surface of sheets for painting;
- selection and purchase of paint;
- applying markings to the walls and ceiling (if necessary). Typically, markings are made by applying paint of several colors to the surface.
After these steps, the final step will be to give the ceiling or wall its final appearance.
Features of preparatory work for do-it-yourself plasterboard walls
In all cases, before plastering gypsum plasterboard structures, a series of preparatory measures is carried out. Immediately after installation, their surface is not ready for applying a finishing coating. Often during work, dents form, corners crumble, and there are always indentations at the joints and from hardware.
Wall preparation includes the following steps:
- Arrangement of the work area
. You should remove from the room all interior items that may be damaged by dust and drops of mortar. It is recommended to lay plywood, cardboard or particle boards on the floor. Cover furniture, windows and lamps with mounting film.
- Cleaning from dust and adhered plaster crumbs
. Removing inscriptions that may appear through the solution. The pencil is erased with an eraser, the marker with alcohol, and the inscriptions with acetone.
- Checking surface smoothness
. Protruding screws are tightened or replaced. New hardware is screwed into the frame at a distance of 2-3 cm.
- Sealing seams
. The chamfer is cut and cleaned of dust. The primer is applied and dried. The seams are filled with grout. A strip of reinforcing material is placed and pressed on top of it. Then another layer of mortar is applied, which is smoothed with a wide spatula. Chips at the corners of the slabs are repaired in the same way.
- Masking holes from hardware
. The mixture is driven into them with a sliver, pencil or other object with a blunt end so that there is no air left inside. Then these places are covered with a narrow spatula crosswise with the solution.
- Strengthening external corners
. To do this, it is better to use a perforated plastic profile with a mesh. The corners of the drywall are leveled, cleaned, primed and covered with putty. Then the profile is pressed into it and sealed with the next layer of the mixture.
- Sanding and polishing
. First, the surfaces are rough treated with a float. As wear and irregularities decrease, the meshes are replaced. Finally, polishing is carried out with fine sandpaper.
- Antiseptic treatment
. Applicable to types of gypsum boards that are not waterproof.
- Primer coating
. You should make at least two passes to thoroughly saturate the material.
The prepared surface, although not perfect, has sufficient adhesion and smoothness to apply a hard topcoat. But it is not suitable for roll or liquid finishing due to its heterogeneity and insufficient strength. Thus, the answer to the question of whether it is necessary to plaster drywall under wallpaper is positive. Otherwise, it will not be possible to achieve a result that meets all quality criteria.
Basic special tools
The main tools include those without which you simply cannot work when puttingtying drywall, these are:
- spatulas,
- roller,
- bath,
- mixer,
- Sander.
Spatulas must be selected according to your hand; too long, too short amenities will add little. How to understand this? First, buy what the store recommends and try to work. You will see for yourself if the mixture constantly falls off the spatula or there is too little of it, it is not suitable.
The roller should be selected wide for large surface areas, narrow for corners, protrusions, columns. When priming walls, you need a handle to the roller. The most convenient option is a telescopic holder, but a mop stick will also work. You will need a fluffy roller, one that wets well. It should not “shed”; the less lint on the wall, the better the quality of the primer, but it doesn’t matter if hair gets into the primer, further work will hide the defect.
Tools need to be selected individually for yourself
The bath is selected according to the size of the roller. The quantity depends on the number of people performing the work.
A mixer is a power tool designed for preparing small volumes of building mixtures. You can replace this with a regular drill or hammer drill. Be careful when using a tool not intended for preparing mixtures, take into account the technical characteristics. Overloading is unacceptable, otherwise it will burn out.
A grinding machine is a power tool designed for mechanical grinding. It can be replaced with a block of sandpaper.
Tools should always be at hand
How to putty a ceiling: 3 tips
There are several life hacks on the topic of puttying the ceiling with your own hands:
- A fugenfüller will help save time and effort on processing seams. It is a tough and durable putty that is an excellent substitute for adhesive tape.
- The usual construction rule will replace a wide spatula and speed up the work process. But it should be constantly soaked in water so that no lumps remain on the surface. It’s simple - the mixture is usually applied with a small spatula, and then the ceiling is treated with this tool, trying to move quickly and maintain a layer of 1-2 mm.
- To make the ceiling ideal, it is better to use high-quality lighting. Regular spotlights will do.
Denis Mosin
Master finisher. 17 years of experience. Decorative plaster expert
Ask a Question
To dry layers quickly, it is better to leave doors and windows open. Experts say that ventilation does not spoil the primer and putty.
Primer for drywall
The primer performs two different functions. The first is that it improves the adhesion (adhesion) of two materials. As a result, when puttying, the chances of bubbles forming and material peeling are reduced. The second function is that it evens out absorbency. The result is less material consumption, and when puttying, a more even surface. So it is not advisable to skip the primer.
When finishing work, it is necessary to prime before each new stage. For example, before puttying, plasterboard sheets need to be primed to improve adhesion to the putty. Before painting or wallpapering - to reduce the consumption of paint and glue. You also need a primer before applying the finishing layer - the starting layer has to be leveled, which is why the surface turns out dusty. Without primer treatment, the finishing layer does not apply well, rolls off and may even fall off.
Primer for plasterboard from Ceresit is also suitable for interior work, but is not suitable for subsequent painting.
What primers are needed? Depends on the stage and the type of finishing material:
- Before puttying gypsum board (starting and finishing layers), use a deep penetration primer or for porous, highly absorbent surfaces.
- The same composition can be used before painting and wallpapering.
- The putty surface of the plasterboard under the wallpaper can be primed with wallpaper glue diluted with water. The proportions are indicated on the glue packaging.
- When painting, you need to look at the manufacturers' recommendations. Sometimes the primer is paint diluted with water. If there are no other instructions, use a deep penetration composition.
To summarize, it is worth saying that priming is a necessary operation. It allows you to get good results and reduce material consumption.
Surface preparation
After sealing the seams with self-tapping screws, let the solution dry. Now the surfaces have the same base for laying a layer of putty. When everything is dry, it’s time to prime the surfaces of the gypsum board sheets. They are primed twice, provided the previous layer has dried. Moreover, make movements with the roller perpendicular to (or close to) the dried layer. It is more convenient to prime diagonally. The next layer is also primed diagonally, only perpendicular to the first. Due to this, good quality of work on priming the base is achieved.
After sealing the joints, let the plaster dry
Sealing screws and seams
For seams there are special compounds Knauf-Fugen, Knauf Uniflot, Fugenfuller, Volma Montazh, etc. After the soil has dried, dilute the putty to the consistency of thick sour cream. Please note that these putties dry quickly, so dilute a small amount at a time.
We take a small spatula, apply the composition to the places where the screws are installed, and remove the excess. There should be just enough putty in this place so that the surface is even. This way we go through all the screws. They can be sealed parallel to the seams, or they can be sealed first. It doesn't matter.
The principle of working with putty is that the mixture is placed on the edge of the spatula, then it is stretched in the right place
There are two types of drywall joints. Along the long side of the gypsum board, the edges are uneven - for easier sealing of this joint. But the sheets are also connected in height, where there are no ledges. You also have to cut the sheets and the joint is also end-to-end. Such connections require special technology, which will be discussed below.
Vertical joints
When puttingtying vertical joints of drywall with normal factory edges, they are first carefully filled and then glued.
After filling, while the composition is still wet, it is glued with a sickle mesh or paper reinforcing tape. This is necessary so that cracks do not form at the joints. If tape is used, it is torn into the required pieces and soaked in clean water for 10 minutes (while the seam is being filled).
The mesh is recessed to the required distance
Having filled the seam, take out the tape, hold it between your fingers, remove excess water, and glue it to the seam. Then take a spatula 8 cm wide (this is a must) and press the tape below the surface of the gypsum board. She “sits” on one of the factory ledges. They begin to press from the middle to the edges. When pressed, the putty is squeezed out from under the tape; we collect it. As a result, if you apply a wide, hard spatula (at least 20 cm wide) to the surface, you can see that the tape is below the surface of the cardboard. Then they go through putty again, leveling the joint level with the surface.
Trimmed seams
It is better to putty plasterboard in places of horizontal joints - where two slabs are connected or on vertical ones, but without edges, after pre-treatment. First, the surface is moistened with water - dip the brush in water and coat the joint well. Walk several times until the plaster gets wet. Then use a sharp knife to cut grooves at an angle of 45°. These joints can be treated before priming. It's even more convenient.
Preparing seams for putty
We coat the prepared joints with primer. After drying, fill the seam with a composition for puttying drywall joints. It is more convenient to work with spatulas 10 cm wide and hard 20 cm. Apply the composition with a small one, and remove the excess with a large one. Fill well, pressing the composition into the seam.
Once again we go through the seam, applying fresh putty about 0.5 mm thick, take the soaked reinforcing tape and glue it to this compound. We take an 8 cm wide spatula and press the tape well to the surface, squeezing out the excess putty from under it.
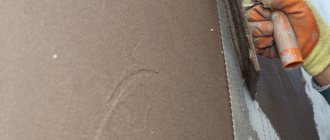
Puttying of cut seams on gypsum boards
In this case, a wave of paper is formed (you can see it in the photo), we make sure that it does not wrinkle, we catch it to the end, where it straightens out. Remove excess solution into the tape and adjacent area of the sheet. And the last stage - again take the putty and coat the pasted tape on top with a thin layer. We make this layer as thin as possible, as they say - “to tear off”. Actually, we stretch the remaining putty in a very thin layer.
Second technology: first tape then putty
There is a second technology - first, serpyanka or paper reinforcing tape is glued onto the plaster, then it is puttied. This works faster, but the disadvantage is the voids that remain under the tape. In these places, the wallpaper may wrinkle or the putty or decorative plaster may crack.
This is how you stick serpyanka onto drywall
They also use sickle mesh instead of paper tape. Serpyanka is more difficult to work with - it is rigid, its edges often stick out from the mortar. To make it a little easier, the mesh is pre-glued, and after the glue has completely dried, it is puttied. In order not to think about glue and speed up the work, use a self-adhesive serpyanka (there is such a thing).
An example of puttying a seam with serpyanka
But, anyway, it’s more difficult to putty drywall - its surface is uneven, the spatula “jumps” on the fibers and you get a small wave that is not at all easy to smooth out.
External and internal corners
External and internal corners on plasterboard walls and partitions are made using:
- reinforcing paper;
- serpyanka;
- perforated aluminum corners;
- special metal corners Shitrok with paper.
Paper and serpyanka are most often used to decorate internal corners - the junction of walls, as well as walls and ceilings. The technology is similar to seam sealing. A certain amount of putty is applied to the corner, paper or sickle is glued onto it, the reinforcing strip is pressed into the composition with a narrow spatula, and excess putty is removed. After this, they go through the corner again, applying a thin layer of putty on top.
Perforated corners are used to design external corners - slopes, protrusions, etc. First, a piece of the required length is cut. The metal is very thin, it can be cut even with ordinary large scissors, but if you have metal scissors, the work is easier. Edges are cut at an angle of 45° or less, rather than at 90°. So, when puttingtying drywall, the edge will not curl up.
Decorating the outer corners of plasterboard walls using a perforated corner
Putty is applied to the outer corner on both sides in small islands approximately every 10 cm (can be done in a checkerboard pattern). A perforated corner is pressed into the solution, its installation is checked whether it is vertical or horizontal, and adjusted. Use a spatula to pick up excess mortar, aligning the edges in one plane with the surface of the sheet. The installed corner is left for some time until the putty dries, after which it is sanded and puttyed again if necessary.
What is different about the metal corner Sheetrock? Thin strips of metal are applied to a paper base. They are more rigid than simple reinforcing paper, but it is more convenient to work with them than with conventional perforated ones, since due to the presence of paper the transition to plane is smoother.
Step-by-step instruction
Installing the tape
The puttying procedure, which is carried out before painting, differs from that for wallpaper, although it has a lot in common. It always starts with caulking the joints between adjacent sheets. Instructions for carrying out puttying work:
- Apply a little mortar to the joints and install reinforcing tape. If it is self-adhesive, then you can do without putty;
- then we apply the solution over the tape and carefully distribute it over the entire joint surface;
Solution distribution
- the solution must be evenly distributed between the entire surface of the groove formed by the edges of two adjacent sheets;
- smooth out any unevenness remaining after the solution has dried with sandpaper;
- After this, we seal the joints of the plasterboard sheets with the ceiling and walls. Here you can use a thicker solution to create a strong bond between the sheets and adjacent surfaces;
- then we cover all the screws. But here you need to first check all fasteners for protrusion from the sheets. If any are found, simply tighten them;
- then apply the second layer. Here the entire surface of the wall is already captured. Therefore, we apply the solution in a very thin layer. This is done in order to even out the overall color of the ceiling or wall. This way the paint will apply evenly and without lumps;
Ceiling putty
- rub the second layer until perfectly smooth;
- After the solution has completely dried, prime the surface. It is recommended to apply several layers to create a good protective layer and prevent uneven penetration of the paint into the material.
If you do not apply a second layer of putty, which you can safely do without when wallpapering, then when applying light paint, the transition will be very clearly visible. To get a smooth surface, experts recommend using ready-made mixtures in this situation rather than kneading them yourself. Self-prepared putty may be poorly mixed and contain lumps. They will lead to roughness, which will remain noticeable during painting. The process of puttying plasterboard sheets for painting is not difficult. The main thing is to consistently follow the above instructions, and you will get an excellent surface, ideal for painting.