5921 0 0
Merlin May 5, 2018
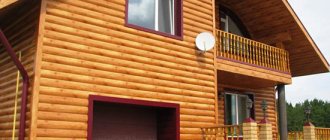
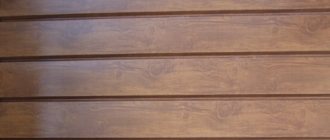
It is more convenient to sheathe long walls using the overlap method
Vinyl siding is the leader in finishing small buildings. If the walls are long and the panels do not meet the standards, the cladding of the house is done with an overlap. Installation technology has its own nuances. Let's talk about styling rules that will help you avoid mistakes and get a good result.
Features of installing overlap siding
Siding is one of the most popular options for facing materials for building facades.
Vinyl siding panels have a significant coefficient of expansion, so in cold weather the material contracts, and when heated by the sun or on a hot afternoon, it expands.
Features of siding coating without the use of a connecting element:
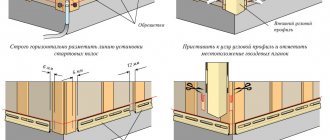
- If you overlap the strips in length less than 25 mm, under certain conditions a gap will appear. Snow and rain will fall into it, which will destroy the material of the building wall.
- A certain temperature gap is created between the guide element of the sheathing and the panel itself, in addition to observing the amount of overlap. When installing in summer, such a gap is made 5 - 6 mm; in winter, in cold weather, up to 15 mm is left. This will help maintain the integrity of the joint between the rows of panels.
- An overlap joint has a certain thickness, so siding without a joint strip is mated over the entire area below the underlying strip. The joint is also covered from above with an uncut section of the panel.
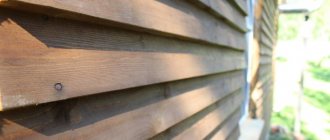
From some angles, the overlapping joint of the panels becomes visible. As temperatures change, the connection will always be less or more noticeable. The installation of the upper strip is done from the shadow side in relation to the lower flat element.
Advantages of overlap joining:
- saving on materials (H-planks and hardware for them);
- connecting strips violate the integrity of the walls, “cut” them into separate sections, so without these elements the facade looks harmonious;
- H-plank is not always precisely matched in color, and draws more attention to individual sections of the walls, and siding without joints is always the same shade.
Some argue that the savings on the H-profile are questionable, since the consumption of panels for the joint overlay increases. But when connected to strips, much more waste is obtained due to the fact that they are small for installation in the proposed segment, and still do not fit anywhere else.
There are also disadvantages to overlap joining. If you violate the installation technology, the panels will skew and the joints will be noticeable due to unevenness. Neglect of temperature expansion gaps or their insufficient size causes the panels to wavy, so the siding joints can open up.
Why use the overlap method
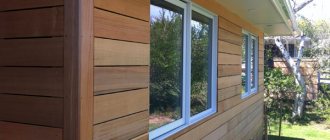
The overlay is economical since an H-profile is not needed
Advantages
There are several reasons to use overlay siding:
- Saving. In order to reduce material costs, an overlap is used - a direct connection. You avoid large-scale trimming, as happens when working with an H-profile.
- Aesthetics. The exterior of the walls forms a single covering without dividing strips. This result is obtained with precise docking, in compliance with the rules.
- Non-standard walls for which the length of the canvas is not enough.
- Easy installation . This method is easier and you can do the house cladding yourself. There is no need to adjust each panel to the required length, and there is no need to install a joining strip. Hired workers take all these nuances into account and significantly increase the payment rate.
- Color spectrum. Using the overlay method, it is easier for you to choose the desired color scheme for the cladding, since components of the desired shade are often not on sale. Therefore, the connection is made without the use of auxiliary decorative strips.
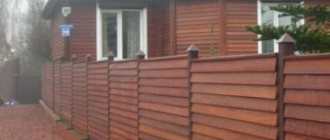
If the correct installation technology is followed, the joint lines are not noticeable
Flaws
There are disadvantages to installing PVC lining with an overlap:
- The work must be done carefully; this is a waste of time.
- The effect of a continuous surface is not observed from all viewing points. The overlay is visible when viewed from the overlay side.
- The cracks become more noticeable with seasonal weather fluctuations.
- If the technological installation rules are not followed, the joints will bulge.
- Violation of tightness. Overlapping areas may be affected by wind. Dirt and dust accumulate in the cracks.
When choosing an overlap method, I recommend weighing the pros and cons, calculating your strengths and only then making a decision.
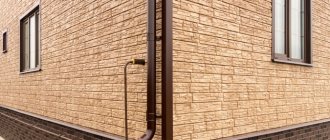
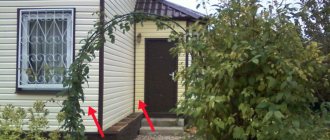
As the building shrinks and the soil shifts seasonally, the gap may become more noticeable
Cases where it is necessary to install overlapping siding
Overlapping is necessary in areas where the pipe exits the wall.
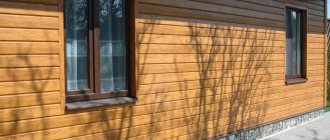
The material is produced with imitation of various natural materials, for example, wood, stone, brickwork, fabric, straw. If dividing strips are installed on the facade, the purpose of decoration will not be achieved.
Cases of using overlap when connecting siding panels:
- In areas where pipelines and cables exit the wall, when dismantling and reinstallation are associated with additional costs, difficulties, or are not possible at all.
- Creating an imitation of a solid layer in the form of masonry plinth, walls made of wood, brick.
- Acceleration of cladding work, since the process of installation, alignment and fixation of the joining element is eliminated.
Joining with an overlap is not always justified, for example, in the case of a short length of walls, when standard strips of siding are enough to create the finishing. The length of the ordinary elements is about four meters, and the width is 0.3 m. Strips without joints are used when cladding small verandas, gazebos, garages, sheds, and guest houses.
If the house is located near a highway, there will be a lot of dust around. It will clog into the connecting gaps and show the seams.
Starting profile: install it correctly
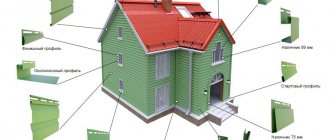
Siding installation consists of several stages and includes the installation of many components, including starting and corner profiles, moldings and much more. This process occurs along the lines of walls, windows and roofing.
Installation of Deke siding consists of several key points:
- Choice of technology;
- Setting up a starting profile;
- Installation of external and internal corners;
- Covering corners other than rectangular.
How to choose the right technology?
First, determine the type of base (Fig. 15). It can be sunken, protruding and even. The first is that the base “sinks” into the wall, which slightly overhangs it. The second - the wall is narrower, the third - they have the same width. Facade cladding with a flat and sinking base is carried out using the same technology, with a protruding base - using a slightly different one.
Sometimes the base can change its appearance, turning from protruding to sinking. This transformation is possible due to the thickness of the sheathing. If you have retained the protruding plinth, then you need to install a vinyl molding under the starting panel. In this case, the base can be left untouched and covered with base siding.
Rice. 15. Types of socles: a - sinking; b - smooth; c - protruding (aligned with the wall by the sheathing); g - protruding with ebb along the top of the sheathing; 1 - wall; 2 - sheathing; 3 - base; 4 – vinyl deck; 5 - cement screed
Docke siding starter profiles are used not only along the bottom of the wall of a building. Starter strips successfully cover the roof gable, which is especially important with an attic covered with siding and open facades. They are ideal for installation on roof gables and at the beginning of subsequent floors when a design or engineering project requires a visual separation of the cladding. Installation is carried out along the bottom line of the wall.
Rules for joining materials without a connecting strip
Installation of overlapping siding
Siding panels are joined in height in a lock. The bottom strip is snapped onto the starting element until it clicks and secured with self-tapping screws in the slots. The top strip is snapped onto the previous one, bringing it into a special relief and also fixed with self-tapping screws.
Lap joint rules:
- If there is a joining of panels along the length in this area, two strips connected overlay are snapped simultaneously onto the bottom strip.
- The technology assumes that the next joint along the length can no longer be located above the previous seam; it is made a little further.
- It will not be possible to snap the upper butted panels over the lower ones, which are also overlapped.
- It is impossible to nail metal or vinyl boards through with nails; for this purpose, there are oval slots at the top of the panel for fixing to the sheathing.
The cladding is installed at above-zero temperatures for the convenience of workers. But the technology also provides for installation at sub-zero temperatures. No wet processes are provided; the material itself and the sheathing frame can withstand negative temperatures. It is not recommended to work at readings below -10°C.
What to consider
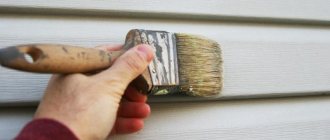
You have decided to buy yourself vinyl siding, the texture of which is made to resemble wood, stone or other material. And you are interested in seamless siding, installed with an overlap.
The following instructions are not for dummies, but rather for people with some experience. First, I advise you to try the classic fastening technology. After this, practice editing in the American way.
Before we talk about how the panel is joined, a few more words. This technology allows you to do without an H profile, that is, without a connecting strip. Siding is mounted on a wooden frame and metal sheathing. Suitable for vertical siding as well. You can make mistakes here if you don't follow the rules. Therefore, before doing the work, practice.
Overlapping siding installation technology
Joining siding
Installation of panels without a special strip occurs correctly if the work is carried out according to technology. The panels are mounted evenly, the fixation points are located at the same level to avoid distortions. The sheathing need not be installed if the vertical fences of the building are perfectly aligned. Such cases are rare, so they use a frame to smooth out the plane.
Perform the steps in the following order:
- The sheathing is fixed to the walls, the correct installation is checked with a level and plumb line;
- foam plastic, penoplex are placed in the gaps of the frame, and the joints are sealed with foam;
- install the starting strip at the bottom of the building, on the base, around the windows, on the pediment;
- They install the siding with an overlap without an H-profile, placing the connection in a checkerboard pattern.
The top strip is placed on top of the bottom strip by 25 mm so that it exactly continues the previous one; they are aligned horizontally.
Installation of the first panel
The starting strip is positioned so as to insert its lower edge into the previously secured start. The upper edge is fixed through oblong holes to the sheathing elements. The self-tapping screw is placed in the center of the hole so that the panel can move in case of expansion from heat or contraction in cold.
Installation rules:
- a long strip is fastened with self-tapping screws, starting from the center, moving evenly to the two ends;
- hardware is not fixed tightly for temperature compensation;
- at negative ambient temperatures, a gap of up to 15 mm is left between the sheathing batten and the profile;
- The panels are placed starting from the openings of doors and gates in order to remove the joints from them as far as possible.
Rows of stripes are placed sequentially from bottom to top. If the panels are installed vertically, start from right to left. The result is a uniform plane in which connections made without a strip are invisible. Sections with such a joint are assembled in different sizes.
Before installing the last element, install the finishing strip. Panel locks are cut at an angle to also provide a gap for temperature compensation.
Installation in difficult places and around openings
If there are external protruding parts in the vertical walls (meters, taps, pipe outlets), the siding strips are adjusted by trimming. Part of the panel is cut out so that its shape matches the outline of the obstacle. This is done if parts from the facade cannot be removed and secured after installing the siding.
When joining the ends of the strips around the windows, perform the following steps:
- measure the size between the bottom of the lock of the end strip and the bottom of the top lock of the previous panel;
- add 15 mm to the resulting distance to bring the end of the siding into the finishing strip;
- the panel is cut to the required size under the window;
- Using a punch, new eyelets-holes are made every 200 mm along the finished part.
The ears are positioned so that they are on the front side of the panel. They try to calculate the length of the panels so that there is no joining in this place or nearby without the use of an H-profile.
Shiplap siding on gables
Installation of siding on the gable
A J-profile is installed on the inclined sides; for reliability, it is fixed after 200 - 300 mm. If short panels are used, they are first laid on top of each other to ensure joining. Then it is cut at an angle to fit the shape of the pediment. Every 2 subsequent strips are measured after installing the underlying ones.
At the top, the edge is inserted into the finishing strip and secured to the sheathing with nails. They can be driven through the body of the siding strip. This is allowed to be done only on the pediment and only in such a place.
How to avoid mistakes: 7 rules
Direct connection of panels, without a connecting strip, has its own characteristics. A guarantee of a good result is provided by following certain rules:
| Photo | Description |
| Rule 1 Installation is carried out only at positive air temperatures, not lower than 10 °C. Otherwise, large gaps will be difficult to set correctly. | |
| Rule 2 The overlap of panels must be strictly observed in the interval of 20–30 mm. | |
| Rule 3 The top panel must be clearly aligned with the horizon, achieving a single continuation of the bottom part. | |
| Rule 4 Trimming of nail strips/panel locks is mandatory. As a result, the required distance is formed, allowing for an even overlay and compensation for expansion moments. | |
| Rule 5 A staggered arrangement helps level out overlap areas. | |
| Rule 6 A stop is placed under the end of the interior siding panel. A timber or board is stuffed, eliminating the possibility of deflection. | |
| Rule 7 To reduce the visibility of the seam, no physical effort should be made. Bending the end, pressing, or pulling on the lock will damage the material. |
Try to remove joints from doors and corners. Start laying from these areas, so the overlay will be placed at a certain distance. This is especially important in areas of doorways, where the wall vibrates when slammed shut.
Frameless cladding: pros and cons
Siding is one of the materials used to construct ventilated facades. In this case, the lathing not only allows you to level the surface, it also provides a gap between the decorative and base surfaces.
- The only disadvantage of the frameless installation method is the lack of the required gap. Free air circulation under the cladding reduces the formation of condensation and promotes its rapid outflow, thereby protecting the walls from moisture.
- This is especially true for insulated facades, because thermal insulation material (see Insulation for facades under siding: how to choose), especially of organic origin, quickly becomes unusable due to high humidity. We can safely say that the lathing extends the service life of the entire structure.
Therefore, permanent buildings, even if their walls are quite smooth, are always sheathed with siding along the sheathing. The only exceptions are wooden frame houses, and here's why.
Dismantling process
To disassemble the structure (for example, to replace several panels or install new trim), you must:
- Using a factory unpacker or a homemade tool made from 3 mm thick sheet, remove the edge of the bottom siding plate from the guide. The tip must be inserted into the gap and pulled towards you, while simultaneously moving the tip along the panel.
- Bend the edge of the top strip, and then use a nail puller to remove the fasteners (or unscrew the screws with a screwdriver). It is not recommended to make sudden movements, which could lead to damage to the panel.
- Remove the siding strip and lay it on the ground, and then continue dismantling the structure.
Restoring corner profiles does not require siding removal. It is necessary to cut off the front part of the part while preserving the base attached with screws or nails to the sheathing. In place of the cut out part, a fragment of the profile is mounted and fastened to the remaining base using aluminum blind rivets.
Do-it-yourself technology for dismantling siding.
Traditional wood panels
Traditional wooden siding, when faced with an overlap, requires preliminary marking on the mounted frame to maintain a constant angle of inclination of the panels. Installation is carried out from the bottom up, starting from the base strip, the thickness of which will determine the angle of inclination of the lamellas.
A 25x25 mm block is mounted along the bottom edge of the wall, then the first panel is installed so that it hangs slightly below the block. The lining can be fastened with nails or self-tapping screws; the main thing during installation is to prevent deformation of the lamella: as soon as it begins to bend, the fastening pressure must be loosened.
The next panel is installed with an overlap, the size of which is determined for aesthetic reasons. Then measure the distance on the frame block from the top of the bottom panel to the top of the next one. This value must be constant throughout the entire cladding. The resulting size is marked on each beam of the supporting frame, and all subsequent cladding strips are mounted according to the marks.
Preparing the base from OSB (OSB)
In theory, siding installation technology allows for fastening elements without sheathing to a flat base. Often, without a supporting structure, frame houses are finished, sheathed with OSB (OSB) boards, which have sufficient moisture resistance and the necessary strength. This is possible if there are no significant irregularities on the surface.
A prerequisite is the presence of waterproofing. A vapor-permeable polypropylene membrane (“Izospan A” and others) is suitable for this, which will protect the interior from moisture penetration. It is laid with an overlap of 15 cm on adjacent canvases
Particular attention is paid to places near door and window openings, as well as at points of intersection with other structures
Attention! It is important not to mix up the side of the waterproofing when installing. There should be a smooth surface of the material outside
For better moisture removal and ventilation of the space under the cladding, a sheathing is made of 20x40 mm bars. The planks are placed on top of the protective membrane in the areas of the supporting pillars of the building. The presence of such a gap is stated in SP 31-105-2002 in paragraph 10.1 on the general requirements for the design of external walls.
Combining siding and facade panels: designer tips
If you decide to decorate your house with siding and facade panels, pay special attention to how the selected colors and materials will combine with each other. They can be chosen in the same color scheme, complementing each other, or, conversely, create a bright contrasting solution
But don’t forget the basic design rule: no more than 3 colors on one façade.
How does it work in practice? Conventionally, the facade of a house can be divided into the following elements:
- walls (main part of the facade)
- roof
- plinth
- openings (windows and doors)
- gutters
- decorative elements (arches, columns, corners, etc.)
Their colors can be combined, but in such a way that no more than 3 different shades are obtained. One of the most common options:
- First color: the main part of the facade.
- Second color: base, roofing and gutters.
- Third: openings, corners and pediments (as a rule, white is chosen for them).
An example of such finishing of a house with siding and facade panels can be seen in the photo.
The owner of the house in the next photo decided to approach the issue outside the box. The roof and the main part of the facade are made in the same color scheme, with the roof being darker. Gables, gutters, openings and corners are white. And the corner part of the building is decorated with contrasting stone-like facade panels.
The next facade also uses 3 colors. But take a closer look at how many different materials there are! This also gives the house a unique “zest”.
The facade can be the most incredible, but at the same time very harmonious and complete. The following photo is the best proof of this:
The owner of the house did not limit his imagination. Most of the building is finished with stone-like facade panels. Some elements are highlighted with vertical siding in two pastel shades. And above the roof itself, horizontal siding is used. Original? Yes. Harmonious? Very.
Sometimes the three color rule can be broken. Look!
In this house, the openings are painted to match the color of the roof. The gutters, gables and balcony are white. The originality of the facade is given by inserts from facade panels of a lighter shade than the base. The gate, which seems out of place with the overall look, is supported by steps and a walkway in front of the house. Overall it turned out very gentle and original.