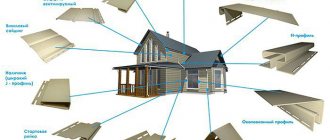
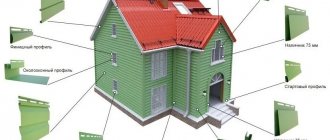
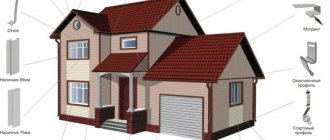
Siding itself is a set of panels made of metal, wood or polymer, which are specially fixed to the surface of the building facade. However, it is not enough to simply install them on the wall - to make the appearance of the house complete, you must also use siding components. They will help to decorate and make beautiful the corners of the building, door and window openings, and other elements of the house. And the installation itself is impossible without them.
Siding components
Covering the facade of a house with siding
Why are components needed?
Siding is a type of facade decoration that has a rather rich history. It originally served to protect the facade of the building from the effects of natural factors - rain, snow, wind and sun. Thanks to him, the main walls of the building remained strong longer, did not collapse, and in order for the building to look beautiful again when the siding lost its appearance, it was enough to replace only the external decoration. This is especially true for wooden houses, because wood, as is known, is more exposed to natural factors than other building materials.
Vinyl siding
On a note! Now there are a huge number of types of siding that can be used for cladding a house. This includes vinyl and metal siding, wood and others. However, all types of panels are durable and strong and can last for decades.
Siding house
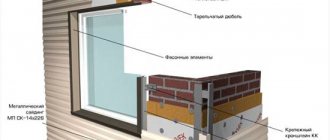
But in order for the siding installation to go quickly and the final work to look complete, it is imperative to use special components. These can be all kinds of strips, platbands, which are used to decorate corners, door or window openings of a building, help to complete the roof or strengthen the siding itself on the wall. Components are not only decorative, but also carry a certain load.
Also, the components for siding allow you to beautifully design the joints of various types of finishing material strips and the transitions between them. Without using them, there is no way to secure the siding so that all the elements on which it rests are hidden from view.
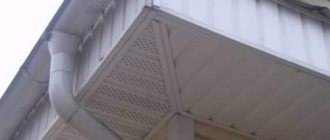
Hemming of roof eaves
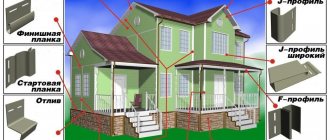
J-profile
The main purpose of the J-profile is to design window/door openings, as well as the junction of the gable and roof.
The J-profile is strengthened even before the siding panels themselves are installed - as a result, their edges will be installed precisely in the J-profile.
In some cases, the profile can be used as a protective or decorative corner element.
In this case, the two elements will be fastened together on both sides of each corner, hiding it from the environment and prying eyes.
Types of components
Depending on the shape of the building covered with siding, different types of components are needed for finishing. Conventionally, they can be divided into two types.
Table. Types of components used for siding installation.
| Type | Types of components |
| Decorative | Finish strip, soffit, flashings, trims, J-bevel, near-window strips, moldings. |
| Load bearing | There are two types - open and hidden. These are J-profile, arched J-profile, starting strip, corner profile, connecting strip, internal corner profiles. |
Additional elements for siding
Siding Accessories
Siding is a common material in the modern world, but in order to install it, it is necessary to take into account some nuances and features, choosing the right components that are needed for this.
Only then can you do everything right, if you want to decorate the facade with this material, then it will look truly worthy and respectable. Let's take a closer look at how to connect siding and what is required for this.
So:
- Speaking about the starting or initial strip of siding, you need to understand that this is an element, and it is customary to begin wall cladding with it. It must be installed with the top edge along the marked horizontal line; be sure to take this important condition into account.
Attention: You must also remember that the siding can cover the starting strip; you do not need to match it to the color of the panels, as many inexperienced people often do.
- Docking strip for siding (connecting). It is usually used to hide the seams between panels.
- The hinged drain strip of this material is usually used for high-quality and reliable protection of windows and the base of a building from water flows.
- Window strips and trims are usually used for finishing openings (see Installation of siding around a window and any opening).
- Soffit is a modern element that is perfect for finishing facades and roofs, which means you should definitely buy it to appreciate it personally.
- The finishing strip for siding serves as the final element of finishing panels; it is customary to install it exclusively under the eaves; such work is performed before installing the last panel of material.
Right choice
The correct choice of all components is also important. Firstly, they must be of high quality. Secondly, it is better to purchase those that are manufactured by the same company that makes the siding itself. Otherwise, they may simply not fit and there will be problems during installation of the panels.
Attention! All elements must match each other in size, parameters and fit together without gaps.
Basement siding with imitation of natural wild stone
As for color, depending on the design idea, components can have a tone-on-tone color or, on the contrary, a contrasting color. It is best to take siding and components in light colors - they heat up less in the sun. This reduces the risk that the material will “lead.” And such elements burn out less.
On a note! It is best to buy matte panels and components rather than glossy ones. This is also related to the intensity of heating. It is very good if the panels are laminated.
Siding prices
Siding
Basic rules for transporting and storing finishing strips and other additional elements
The durability and attractive appearance of siding trim directly depends on the quality and condition of the panels and additional elements. Before installation, you will be able to preserve them in the same form in which they arrived from production if you follow the rules of transportation and storage. So let's get to know them. First, let's look at the basic provisions that must be observed when transporting siding panels, finishing strips and all additional elements.
- It is advisable to use covered transport to transport the finishing strip and other siding parts.
- The length of the body of the vehicle used must correspond to the length of the siding panels and additional elements - they should not hang outward.
An example of what not to do
- Transportation of finishing elements without packaging is undesirable. If for some reason it is not there, then the panels and additional elements must be laid face up, placing fabric or thick polyethylene between the individual parts.
- When loading all parts of the siding trim into the back of a truck, the following order must be observed: panels should be at the bottom, and finishing strips and other additional elements should be at the top.
- After loading the package with siding panels and other parts, be sure to secure them well to prevent them from moving in the body during transportation.
- When transporting siding panels and finishing strips, the temperature in transport should not fall below -50°C or rise above +50°C.
Suitable body for transporting finishing strips and other additional elements
Similar requirements apply to the storage location of the finishing strip and other parts of the siding trim.
- The place for storing the finishing strip should be covered - direct sunlight on products for siding finishing is undesirable.
- Also, stored panels and additional elements should not be exposed to precipitation.
- During long-term storage, the finishing strip and other parts should be placed on wooden pallets.
Base siding panels and accessories for them are supplied in original boxes made of durable corrugated cardboard
- In the room where the finishing strips are located, the temperature should be in the range from -35°C to +50°C. Permissible humidity – no more than 60% and no less than 40%.
- Vinyl siding should not be located near stoves, radiators or other heat sources.
- Packages with panels, finishing strips and additional elements should be placed no more than 5-10 in a stack.
- It is unacceptable to store additional elements and siding panels by installing them “on the butt”.
- It is prohibited to bend or throw packages with finishing strips and other finishing parts.
Storing siding trim elements
Important! Separately, it is worth saying that when carrying and working with finishing panels in low temperatures, you need to be careful - vinyl becomes more fragile and brittle, therefore the risk of damaging finishing elements increases significantly.
Installation
Before you begin installing siding and components, you should be sure to read the detailed instructions for installing the elements. Otherwise, all the work may go down the drain. But in general, all the work can be done independently, without resorting to the help of craftsmen.
The first step before installing the siding is to install a starting profile on which the panels will be attached. It is screwed onto the sheathing or facade wall using self-tapping screws into special holes exactly in their middle. Next, the J-profile, arched profiles (if needed), corner profiles are fixed, and the joints are formed. Only after this does the installation of the siding panels themselves begin.
Installation of additional metal siding elements
In order for siding installation to proceed as quickly and professionally as possible, you may need the following tools:
- tape measure and ruler;
- carpentry corner;
- screwdriver;
- hammer;
- construction level, preferably long;
- pliers;
- string and pencil or chalk;
- metal scissors.
Prices for popular models of screwdrivers
Screwdrivers
Lathing for siding
The sheathing, on which siding panels are often “planted,” is also considered a unique type of component element. It is recommended to use it even if the installation will be carried out on a perfectly flat wall surface. The fact is that such a design will be as reliable as possible, since it can withstand greater loads than just siding fixed to the wall. This is especially true for decorating the basement of the house and attaching metal siding.
Lathing for vinyl siding or metal siding using a 60x27 guide profile
To install the lathing, it is best to choose a profile with a cross-section of 2.7x6 cm. It will be stronger than a thinner one. The profile fastening step should depend on the weight of the finishing material. And the larger it is, the smaller the step. The distance between the slats must be at least 0.4 m (for metal) or 0.6 m (for vinyl). The sheathing is installed perpendicular to the installation line of the siding panels.
How to make lathing for siding with your own hands
One of the most popular options today is siding. The quality and durability of such finishing is ensured not only by the use of good material, but also by the presence of a strong and reliable frame. Do you want to gain basic knowledge on how to make your own siding sheathing? Then check out this article.
Video - Installation of siding sheathing
Prices for different types of bars
Bar
Installation of soffit panels
Let's figure out how to install soffit panels for siding. To do this, you will need the soffit panels themselves, a finishing strip (J-profile), connecting strips (H-profile) necessary to make the design of the soffit system aesthetically pleasing, and wooden slats measuring 3x5 cm.
Step 1. Using a building level, marks are applied to the wall of the house along which the wooden slats will be attached. They should be level with the overhanging part of the roof.
Using a building level
Marking
Step 2. The slats are fixed to the wall of the house using quick-installation pegs.
Rail fastening
Another photo of the process
Step 3. The slats are also attached along the entire length of the gutter belt, along the perimeter of the overhanging roof.
Fastening slats around the perimeter of an overhanging roof
Step 4. Additional supports are installed from slats, perpendicular to the previously installed slats. An additional wooden strip can be installed in the middle of the crossbars. This will be another support point for the soffit.
Installing additional rails
Additional support points for soffits
Step 5. A finishing strip is mounted to the rail that is attached along the building, as well as to the gutter belt. The entire structure is finished with slats in those places where soffit panels will be inserted.
Correct installation of trim strip
Attaching the finishing strip
Installation completed
On a note! The planks are easily joined together if you cut off the fastening element on one of them and insert one plank into the other.
How do the planks fit together?
Step 6. If necessary, the soffit panels are trimmed in such a way that their parameters allow the so-called thermal expansion to occur.
Do not forget about the thermal expansion of the material
Step 7. Next, the soffit panels are simply inserted into the finishing strips. A sign that the panel is in place is a distinct click.
Installation of spotlights
Connected panels
Step 8. Mount the corners using corner strips. These strips are inserted into the corner parts of the structure. Next, using a corner or level, the outline of the facade is transferred to the plank. The resulting angle is cut off.
Installation of corner strips
Checking with a level
Ready
Step 9. The cut strip is attached to the inner corner of the structure. Next, the outer part is cut using the same method. The plank is mounted to the corner.
The cut strip is attached to the inner corner of the structure
Step 10. The panels in this part are mounted as follows: one of them is inserted into the lock with the previous panel, the cut angle is marked. The excess soffit panel is cut off. The panel is installed in its place. The remaining corner panels are mounted in the same way.
The cutting angle is marked
Panel installation
On a note! Above is a method of installing herringbone soffits. But direct installation can also be performed. In this case, the H-profile is not installed in a corner, but parallel to the soffit panels.
Direct installation of spotlights
Prices for different types of spotlights
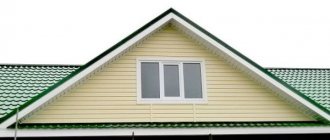
Roof soffits
General recommendations
The basis for installing siding is sheathing. Made from wooden blocks (humidity up to 20%) or galvanized steel profile. For wooden sheathing, use 40x50 mm bars, pre-treated with fire and bioprotection. To install horizontal siding, the sheathing is attached vertically in increments of 30-40 cm over the entire surface of the walls. Separately, the bars are fixed along the perimeter of the openings, the lower and upper edges of the cladding.
For fastening use:
- galvanized nails 40 mm (head diameter 8 mm, legs - 3 mm);
- galvanized self-tapping screws 25 mm (head 8 mm, leg - 3 mm).
The leg of the fastener should be located in the center of the mounting hole, and do not press the element tightly.
Before you start working
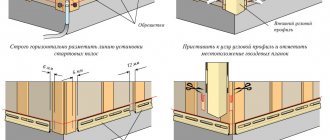
- The plastic used to cover windows and walls changes its physical properties with temperature changes (it shrinks in cold and expands in heat), so during installation it is recommended to leave a gap between the panels of 6-9 millimeters (in summer) and up to 10 millimeters (in winter).
- When installing a profile in the cold season, before starting work it must be kept in a warm room for at least 12 hours, otherwise the plastic will break in the cold.
- When attaching a profile to the frame with self-tapping screws, you cannot tighten them tightly, as this will lead to the destruction of the plastic, which will expand or contract under the influence of temperature.
- When calculating the dimensions of materials, approximately 6 centimeters should be added to them so that there is a margin for trimming.
Knowledge of these secrets will allow you to set the profile in such a way that after a while it will not deteriorate and will not have to be changed. This means that the owner of the house will not have to make unexpected expenses and redo all the work.
J-shaped universal bar