Tired of digging ditches with a shovel to install fence posts? Not surprising, because preparing holes for posts is the most tedious task when installing a fence on a site: you have to pull a large amount of soil to the surface, which takes a lot of effort and time. What to do? Hire a mounted pit drill on a car base and spend a lot of money on it? But this is far from always advisable, and besides, using heavy equipment on a summer cottage when installing poles is nonsense! But there is a way out, fortunately technology does not stand still. Our article today is devoted to what is better and how to properly drill holes for fence posts or installation of foundation piles in one case or another.
Holes for fence posts - what and how to dig
Concreting and butting are two types of reliable installation of a fence post. Both methods involve creating holes for installing supports. You can dig them up in different ways, using different tools. What are the requirements for holes for fence posts and how best to make them, we suggest you read in the article.
Briefly about the main thing
You can dig a hole for a post using several tools: a shovel, a digger, a drill and a mechanical drill, which will cope with the task in a short time.
Before you start work, you need to make certain calculations: how close the pillars should be to each other and how many there will be. You also need to know what kind of soil the work will be done on. If it is too hard, then it needs to be moistened; if it is too loose, then problems may arise with it during installation of the post. If you put it in loose soil, it may not stick well to it. In this case, the hole needs to be made deeper.
It is better to make formwork from reinforcement; it will be more durable. The concrete mixture should have a consistency similar to sour cream. After it is filled and the pole is installed, it is necessary to remove the remaining air inside by vibration.
Ratings 0
How many fence posts do you need to install?
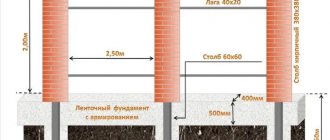
To determine the number of pillars, the total length of straight sections of the fence and the width of the span are always taken into account. The distance between supports for a fence made of lightweight fillers, such as corrugated sheeting, can be from 2 to 3 meters. The average value is 2.5 meters. For fences with concrete or brick sections, it can be reduced to 1.5-2 meters.
Knowing the approximate loads and length of the section, you can calculate the number of wells for drilling. If the total length of the straight section is 20 meters, then for a fence made of corrugated sheets you will need to dig at least 9 supports. The calculation is made by simply dividing the total length by the distance between the supports. We always add 1 to the resulting value. We perform the calculation and get (20m / 2.5m) +1 = 9 pillars.
With the same site dimensions, but for heavy fences with a span length of 2 meters, it will be necessary to drill (20m / 2m) +1 = 11 holes.
Also, when calculating, you should take into account the presence of a wicket and gate. The rules are as follows:
- If the gate is mounted on a separate support, we add one more post to the obtained calculated value.
- If the gate is mortise (part of the span), then the number of pillars does not change.
- Swing gates are always installed on separate posts. Therefore, the straight section should be divided into two: from the left and from the right gate support.
You should always take into account that as loads increase, the frequency of installing fence posts increases. This rule should especially be taken when constructing structures whose height exceeds 2 meters.
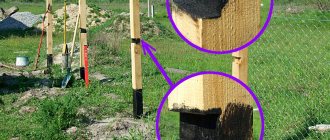
Butting
Sketch of butting a support column
The butting method is otherwise called dry concreting. It is applicable for installing any support - wooden, concrete or asbestos-cement. In this case, after making a hole of the required size in the ground and levelly installing the pillar in this hole, the voids are filled with crushed stone. The void around the pillar should not be filled immediately, but gradually.
First, you need to fill the crushed stone in one layer and compact it, then lay out the crushed stone in a second layer and also compact it, and so on. To simplify the work, you can use a device such as a vibrating plate. Its other name is vibroleg. It will help with compaction.
If you don’t have such a device, you can make it yourself using a cut log. One of the main advantages of dry concreting is soil drainage. Water does not flow to the base of the support, since the crushed stone does not allow it to do so. Poles installed using the butting method can stand for a long time, but still, it is possible that under the influence of a strong wind they will become loose, and then the tamping will have to be repeated.
What diameter of the hole for the fence should be
The diameter of the hole for the fence post is the width of the hole that needs to be dug. For concreting, it is necessary to ensure that the post fits freely into the hole. There must also be a gap between the pipe and the wall of the pit. The size of the gap allows you to easily pour concrete or compact the sand-crushed stone mixture.
The recommended hole diameter is 2.0-2.5 times the diameter of the post. An approximate calculation would look like this:
If a pole with a diameter of 57 mm is used, then this value must be multiplied by 2-2.5. We get 57mm x 2 = 114 mm - this is the minimum size of the hole. 57mm x 2.5 = 142.5 mm is the optimal hole diameter for a fence post.
Thus, for 57 mm fence posts you need to dig a hole with a diameter of 114 to 143 mm.
The rules are:
- The larger the hole, the larger the size of the foundation.
- As the size of a concrete foundation increases, its load-bearing capacity increases.
- As the size of the well increases, the costs for construction materials increase: crushed stone, sand, cement. Therefore, exceeding the recommended sizes is not recommended from the financial side of the issue.
- Too small a hole diameter will not allow the support to be secured properly.
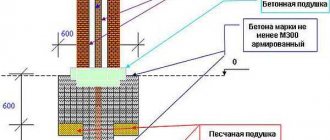
Concreting
Scheme of concreting the fence support
Often, when installing a fence around a private suburban area, the pillars are mounted using the concreting method. This method is considered universal. In this case, a hole is made in the ground, a post is installed vertically into it, and all the remaining space around the post is filled with concrete mortar.
Article on the topic: Why do veins hurt after blood sampling?
There is an opinion that in this way the pillars are securely fixed in place due to the high strength of concrete. However, the mixture that fills the empty space in the hole around the support post does not do its main job well. After all, soil can swell under the influence of low temperatures. As a result, the pillar may shift, move outward, or even collapse.
Before concreting, it is necessary to take into account the characteristics of the soil on which the fence will be installed. Most often, the result of soil heaving can be detected in the spring, after the snow melts. However, sandy soil is not subject to heaving, and therefore this technology is quite suitable for it. But on clay soils, pillars should be installed using one of two alternative methods: butting using crushed stone or driving.
The last method is very simple. A small hole is made in the ground, smaller in size than the diameter of the post itself, and then the post is driven into this hole using a sledgehammer. To simplify the work, you can use a stepladder.
How deep is a well to drill under a fence post?
At what depth to dig a hole for a fence post depends on various related parameters. Among them:
- The weight of the entire fence structure.
- Soil type.
- Groundwater level.
- Soil freezing depth.
You can calculate the depth in stages. At the first stage, the digging depth is calculated based on the depth of soil freezing. This is one of the main evaluation parameters. The depth of the well under the fence support should be 20 cm below freezing. Otherwise, frost heaving can lead to the support being pulled out.
Each region has a calculated freezing depth. The values are indicated in SNiP. For warm regions this is 80 cm, near Moscow - 1.2 m, near the northern regions - it can reach up to 2.5 meters.
Next, we take into account the weight of the structure and its windage. Tall fences with solid sections are more susceptible to sail effect from the wind. Therefore, for heavy fences, it is advisable to add up to 10-15 cm to the previous calculation.
If the groundwater level is high, then you need to dig a well for fence posts even deeper. The position of the column should be 20 cm below the groundwater line.
Thus, for the Moscow region, 1.2 meters + 20 cm will be required with the calculation of the depth of soil freezing. If the fence is made of corrugated board with a height of 2.5 meters, then it should be deepened by at least another 10 cm. And if the occurrence of groundwater in the area coincides with the calculated value, then it is necessary to deepen it by another 20 cm.
We obtain the standard depth of the well for fence posts for the Moscow region from 1.4 to 1.6 meters.
Preparation and necessary calculations
Schematic drawing of the correct installation of pillars
Not a single pillar can be installed without correct calculations and without correctly made holes in the ground. The location of the fence must be marked on the site before its installation. In this case, the installation of the pillars is immediately calculated. All this should be done before purchasing all the necessary materials. The dimensions are entered in the drawing.
Article on the topic: What is the name of the room in the bathhouse where they wash?
The slightest inaccuracy can lead to serious consequences, which will be quite difficult to correct. If one post is installed incorrectly, the entire fence may skew or fall to one side. The basics for proper installation are:
- When making calculations, you need to correctly determine the distance between adjacent support posts of the future fence. It depends on the area of the fenced area, the weight and size of the canvas itself, which will be attached to the posts. Typically, adjacent support posts are no more than three meters apart from each other.
- The diameter of the support pit must be greater than the cross-sectional diameter of the pillar itself. However, it is better not to make the hole too wide, otherwise the soil around the post will be loose. If, on the contrary, the hole diameter is too small, concreting will not be possible.
- In order to determine the number of holes required, you need to make calculations. To do this, the length (perimeter) of the entire fence should be divided by the width of one run. This refers to the distance between adjacent pillars, on average - 250 cm. If you reduce the width, you will not be able to avoid additional financial costs, and if you make it, on the contrary, larger, then the canvas will sag.
- The distance between the posts also depends on the height of the fence. The higher the fence, the shorter this distance should be.
- You also need to pay attention to the depth of the holes. This indicator depends on the soil. The stronger the soil, the shallower the depth of the holes can be made. If the soil composition consists primarily of sand and clay, then such soil is usually considered unstable. And there should be more holes for fence posts. Their depth can even reach one and a half meters, while posts installed on more stable soils need holes with a depth of only one meter.
However, whatever the composition of the soil, the support pillar must extend into it at least a third of its length.
How to dig a hole for a fence post
After all calculations have been made for the well parameters, you can begin the drilling process. There are several types of tools and equipment that are used for these purposes. Among them:
- shovel;
- garden drill;
- motor drill;
- hydraulic drill
Each has its pros and cons, differs in labor costs and technology of use.
Price
If, when planning work, a decision was made to involve specialists to carry out drilling work to construct pits, then the information below will provide an opportunity to make an approximate estimate of their cost:
- a hole with a diameter of 100 mm and a depth of 900 mm - 400 rubles;
- hole with a diameter of 200 mm and a depth of 900 mm - 430 rubles;
- hole with a diameter of 300 mm and a depth of 900 mm - 460 rubles;
- a hole with a diameter of 200 mm and a depth of 1500 mm - 500 rubles.
The use of the JCB 4 CX industrial drill is presented in the video below.
Digging a hole for a fence post with a shovel
The method of digging holes for fence posts with a shovel is the simplest, if not primitive. Despite this, it is popular due to the absence of additional financial expenses. A shovel is present in the inventory of almost every summer resident and owner of a private house. In this way, you can do the work yourself without involving other people.
It’s probably not worth talking about digging technology again. But you can talk about the nuances and disadvantages of the method.
The disadvantages of this digging method include:
- High labor costs. Digging even small holes by hand is difficult. Considering digging the earth to great depths, it is simply a huge amount of work.
- Time consumption. Digging one hole will take a lot of time. If the perimeter of the site is large, then the process may take several days.
- Poor quality of holes. It is impossible to get an accurate hole with a diameter of 15 cm with a shovel. Consequently, doing the work this way will result in a large hole, at least as wide as the blade of your tool.
- Inability to use the tool on stony and rocky soils.
There are still cases when using a shovel is possible and even better. Among them:
- Installation of light wooden fences;
- Installation of temporary structures that do not require concreting.
- Installation of chain-link fences with butted posts.
In all these cases, a slight deepening of the fence post is allowed. You can dig a layer up to 50-80 cm. You can do this even with a shovel.
Stages of work
To dig a hole in the ground, follow the following sequence of actions.
- Using a shovel, dig out a small (top) layer of soil of 10-20 cm. This way you will set the expected location of the future hole.
- Place the drill strictly vertically. Start using it to cut through layer of earth layer by layer, maintaining a vertical position. Apply slight pressure on the tool - without effort on the part of the master, it will not move deeper as quickly as necessary for the work to proceed effectively. Pressing too hard and moving the drill too quickly deep into the soil can damage the cutting edge with foreign coarse inclusions. The rapidly increasing resistance of the destroyed soil will “sag” the engine speed.
- After making several full turns, remove the drill from the ground , removing the destroyed soil and clearing the cutting edges of adhering earth. Repeat the previous two steps again.
If the drill does not cut the ground correctly and efficiently as when you first started, check to see if the cutting edges are dull. Blade dullness is a common occurrence on hard ground, which may contain stones and other foreign particles that differ from the fine structure of the clay.
- With the help of an electric or gasoline hole drill, soil drilling will be significantly faster. The sequence of drilling for pillars or piles here may be as follows.
- Install the working part (cutting tool), securing its shank in the drive clamping mechanism. Check if the axis is bent - when rotating, the bent axis “walks” in different directions; this can be easily checked by detecting rhythmic deviations of the drill tip in different directions. The misalignment of the working tool will be indicated by the beating of the drill during drilling.
- Install the drive with the drill vertically. Start drilling.
- When the drill slows down to a point where operating efficiency drops sharply, turn on the reverse mode. This will allow the tool to emerge from the destroyed soil. The turnover will increase. Switch the motorized or electric drill from reverse to normal again and loosen the layer being drilled.
- Remove the destroyed rock from the hole, clean the blades from adhering soil. Continue drilling, moving deeper.
- Repeat drilling until the hole reaches the required depth (according to the specifications).
Article on the topic: How to build a house from vulture panels
If drilling has become noticeably more difficult, and the efficiency and speed of drilling has noticeably decreased, add 20-30 liters of water into the hole. Hardened and excessively compacted soil from the overlying layers will soften. Since clay turns into mud that is difficult to wash off, it is useful to continue drilling the same hole after a day or two - when the water is completely absorbed and the upper layers of clay do not stick to the drill blades.
An auger drill, more often used with a walk-behind tractor or an electric drive, like a drill drilling wood or metal, brings a significant part of the soil out on its own. After installation at the drilling site and when further moving deeper into it, you should not pull it upward to remove the earth - only simple drills, the cutting part of which is made of two halves, have this drawback.
Too dense soil will require drilling a hole at a reduced speed - a mechanized drill has several speeds. By strictly following the technology of drilling holes for posts, the master will ensure high quality and durability of post supports for a fence or small structure. Deviation from the above-described schemes will almost immediately lead to distortion of the supporting structures.
For a visual video of drilling and concreting pillars, see the following video.
Drilling holes for poles with a hand drill
A garden or hand auger is a tool that is equipped with a spiral blade and a driver.
By manually rotating the knob, the blade will go deeper into the soil. The loosened soil will be thrown out as the spiral moves. Among the advantages of the method:
- Higher hole accuracy. The size of the hole is determined by the diameter of the spiral blade of the drill.
- You can drill to a decent depth, up to 1.5 meters - that’s for sure. The resulting hole can easily be supported. There will be enough space for concreting.
- The cost of such events is low. To do this, you can even purchase a tool that may be useful in the future. This drilling method also has disadvantages. Just like using a shovel, drilling will require a lot of force. It is especially difficult to make a well on rocky soils. The speed of work is increased, but it remains low compared to the mechanized drilling option.
Preparation
Before drilling holes for posts and supports with a hole drill, the area is marked out - according to a pre-prepared site plan. When marking, pegs are installed in the center of future holes. The plan of the site or area takes into account the diameter of the holes - this plays an important role in choosing the optimal distance between the posts.
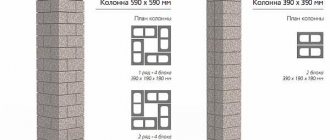
Square, rectangular or round - the pipe must be cut into equal parts. For example, clay soil requires pipe sections of 3.2 m (1.2 m “recessed” into the ground and filled with concrete). The diameter of the hole is 40-50 cm. During the marking process, the area should be cordoned off around the perimeter with fishing line or thin twine stretched over pegs. The latter are located in the corners of the site. The same distance between the pillars is measured along this line. Markers are placed in the form of additional pegs.
Digging a hole under a fence post using a motor drill
A motor drill, or also called a pit drill, is a mechanized tool that works similarly to its manual counterpart. Its main difference is the presence of a drive. The motor allows you to rotate the barrel with a spiral without human effort. This significantly increases productivity and allows you to get perfect results in a short time.
Motor drills come with electric, pneumatic and fuel drive. The latter are divided into gasoline and diesel. Regardless of the drive type, the tool works very efficiently. Fuel models can be used at any distance to sites, since they are not tied to power sources. They are more popular.
Wells for fence posts can be drilled on any soil. But you should pay close attention to the process if digging is carried out on rocky ground. To avoid damaging the engine and working blades of the drill, on such soils you should only work at low speeds. Also, for this it is better to use more powerful equipment so that there is enough power reserve.
Useful tips
If you are going to soften the soil with water to make drilling easier, drill several holes at the same time: this will help avoid downtime. Do not try to jerk the garden auger out of the hole, as this may damage your back. It’s better to swing it slightly, after which you can get the tool out without any tension.
You should sharpen not only the end parts of the auger, but also the edges of the round plates: they are not directly involved in drilling, but by cutting off the roots of plants, they will help complete the job faster.
One last piece of advice: if this is your first time getting started, try your hand at a post hole located in the most inconspicuous place, and no one will notice your mistakes. And only then, having gained experience, you can start drilling the remaining wells and do the job flawlessly.
Drilling holes for a fence post using a hydraulic drill
A hydraulic drill is a mechanized installation that is mounted on a wheeled chassis - a car. Its peculiarity is its enormous power. Therefore, it is recommended to use this digging method on rocky soils and, if necessary, go deeper into the ground to a distance of more than 1.5 meters.
The advantages of the method are obvious:
- The productivity of the method is very high. In one day, you can build holes for fence posts on an area of several tens or even hundreds of meters.
- There is no physical stress when operating the drill - everything is completely mechanized.
- Vertical accuracy is maximum, regardless of depth. Therefore, such drilling is best for installing high fences of 2.5 m or more.
One of the disadvantages is the need to provide access for equipment to the site. Sometimes this is impossible to do. There is also an increase in construction costs. Hydrodrill is a special construction equipment. Buying it for one time is very expensive and pointless. Renting also costs money.
Hole parameters
Chernozem-sandy loam soil is less dense. Heaving (as a result of prolonged frosts) also makes adjustments to the depth and diameter of the hole. In such soil, the depth of the underground part of the pillar is at least a meter. Many owners of country houses, replacing an old mesh fence with a new one (made of corrugated pipes and roofing sheets), bury the posts to a level of 1.4 meters or more. Loamy (or clayey) as well as rocky (containing smooth stones or rock fragments) soil eliminates the need to bury the pillars to a depth of more than a meter. Common depth is 0.8-0.9 m.
A hole diameter greater than half a meter is not practical for fence sections. The fence does not belong to a permanent type of structure: it is only affected by its weight, hundreds of times less than the weight of a small country house, and possible windage during a hurricane (profiled sheet flooring resists the wind). The gate, combined with a wicket, allows you to slightly exceed the diameter of the hole, however, the user knows that the deeper and wider the hole under the post, the more concrete will be needed. The larger diameter, length and weight of the concrete “ingot” will make it possible to hold the pillar for decades, preventing it from tilting even a degree.
The height of the above-ground part of the post for the same fence is no more than 2 m . It makes sense to install a higher fence if the object is not a dacha or a country house, but a protected building, for example, a point or branch of a state office, university, hospital, military unit, etc. A fence that is too low threatens a constant violation of the access regime adopted by the checkpoint . The distance between the centers of two adjacent holes (the location of the posts) is chosen so that the fence does not squint or fall, for example, due to frequent and strong winds in the area. For example, for pillars where a square corrugated pipe with a cross-section of 50*50 mm is used, and a rectangular pipe 40*20 is used as horizontal crossbars, the optimal distance between two adjacent supports is no more than 2 m.
Article on the topic: Which profile pipes to use for the fence