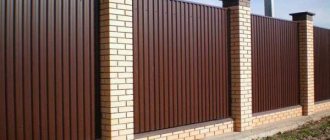
You can make a reliable and relatively inexpensive fence for a site using a combined fence - the posts are made of brick, and the filling (spans) is made of any light material - wood, corrugated sheets, forged fences. The look is solid, and the costs are much lower than for a “pure” brick fence. Moreover, laying pillars is not the most difficult task, but it is profitable. Two years ago craftsmen were asking for 2,000 rubles per pole, but today prices have more than doubled. You can build brick fence posts with your own hands without the skills of a mason. It is important to follow the technology and everything will work out.
Calculations and preparation for work
The first stage of preparatory work is calculating the number of posts for the future fence. They are usually installed at a distance of 3 meters from each other. But, if the length of the site exceeds 150–200 meters, it is increased to 4. This is due to the high costs of installing brick pillars at such a distance.
For an accurate calculation, first determine the location of the corner posts, entrance gate and gate. After this, the distance between them is divided into spans of the accepted size.
The height of the pillars usually varies from 2 to 2.5 meters. These are the optimal sizes suitable for filling spans with mesh or corrugated sheeting. It is not recommended to make the fence higher - this will require deepening and strengthening the foundation so that it can withstand the effects of wind. This is especially true if the spans are made of corrugated sheets, which have a large windage.
Scheme for calculating the deepening of pillars and the distance between them Source ts-zabory.ru
After preliminary calculations of the supports, a rope is stretched around the perimeter and stakes are driven in at the sites of future pillars. Calculation of the amount of materials for pillars and preparation of the foundation will depend on the choice of the type of foundation and the method of laying bricks.
Determining the type of structure
They begin work by carefully drawing up a drawing. The diagram should show:
- soil type;
- type, height of the foundation;
- height of pillars;
- location, area of the fence on the site;
- dimensions of gates, wickets;
- step between supports;
- material for filling openings;
- communications that can pass under the fence.
Scheme of a fence with red brick pillars
It is important to correctly calculate the load on the base so that the fence can withstand the weight of the materials and does not begin to collapse.
In addition, it is worth remembering the SNiP requirements for fences. You will find detailed recommendations of the current legislation in the article: “What distance should be from the house to the neighbors’ fence.”
Pouring the foundation
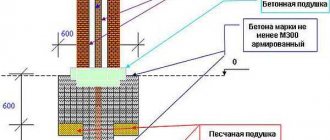
The simplest type of foundation is strip-column. To install it, after marking the territory along its perimeter, a trench 30 cm deep and about 40 cm wide is opened. In the places of the brick pillars, 90 cm recesses are made. The total depth of the pit for support will be 120 cm. For the temperate zone, this depth will protect the foundation from soil freezing. This will prevent its displacement and destruction.
Excavation of a trench can be done manually or using machinery. Experienced craftsmen recommend the first option - the work will be much more accurate, but the time costs will increase by about 2 times.
Diagram of the foundation for brick pillars Source 1pokirpichu.ru
The trench is reinforced with metal rods with a diameter of 14–18 mm. This will additionally increase the strength of the foundation and compensate for the loads during soil subsidence. Metal profiles or pipes are installed in place of brick pillars. Pouring the foundation begins with recesses under the pillars. Using a building level, the vertical position of the pipe or profile is controlled, after which the rest of the tape is poured.
A fence with brick pillars on a strip foundation is considered the best option - it combines reliability and relatively low time and financial costs.
The construction of a grillage foundation will be more reliable, but more expensive in terms of materials. The grillage is the upper part of the foundation, which sequentially fastens pillars or piles. The grillage is also present in the strip-column foundation, but it is located at ground level.
To install it, formwork is installed - 30 cm from the ground along the perimeter of the dug trench. Reinforcement is carried out as in the case of a strip foundation, after which the formwork is poured with concrete.
After pouring the foundation, it should take 2 or 3 weeks for it to dry completely. Then you can erect brick pillars for the fence.
Frequently encountered problems
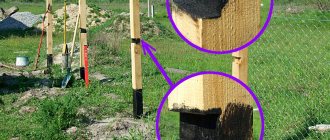
Most often, when laying brick pillars, two problems arise - increasing the size of the upper part of the support and twisting the structure around its axis. Both defects arise due to the fact that the masonry process was not well controlled. The fact is that when using a regular building level it is difficult to control the size. Such a tool has a large error, and therefore, with a length of 70 cm, deviations may not be visible.
In addition to the level, you can also use a tape measure or a pre-prepared template. And in order to prevent the pillar from twisting, it is necessary to closely monitor the location of its corners. They must be strictly one above the other. You can simplify the task by using a pair of corners attached to opposite corners.
Preparation of the solution - proportions and rules
Proportions for preparing mortar depending on the brand of cement Source www.navesfasad.ru
Sand and cement are the main components of the mortar. The mixing proportion is standard: 1 part cement, 5 or 6 parts sand. The latter is better to choose the small fraction. The higher the grade of cement, the better the quality of the solution. It is advisable to choose at least M400. Some craftsmen add detergent or liquid hand soap - this ensures better plasticity of the solution.
To facilitate mixing, sand and cement are first mixed dry and then water is added. The main thing is to choose the optimal ratio - the solution should not spread, but also not be dry.
For decorative purposes, special additives are added to the solution, which are sold in hardware stores. For example, it could be simple soot. A small amount will give the solution an almost black color, which will highlight the light brick.
List of materials
First, we list what materials and tools you will need:
- decorative or red brick, it is better to take a new whole one;
- cement mortar of a grade not lower than M400;
- a metal pillar around which the brick one will be built;
- gas drill or hand drill, shovel;
- crushed stone and sand for butting;
- metal rods 8 × 8 mm;
- plumb and level so that everything is smooth and beautiful;
- grinder, welding machine and rubber hammer;
- trowel - a spatula for applying the solution;
- mortgages, on which the fence itself will then be attached.
A natural question arises: what about the number of bricks per fence post? Below we will tell you how to make the calculations, but on average you will need 128–132 pieces per support. It is better to take a little more so as not to interrupt construction if there is not enough.
Which brick to choose
Sand-lime brick of various shades Source bonostroi.ru
See also: Catalog of companies that specialize in the construction of fences and enclosures.
One of the main tasks when building a fence will be the choice of the main material - brick. It should not only ensure the reliability and strength of the building, but also have an attractive appearance. The modern market offers the following types of bricks:
- silicate;
- ceramic;
- clinker;
- hyper-pressed.
Classic options are silicate and ceramic. The first is made from quartz sand, the second is made from clay. These are universal options, have good strength and moisture resistance. One of the main characteristics of a brick is the number of freezing/defrosting cycles. In this indicator, clay brick is inferior to silicate brick, which can withstand up to 60 cycles without loss of performance characteristics.
Clinker brick is the most durable of the presented types. Produced from refractory clays at high temperatures. Withstands up to 150 freezing and thawing cycles. Excellent technical characteristics are combined with a variety of colors and shades. Buildings made from this material, subject to all technologies, retain their strength and aesthetic characteristics for 100 years. The only negative is the price is higher than silicate and ceramic.
Hyper-pressed or Lego brick. Thanks to high pressure processing, the particles of the material are bonded at the molecular level, which provides it with strength on par with clinker.
Any of the listed types can be used to build brick fence posts. The main selection criterion will be the financial issue.
Brick pillar laying technology
Before starting masonry, roofing material or special waterproofing is laid under the bricks. It will not allow direct contact with water.
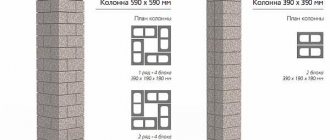
Depending on the width of the brick fence post, there are two most popular masonry methods:
- one and a half bricks;
- two brick masonry.
In the first case, the result is a post 380x380 mm, in the second 510x510 mm. The first option is more economical in terms of solution consumption. The support profile for the pillar is usually 80x80 mm. This will greatly reduce the gaps between it and the masonry and require less mortar to fill them. In the second case, the support will be more durable and massive, but will require filling the gaps with a large amount of solution.
Laying a pillar with one and a half and two bricks Source pinterest.com
The bricks are laid according to the diagram. Using a building level, the horizontal and vertical planes are controlled. The next layer of brick overlaps the seams of the previous one. The gaps between the iron support and the masonry are filled with mortar and compacted.
To obtain perfectly even seams, round or square metal rods with a diameter of up to 10 mm are used. Such rods are laid along the perimeter of the first row of bricks from the outer edge. The area is filled with solution with some reserve towards the center. The brick is laid on the rod with one side, and the other is leveled to the building level. After filling the vertical seams, the procedure is repeated with the next row. The rods are removed from the previous row. This technology will allow you to control the masonry and make the seams neat and even.
After the brick pillars have been erected to a given height, a decorative cap is installed on the end. Various options can be found in building materials stores. The cap can be metal, ceramic or concrete. It is installed on masonry mortar. The cap will protect the pillars from moisture and precipitation.
Parapet installation
A parapet is one of the mandatory elements of a fence. In addition to creating a complete image, it also plays a protective role in the fence structure. But if at first you chose caps made of cast concrete or clinker, then it is worth buying a concrete parapet. You should not mix different materials and install concrete caps on supports for a fence with a parapet made of a flexible profile sheet.
Metal parapet
Simply being horizontal, the surface is constantly exposed to sunlight and humidity. Over time, this leads to the appearance of cracks and deformation of the fence.
Wiring diagram
When investing money in setting up a summer cottage, no homeowner wants all his efforts to be in vain and after a few years the fence suffers serious damage. Therefore, when calculating the budget, you should definitely include such mandatory elements as caps and canopies for fence supports.
Fence and gate installation
At the stage of laying pillars, it is necessary to decide on the material for the spans. If the materials chosen are metal (corrugated sheeting, forged gratings), and also if the choice is a wooden fence with brick pillars, then metal elements are welded to the supporting posts of the pillars at the same height to install horizontal jumpers. For reliable fastening, two jumpers are constructed.
In those places where wickets and gates are located, it is recommended to install three jumpers to securely fasten the doors, since these elements are constantly under load and in use.
Installation diagram of corrugated board between brick pillars Source iw.aviarydecor.com
An alternative to the listed materials would be to lay a brick fence between the pillars. This is a more labor-intensive and time-consuming process. Each subsequent row must be aligned horizontally and vertically. The foundation for such a fence must be strong in order to support the mass of bricks.
The advantages of this type of fence are the ability to use different bricks in color and texture, which will give the fence an attractive appearance and individuality.
Nuances of choosing caps
The structure will not look complete if a cap is not installed at the end of the post. It's like Santa Claus on New Year's Eve without a gift. What functions does the cap have and what is it for, let’s figure it out together.
- The cap protects the brick pillar from precipitation and the negative influence of an aggressive external environment.
- Protects concrete and pipes that are located in the middle of the column. Prevents sediment from accumulating in recesses.
- From an aesthetic point of view, the cap gives the pole a finished look and the correct shape.
- It is important to choose the right “cap” for the pillar. The dimensions of the cap should be slightly larger than the structure of the pillar, ensuring its protection.
Headings for fence posts
There are certain requirements and recommendations when choosing a cap. He should not be afraid of moisture. The angle of inclination should direct the flow of water away from the pillar. The hat must fit firmly: a secure fastening will be required.
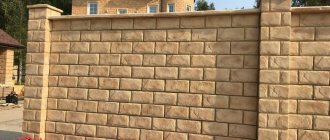
Photo examples of fences with brick pillars
A column of light and dark bricks combined with simple forging Source mebelsobe.ru
Light brick combined with openwork wrought iron gates looks elegant Source pinterest.it
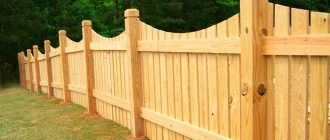
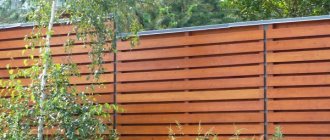
A fence made of light-colored brick pillars and dark wooden planks Source aquasd.ru
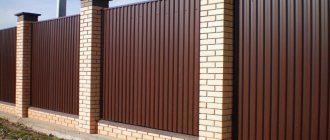
The combination of yellow brick and dark brown corrugated board is one of the most common options Source mebelsobe.ru
Yellow brick and green corrugated sheets are also a current option Source tvoj-zabor.ru
A budget option for a fence with brick pillars - using a chain-link mesh Source mebelsobe.ru