Despite the fact that the quality of oriented strand board exceeds the characteristics of chipboard, this structural material is not suitable as a finishing floor covering:
- It is necessary to leave a gap of 2 - 5 mm between the sheets to avoid squeaking during thermal expansion;
- the seams are sealed with sealant, reducing the aesthetics of the coating design.
Nuances of OSB installation.
Therefore, OSB is used more often as a subfloor:
- the slabs have ideal flatness, which allows them to level tongue-and-groove floorboards that have become deformed from long-term use;
- the solid surface of OSB sheets is suitable for small format claddings that cannot be laid on an unedged board without disturbing the flatness;
- the slabs have a stable geometry and self-supporting ability, so they can be used to reinforce a subfloor with a rare joist pitch or a small thickness of floorboards in order to increase its spatial rigidity and load-bearing capacity.
After laying OSB, the surface is smooth and has a high load-bearing capacity.
In this case, you need to know how to properly attach OSB sheets to floorboards/joists and use offset seams in adjacent rows.
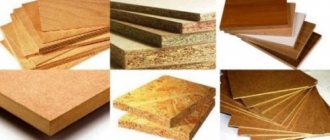
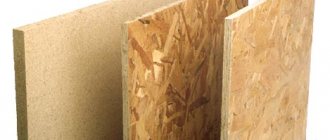
There are several types of oriented strand boards:
- OSB-2 – only for dry rooms;
- OSB-3 – can be used in rooms with high humidity;
- OSB-4 – for load-bearing structures.
Important! Since the subfloor has low maintainability, it is prohibited to use OSB-2 in it. The slabs are additionally treated with an antiseptic and waterproofing material.
The main characteristics of oriented strand boards are:
- density – 630 kg/m³;
- thermal conductivity – 0.13 W/m*K;
- linear expansion – 0.15% at a humidity of 70%;
- straightness – 0.6 mm/m;
- the perpendicularity of the opposite sides of the sheet is within 3 mm;
- thickness deviation – 0.3 – 0.8 mm (ground, untreated, respectively).
Advice! Manufacturers produce slabs of different sizes, which must be taken into account when purchasing in order to reduce cutting waste for specific dimensions and room configurations.
Installation technology
To properly lay sheet material over an existing plank floor, the following conditions must be met:
- revision of the base - rotten joists and boards are replaced, creaks are eliminated, the presence of insulation, a vapor barrier membrane on top of it and waterproofing under it is checked, the impregnation of floorboards with antiseptic and fire retardant is updated;
- layout - usually from a long wall, offset seams in adjacent rows by at least 30 - 40 cm;
Layout of material on the floors.
OSB fastening diagram.
Important! When laying parquet, PVC tiles, and other small-format cladding, the screw heads must be puttied.
Installation recommendations
Depending on the type of finishing floor covering, OSB boards are oriented differently on a wooden floor:
- for small-format decorative materials, it should be ensured that the seams of tiles and PVC tiles do not coincide with the joints of OSB boards;
- When choosing laminate, tongue and groove, decking or parquet boards, it is better to lay the rows of OSB across the direction of the long facings of the finishing layer or at an angle of 45 degrees for a diagonal layout (relevant in rooms with defects in the geometry of the walls).
Advice! On OSB it is allowed to apply a screed made of DSP or self-leveling floor. However, the surface of the oriented strand board must be pre-treated with a waterproofing material to avoid leaks into the lower floor and swelling of the structural material itself.
Finish flooring repair
The main problem with plank flooring is a floorboard or several boards, which develop a transverse “hump” during periodic changes in humidity or during drying. This leads to an increase in the repair budget:
- the floor surface becomes an uneven “comb”;
- OSB boards do not rest on the floorboards with their entire surface, but only in places of contact with the “humps”;
Deformation of the wooden floor.
In other words, OSB with a thickness of 22 mm or more should be used. This problem can be solved by preliminary grinding or scraping of the base:
- a grinder or sander will smooth out the “waves”;
- the contact area of the subfloor layers will sharply increase;
- You can get by with oriented strand boards of smaller thickness.
However, this is not always possible when the existing floor covering is thin.
OSB subfloor top layer
Wood-containing boards are excellent for the top layer of a subfloor, as they increase the performance characteristics of the structure:
- provide a level base for the floor covering;
- increase spatial rigidity and strength of the base;
- reduce labor and material consumption of work.
Unlike floorboards, self-tapping screws are screwed into OSB boards strictly vertically. When the hardware is tilted, a change in geometry and warping of the material over time may occur.
The main problems arise when opposite walls diverge (trapezoid instead of a rectangular room shape). In this case, it is necessary to mark the existing wooden floor in order to trim only the slabs of the first row:
- a center line is drawn along the long wall of the room;
- depending on the size of the slabs, markings are made parallel to it;
- the edge of the OSB sheet mating with the wall is trimmed with a hand saw or power tool;
- the second and subsequent rows are laid according to the markings without trimming, taking into account the displacement of the transverse seams;
- the last row is cut in a similar way to give the sheets a trapezoid shape.
Thus, the OSB structural material is suitable both for creating the top layer of a subfloor and for repairing a finished floor covering made of tongue-and-groove boards if dismantling this cladding for some reason is not practical in the room. When choosing an oriented strand board, the labor intensity of the work is reduced, and the home master makes do with the existing arsenal of tools.
Advice! If you need floor repair specialists, there is a very convenient service for selecting specialists from PROFI.RU. Just fill out the order details, the experts will respond and you can choose who to collaborate with. Each specialist in the system has a rating, reviews and examples of work, which will help with the choice. Looks like a mini tender. Placing an application is FREE and does not oblige you to anything. Works in almost all cities of Russia. Without your desire, no one will see your phone number and will not be able to call you until you yourself reveal your number to a specific specialist.
If you are a master, follow this link, register in the system and be able to accept orders.
Choosing a floor slab
A competent approach to the selection of OSB boards laid on a wooden floor is impossible without taking into account such an important factor as the company that produces them. Preference is usually given to products from Europe and Latin America that have proven themselves in all respects (including strength indicators). To this should be added the need to assess the advantages and disadvantages of the slabs themselves.
Advantages and disadvantages
The undeniable advantages of unique products include:
- environmental friendliness of the material, the basis of which is natural wood;
- resistance to temperature changes and mechanical deformation;
- excellent indicators of strength and ductility of flooring manufactured on the basis of OSB;
- ease of processing and installation of the products themselves;
- uniformity of structure and attractive appearance;
- relatively low cost.
The list can be supplemented with a perfectly flat surface of OSB boards, on which, as on a subfloor, any finishing coatings (including linoleum) can be installed. The multi-layer structure guarantees good sound absorption, as well as additional insulation and waterproofing of the laid flooring.
Their relative disadvantage or disadvantage is the presence of phenolic components, which, according to the latest data, are completely absent in the latest environmentally friendly developments.
Required thickness
When choosing suitable slabs for flooring, it is important to take into account not only strength characteristics. To obtain a reliable and durable coating, their thickness should be taken into account, which is selected based on the following considerations:
- When laying OSB on a rough concrete base, slabs of 10 mm thickness are sufficient.
- When laying OSB on a wooden floor is intended, preference should be given to blanks with a thickness of 15 to 25 millimeters.
When carrying out rough work at various construction sites, the thickness of the OSB for the floor varies from 6 to 25 mm. Its specific value is selected depending on the following factors:
- brand of selected blanks;
- the magnitude of the expected load;
- the distance between the supporting logs (their pitch).
Only if all factors are observed will it be possible to achieve the required result, guaranteeing the reliability of the flooring structure.
Laying technology
Various rough coatings or structures can be used as the basis for installing OSB. Each type has its own styling features.
Dry screed
The possibility of arranging a floor without dampness and a long wait for the wet coating to dry forces homeowners to pay attention to dry screed. As such, fine expanded clay is often used, when leveling it it is customary to use unique beacons that allow you to indicate the level of installation
OSB boards are laid on the prepared surface, pressed tightly into the expanded clay, after which a finishing coating is attached to them. This method can only be used in utility rooms (in the attic of a private house).
Concrete screed
In the case where it is intended to install OSB slabs on a concrete screed, it is recommended to adhere to the following sequence of actions:
- Special marks or beacons are installed that record the required filling level (the distance between them is selected based on the convenience of leveling the future coating, that is, approximately 50–60 cm).
- The correct installation of the marks is checked using a building level (if there are deviations, they should be leveled in the horizontal plane).
- You can proceed to preparing the solution, which must have the appropriate condition (not too thick and not very liquid).
- The prepared composition is poured into the place intended for forming the screed, after which it is carefully leveled.
The screed should set completely in about a day, after which it will be possible to start laying the floor. It will gain final strength only after 14–15 days (this depends on the air temperature in the room).
When laying OSB on floors along joists in wooden houses, special attention is paid to such an important point as proper selection of the dimensions of the supporting structure. This applies to both the thickness of the bars themselves and the distance (step) chosen between them. Particular attention to parameters is explained by the fact that OSB is a complex system, the further behavior of which cannot be predicted
The situation is aggravated in situations where it is planned to install a warm floor under the rough covering
Particular attention to the parameters is explained by the fact that OSB is a complex system, the further behavior of which cannot be predicted. The situation is aggravated in situations where it is planned to install a warm floor under the rough covering.
This is why it is so important to lay OSB correctly when supports in the form of logs are used for this. To comply with these requirements, the size of the bars is selected as follows:
- their cross-section should be 50 x 50 or 40 x 60 mm (depending on the thickness of the material);
- the distance between the support bars is selected starting from 40 cm;
- its exact value is determined by the dimensions of the products being laid.
Expert advice. With the above parameters, it is most convenient to use slab samples with a thickness of 15 to 17 mm.
If the flooring pitch is increased to 50 cm, the thickness of the OSB for the floor along the joists is chosen to be no less than 22 mm.
On a wooden floor
The so-called substrate for OSB on a wooden floor is an intermediate (rough) base, the use of which is considered the best option. Its presence will give the entire structure additional stability, and will also significantly reduce the load on the slab itself. The function of an auxiliary base can be performed by a coating of moisture-resistant plywood or an old floor.
Note! The old floor can be used only if the flooring is in good condition (if there are no clearly visible defects on it). When preparing an old floor, you should scrape off the remaining paint on it, and then carefully sand the surface and repair any existing scratches and cracks.
Then they must be sanded and treated with a special protective compound (antiseptic). Only after completing all the preparatory procedures can you begin laying the slabs themselves
When preparing an old floor, you should scrape off any remaining paint, then thoroughly sand the surface and repair any scratches or cracks. Then they must be sanded and treated with a special protective compound (antiseptic). Only after completing all the preparatory procedures can you begin laying the slabs themselves.
Preparing the surface for work
Correct installation of slabs on a rough base requires its preliminary preparation. Otherwise, during operation, creaking may occur and deflections may appear. Preparation includes the following work:
- Inspection of boards. They need to be inspected for large cracks and rotten places. Creaking floorboards and deformed products are also found. Additionally, the condition of the thermal insulation is checked. It should not be settled, damaged by insects or rodents, or wet. If necessary, it will have to be replaced.
- Checking the evenness of the flooring. The rule used for this is the building level. The tool is installed so that it is across the boards. If there is a gap between the base and the level, this deformation must be eliminated. If this is not done, thin slabs may sag and take shape. Laying parquet boards or laminate will be impossible. Thick slabs will not be able to fit tightly to the subfloor, so after some time after installation the base will begin to creak.
- Leveling the flooring. This process is carried out in two ways. The first of them involves the complete dismantling of damaged elements and their replacement. However, this option is not cheap, so it is rarely used. The best solution is to scrape the base. This requires special grinding equipment. However, this leveling method is acceptable if the difference in height is not too large.
- Checking the state of the lag. If necessary, you need to replace the damaged elements or change the distance between them.
- Treatment of wooden elements with protective compounds. In this case, antiseptics and fire retardants are used. These substances protect wooden products from damage by insects and rotting. Fire retardants increase the resistance of the entire structure to fire.
Lastly, clean the rough base using a construction vacuum cleaner.
Using QuickDeck instead of OSB
Quick Deck slabs are a modern, technologically advanced building material. They are made of moisture-resistant high-density wood chips and are equipped with a tongue-and-groove joint around the perimeter.
For high-quality preparation of the subfloor, Quick Deck Professional and Quick Deck Master slabs with a thickness of 16, 22 or 38 mm are used. The thickness of the slabs is selected depending on the expected loads during operation. At the same time, the Quick Deck slab with a thickness of 22 mm can withstand a greater load without deformation than an old wooden floor with OSB laid on top. In addition, this material has the following advantages:
- absence of expansion and deformation under high humidity and direct exposure to water, as well as during changes in room temperature;
- perfectly flat and smooth surface of the rough slab flooring - suitable for absolutely any finishing coating;
- increased rigidity of the coating - tongue-and-groove joints and the strength of the slabs guarantee the reliability and durability of the floor;
- convenient format;
- simplicity and high speed of installation.
- Also, Quick Deck Master slabs have an additional protective film on their surface, which prevents the flooring from contamination and damage during other repair and finishing work indoors. Before the final operation of laying the finishing floor covering, it is removed and disposed of along with the rest of the debris.
Quick Deck Professional and Quick Deck Master slabs are installed floatingly on dense insulation or on joists, and do not require additional flooring, which, when compared with a wooden floor, allows you to increase the height of the room.
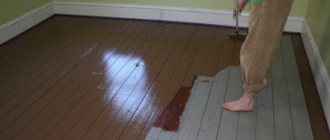
Finish options
Having dealt with the varieties, we can move on to discussing what can be used to cover an OSB slab on the floor. There aren't too many options here:
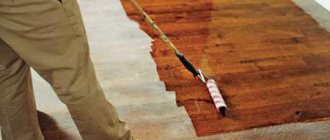
- Varnish for wood.
- Dye.
- Putty.
- Finish coating such as laminate, linoleum and so on.
The last option is the simplest, since laying the topcoat is not difficult and there are no difficulties with it. You simply purchase the type of material you need and install it according to the instructions. It is more difficult to choose the right paint or varnish.
Advice from professionals
Despite the fact that today there are quite effective, safe and durable adhesive compositions, if you have to lay OSB on floorboards, it is best to limit the use of glue. It is believed that on plank floors, OSB sheets and linoleum should be fixed pointwise, leaving most of the surface free. This will preserve the system of logs and beams. In addition, laying the material is not the most difficult thing; you still need to think about how to remove it in the future during the next major overhaul.
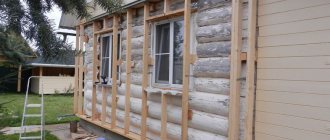
Installation of OSB boards on a wooden base
Wooden floors are a capricious base that can withstand moisture and will not withstand temperature changes very well. Due to changes in the microclimate of the room, the dimensions of the covering made of boards change: they either swell or shrink.
How to lay OSB on the floor to get a flat and smooth surface
Wood floors attract bark beetles and other pests, including rodents. To ensure that the leveling layer is not as capricious, it is necessary to use oriented strand material that will withstand exposure to moisture and will not become attractive to insects and rodents. Therefore, you should figure out how to put chipboard on the floor. The material laid on a wooden floor must be smooth and durable.
To lay OSB boards on boards, you need to prepare the appropriate tools:
- electric plane;
- screwdriver;
- hammer;
- electric drill;
- level;
- screws and nails;
- roulette;
- marker;
- hacksaw.
Laying OSB on a wooden floor is as follows:
- The first step is to inspect the plank floor and identify defective areas of the joists underneath. If necessary, replace and treat the logs with antiseptic agents.
- Old deformed floorboards must be replaced with new ones of the same section.
- After the joists have been replaced and the floorboards have been laid on them, check to see if the floor is creaking. Creaky areas are tightened with additional screws.
- Sand the surface of the boards and remove defective areas with an electric plane to reduce possible differences in heights.
- Dust and dirt are removed. They are treated with antiseptic agents, which will preserve the strength of the base under the slabs for a long time. After applying the product, you should wait until it dries completely before proceeding to the next steps.
- Installation of a frame under the slabs, which will allow them to be laid on the same horizontal level. For this, bars with a cross section of 40-50x50-60 mm are used. Check the horizontal level of the frame.
The thickness of the frame with the floor covering steals the height of the room
- A waterproofing layer is laid between the joists. This could be plastic film.
- To improve the thermal insulation and sound insulation properties of the floor covering, expanded clay is poured between the frame joists or mineral wool is laid.
Attention! When working with mineral wool, you need to protect your respiratory system from dust from the slabs and cover the insulated floor with a vapor barrier film so that phenol from the mineral wool does not enter the room.
- The frame is ready, the slabs are cut to the required dimensions so that the joints of the slabs are on the joists.
- The slabs are attached with a distance of 1.5-2 cm from the edge. Self-tapping screws or nails are used for fastening.
- The heads of the screws must be recessed, so holes are made in advance for fastenings and around the niche holes for the head with a large-diameter drill.
When laying OSB boards, do not forget that this is a wood material, so it can change dimensions. Therefore, a gap of 8-10 mm is left around the perimeter of the walls, and 3-4 mm between the slabs.
Chipboard floor on joists with insulated contour
After laying, the horizontal level of the surface is checked and, if necessary, sanded.
Fastening OSB to joists and boards
To fasten oriented strand board to the joists, use a self-tapping screw or rough nails. And for even greater reliability, fastening joints are sometimes lubricated with universal glue. What is preferable to use for fixation, nails or screws?
- Self-tapping screws are more expensive than nails when compared to the cost per kilogram.
- Fixing (screwing in) one screw using a screwdriver usually takes up to one minute. Fastening slabs with nails is much faster. And when you have a nailer (nail gun), it’s 100 times faster.
- But self-tapping screws withstand pull-out resistance better.
- If the plate was fixed with self-tapping screws, then dismantling it is much easier; removal is possible without damaging the OSB sheet. With nails it is more difficult not to damage the slab during dismantling.
In order for OSB sheets to be fixed as securely and firmly as possible, they are attached not only around the perimeter. For example, draw two diagonal lines to screw self-tapping screws along them with the same pitch. And if the base of the floor surface is covered with whole, large OSB boards, then this is especially important.
Professionals believe that it is safer and more convenient to fix OSB to a wooden floor surface with high-quality self-tapping screws. But this is when there are no restrictions on cost and time.
In the article, we examined the main points of laying OSB boards on logs, concrete screed and wooden flooring. As you can see, this is not such a difficult task and any home owner can cope with it.
Advantages compared to other materials
Despite their simplicity, OSB boards are multifunctional. They are used in various areas of the construction industry, in rough and fine finishing, construction of structures and floors. This material has a lot of benefits useful to the consumer:
- Simplicity. There is no need to purchase special equipment or tools for installation. Anyone can do this kind of work.
- Convenience. Thanks to its dimensions, one OSB board can level a large area of the room. The length is designed for installing logs in increments of 56 centimeters, which allows you to insulate the space under the floor.
- Cheapness. The cost of OSB is optimal, and the price-quality ratio will please consumers.
- Durability. The slabs are well fixed with popular fixing elements, do not deform, do not become loose and can withstand the load perfectly.
OSB is one of the newest and most practical flooring materials, which is gaining popularity every year. Now you don’t need to think long about how to level the floor using OSB. Compared to other similar products, they are resistant to humidity, wear and mechanical stress. An excellent example for its price category, meeting the requirements for building materials, and, importantly, multifunctional.
Briefly about the main thing
When wondering whether OSB is suitable for flooring, or whether it can be laid on the floor instead of plywood, do not doubt your choice. This material is universal and suitable for roughing and finishing. Unlike analogues, it has no equal and allows you to significantly reduce the cost of floor repairs.
When purchasing OSB sheets, it is important to pay attention to the marking: E1 or E0.5 with the designations “Green” or “ECO”. This material is suitable for residential premises
OSB boards are attached to the floor only with self-tapping screws, longitudinally-transversely or diagonally. They can also be used as a substrate for a concrete base. In this case, the slabs are laid in one layer.
The material is installed face up, cutting is done using a jigsaw. Laying slabs for an irregularly shaped room starts from the center of the room, and for a standard rectangular room - from the corner.
Source
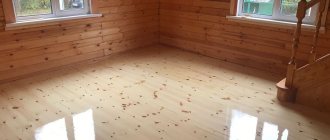
Processing OSB for different finishing coatings
A strong, hard and smooth surface makes OSB a universal base for all modern types of finishing floor coverings. How to cover an OSB floor? Here are some popular solutions:
- Varnish or paint. In this case, OSB boards will act as finished floors, which will only require decorative finishing with paints and varnishes. OSB sheets do not require any additional preparation; it is enough to clean them from dust and apply 2-3 layers of varnish (paint).
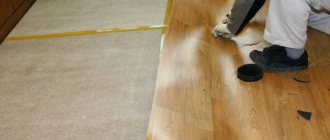
- Roll materials - linoleum and carpet. When laying rolled materials, it is necessary to ensure that the joints between OSB boards are located flush with the rest of the surface. It is advisable to remove all irregularities using sanding paper. Compensation gaps should be filled with elastic sealant.
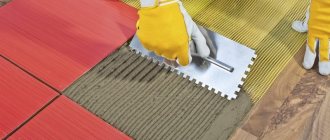
- Tiles (ceramic, vinyl, quartz vinyl, rubber, etc.). In order for the tile to be held on the OSB base, it is necessary to ensure its immobility. To do this, logs are placed more often than required by the thickness of the sheets. The pitch between the fastening elements is also reduced. The tiles are glued to OSB using a special adhesive suitable for the wooden surface and the tiles used.
- Laminate is a finishing coating that is fixed in a “floating” way, without rigidly fastening the lamellas. This coating is quite rigid, so there is no need to prepare OSB for laying the laminate. Minor irregularities that may exist at the joints of the plates are leveled out by the substrate.
What exactly to choose is up to you.
Using OSB allows you to inexpensively and quickly level an existing wood or concrete floor. And if necessary, create it from scratch on logs. An OSB surface will not require expensive finishing, additional leveling, or coating with moisture-resistant compounds. This is an excellent choice for those who want to create a high-quality floor with minimal effort.