An old wooden floor has large gaps, unevenness, and it looks somehow unattractive. Therefore, many in the process of renovating an apartment prefer to make a modern floor finish, using, for example, laminate, parquet, ceramic tiles and much more. A wooden floor is not suitable as a basis for laying other types of finishing materials. The surface must be carefully leveled. A suitable option in this case is laying OSB on a wooden floor and properly preparing the surface.
Particle boards are a multifunctional building material and one of the popular types of floor finishing.
Types of slabs
OSB sheets are made by pressing wood chips with an adhesive mixture and shaping the product into a flat sheet of specified dimensions and thickness. When gluing several layers, the technology of laying sheets is that each layer is placed with fibers across the previous sheet. This in turn makes the product durable and resistant to mechanical stress.
OSB boards
There are three types of particle boards on sale, differing in size and technical characteristics. Sheets are divided into categories:
- OSB – 2;
- OSB – 3;
- OSB – 4.
Products included in the OSB 2 list are sheets of pressed chips intended for finishing floors in dry rooms. Plates 3 are characterized by increased resistance to humidity, so they are better suited for installing floors or partitions in the bathroom and kitchen. But if you need to make load-bearing structures, then it makes sense to purchase OSB 4 boards, the thickness of which reaches 25 millimeters, and their installation is applicable in various areas of finishing.
OSB flooring: which slabs to choose, how to lay and finish
Many developers are interested in the question of whether it is possible to make a floor from OSB boards, and if so, what is the correct technology, how will it behave after several years of operation. After all, this material is relatively new, the experience of using it is still limited. But you can rely on its properties, taking into account what raw materials are used to make oriented strand boards and how it is produced. Knowing the characteristics of the material, it will not be difficult to decide on this issue.
Leveling a wooden floor
There are many materials for leveling floor defects, and you can choose any of them. But the choice must be made taking into account the curvature of the floorboards. In this case, it makes no sense to install thin sheet plywood. Compared to chipboard and fiberboard, wood boards are characterized by high strength and maximum thickness, depending on the product category. Correcting the curvature of a wooden floor yourself is not difficult. They are easy to install and do not require special technologies or devices.
Laying OSB on the floor
OSB sheets are suitable for rough finishing work on floors, both concrete and wooden, and preparing the surface for laying laminate flooring. In addition, the material has a number of other functions, such as:
- a strong foundation for the future floor;
- rough leveling of surfaces;
- soundproofing.
The presence of several layers of overlap prevents the penetration of extraneous sounds into the room and softens the impact of the floor when walking, and also insulates the room. Modern production of OSB boards fully complies with environmental requirements. Manufacturers have completely abandoned the use of toxic substances.
Technology selection
To choose a certain leveling method, you need to assess the condition of the floor and find out how much the relief deviates from the desired norm. If the height differences are about 2 mm, and the area does not exceed 1 sq. meter, no need to level the floor. It is enough to use acrylic sealant on the surface or use the putty method. In the latter case, you can make the mixture yourself by mixing moistened sawdust and PVA.
Small unevenness can be smoothed out with ordinary putty
Having the correct laying of the floorboards, where differences are uniform up to 5 mm, you can attach the plywood directly to the floor. When differences reach 8 cm or more, you need to make point or strip supports. What are boards/thick plywood used for?
how to attach plywood to wood floor
how to attach plywood to wood floor
IMPORTANT: for a board whose width is from 10 to 20 cm, a thickness of 10 mm is sufficient. When the width exceeds 20 cm, use thicker plywood sheets.
When the differences are too large, the structure will have to be disassembled and rebuilt by purchasing new materials. In addition, under such deformation there are usually some serious reasons that need to be clarified.
IMPORTANT: plywood is used for leveling only if the technical parameters of the shelf meet the standards.
Table. Characteristics of plywood and plywood boards made from birch veneer sheets
| Index | Regular plywood | Bakelized plywood | Plywood boards |
| Thickness, mm | 4 | 16 | 20 |
| Density, kg/m3 | 696 | 1190 | 749 |
| Water absorption in 24 hours,% | 24-32 | 0,92 | — |
| Tensile strength (MPa) along the fibers of the outer layers | 101,1 | 113,4 | 104,0 |
| Tensile strength (MPa) across the fibers of the outer layers | 65,9 | 120,0 | 94,4 |
| Ultimate strength (MPa) during static bending across the fibers of the outer layers | — | 112,0 | 85,7 |
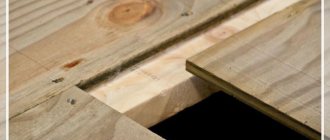
Installation of OSB sheets
The following provides detailed instructions for installing slabs on a wooden floor.
Installing strand sheets is an easy way to create a durable, level subfloor. If the main wooden floor has a large drop or unevenness, you will have to level the level using small logs, onto which OSB will be nailed on top. The fixing bars are mounted at an equal distance from each other, with the joints calculated. For greater reliability, the underside of the sheets is covered with waterproofing.
If you plan to lay the laminate later, then you will need to make vapor insulation with a special polypropylene film over the OSB sheets. This will prevent moisture condensation, which will destroy the wood structure.
To secure OSB to the floor, it is nailed with nails of the required length, or screwed with screws to the supports at intervals of 30 centimeters from each other. The fastening length can be calculated by multiplying the sheet thickness by 2.5. This optimal length will allow you to securely fix the material to the base.
So, to install the canvases and level the floor you will need the following tools:
- hammer;
- nails;
- screwdriver;
- self-tapping screws;
- roulette;
- hacksaw;
- thin timber for forming lags.
The joints should fit snugly against each other, and the fasteners should be driven completely into the surface of the sheet. Installation of particle board material is not very difficult, the main thing is to adhere to the accuracy of the technology and be careful. Then the floor will be both smooth and durable.
Adjustable plywood studs
Plywood on studs
The next technology is the installation of an adjustable floor.
- Approximately half the thickness of the sheet is made in the plywood with a drill, in those places where the pins will be attached (every 40-50 cm). The diameter of the recesses is equal to the size of the head of the hairpin.
- Inside each recess, a through hole of smaller diameter is drilled in the center (diameter equal to the stem of the hairpin).
- Washers are inserted into the recesses and markings are made through them - in which places on the floor holes will need to be drilled.
- The sheet is then temporarily removed to make holes in the concrete with a hammer drill.
- Anchor studs are driven into the floor, with a washer and nut screwed to them.
- Using the laser level, all washers are aligned in the same plane. To secure them tightly in one place, you can use a thread locker.
We put nuts on studs
- Next, the sheet of plywood is laid on the studs. As a result, the lower part of the sheets will lie on the stud with a washer, and the upper part will need to be tightened with nuts. The excess length of the studs is cut off with a grinder.
Trim the excess length of the hairpin with a grinder
Recommendations for laying OSB
Two types of installation are used: on logs and using point support. The steps are not complicated, you can do it yourself. Logs are wooden beams laid from one wall of the room to another, in one direction. Point fastening is the installation of small blocks, in the form of a grid across the entire floor, with a cell size of up to 35 centimeters. With a sheet thickness of 20 millimeters and above, you can increase the distance of the slabs to 40 centimeters. The frequency of the supports will provide resistance to dynamic stresses on the surface.
Installation of OSB to joists
Holes are made in the floor sheets in the corners of the room to allow air to pass under the floor and prevent mold from occurring. All joints with walls and between panels, as well as air duct openings, must be sealed with gauze and PVC glue so that insects living under the floor do not pass upward.
Stage 6. Marking the scope of work
Here's how to correctly determine from which corner in the room to start laying plywood sheets. We just take a regular construction angle and apply: which of all four angles is closest to 90° (by the way, you will be surprised at the curvature found), and we start working from there. And it is desirable that this angle be the highest - find it. If you give preference to an angle that is greater than 90°, then an ever-increasing gap will begin to form between the wall and the sheets of plywood.
Another simple way to find out how much the angle of a room corresponds to 90° is to measure 3 cm on one side, 4 cm on the other, and draw the common hypotenuse of this resulting triangle. If it is 5 cm, then it is exactly 90°. You need to calculate the required number of plywood sheets as follows: total floor area plus 10% for cutting.
Sometimes plywood on joists can make a squeaking sound when walking on the floor - this can also be solved. Just before laying it, pour a few drops of melted paraffin directly over the bars. But during professional installation, the logs are glued with special construction tape:
Preparing old coating
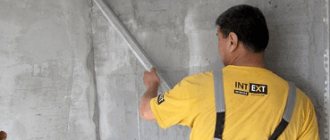
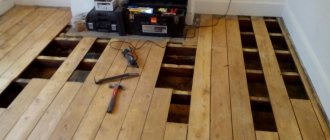
Before laying pressed particle boards on the floor, it is necessary to prepare the old surface. Special equipment will help remove paint from wooden boards or even remove them if possible. The following is a process consisting of step-by-step steps:
- the old coating is removed;
- the floor is treated with a primer;
- OSB sheets are installed;
- strengthened with nails or self-tapping screws.
When there is a need to install a raised floor for communications, for example, in an office, then a good option is to lay OSB on a wooden floor with a pre-designed frame. Sheet flooring material is placed on top of it.
Another problem home owners face is squeaks from old floors. Here, no matter how you level it, the sounds when walking will not go away. In order not to have to redo the repair in the future and to prevent the boards from creaking, they are nailed to the joists, each separately. The screws are twisted at an angle towards the joists.
Floor installation
Video description
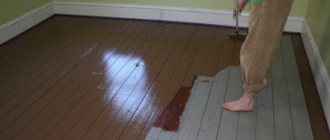
The technology for painting OSB is described in the video:
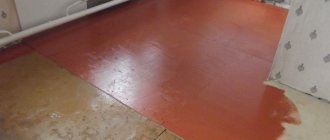
If varnish is used, the first layer can be applied with a brush or roller. When it dries, the surface is slightly moistened and “smoothed” with a wide spatula, removing small splashes, stripes and other irregularities.
When finishing, a small amount of varnish is poured onto the floor and spread with a spatula using wide movements to obtain an even and thin layer.
All work must be carried out at air temperatures above +5 degrees.
Source
Processing of slabs for finishing
The floor is leveled, wood sheets are laid. Now we process them for finishing. Of course, if you are satisfied with the natural pattern of the OSB, the floor can be left as is, varnished, a plinth installed, and that’s all. Or you can put any other type of finish on top. The surface of the slabs and their processing characteristics are determined by the type of finish used that will cover them.
- Clean finish. Chip sheets are used in their original condition, but the surface must be protected from destruction and wear. Several layers of varnish or a special substance are applied on top to prevent the appearance of bark beetles and other insects.
- Linoleum or carpet. Roll materials require a perfectly flat floor. Any differences at the joints and gaps negatively affect the operation of the linoleum, and it will not look very nice in appearance. Under the elastic carpet, cracks and other bulges from changes or screws will be felt. It is best to cycle the floor to achieve one level.
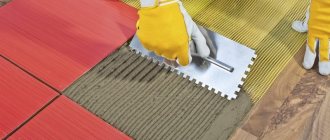
- Ceramic floor tiles. The base must be stationary, especially if the sheets are laid on joists. The surface is sanded with sandpaper or a metal brush, and the tiles are placed on a special glue that connects ceramics and wood.
- Laminate. This is a fairly rigid and durable material, equipped with a special fastening, so there are no special requirements for the floor. The main thing is that everything is smooth. These recommendations will help make the interior beautiful and practical, functional and durable.
Advantages compared to other materials
Despite their simplicity, OSB boards are multifunctional. They are used in various areas of the construction industry, in rough and fine finishing, construction of structures and floors. This material has a lot of benefits useful to the consumer:
- Simplicity. There is no need to purchase special equipment or tools for installation. Anyone can do this kind of work.
- Convenience. Thanks to its dimensions, one OSB board can level a large area of the room. The length is designed for installing logs in increments of 56 centimeters, which allows you to insulate the space under the floor.
- Cheapness. The cost of OSB is optimal, and the price-quality ratio will please consumers.
- Durability. The slabs are well fixed with popular fixing elements, do not deform, do not become loose and can withstand the load perfectly.
OSB is one of the newest and most practical flooring materials, which is gaining popularity every year. Now you don’t need to think long about how to level the floor using OSB. Compared to other similar products, they are resistant to humidity, wear and mechanical stress. An excellent example for its price category, meeting the requirements for building materials, and, importantly, multifunctional.