Work related to the finishing of premises is divided into certain stages, the most important of which is tiling. This finishing option has a direct impact on the appearance of the entire room as a whole. In addition, the service life of the coating depends on the quality of installation. Let's try to figure out whether it is possible to lay tiles on a brick wall without plaster.
How to tile a backsplash in the kitchen
When finishing a kitchen apron with ceramic tiles, the technology is practically no different from that described above. There is simply no need to calculate the number of vertical rows. The “start” location is determined by the height of the tabletop: it should start 5-10 cm above the edge of the tile. Attach the bar at the required level, align it exactly with the horizon, and you are ready to begin.
An example of a tiled apron on a working wall in the kitchen
An apron in the kitchen is usually made on the work wall. If it is not one wall, but two or three, you can start from one of the corners.
How to tile a backsplash in the kitchen
If it is laid out from small-sized tiles, the undercuts may not be very noticeable. If you want to do everything symmetrically, repeat the layout and start from the center, as described above.
Useful advice from professionals on facade finishing
It is quite possible to install clinker yourself, but for the durability of such a coating it is important not to neglect the advice, building regulations and installation rules
- To finish the facade, you should choose dry and windless weather with a temperature of +5+30 degrees.
- You need to start decorating with windows and doors, marking the boundaries of the location with a pencil.
- It is advisable to divide the walls into squares with a side of 1 m so that the tiles look natural and highlight the walls favorably.
- As a rule, darker-colored tiles are laid at the bottom of the facade - up to 6 m from ground level.
- The tiles should be uniform in texture and shade, although minor variations in color are acceptable.
- Dark color contributes to overheating of the building, so it should not exceed 20% when laid out, taking into account the total area of the facade.
- To fill the joints, it is recommended to use a grout mixture, and you can buy it in different colors, taking into account the shades of the tiles.
- The surface before installation must be smooth and clean, without chips or cracks, which must first be covered, then apply a layer of primer.
- After sealing, it is additionally recommended to prime the walls to strengthen the base and increase its adhesion to the mortar.
- The clinker must be installed after the reinforcing mixture has completely dried.
- Laying clinker is done in rows, and start work from the corner of the room, moving from bottom to top.
- When gluing insulation to walls, it is advisable to cover the top with a reinforcing compound or a layer of fiberglass.
Fiberglass will help insulate the room
Tools and material calculations
Before gluing gypsum bricks to walls, you need to prepare tools and calculate the amount of material. To calculate, it is necessary to measure the length and height of the walls on which the installation will take place and multiply the resulting values. Door and window openings are removed from the resulting number in order to reduce costs. After calculation, about 10% is added to the total value for the reserve. Knowing how much material is needed, it is necessary to take into account that it is flat and angular, which is used at the corner of the room.
Tools for laying decorative stone
To work you will need:
You may need a hand tool in the form of a saw for cutting bricks. The adhesive composition is sold differently, depending on where the brick walls are being finished: inside, outside. The glue can be dry or liquid, in the form of a paste. Additionally, crosses are purchased so that the seam is even everywhere.
What the professionals say
In theory, renovation and construction professionals answer the question “Is it possible to put new tiles on old tiles?” answer positively. In reality, the decision is made depending on the conditions:
- room dimensions. Laying tiles on top of tiles will eat up some of the space. If there is already little space in the room, the old tiles are dismantled;
- condition of the material. Before making a decision, the old tiles are inspected for defects and voids between the coating and the wall. A poorly laid tile may fall off under the weight of a new one.
Important: the opinion that laying tiles with a second layer is less expensive is not entirely true. Smooth tiles do not absorb glue; without special treatment, the new coating will appear on the floor in a couple of days. Preparing old tiles and gluing an additional layer on top is easier than dismantling the material, but not much.
Advantages and disadvantages of such repairs
Before deciding whether it is possible to lay tiles on old tiles in your case, evaluate the feasibility of such repairs. Among the advantages of the process:
- no need to dismantle the old tiles, you won’t have to spend a long time cleaning the room from dust and disposing of heavy garbage;
- insignificant, but still a saving. The amount of money and time spent is reduced;
- no need to level the surface. You don’t have to purchase the necessary materials and waste time eliminating defects;
- there is no need to figure out how deep the communications are and take into account the location during installation.
There are just as many disadvantages to renovations that involve laying tiles on tiles. The main disadvantage is the reduction in room area.
Article on the topic: Is it possible to sheathe a brick house with metal profiles?
The level of the floor or walls will change to the thickness of the tiles and “eat up” part of the space.
If the condition of the material is not assessed before laying new tiles, voids and defects may cause cracks on the surface. The additional layer will not last long even if low-quality plaster and glue were used the previous time.
Preparatory stages
Before installing clinker facade tiles, you should first carry out preparatory work.
- Calculate the amount of tools and material needed.
- Decide on a laying scheme; usually the panels are placed vertically on a fireplace, wooden, or concrete base.
- Make calculations, calculate the area, perimeter (length, height) of the facade.
Before starting work, it is necessary to make calculations.
During preparation, the base (metal, cement screed, concrete, brick wall) requires special attention and should be:
- durable;
- level vertically and horizontally;
- dry for perfect laying of clinker;
- with high load-bearing capacity;
- no cracks;
- clean and it is necessary to remove particles of varnish, paint, lubricants, otherwise the adhesive properties of the adhesive composition will be reduced;
- durable, shedding of individual sections is unacceptable.
If necessary, the base must be plastered and leveled using repair plaster. In the case of laying clinker tiles on the facade, it is advisable to first lay thermal insulation, which will facilitate the transfer of heat into the room and protect against fungus and bacteria from penetrating the walls.
On a note! There should be no loose plaster elements left on the base. They must be removed so that the clinker sticks evenly and firmly for many years.
The clinker is laid on an adhesive compound, which can be purchased at a hardware store, taking into account the operating instructions written on the packaging during installation.
You can use traditional mortar by preparing it yourself:
- sand (4 parts);
- cement grade M500 (1 part).
The output should be a fairly plastic composition with the addition of water so that it is applied and distributed over the surface in an even thin layer.
Features of preparatory work
Before you start laying tiles, you need to check that the wall is dry and clean. There is an option to lay ceramic tiles on previously painted plaster; the other wall covering must be removed. Modern technology suggests that new tiles can be laid on old ones, thanks to existing effective adhesives. Thus, there is no need to waste time chipping away the previous coating or cleaning and washing the room. Of course, an important condition is that the old tiles are firmly attached to the base, otherwise they must be removed. If there are small chips or cracks, then they are not repaired, since in the future this will be done by the mortar when installing new tiles.
A cleaned and primed base is an ideal condition before installation.
It is the preparatory work that is the key to successfully updating the wall surface, even if it takes quite a lot of time.
Joining materials
Technological joining of laminate and ceramics can be done using the following products:
- the use of a flexible PVC profile allows you to connect curved bends;
- a flexible metal profile is used to connect curved zones and straight seams;
- an aluminum threshold is used to process the joining surfaces under the door leaf;
- the use of a box threshold increases sound insulation and seals joints;
- using a transitional PVC profile, coatings with a large difference in height are finished;
- when using a cork expansion joint, a smooth joining surface is obtained between the laminate and the tile;
- Using a T-shaped profile from solid wood, straight seams are made.
Answers from experts
Boris Stepanov:
Mandatory and always cement-sand mortar. If you invite an experienced tiler, he simply will not lay tiles on an unplastered wall. Moreover, he will also check the quality of the plaster - he will take a 2-meter jointed lath, apply it to the plaster and tell where the hump is, where the belly is, or everything is fine and you can lay the tiles
On a plastered wall, the tiles will lie perfectly flat; there will be no need for unreasonably large amounts of glue, which is especially important; the strength will be significantly higher, and therefore durability
Vladimir:
Of course it’s necessary, the brickwork is uneven, otherwise it will be awry
Alexey Frost:
Yes, in principle no
Alexey Oveskin:
If the brick is laid “beautifully”, by no means!
Alexander Kukushkin:
Not necessarily, but then it will be easier to lay the tiles and less glue will be needed.
Gennady_36:
If you lay tiles over plaster, it will be smoother. But the plaster may not stick well to the wall and will then fall off along with the tiles. It is better to glue tiles to the wall and glue them to the brickwork. Larger area of contact between glue and masonry, better adhesion.
NOT OLD YET:
When laying tiles under a comb, the walls must be leveled with plaster along the beacons.
Oleg Prozorov:
Be sure to plaster... just not with cement mortar. After plastering, laying the tiles will be faster, and less glue will be used, and it will be much smoother. And don’t listen to the sharomygs who advise laying without plaster!
Bronislav Zmitrukevich:
Of course, plaster! Otherwise how to lay that tile. And if the area is large, then you can do it by machine, for example, plastering /services/.
Alexandra Timofeeva:
Yes need. I recommend using “MIXTER” plaster (made on the basis of gypsum and cement with the addition of a light filler, which reduces the consumption of the dry mixture, and high-quality modifying additives, allowing high-quality finishing work to be carried out in a short time. It is ideal for work in rooms with normal and high humidity. Layer thickness from 5 to 60 mm.) from the company Starateli or Optimum plaster (designed for mechanized and manual plastering of walls and ceilings on brick, concrete, foam-aerated concrete, gypsum and other bases in rooms with normal and high humidity, for finishing in all types of buildings and structures (A-B), including rooms where a wet disinfection mode is provided. Mixture consumption (with a layer thickness of 10 mm) - 10-11 kg/sq. m. Layer thickness from 5 to 60 mm). I also recommend “Plus” tile adhesive
Darina Krasyuk:
SERGEY BLAGININ:
It’s possible, but it will fall off, and the glue will separate from unplastered bricks. just prime, plaster, prime again and glue the tiles. I’ll explain why you can’t glue it directly to the brick. The glue is applied in a layer of no more than 10 millimeters (it is written on any bag). On brick, such evenness practically does not exist and the thickness of the glue is uneven. However, there are special adhesives for unplastered surfaces with a layer of up to 30 mm, but this is for specialists. better do it as it should be - first plaster and then glue even a mosaic under the comb
zero phase:
Of course Mona
Diam:
Can.
Alex Swan:
It’s possible, but I seriously doubt that your brick lies level.
Alexander Bakushev:
primer and glue!
Alexander Kolisnichenko:
It is possible, but the glue consumption will be large. It is better to plaster under the lighthouses with a cement-sand mixture. It will pay off in the end
Hokim Jumaev:
Can!
Victoria:
When I changed the tiles in the bathroom, it was a pity to throw away the old one, it broke off completely, and I glued it on the balcony to a brick wall with the most ordinary cement-sand mortar, it still holds (15 years) in those places where it was not knocked down during installation windows, but I must say that the masonry was far from perfect. This year I bought some leftover tiles on sale and want to re-glue them.
Scarifier:
Brick expands with seasonal temperature fluctuations, tiles on bricks will stick, but later cracks and peeling will appear, plaster acts as a damper between tiles and bricks, and a profile-flat wall is easier to cover. It is impossible to glue a mosaic, small decorative elements such as a pencil onto a brick without plastering it.
turnkey bathroom:
If the wall is smooth and there are 90 degrees in the corners, then “Betonokontakt” is a special primer and start working. Otherwise, plaster with “Betonokontakt” primer and lay the tiles.
Masonry
Before starting work, it is necessary to prepare the surface. If there are old layers, they need to be removed and try to make the surface as smooth as possible.
After the surface has been leveled, you can begin gluing the material. The adhesive solution is applied to the building material and to the wall surface, so the tiles will stick more securely.
The material must be pressed against the wall and held for several minutes. This is necessary so that the glue has time to set.
Laying methods:
- diagonally;
- seam to seam;
- in the dressing.
Best answers
Vadik Andreev:
If your base, i.e. the wall, is fairly flat, then you can lay tiles on it, having done all the preparatory work in advance. If the wall has large deviations in level and plane, then you cannot do without plaster. Plaster also has a protective function. In general, in order to carry out high-quality work on tiling walls and floors with ceramic tiles, you need perfectly leveled surfaces, here the glue consumption is minimal, and the time spent on the work is reduced significantly.
Bolshevik cats:
If the tile adhesive is suitable for silicate surfaces, then yes. Whether it will fall off or not, you need to choose high-quality modern adhesives and look at what surfaces they are suitable for.
Andrey Borisovich:
lay down » no. just put
Druid:
If money is not important at all, then you can. It is better to plaster it, it is better to lay it on a flat surface and tiles, but it will be difficult for a non-professional to lay tiles on a 3cm layer of glue
You just treat the brick with a primer, this improves adhesion and there is no dust on the brick.
Igor Iskandarov:
Of course you can. Mix the solution 1 to 4, and add 2 kg of glue per bucket of solution. Wash the wall with a brush.
kostiann:
if you do it properly, you will put it on for 2 months...
Alexander Bakushev:
You can pin the gypsum board onto the fugen and screw the dowel with nails, then prime it and lay it in chocolate!
How to remove tiles from a wall
Like all other finishing work, laying tiles begins with careful preparation of the base. First of all, you need to start by removing the old tiles. For this we need a hammer drill with a lance. The sequence for dismantling the tiles is as follows:
Use a sponge to dampen the joints between the tiles.
Clean the grout from the joints using a metal spatula.
By inserting the point of the hammer drill into the seam between the tiles, remove the tile from the wall. It is better to dismantle the tiles from top to bottom.
The tiles can be removed in another way - using a hammer and chisel. First, the seams, as in the previous method, are wetted and cleaned of grout. Then a chisel is inserted under the top tile and the tile is knocked down with hammer blows. However, this process is more labor intensive than using a hammer drill and will take longer.
Cladding an uneven brick wall
Most often the problem of unevenness can be found in Khrushchev buildings. In this case, there are two options for laying tiles on a brick wall:
- After cleaning and drying the surface, it is laid on a layer of glue, that is, everything is the same as in the case of a flat surface. The difference lies in the need to use a thick layer of glue (sometimes over 3 centimeters). The wall is leveled using glue. This method is impractical, as it has three significant disadvantages: high cost, complexity of installation, and a high probability of tiles slipping. This installation method can only be used by a high-class professional.
- The brick wall is cleaned and dried. Then they prime and plaster, leveling the surface. It is preferable to use a deep penetration primer in order to minimize the seams between sand-lime bricks and prevent the further formation of unwanted cavities under the cladding.
Preparation for installation
Before laying tiles on the wall, you should draw a diagram of the walls with the exact dimensions of the surfaces to be finished. The diagram also indicates recesses, openings, sockets and other elements that affect the installation order.
Necessary materials
To understand the question of how to lay tiles on a wall, you should first purchase the necessary materials for this:
A binding material such as glue or cement mixture;
- Primer;
- Grout;
- Tiles selected depending on the operating conditions of the room;
- Remote plastic crosses ensuring compliance with the dimensions of the seams;
- Trims that allow you to correctly form angles;
- Guide profiles that allow the bottom row to be made exactly horizontally;
- Self-tapping screws for fastening profiles.
Tools
Laying tiles on the wall also requires a certain set of tools that must be prepared in advance:
- Tile cutter (you can use a glass cutter or grinder);
- Drill;
- Drill attachment for mixing the solution;
- Drill bits for a drill;
- Notched spatula to optimize adhesion;
- Rubber spatula;
- A spirit level or laser device to correctly mark horizontal points;
- Sandpaper;
- Construction containers for preparing glue and grout.
About preparing the wall
Proper wall preparation ensures reliable fastening of bathroom wall tiles, impeccable appearance and long service life of the tiles. Therefore, before installation, it is often necessary to correct the builders’ mistakes by plastering with parallel leveling of the surface.
Next, the wall surface is treated with a primer, ensuring optimal adhesion.
Wall preparation can be done without removing the following finishing materials:
- Paint covering mineral substrates such as brickwork, concrete, expanded clay concrete;
- Moisture-resistant plasterboard sheets.
It is not recommended to lay new bathroom tiles on top of old ones - this is only permissible if the cladding has recently been replaced and all preparatory work has been completed. To reliably glue tiles to old tiles, it is necessary to use especially strong glue, as well as apply adhesion-increasing layers.
What to pay attention to during installation
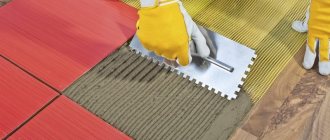
A pencil and ruler will allow you to mark the level of the wall. The distance between the horizontal lines should be 10-15 centimeters. If you want to use trim trim, it is recommended to lay them in the lower, less noticeable part of the wall. Prepare a comb or spatula; using one of these tools will be convenient for applying glue to the back of the tile. The adhesive composition is also applied to the surface to be coated, while the spatula should be held at an angle of 60 degrees. At the next stage, you need to press the tile into the surface with rotational movements, from under which the adhesive solution will be squeezed out. It is recommended to use the resulting excess for further sealing of seams.
It is important to remember that the styling composition sets in 30 minutes. During this time, you need to have time to smooth out the seams using a narrow wooden spatula
Excess solution must be removed with a damp foam sponge. To finalize the seams, it is necessary to use foam rubber or a brush; they are first moistened in water.
How to care for stone
Caring for gypsum stone will not require much effort on the part of the housewife.
All that is required is to periodically wipe off the dust from the varnish base. It is worth noting that if bricks with an aging effect were used in the interior, then the dust on them is not visible as on dark varnished bricks. The varnish, in turn, protects the plaster from moisture. Gypsum bricks for decorating a room are the best budget solution. With the help of such inexpensive materials, you can create a cozy interior in any corner of the house, and all that is required to design an interior solution is imagination, time and compliance with installation technology.
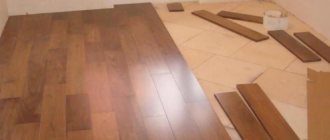
How to lay tiles on walls correctly
As a rule, tiles are not laid behind kitchen furniture; this significantly reduces costs. If you are planning to finish only the work surface, draw a horizontal line where the kitchen table ends. Fix a narrow profile for drywall along it (with a reserve of 2-3 cm). The bottom row of tiles will rest on the profile. Fix the profile to the surface with dowels. Check the correctness of fastening using a level.
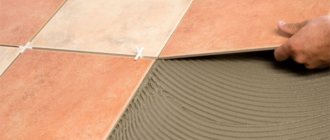
Stages of laying tiles.
Plastic crosses will help you form uniform seams between the tiles. The thickness of the crosses depends on how thick you want the seams to be. The size of the spatulas depends on the size of the tile.
Pay attention to the back of the tile, there is an arrow indicating where the bottom of the tile is. It is advisable to first lay the entire stack of tiles on the desired side first, so as not to be distracted during the work
The next stage is preparing the glue. To ensure that the glue has the required consistency, be sure to follow all the instructions given by the manufacturer on the packaging. It is advisable to mix the glue using a drill with a mixing attachment. After this, wait 5-10 minutes, then stir again. This technique will make the glue flexible. The next step is the actual laying of the tiles. Scoop up the adhesive with a spatula and apply it to the tile. Keep the spatula in water all the time so that the glue does not stick to it. Remove any remaining adhesive from the tiles with a notched trowel.
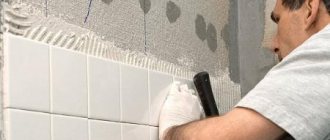
Press the tile to the surface. Check the correct installation using a level. If the surface is well plastered and the profile is correctly fixed, the tile will stand up properly on its own. The next tile is laid side by side, do not forget to place crosses between them. Check the flatness using the rule. Avoid any gaps.
If there is a need to cut tiles, carry out the work carefully: you can easily get injured on a sharp corner. It is advisable to use a tile cutter for cutting.
If it is missing, you need to make an incision with a simple glass cutter, then break off the tile, placing it on the edge of the table. If you need to make cuts to fit the shape of a socket or switch, you will need a grinder.
Please note that you can move or adjust the placement of tiles only 15 minutes after laying. After this time, you will have to remove the tile, treat it and the surface and put it back on.
To neatly finish the corners, use plastic corners; the ends of the tiles are inserted into them. The corner must be 2 mm thicker than the tile, otherwise the edges of the tile will not fit into the corner.
After all work, leave the glue to dry for the whole day. Then remove the profile that served as a support for the bottom row. The tile will no longer move downwards.
Next, start grouting.
After removing the plastic crosses, start grouting. Choose a grout that matches the shade of your tile. The composition will need to be diluted until a uniform consistency is formed. Using a rubber spatula, carefully apply the compound between the tiles. When finished, wipe the ceramic with a slightly damp sponge.
Learning how to lay tiles on walls is easy. But in this work you need to apply maximum patience and accuracy, and also strictly follow the instructions for using the materials. If you lay high-quality tiles on the kitchen walls, this will create an atmosphere of warmth and comfort in the room.
- What are we repairing? click to expand Ceiling Select
- Prepare
- Wallpaper
- Painting
- Tensioner
- Suspension
- Drywall
- PVC panels
- Rack and pinion
- Whitewash
- Tile
- Choose
- Choose
- Installation
- Interior
- Sockets
- Washing machine
- Renovation of rooms: living room, kitchen, bathroom. Bathroom
- Kitchen
- Children's
- Balcony
- Bedroom
- Living room
- Corridor
- Hallway
Technology for laying new tiles
To lay tiles on tiles, glue with increased adhesive strength (adhesion) is used.
The latter is measured in MPa, its value is indicated on the packaging.
For different brands of adhesives, this indicator varies from 0.2 to 1 MPa.
According to adhesion strength, adhesive compositions are in the following order (from weak to strong):
- cement;
- dispersive;
- epoxy.
The latter type is expensive and is used in special conditions: for covering floors in areas with high traffic, and structures exposed to constant direct exposure to water. There are also polyurethane adhesives - for “warm floors” and structures prone to deformation and vibration. Under normal conditions, dispersion adhesive is sufficient. It is supplied only in finished form and has a paste-like consistency.
For cladding with glass mosaic or tiles made of marble or other light stone, white glue is used. In other cases, color does not matter.
To work you will need tools:
- metal spatulas: straight and serrated;
- rubber spatulas: for grouting joints;
- tile cutter or glass cutter;
- bubble level.
Notched spatulas differ in tooth height - from 6 to 12 mm. This parameter determines the thickness of the glue layer. Since the spatula is held at an angle when leveling the composition, followed by pressure on it with a tile, its thickness as a result is 0.3-0.5% of the height of the spatula tooth. Accordingly, a No. 8 spatula is used to apply a layer 2.4-4 mm thick.
Stages of tile laying work:
- When facing a wall from below, a starting strip is attached strictly horizontally to it with dowels, which prevents the facing material from slipping. The position of the rack during installation is controlled by a level.
- Wall cladding begins from the far lower corner. There are no clear recommendations for the floor: start from the walls, from the corner or from the center.
- A layer of glue is applied to a small area of the wall or floor with a straight metal spatula. It is also recommended to cover large facing products with a layer of 1 mm of adhesive mixture.
- Using a notched trowel, level the surface and give the desired thickness.
- Glue the tile, pressing it down and controlling the position with a level. The tiles are placed so that the seams in the new and old cladding do not match.
- Remove excess glue with a rag: this is done immediately, before the composition hardens.
- Glue the next tile in the same way, placing a plastic cross between it and the previous one to give the seams an equal width. The position of the cladding elements is constantly monitored by level. The optimal seam width is 2-3 mm. If the width of the joints is larger, the grout will crumble; if it is smaller, the coating will look unattractive, since it is difficult to fill such gaps with a fugue.
Article on the topic: Which house is safer, brick or panel?
If the starting rail was not installed, when gluing the wall, lay the tiles in no more than 3-4 rows, and then stop for an hour while waiting for the glue to set. With more rows, the coating will slide under its own weight.
For laying at the end of the row, the tiles are trimmed. The procedure is as follows:
- measure the width of the remaining gap;
- measure this size on the tile and mark it with a marker;
- Applying a straight strip to the drawn line, run a tile cutter or glass cutter along it, pressing the tool;
- easily hit the tile flat on the floor - it will split along the cut line.
After the glue has dried, begin grouting the joints. The ceramic tile base does not absorb water well and the glue on it takes longer to dry than usual, so it is recommended to start grouting no earlier than 3-4 days after finishing work.
Filling the seams is carried out with a rubber spatula. Such tools with different widths are usually sold in sets; the widest one is often used.
After 15-20 minutes. After starting work, return to the first seam and wipe off traces of grout from the tiles with a rag or damp sponge. By this time, the solution will have dried enough so that it will not fall out of the seam during careless manipulation with a rag, and at the same time it will not yet harden so much that it cannot be washed off.
How to make it yourself
Gypsum tiles are usually made industrially, but there is also a technology by which you can make it yourself. To do this, it is necessary to prepare a special room, equipping it in such a way as to maintain a constant temperature and humidity.
For independent production you will need:
- gypsum;
- forms;
- container for preparing the solution;
- acrylic lacquer;
- colors;
- spatula and brushes.
Before production begins, it is necessary to select the right raw materials. It is recommended to give preference to G10 grade gypsum, it is considered the highest quality. Additionally, you will also have to purchase plasticizers in the form of citric acid or slaked lime.
For independent production of decorative tiles, it is important to choose its matrix. There are silicone and polyurethane matrices, while the former are cheaper and can only be used for gypsum mixtures, while the latter are considered universal
This process is not considered complicated and will only take one day. A stone sample is used as a basis and a matrix is calculated and prepared from it. After it has completely dried, polyurethane is poured in and the desired product is obtained.
Before pouring, the matrices are thoroughly cleaned and lubricated with mixtures containing fat. To prepare the solution, take 6 parts of gypsum, 1 part of lime, color and clean water (in a ratio of 1: 0.7). Since gypsum tends to harden instantly, the solution must be prepared quickly, stirring all the components using a construction mixer. The mixture is poured into molds and smoothed with a spatula. It is worth noting that the mixture is prepared only for the required number of molds; it cannot be prepared in excess, because it will become hard and unsuitable for further use.
All filled forms are placed on a flat surface and left for 20 minutes to set. Complete drying takes about a day and should occur in a dry room.
It is also important to check that after filling the matrix, the solution is distributed evenly and does not have any air bubbles on the surface, otherwise the product may end up with defects
When the plaster has dried, it is taken out and left to dry further. Products from matrices must be removed carefully, without disturbing their integral structure. To speed up the drying process, it is recommended to place the future tiles in drying chambers, while avoiding direct sunlight.
Initially, gypsum tiles are white, so if their finishing involves color, the product must be painted. As coloring solutions, as a rule, dry mixtures are used that dissolve in liquid colors.
Painting can be done in the following ways:
- Add dyes to the solution immediately before pouring the molds. The result will be a beautiful and homogeneous mixture.
- Paint the matrix from the inside. This will give the tiles a natural look.
- Prepare a coloring solution and apply it to the surface of the material using a sprayer. After which the product should be additionally coated with acrylic varnish.
Grouting joints
After the tiles are laid on the wall, the surface of the seams is cleaned of any remaining adhesive and grouted. For this purpose, a special building compound is used. The grout is applied using a rubber spatula.
The gaps between the tiles are filled with the solution used. Use a foam sponge to remove residues.
With its help, the grout is evenly distributed along the seams.
When deciding how to lay tiles correctly, you need to pay attention to the following points:
- Before laying the tile yourself, you should check its quality and calibration;
- the material used is sorted by size to obtain smooth seams;
- at the stage of pre-treatment of the wall surface, you should not skimp on the primer;
- The verticality and horizontality of the masonry should be periodically checked;
- The adhesive composition must be applied to a dry coating.
Is it possible?
Experienced builders assure that laying tiles on brick without first plastering it is allowed. True, there are certain nuances due to which it is not recommended to carry out such work on your own.
So, they tile:
- a wall made of brick material without a plaster layer. It is better if the surface is flat, but minor differences can be corrected with an adhesive solution. Naturally, its consumption will increase, which will entail an increase in the cost of repair work;
- pre-prepared wall. The surface is leveled with plaster mortar and primer mixture; all that remains is to lay the tile material with minimal glue consumption. The option is cheaper and takes less time.
Surface cleaning
Cleaning surfaces before tiling is very important. Unfortunately, many people, especially beginners, are not very careful when cleaning the surface on which tiles will be laid, but in vain. After all, the quality of the facing surface is the key to an impeccable tiled coating.
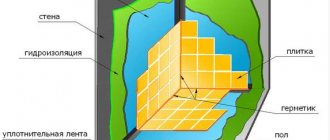
Here is a photo that schematically shows the correct execution of finishing work. In this case, the primer is applied to the plaster before laying the tiles
If the surface on which the tiles are supposed to be laid is already ready for such work, then you can begin laying the tiles immediately. But as practice shows, such luck happens in very rare cases and therefore you have to prepare the surface for laying tiles yourself. Treating the walls before laying tiles should be included in the mandatory repair work.
What is better glue or liquid nails?
You can lay tiles using two means - glue or liquid nails. Many people will have doubts: is it possible to lay tiles on brick using liquid nails?
The answer is yes, but they are used for installation on drywall or a flat treated surface. In this case, the second option is used only if the brick partition is smooth.
But it is worth considering that the nails dry quickly and after 15 minutes they can begin to perform other work. In most cases, tiles are laid on brickwork using glue. If the surface is smooth, then a notched trowel is used for this.
It applies the adhesive evenly to the surface of the ceramic piece. But if the wall is not level, then use a smooth spatula.
Is it possible to make tiles with your own hands?
The gypsum solution should have the consistency of thick sour cream.
Brickwork made from gypsum tiles is particularly attractive. This finishing material can be made with your own hands. This allows you to ensure the individuality of the cladding, save on repairs, while maintaining a high level of quality.
The tiles are made from gypsum mortar, the following ingredients are used:
- PVA glue;
- building gypsum;
- pure water;
- coloring pigments (if the tiles will not be painted after installation).
The ingredients are thoroughly mixed, the consistency should resemble thick sour cream. Afterwards the mass is simply poured into silicone molds. They can be bought at any hardware store. When filling out the forms, you must ensure that there are no pores, cracks, or air bubbles, as this affects the quality of the tiles.
As a mold for tiles, you can use a rectangular shape resembling a brick.
Various options can be used as forms. These are polyurethane elastic molds and silicone molds for the production of large-format tiles. Before use, such forms must be cleaned, but there is no point in preparing them in large quantities for interior decoration of the house, since the plaster hardens in about 15 minutes, which means that in a day you can make enough material for interior decoration with your own hands.
Once the tiles are ready, you can begin laying them. After the glue dries, the surface is painted, but to avoid this, you can add various dyes to the composition. This will ensure higher quality and attractiveness of the product. In this case, there is no need for constant tinting of the surface; the color remains in the mass, does not fade, and does not chip.
Marking
The next stage is choosing a scheme. A wide variety of options are used for walls:
The last two methods are difficult. If you are new to this business, it is better to glue the tiles according to the usual patterns.
Once you decide, you need to mark the wall. Ideally, use a laser level, but you can get by with a regular tape measure. First, mark the boundaries around the perimeter, since the sizes of the sides of each rectangular area are likely to differ.
For convenience, plumb lines are used. Next, determine how to correctly lay the tiles according to the chosen pattern on the wall: draw the contours of the rows vertically and horizontally. Do not forget that here you need to take into account the distance intended for the seams.
Briefly about the main thing
Brickwork, despite the emergence of innovative building materials, remains a popular method of constructing walls of residential and non-residential buildings and structures.
There are several different techniques for laying bricks, but following the basic rules of this technological process is equally important in each specific case. When choosing a laying option, you should always remember about a sufficient amount of mortar that is applied to the wall under construction, and the correct technology. In order for the structure to be strong for many years, the seams in the masonry should not coincide vertically
If you choose even the simplest laying scheme, you should alternate the tie and tray rows or shift the masonry by a quarter or half of the brick.
In order for the structure to be strong for many years, the seams in the masonry should not coincide vertically. If you choose even the simplest laying scheme, you should alternate the tie and tray rows or shift the masonry by a quarter or half of the brick.
Preparation for installation
Gypsum tiles must be laid correctly, since not only the aesthetic appearance of the decorative cladding, but also the service life of the material will depend on the technology of work. The product is universal and can be mounted on plaster, concrete, brick or plasterboard sheets, provided that the base surface is smooth and free of defects. If the walls or ceiling are covered with old finishing, on which cracks and bumps have formed, then the old covering must be removed and washed well. Then the putty is prepared and its mixture is applied to the surface.
If the defects in the base are significant, then it should be carefully treated with a primer, after which a cement mortar is made that fills all the cracks. Then the surface must be re-primed and dried. Primer treatment is necessary in order to improve adhesion between the tile and the wall. In this case, you need to choose a special composition that contains components that prevent the appearance of fungus and mold.
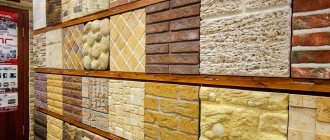
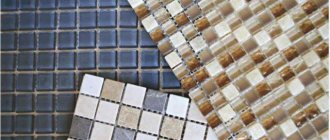
Types of tiles
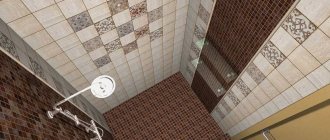
There is a very wide selection of this material available on the market. And any type of ceramic product is used for repairs. The choice depends on the purpose of the room where the work will be carried out. For example, in a bathroom it is better to use porcelain stoneware on a brick partition.
Let's look at the types of ceramic tiles:
- Porcelain tiles have minimal water absorption and are frost-resistant. If the material is not glazed, it is very similar to natural stone, but the physical and strength characteristics are better.
- Clinker is a product with good physical characteristics. It is often used in swimming pools because it does not absorb water and can resist chemicals.
- Cotto - this product is made from red clay, which is why there is not a large selection on the market. Most often it is used for flooring. After the firing process, a special agent is applied that prevents moisture from penetrating into the product.
Scope of application
The use of gypsum tiles in home design is limitless. Most often it is chosen to decorate walls in living rooms and passers-by. An interesting option is also considered to be decorative finishing like brick or stone, which can be used to cover empty surfaces in the room, niches, as well as work walls in kitchens. The most popular type of use of tiles is fireplace lining; they add sophistication to the structure and cope well with thermal insulation.
Recently, when decorating rooms, pilasters and columns have been installed so that such structures fit harmoniously into the overall decor of the space; stylists recommend decorating them with gypsum tiles imitating stone or brick. This material also looks good on kitchen ventilation ducts; it visually reduces the size of the structure and makes it a real decoration.
To decorate the walls in the living room, it is important to provide good lighting, since the “stone” decoration will look impressive only with bright lighting from above and from the side; in addition, the use of the material depends on the size and shape of the room. Dark colored tiles will narrow the space, while light colors, on the contrary, will visually enlarge the room.
Therefore, when decorating the interior of living rooms, it is necessary to select decorative elements in warm colors, giving preference to red, brown and beige. If the design requires “coolness,” then you can install individual fragments of gypsum tiles in a gray or light blue shade in the room. The decoration will also look gorgeous in the bedroom if done in white.
In addition, gypsum materials are also widely used in external cladding of facades; they, just like clinker tiles, are characterized by strength and durability. This type of decoration looks interesting on balconies or loggias.