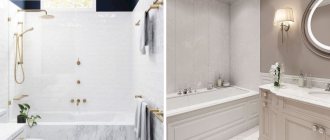
Mosaic cladding in the bathroom allows you to reliably protect the walls from the effects of high humidity. In addition, this is a spectacular and unusual solution for the bathroom interior.
Various types of textures, materials, sizes and colors of finishes make this type of coating universal. How to glue a mosaic in the bathroom, what kind of glue you will need for this, and how to care for it, we will discuss in this article.
Preparing surfaces for installation
When doing the work yourself, first level the surfaces. If this is not done, all the shortcomings of the supporting structure or partition will appear.
The installation process is simplified when mosaic tiles or mosaics on mesh/paper are used.
The first of the types of cladding, which is a solid base with small items on it, imitates a mosaic.
Mosaic on a grid is an economical option. In both cases, it is necessary to level the walls, since a curved surface can shorten the service life of the cladding.
Recommendations for preparing the site for installation:
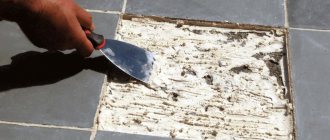
- The old coating (if any) is dismantled. It is removed using moderate force, otherwise areas of the load-bearing wall may be partially removed (for example, when using a hammer drill, sledgehammer).
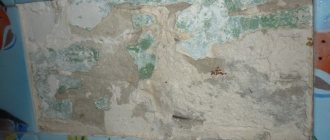
- If it is necessary to finish a room that has not been used before (for example, in a new building), the rough surfaces are leveled. For this purpose plaster is used.
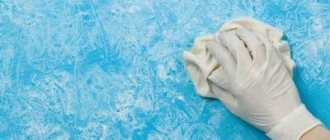
- The walls are cleaned of dust. As a result, the adhesion of materials is enhanced.
- If there are defects on the cladding (dents, holes, cracks, chips), putty is used. This composition helps to increase the service life of the coating.
- After applying the putty or plaster, the surface is sanded with medium or fine-grit sandpaper, being careful not to leave too large grooves. Due to this, the strength of the coating increases.
- When the walls are leveled, they are re-cleaned of dirt. This measure also increases the adhesion of the rough finishing layer and the adhesive composition.
To make the work easier, it is recommended to mark the surface. The accuracy of drawing lines, their position relative to the vertical and horizontal are determined by the building level.
The recommendations that are taken as a basis when performing work are the following:
- In corner areas, tiles are laid from the outer corner.
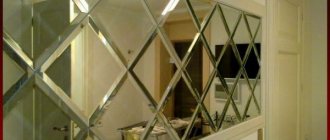
- If mirrors or other interior items hang on the wall, take into account their position during cladding. It is important that they fit organically into the pattern created on the wall by the mosaic.
Alignment methods:
- grinding using an angle grinder (a diamond disc with a comb height of at least 3 mm);
- puttying level differences in different areas within 3-5 mm;
- plastering using a beacon system;
- installation of drywall.
Wall marking
Applying markings on the wall before laying the mosaic
Before starting to lay the mosaic, be sure to make a sketch on paper and high-quality markings; the evenness and appearance of the final cladding largely depends on the accuracy of its lines, especially the starting line. When facing with single-color or mixed tiles, sometimes markings are made immediately on the surface; for this, each individual mosaic module laid on a flat surface is measured, and the resulting measurement is transferred to the surface horizontally and vertically, so as to form a grid.
Types of adhesive compositions and their choice
When purchasing, take into account the properties of the materials, the method of their use, and the cladding technique.
Criterias of choice:
- the size of the mosaic (the smaller it is, the more painstaking the work will be);
- type of material (natural or artificial stone, ceramics, glass);
- method of assembling mosaics (paper, mesh);
- the degree of curvature of the surface that needs to be lined;
- type of base material (brick, concrete, drywall).
It is important to choose the right adhesive mixture. The reliability of the coating will depend on this: its strength and service life.
If the work will be done on plaster, it is recommended to purchase tile adhesive. Materials containing medium and coarse sand are not considered.
The most suitable option is a two-component composition. Manufacturers often recommend choosing only this. For a bathroom, the key selection criterion is the level of moisture resistance of the adhesive mixture. If you use another composition that does not contain components that repel moisture, the tiles that were recently glued will begin to come off. The reason for these consequences is the destruction of the glue under the influence of water.
When laying mosaics in the bathroom, the following glue options are often considered:
- Cement composition. Recommended for use on surfaces made of mineral materials. This glue is characterized by a light color due to the presence of white cement in the composition. It is water-resistant, prevents the mosaic from slipping, and is used for installing ceramics, glass, and porcelain stoneware.
- Dispersive. It is used for bonding different types of materials: metal, wood, brick, plaster compositions, concrete, etc. Dispersion adhesive can be purchased in ready-made form.
- Reactive. The properties are no different from other types of adhesive mixtures. Belongs to the group of 2-component products.
Advantages and disadvantages of mosaic tiles
Despite the fact that mosaic tiles really look presentable and do not require painstaking care, this does not mean that this type of surface is ideal. Like any other material, it has its strengths and weaknesses. Understanding both aspects will help you decide for yourself whether it is worth giving preference when organizing a bathroom renovation.
Therefore, having considered the huge selection of materials, shapes, and textures of mosaics, it’s time to note its advantages and disadvantages. This will help you organize construction work correctly.
Advantages:
- The surface of the tiles - it looks impressive when completely laid out. In addition to plain tiles, you can also buy multi-colored ones with patterns. With it you can bring to life various design options. Depending on your budget, creativity, and the space you have to work with, you can create as simple or intricate a design as you like. In addition, the mosaic surface is highly reflective, which makes the room much brighter and larger.
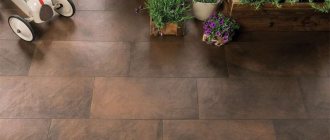
- Durability - highly resistant to most types of damage, while other surfaces need to be replaced after a few years. Mosaic on the floor in the room is what you need to save money on restoration.
- Environmentally friendly - this type of tile has a composition that is safe for human and animal health, and also does not cause harm to the environment.
Flaws:
- Installation - if the installation work was carried out incompetently, then there is a possibility that the glue will be visible through the tiles, and the grout may stain the walls and the floor itself. Hire professionals to eliminate these problems.
- Cost – Please note that the cost of the product is quite high. The price ranges from 30-40 dollars to 120 conventional units per 1 m2.
- Extra slip – has a smooth, glossy surface that becomes especially slippery underfoot when wet. However, there are ways to mitigate this, such as using textured tiles, grout lines, and anti-slip mats.
Required Tools
To work with mosaics prepare:
building level;
- spatula (toothed with a comb profile height of 3 mm, as well as rubber);
- roulette;
- pencil;
- plumb line;
- rule;
- grater (preference is given to a polyurethane product);
- rubber mallet;
- container for preparing the solution;
- knife;
- construction mixer.
In areas of complex configuration, you need to divide the mosaic tiles into parts. A standard tool, a tile cutter, is not suitable for this. You need to use an angle grinder, and with a diamond blade. There is a risk of injury when handling the material.
Glue consumption
The packaging indicates the consumption in kg per 1 m2. This is an average. The figure is for laying on a flat surface. Increase consumption:
- wall unevenness;
- heavy material (gluing stones requires applying a thicker layer);
- temperature regime (needs to be laid at 18-20°C, temperatures higher or lower increase consumption);
- weather conditions (when laying outside, the wind dries moisture from the mixtures faster);
- qualification of the master (an experienced layer evenly distributes the mass with a spatula, while a novice has to additionally level it by removing excess).
Almost all causes of increased consumption can be eliminated before work begins.
Technology for laying mosaics on standard surfaces
If you follow all the steps in the recommended order, you can get coverage for a long service life.
Instructions:
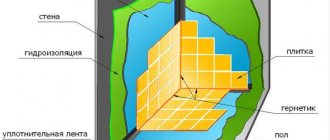
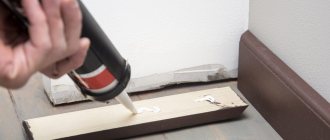
- Waterproofing material is applied to the prepared base. Bitumen is not suitable for this. The best composition options: coating, painting insulation.
- Choose an installation technique: start tiling on the floor from the front door; on load-bearing walls, partitions - from the far corner of the most important part of the room.
- After preparing the solution, begin laying the finishing material. First, apply the substance to the walls/floor with a spatula with a smooth edge, then apply it again to remove excess mixture. The glue layer becomes textured thanks to the use of a spatula with teeth (3 mm).
- Start installing the mosaic at any wall height. Full-size tiles are heavier, so install the bottom tiles (above the floor) first. This allows you to make the masonry more even.
- When the glue dries, the joints between the tiles are rubbed. The composition for the mosaic is chosen taking into account the speed of hardening. In most cases, the drying period is 4-24 hours. When choosing the shade of such material, the colors of the interior are taken into account, since the grout imparts a shade to the seams.
If mosaic tiles are used, the paper backing is removed 20 minutes after installation.
We produce grout
Grouting the mosaic
Grouting of the joints should begin a day after installation. For this work, a rubber spatula is used. Before grouting, inspect all seams. Remove any protruding adhesive residue and debris from them. The grouting itself is done with strokes in different directions. The last pass must be perpendicular to the previous one.
How to veneer rounded surfaces
Mosaics are used to cover bathtubs, columns, and any surfaces with uneven surfaces, which simplifies the procedure for finishing walls, since small-sized products mounted on mesh or paper help create curves. The principle of tiling in this case does not differ from the standard laying method, but it is important to carefully adjust the position of the tiles so that small items do not protrude above the surface.
It is not always possible to use a building level in such conditions. For this reason, high quality finishing is ensured by the roller that is used to roll the coating after installation.
Photo
Bathroom design using mosaics
Mosaic tile design
Interior design with mosaic tiles
Contrasting kitchen apron
Mosaic floor
Mosaic panel in the kitchen
Panel on the kitchen apron
Wall decoration in the bathroom
Dark mosaic apron in the kitchen
Vertical mosaic
Yellow mosaic
Did this article help you?
FAQ
Can gold and silver coated mosaics be used in wet areas?
Yes. But it is worth considering that this mosaic has a polished surface, which is unsafe when used in the shower.
Is it possible to combine mosaics of different textures in one plane?
Yes, in almost all cases. The exception is shower floors. Strong jets of water hit them directly onto the surface of the mosaic. In this case, the heterogeneity of the texture may cause a loss of aesthetic and performance qualities of the finish.
How long does it take to lay mosaics?
An experienced master can decorate a small bathroom in 3 to 4 hours. A beginner will need several days to do the same job.
Glass mosaic has lost its shine and smoothness. Is it possible to restore it?
Yes. You need to purchase a special polishing mixture - gel paste. Apply it to the surface, wait until it dries, and then polish the mosaic with a hard cloth.
I accidentally painted the ORRO Anticato II marble mosaic with Atlas 023 grout (brown). Workers applied grout to the mosaic and left it for a day. After washing off the grout, the marble took on its tone and darkened. Is it possible to restore the natural color and undertones?
Buy Litonet from Litokol. Apply the liquid, after 5 minutes scrub with a brush and rinse with plenty of water. Repeat the procedure if necessary.
Regular tiles can be attached directly to wet putty. Is it possible to do this with a mosaic?
It is possible, but only if you plan to finish dry rooms. This method is not suitable for wet conditions. The mosaic will not hold on to the putty, so it is necessary to “plant” it with glue.
Is it possible to cut mosaics?
No. The only option is if you are a professional and have a special diamond cutter. In this case, tiles with individual element dimensions of at least 2×2 cm and made on a reinforcing mesh will be cut. This will not work with paper-based sheets. The diamond wheel of a professional cutter is water-cooled, the paper will get wet and the sheet will fall apart into separate pieces.
What to do if the gap in the corner is larger than the width of the fragment?
It is better to accurately calculate the distance in advance and slightly increase the gaps between the plates. But this method is possible if an increase of no more than 2 mm is necessary, otherwise the appearance of the surface will deteriorate. Alternatively, you can use plastic corner corners. With their help, gaps up to 0.5 cm are eliminated.
Advice from the experts
Laying mosaic tiles has nuances that are worth considering before starting work.:
- It is not possible to cut round holes for pipes in mosaic canvases, so it is worth considering this situation. Choose a mosaic with small elements so that where the pipes exit, you can partially remove them and decorate them with grout.
- It is almost impossible to cut a glass mosaic into place. Therefore, joining at external corners is not performed. The sheet is laid back from the corner, and the ends of the tiles are covered with a metal profile.
- The installation of glass mosaics in swimming pools should be planned taking into account lighting, since horizontal lighting will reveal any errors.