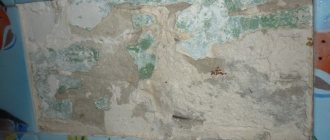
Reasons for old tiles peeling off
The reliability of tiles does not guarantee the durability of the entire finish.
During installation, the master may overlook many points:
- The presence of voids between the tile and the load-bearing surface - if this figure is more than 10 percent of the entire joint area, then the tile collapses;
- Uneven load-bearing base - mainly concerns installation on a skewed wall;
- Poor adhesion - occurs due to the lack of minor roughness on the supporting base (for example, walls can be wooden or plastic);
- Poor quality work with glue - implies both the choice of a cheap adhesive composition and the lack or excess of its volume when applied;
- Overmoistening - occurs due to poor-quality seams or the use of a low-quality adhesive mixture;
- Mechanical loads indicate improper use of furniture, shrinkage of walls, or intensive repairs in the adjacent room.
Checking the supporting base and the backing layer of the tile allows you to find out what caused the collapse or displacement of a separate fragment of the entire finish. If mold and moisture are detected, the ventilation system will have to be updated.
The displacement of the tile indicates incomplete shrinkage or tilting of the surface of the supporting base. The voids are an excuse to strip off the old layer and apply a fresh adhesive mixture.
Why do tiles come off the floor?
The most important reason is that the technology for laying the flooring is broken, which consists of many factors. Let's look at them:
First of all, this is a poorly made base for the floor. The screed must be laid from M-100,150 mortar in order to have the necessary strength and thickness necessary to obtain a level surface.
No primer was applied to ensure better adhesion between the glue and the base. Before priming, it is necessary to clean the surface and remove dust.
The adhesive mass was not prepared according to the instructions, that is, there was a violation in the proportions of the constituent components, which affected its quality.
The adhesive mixture was not applied to the entire area of the tiles, which led to the formation of voids, which means there was no continuous adhesion of the tiles and the adhesive composition.
We just decided to save money and applied a thinner layer of glue and not over the entire area. As a result, the tiles on the floor move away from the base.
To control from practice, I can cite the average glue consumption rate in our company - 6 kg per 1 m2 of tile covering (with glue thickness = 4 mm). It can, of course, be more (up to 10mm) if there are uneven bases.
In addition, if the house was recently built and stands on subsiding soils, then during settlement in the first year the screed could simply crack. The soil is to blame here, and to prevent this from happening, you had to reinforce the screed with a light mesh with a diameter of 4 - 6 mm.
Required Tools
Fragmentary wear and tear on the tile trim can easily turn into a major overhaul. Therefore, it is recommended to fasten fallen tiles quickly.
To do this you will need the following tools:
- Toothed, cap, regular and rubber spatulas;
- Rubber mallet;
- Chisel;
- Level;
- Paint brush;
- Mounting crosses;
- Sandpaper of different grain sizes;
- Brush and rags;
- Containers for working with the solution.
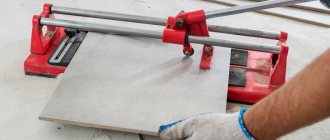
If corner tiles collapse and possibly crack, you will have to use a tile cutter. But before you take on the machine, you need to purchase tiles of the required series or the most similar analogue.
It is quite possible that you will have to wipe off the hardened layer of glue with a brush attached to an electric drill or hammer drill.
How to prevent peeling
Is it possible to varnish porcelain tiles on the floor video Is it possible to paint ceramic tiles on the floor
What measures can be taken to prevent the tiles from peeling off? First of all, you must follow the tile laying technology. No exceptions can be made. Otherwise, you will inevitably have to do the repairs again. Only a prepared, leveled surface can be covered.
If the coating is to be installed on a wooden base, you need to make a plywood backing and a screed to level out the movement of such a dynamic material. Be sure to only use the appropriate adhesive for the surface. For wood materials, special mixtures are produced that are more viscous and mobile, but do not violate the integrity of the tile.
Before applying the solution, care must be taken to improve the adhesive properties of the base. To do this, it is carefully primed and work continues only after complete drying. For cement adhesive, you must first soak the tiles in water. Work only on dry and clean surfaces. Apply only as much solution as needed for a given type of tile, otherwise it will often fall off again.
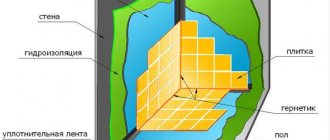
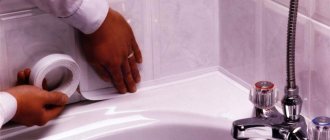
To prevent the tiles in the bathroom from falling off in the future, use latex, silicone or epoxy mixtures to grout joints and seal joints. Well, if you couldn’t avoid the problem, try to fix it very carefully.
It happens that the entire tilework moves, protrudes and tends to collapse. If the tile is beautiful, do not rush to break it in order to re-glue it. If the entire masonry is movable, then there are voids underneath. At the joints of the tiles, where the crosses stood, drill through holes in the glue with a 3 or 4 mm Pobedit drill (you do not touch the tiles) and push foam from a can into these holes. Having gone through all the areas, press the protruding places with a spacer in the form of a large mop and after 2 hours the tiles are in place and will not move.
Good afternoon. Can you tell me the name of the can of foam? Thank you.
Similar problem: the tiles in the bathroom are intact, but are coming off. Can you tell me what kind of foam should be used to glue it?
We strongly do not recommend using this method. Because if you overdo it with the amount of polyurethane foam, expanding, it can destroy the masonry and squeeze out peeling tiles, which, if dropped, will most likely break or, at least, get chipped. But it is impossible to calculate the exact amount of polyurethane foam in this case, since we do not see exactly where the peeling has formed and cannot determine the volume of voids in any way. In this case, we recommend carefully removing all the peeled tiles and placing them again on the adhesive solution.
Thank you for quick response. I won't use foam!
I used foam, but on the floor, you just need to put something heavy and that’s it)
It fell off on the wall near the heating boiler along with the solution, is it possible to glue it to something with the same solution? Since the layer of glue cannot be removed from the tiles.
Selecting consumables
In particular, we are talking about a substance that will be used to adhere the tiles to the wall-floor surface.
Today there are quite a lot of such consumables:
- Silicone sealants;
- Liquid Nails;
- Bulk solids;
- Cement mortar (not to be confused with adhesive mortar, which is prepared from bulk substances).
Cement mortar is a budget option, so it is suitable primarily for the restoration of flooring inside industrial and commercial premises.
Bulk compositions are an analogue of cement mortar. Their composition includes stabilizers and glue for fast and high-quality adhesion. Silicone sealants come in a gel or paste state that quickly hardens after application. The second advantage of such compositions is a high level of tightness.
All that remains is to choose products from recognized brands (eg Ceresit, Knauf, Unis). Liquid nails are the same silicone sealants. However, due to the small volume of the so-called. nails are used pointwise.
This approach saves mixture consumption, but degrades the quality of the clutch. However, for adding individual pieces of tiles, liquid nails are a suitable solution.
Universal glue
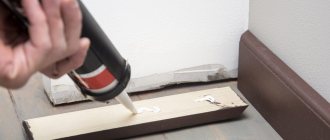
Liquid nails are convenient for use in hard-to-reach places, for example, behind the toilet tank, under pipes. The product is sold in compact tubes weighing 300-500 g, squeezed onto both surfaces and, if necessary, leveled with a spatula.
The leader in application and reliability is Moment glue. Under this brand there is a wide range of adhesive materials for all areas of application.
For tiling work, the manufacturer offers multi-purpose adhesive “Montazh”. This brand also has a specialized product for installing ceramics, Moment Ceramics. It is characterized by rapid hardening and high adhesive properties.
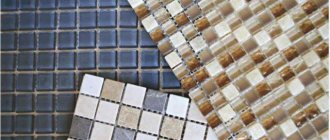
Restoration of old tiles
There are two types of fallen tiles - solid and cracked. Instead of the latter, it is recommended to use a solid analogue. The fact is that cracked tiles always have pores due to lost tile particles.
If this does not discourage installation, then you will have to:
- Create a form or supporting base for balanced joining of fragments with each other and their subsequent fastening to the wall;
- Clean each fragment from the reverse side;
- Clean and smooth the surface of the sections.
Working with solid tiles is quick. However, the grippy material behind it must also be removed. This is done by wetting the underside with warm water for 3-4 hours.
If the adhesive is difficult to remove with a brush, then instead of water you should use a 15% solution of citric acid or a 5% solution of acetone. You can also use either a household brush or fine-grained sandpaper to remove glue.
Basic requirements for tile adhesive
Regardless of the composition and form of release, tile adhesive must comply with accepted standards and meet the basic requirements:
- it must have high ductility and fit easily onto the work surface;
- have good adhesive properties and reliably fasten the cladding to the base;
- the glue should not shrink significantly (ideally, this indicator should be zero);
- the viability of the solution and the adjustment time must be long enough so that the master has the opportunity to properly fit all the elements and eliminate masonry defects.
Tile adhesive should have good adhesion and slight shrinkage
These conditions apply directly to the solution, but there are also requirements related to the hardened adhesive layer:
- resistance to deformation, that is, the strength of the adhesive in compression and shear;
- resistance to temperature changes;
- resistance to high humidity.
Tile adhesive must be resistant to temperature and humidity changes
The glue packaging indicates the main characteristics of the composition: its strength, specific gravity, pot life and complete drying time, degree of resistance to various types of influences. So before purchasing, you should carefully read the adhesive’s characteristics – this will allow you to choose the optimal mixture for specific conditions.
Information about the adhesive mixture is indicated on the packaging
Preparing the base before laying new tiles
The surface of the walls or floor must also be cleaned of the remaining mixture.
This can be a primer, putty or hardened adhesive:
- When preserving the seams, it is necessary to carefully beat off the old grout with a chisel and mallet;
- Next, you will have to check the reliability of adhesion of adjacent tiles (if, when pressed, the fragments move, then it is recommended to clean the gaps and fill them with sealant);
- The next step is to clean the hardened dry mixture on the surface of the supporting base using a spatula, brush or sandpaper;
- Next, the surface is leveled with putty, cleaned of construction contaminants, degreased with a 10% soap solution and primed.
Some putty mixtures include a primer. The latter promotes reliable adhesion of the tiles.
If the load-bearing surface will be subject to fungal mold, it is recommended to add a fungicide to the primer solution. The primer can also be applied in two layers if the base tends to absorb moisture.
Preparing for recovery
Before you begin, you need to carefully prepare the surface for applying glue. The first thing to do is remove the ceramic tiles if they have not completely fallen off. This must be done very carefully so as not to touch or crush the entire surface. After this, use a metal brush or grinder to remove all remaining adhesive. If the surface on which the tiles were previously laid is uneven, level it. All humps must be cut off, as they will interfere with the correct installation of the fragment in its place. If the base was not perfectly leveled before the previous installation, you can pour a thin layer (no more than 2 mm) of mortar before repair. This procedure will help smooth out uneven surfaces that may create voids.
Instructions for laying new tiles
The period of complete drying of the primer lasts up to 36 hours. If the base absorbs moisture, then 2-3 hours after applying the primer it is recommended to apply a second similar layer.
After the finishing layer has dried, you can begin installing the peeled tiles:
- First you need to prepare a working solution in a container, then let it sit for 15 minutes (silicone sealant and liquid nails are applied in a ready-made state);
- Next, using a spatula, a solution is applied to the center of the back side of the tile, after which the latter is distributed over the entire tile (if the fragment does not belong to the pendulum row, then the mixture is applied directly to the base);
- The next step is to level the layer and create grooves in it using a regular and comb spatula, respectively;
- The tile is carefully inserted into the empty opening and easily pressed with hands from four sides;
- Mounting crosses are inserted into the seams.
To position the tiles correctly, you must also use a level. When using sealants and liquid nails, the working substance is distributed over the entire surface of the tile or base, depending on the row of finishes. To do this, it is enough to apply the viscous substance in several places and rub it with a sponge or a regular roller.
How to make repairs?
After the surface is cleared of glue residues and leveled, you can begin priming. Use a small brush or kitchen sponge for this. The primer must get into all the cracks to ensure maximum quality work. Do not apply glue before the primer has dried. All instructions for laying tiles indicate that the adhesive is applied only to a dry surface. Check the label for drying time. If necessary, you can apply 2 layers of primer.
The next stage is the direct application of the adhesive mixture. The technology allows it to be applied to the base and tiles. Here the choice is yours - apply it as conveniently as you like. Can be applied to floors and tiles to increase durability. Glue the fallen tile, while controlling the gaps: they should be the same on all sides. After pressing, a small amount of glue appears between the seams, which must be removed. After the mortar on which the tiles were glued dries, you need to grout the seams.
Grouting joints
Cement mortar takes the longest to dry. But if an adhesive mixture or sealant was used instead, the drying period is reduced to 12 hours.
After the working mixture has completely hardened, you can begin grouting the joints:
- First, you need to clear future seams from crosses and residues of the mixture (to remove the latter, use a toothbrush or a stationery knife);
- Next, the empty tile seams are wiped with a damp sponge;
- The next step is to apply the grout mixture to the edge of the rubber spatula;
- Using smooth movements, apply the grout to the seams until they are filled;
- After 40-50 minutes, the dried grout remaining on the surface of the tile is removed with a damp sponge.
The sponge should be soft and cellulose. The absorbed grout must be constantly removed into a container with water to keep the sponge clean.
Otherwise, grout particles may leave scratches on the tiles.
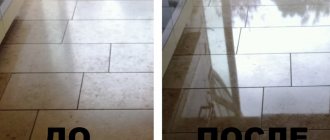
Repairing chips and cracks without removing tiles
During operation, minor damage to the tile surface inevitably occurs. This could be an accidental scratch, chip, or crack. Before taking drastic measures to replace the tiles, it makes sense to try to eliminate or disguise the defect.
For thin small cracks, a method is used based on the use of a mixture of cement and very fine sand in a 1:1 ratio diluted with water. Rub the prepared solution into the cracks in a circular motion until it penetrates deeply enough. Good results are obtained by using a soft spatula for grouting joints.
The problem with chipping is solved differently. All kinds of materials help with this. From silicone to hard waxes and colored heat seals for repairing cracks, cavities and chips. Separately, it should be noted the use of epoxy and polyester adhesives.
To seal chips and cracks in tiles with a matte surface, polyester glue with the addition of special dyes is used. If the tile is glazed and has a glossy texture, epoxy adhesive with dyes is used.
To achieve maximum color matching, the matching process is carried out by applying tinted glue directly to the chip site. When the color is selected, the chip is cleaned of glue (acetone can be used), the surface is dried, a hardener is added and the chip is finally sealed. After hardening, polishing is done with a thick cloth.
Photo of how to glue fallen tiles
Best Brands of Tile Adhesive
In order not to make a mistake in your choice, it is worth purchasing products from popular manufacturers that fully meet the specified requirements, in contrast to cheap handicraft mixtures. Knauf is also a leader in this area: under the same brands they produce entire lines of tile adhesives and repair compounds in a wide price range. Here you can easily choose adhesives for all types of tiles, natural stone, porcelain stoneware, waterproof and frost-resistant compounds, and mixtures for laying tiles on heated floors.
The adhesives “Osnovit”, “Yunis”, and “Starateli” are in high demand. Even the simplest cement compositions are distinguished by their adhesive strength and durability, are easy to apply, and have a long setting period. Among the reinforced types of glue, “Plitonit” stands out due to its characteristics - mixtures of this brand are excellent for floors in high-traffic areas.
| Name of glue | Main characteristics |
UNIS 2000 | The adhesive has enhanced adhesive strength, resistance to moisture and sudden temperature changes, and is suitable for lining heated floors. Used for laying tiles from 30x30 cm to 60x60 cm. Can even out height differences on the working surface up to 15 mm. Average consumption is 1.4 kg/m2, pot life of the mixture is 180 minutes |
CERESIT SM-11 | A universal composition that is great for beginners. The mixture is very plastic, easily distributed over the surface, and firmly adheres to the base. The viability of the solution lasts 120 minutes, the adjustment time is about 20 minutes. Apply glue in a layer from 2 to 10 mm, consumption is 2.7 kg/m2 |
PLITONITE V | Waterproof composition for ceramic tiles and porcelain stoneware up to 60x60 cm in size. Suitable for any surface, characterized by plasticity and ease of application. The maximum permissible layer thickness is 10 mm. The solution remains viable for 4 hours, dry mixture consumption is from 1.7 to 4.3 kg/m2 |
Prospectors STANDARD | The composition is suitable for tiles and porcelain stoneware of any format, can be used in unheated rooms, at normal and high humidity. It is applied in a layer up to 15 mm thick, consumption is from 3 to 5 kg/m2. The solution remains viable for 240 minutes, adjustment time is about 10 minutes |
Lithocol LITOACRIL PLUS | Ready mix with extended adjustment time. Suitable for ceramic tiles of any format, can be used in bathrooms, kitchens, bathrooms. Consumption per m2 ranges from 1.5 to 4 kg. |
NEOMID glue | Ready-made heat-resistant adhesive mixture. It has increased moisture resistance and is suitable for all types of floor tiles, natural stone, and agglomerates. The maximum application thickness is 4 mm, complete drying time is up to 120 hours. Consumption ranges from 0.5 to 1 kg per m2 |