When renovating an apartment, many people want to make the interior beautiful, but at the same time they want to save money by choosing inexpensive finishing materials. For the ceiling, one of the most budget-friendly, fastest and high-quality finishing methods is foam ceiling panels. They do not require extensive preparation of the base ceiling, and the material will provide good heat and sound insulation.
Finishing the ceiling with foam tiles
A guarantee of a beautiful, neat ceiling is the correct installation of ceiling tiles.
To apply the sticker you will need adhesive. Today there are many of them depending on price, purpose and quality. “Titanium”, “Moment”, “Master”, “Eco-naset”, “Liquid nails” (white) and others. For recommendations, glue characteristics, and the best way to glue ceiling tiles, read the article.
Apply glue to the back side of the tile in accordance with the type and recommendations in the instructions for the glue. This can be a spot application along the edge of the product plus the center, diagonally, etc.
Depending on the chosen glue, we apply it to the back of the material, and if it can set quickly, then we do everything quickly. If it is prescribed that it “dries out” a little, then wait a couple of minutes. This is all indicated in the instructions.
After applying the adhesive, place the tile in the intended place, and pressing it well, do not leave any gaps with the adjacent one. Smooth out evenly so that all items are on the same plane.
The first tile is glued in the center so that one of its four corners is located at this point (diagonal sticker). The next four pieces of the central part will then be adjacent to its sides. If there is a chandelier in this place, then carefully trim the corners of the tiles in place.
Be especially careful about the evenness and tight fit of the first rows, since the quality of their stickers is a kind of guideline for evenly gluing all subsequent rows.
When considering how to glue foam ceiling tiles further, we strictly adhere to the markings and glue the following elements close to the mounted tiles.
If you see arrows on the back side of the foam, this is a kind of sign that the arrows on the product should be directed in one direction. Then the pattern on adjacent tiles will match, the adjoining sides according to the pattern will be correct.
Having reached the last row adjacent to the walls, trim the product to the required size. Take measurements in place, and only then mark on the foam, cut with a knife and “plant” it with glue in the right place.
After completing all the work, it is necessary to seal all joints. In addition, at the final stage of the work, install a ceiling plinth (baguette) made of foam plastic to give the ceiling completeness. Eliminate drafts.
Once you learn how to glue foam ceiling tiles, you will be able to do this job yourself. If you are doing this for the first time, you will choose tiles with a simple pattern for a better fit of the pattern.
Gluing technology
Windows and doors are closed to prevent drafts - then there is less chance that the coating will peel off. Before gluing, each tile is inspected and the material is rejected - specimens with uneven edges, dents and other defects are set aside, they will be useful for trimming. The furniture is taken out or covered with film.
The gluing of ceiling tiles is carried out in the following sequence:
- Apply glue to the back of the panel.
- Press the tile to the ceiling. To prevent thin foam from cracking under hand pressure, use a wide wooden plank.
- Based on the markings, the remaining slabs are glued. The glue is removed with a damp sponge or cloth.
- The panels are trimmed against the wall with a sharp knife.
- The last step is to glue the ceiling plinth.
Sometimes you come across tiles that are slightly larger or smaller in size; such a defect is not always noticeable during rejection. To avoid the formation of unsightly gaps or inconsistencies in the pattern, first try dry tiles on the ceiling and only then apply glue.
How to properly apply adhesive to ceiling tiles
The adhesive mixture is applied in one of two ways:
- On the protrusions on the underside of the panel.
- In the middle of each tile and at touching corners.
If the ceiling has a porous texture, the layer should be thick. Some types of glue (for example, “Moment”) require preliminary curing before gluing. The conditions for use of each product are indicated in the instructions on the package. Sometimes the glue sticks out on the sides. To prevent this from happening, it is applied 1 cm short of the edge of the tile. Any excess that appears is carefully wiped off with a clean damp rag or sponge.
How to glue tiles near a chandelier
If there is a chandelier in the center, a hole is first made in the panels. To do this, each of the four squares is applied to the attachment point and the excess part is cut out. If installation is carried out from the central tile, then a hole is made in the middle of the panel.
Polystyrene foam is easily cut with a utility knife. The main thing here is not to overdo it, so that the decorative cap of the chandelier subsequently hides the hole.
How to seal gaps between ceiling tiles
Often, after gluing the tiles, gaps remain between the elements. This defect often appears on a crooked ceiling. The tile joints are filled with white acrylic sealant. The extended nozzle is very convenient for covering narrow cracks, and the white color will not stand out on the finishing surface. You can use finishing gypsum putty. In this case, it is better to make a thick solution and fill the seams, rubbing the mixture with your finger, then remove the excess with a foam sponge.
After installation, the tiles are coated with acrylic, latex or water-based paint in 1-2 layers. Since the surface, as a rule, has a relief pattern, use a brush or spray. The ceiling must first be primed to improve adhesion. The second time they paint perpendicular to the first layer. Laminated panels are not painted, so they are handled with extreme caution.
Main parameters and advantages of foam ceiling panels
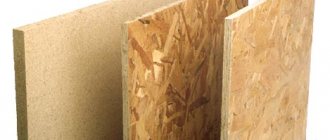
Based on the type of material from which the boards are made, they can be divided into two types: polystyrene foam and polystyrene foam. Both types have similar characteristics, which greatly simplifies the installation process, since the technologies also differ little from each other.
As for production methods, such panels can be produced in three ways:
- The pressing method involves using an industrial press to compact the panel. The thickness of slabs of this type ranges from 7 to 8 mm.
- The injection method involves placing liquid foam into a press blank, and then hardening it using high temperature. Unlike pressed ones, foam plastic ceiling panels are thicker (14 mm).
- The extrusion method is usually found in the manufacture of polystyrene boards, however, there is a possibility of encountering extruded foam panels. One of the decorative options could be coating with a special film.
It is also necessary to pay attention to the fire resistance of the tiles, since, made from construction-type foam, the panel should not ignite or support a fire. Detailed information about fire safety is often included on the packaging.
When choosing the shape of the ceiling panel, it is also necessary to take into account that the standard size is 50x50 cm. The most popular are square shapes, although rectangular slabs used in the decoration of public places can also be found.
Foam ceiling decor options
Foam ceiling panels are available in a wide range of textures, so by choosing them for finishing, you can implement different design ideas.
A simple method of decoration is based on pasting the flat surface of the ceiling with foam elements. Often, in order to make the ceiling the highlight of the interior, multi-level structures are used. Hanging systems made of plasterboard, which are decorated with tiles, are used as the base surface.
Glued foam panels for the ceiling can be decorated with stucco molding from the same foam.
Decorative plinth of different widths, glued along the perimeter of the ceiling, will also add its own touch to the interior design. You can use moldings. With their help, you can make decorative frames or coffers on the ceiling; stucco rosettes above the chandelier or lamps will add elegance to the room.
Stucco molding in the form of flowers, shapes, and curls can be used to create intricate patterns. Focus on the relief by harmoniously shading individual areas of the elements with gold or silver paint. This finish will be in no way inferior in appearance to stretch ceilings or complex suspended structures made of plasterboard.
If you are not a follower of traditional classics and prefer bright colors, you can paint the foam ceiling in any shade you like that fits into the overall color scheme. Just don’t forget about the basic rule: light colors increase space, dark colors reduce it.
As you can see, even such an inexpensive material as foam ceiling tiles has its own characteristics and is often used for decorative finishing of ceilings. If you select products that are suitable in appearance, and do the ceiling cladding correctly, your room will be transformed and sparkle with new colors.
Main varieties
The main purpose of foam ceiling tiles is to finish the ceiling surface with subsequent painting with water-based compositions or the use of other decorative methods.
The shape of foam ceiling tiles can be:
- square (25x25 cm, 30x30 cm, 50.50 cm);
- rectangular. Available in dimensions 100x165 cm, used for finishing ceilings of public buildings;
- any other irregular geometric shape. With its help you can create a unique designer interior.
Depending on the manufacturing methods and thickness, the following types are distinguished:
- stamped is made from polystyrene foam blocks using stamping. Thanks to this, a relief pattern is obtained on the surface of the elements. The thickness of the squares ranges from 6 to 8 mm. Due to the fact that there is no protective coating on the segments, the tiles are susceptible to mechanical damage and may break when pressed;
- extruded. In the production of such ceiling tiles, polystyrene strips of small size and low porosity are used. The finished product is obtained by pressing, its thickness does not exceed 3 mm. A special coating makes the tiles resistant to dust and other contaminants;
- injection. It is obtained by baking and casting raw materials at high temperatures. The thickness of the plates ranges from 9 to 14 mm, the products are durable, not afraid of temperature fluctuations, with a clear and deep relief on the surface.
Injection tiles are available only in white, but they can be painted in any tone with acrylic or water-based paint.
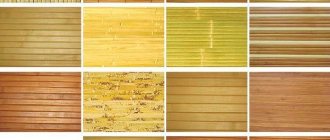
The tiles also differ in their front surface: smooth, embossed, with or without edging. Such products are produced mainly in standard white color with a simple pattern. But you can also find color options on sale.
Design
According to the method of surface design, tiles can be:
- relief - the front side after pressing has protruding elements that form geometric patterns, natural motifs or imitate plaster stucco. There are a huge number of embossing options;
- colored - decorative elements are painted during the production process (dye is added to the molten mass) or after injection;
- volumetric - using embossing and special coloring methods, 3D tiles with a three-dimensional effect are obtained;
- with decorative inserts, most often mirrored. This design technique allows you to get a light, sophisticated coating.
Surface type
The front side of the panels can be:
- glossy - option is possible only after painting;
- matte - gives the natural color of the material;
- mirror - a thin layer of reflective material is applied;
- laminated - a special protective film with a pattern is glued.
Mirror tiles are used in public buildings, matte, glossy and laminated are intended mainly for residential premises.
Blossom
There are more and more alternatives to the standard white color. On sale you can find collections in white-blue, light pink, delicate milk, cream, sand, coffee and gray colors. Golden, silver, copper, brownish, marsh tones look original.
Form
Classic ceiling tiles have a square shape with straight edges. There are many advantages here: it’s easier to create a layout sketch, lay it out, especially in the corners, and it’s easy to combine joints. In addition, you need to take into account the visual perception of the finish - symmetry always looks aesthetically pleasing, the ceiling seems even even with a slight distortion.
To diversify the design, manufacturers offered rectangular slabs and tiles with shaped sides: wavy, concave, convex. After gluing, tiles with complex edge geometry create an attractive pattern that gives the room charm and uniqueness.
Edge type
Based on the type of edge, tiles are divided into 3 types:
- with an edging that forms a clearly visible seam;
- chamfer - the edges of the tile are cut at approximately 45o. After gluing the boards, a beautiful seam is formed. The presence of a bevel allows you to diversify the design due to the layout;
- seamless - the edges of the decorative elements have a perfect cut along the edges, which allows them to be pressed together so tightly during the gluing process that the connecting joint is practically invisible. The ceiling looks like a solid surface. To help in adjusting the pattern or relief, laying direction indicators are applied to the back of the tile.
General concept, composition, material characteristics, selection features
Among the variety of facing materials, ceiling tiles perform well during repairs. Externally, it is simply a geometric shape, usually a square or rectangle, less often more elaborate design options. The squares have dimensions of 50 x 50 cm or 30x30 cm. The color scheme of the original panels depends on the type of manufacture, and the surface of the front side depends directly on the processing method.
Composition and manufacturing features of the material
Expanded polystyrene is essentially the same polystyrene foam. It is made by foaming the polymer with pentane gas, which is produced at high temperature. In this case, balls filled with air are formed, which stick together into a homogeneous elastic material. Further pressing produces slabs. The uniqueness of the material lies in its composition: 98% air. The raw materials and the production process itself are relatively cheap, which is reflected in the low price of the product. We will consider the advantages and disadvantages of the material in accordance with the existing characteristics inherent in each of its types.
Standard square shape of foam ceiling tiles Source moskvacenter.com
General advantages and disadvantages of polystyrene foam ceiling tiles
Foam ceiling tiles have a number of advantages:
- lightweight and convenient for transportation and installation;
- fire-resistant - due to special treatment with anti-perenon agents;
- resistant to alcohol, alkalis, salts, lime and cement mortars;
- does not rot, is resistant to mold, which allows use in conditions of high humidity;
- withstands temperature changes;
- environmental material;
- possibility of sanitary care;
- possibility of changing color schemes;
- plasticity, possibility of restoration;
- relatively low cost;
- quite long service life.
Along with the advantages, these products also have disadvantages:
- susceptible to organic solvents, gasoline;
- may be deformed under the influence of varnish and some paints;
- not always compatible with expensive designs and some styles;
- fragility, brittleness, susceptibility to mechanical damage and deformation;
- At high temperatures it melts, causing strong smoke.
One of the options for decorating the ceiling with polystyrene foam tiles Source roomester.ru
Safety of polystyrene foam ceilings
Subject to the production, installation and operation technology, foam ceiling panels comply with generally accepted standards. Does not emit toxic substances under standard conditions. The main harmful factor for expanded polystyrene remains exposure to ultraviolet radiation and high temperature. Considering the “airiness” of polystyrene foam, it is considered not flammable, but melting. But, with the use of special anti-perforation treatment, it is difficult to melt high-quality polystyrene foam.
Advantages and disadvantages
The main advantages of foam ceiling tiles include:
- light weight;
- environmental safety and cleanliness;
- resistance to rot and mold;
- moisture resistance;
- budget price.
As for the disadvantages, the following disadvantages of foam cladding are highlighted:
- materials are not resistant to chemical influences. Therefore, you cannot paint ceilings decorated with tiles, nitro paints or other dyes containing solvents;
- fear of UV rays. Certain types of coatings may turn yellow if they are exposed to the sun for a long time, lose strength, and become brittle;
- fear of high temperatures. That is why it is not recommended to place lighting devices with powerful lamps too close to the ceiling surface, finished with foam plastic.
Advantages
The main advantage of such a ceiling covering is that it is very easy to glue foam tiles to the ceiling, and even an untrained person can handle it.
In addition, the following advantages can be noted:
- Light weight allows the tiles to be used on ceilings of any design.
- The tile has sound and heat insulating qualities, and is not afraid of changes in temperature and humidity.
- The light weight of the tiles makes it possible to use simple glue that does not have ultra-high strength, and, therefore, a high price.
- This ceiling covering will allow you to save not only on material, but also on work - because it can be done independently.
ATTENTION! Foam ceiling tiles can change their physical properties (melt) when exposed to high temperatures, so installing powerful lamps in close proximity to them is not recommended. It is better to use pendant lamps and place them at a distance of at least 20 cm from the surface of the tile. The tile can withstand the temperature of hot water without changing its shape, so it can come into contact with the pipes through which heating occurs.
Materials from which the ceiling plinth is made
Modern trends in construction and design today are aimed not only at giving rooms maximum comfort through the use of advanced materials, but also at bringing something new into the interior. One of these elements is considered to be a ceiling plinth, which, by hiding the imperfections of the base surface, allows you to make the room and, of course, the ceiling, more harmonious.
Despite the inconspicuousness that seems at first glance, this interior detail nevertheless plays a colossal role in the process of creating the design of the room. Ceiling plinths are fillets made of polystyrene foam, polystyrene, etc., which are used to finish the room at the last stage of renovation.
Materials from which the ceiling plinth is created:
- Styrofoam;
- expanded polystyrene;
- polyurethane;
- tree;
- gypsum.
Depending on the manufacturing method, the most popular are:
- injection version with a length of one or two meters: it is one of the varieties of polystyrene plinth produced by injection;
- extruded version with a length of two meters - it has a smooth surface and a clear linear pattern.
Foam baseboards are the most popular today. Polystyrene foam is a cellular structure, most of the volume of which is gas. Polystyrene foam as a building material has fairly high sound and heat insulation characteristics. In addition, it has a fairly affordable price.
Ceiling plinth made of polystyrene foam is also used much more often than, for example, analogues made of wood or polyurethane. This popularity of expanded polystyrene is primarily due to its good performance and aesthetic qualities.
It is also important that polystyrene foam has a low cost
What glue to use to glue ceiling tiles
The construction market offers a variety of adhesive compositions that are used for various purposes. To correctly choose the most optimal options, you need to operate with several criteria:
- The glue should set quickly, then you won’t have to stand for a long time in a static position and hold the element being glued;
- Solvents are not allowed in its composition, otherwise the foam at the points of contact with it will sag;
- It is important that the color of the adhesive is white or transparent - partial translucency may be observed on thin stamped sheets;
- The adhesion of the adhesive is required to ensure adhesion to a dry concrete surface;
- Since the ceiling material can be different (wood, concrete, OSB, plasterboard), it is advisable to purchase a universal product that is suitable for all conditions.
The following video discusses some options for fixing mixtures:
Acetate compounds
Universal transparent adhesive mixtures with a pungent odor of acetone, which are sold in liquid form in transparent plastic bottles - this is acetate glue. In air, the acetone evaporates, and a thin layer of liquid resin hardens, firmly fixing the glued element.
Despite their external similarity, different products with acetate glue have noticeably different setting speeds and can greatly delay the gluing process and tire the working person. Products such as “Titan” and “Dragon” are the most effective.
Among the most noticeable advantages of this type of glue is good adhesion - it allows you to fix it directly on the whitewash.
There are a few more disadvantages:
- The mixture does not allow you to mask joints, as it is completely transparent;
- It has a pungent chemical odor, so work must be carried out with good ventilation;
- It is impossible to perform a good fixation if there are noticeable unevenness on the base or the presence of heavy glued elements (decorative skirting boards, injection or mirror tiles.
Wallpaper glue
All types of mixtures that are used for gluing wallpaper can be used as fixatives for plastic panels: Bustilate, PVA, non-woven and vinyl glue. The technology for using these compounds is very similar to the process of gluing wallpaper, when glue is generously applied both to the product and at the same time to the ceiling surface.
The disadvantages of wallpaper mixtures are significant:
- Very long drying time. You will need to simultaneously glue and hold several sheets at once to speed up the process at least a little;
- The technological features of the application are such that it is convenient to fix only thin stamped types of tiles;
- It is not possible to mask seams with this glue, as is the case with acetate.
Acrylic adhesive putty
Acrylic putty meets all the requirements for a means for gluing ceiling tiles. It is white, quite viscous, instantly fixes and holds any plastic sheets and baseboards. In addition, it can be used to mask small flaws and joints in injected ceiling coverings.
The method of using acrylic putty is somewhat unusual. It is applied with a thin layer of putty to the ceiling, filling all the unevenness and defects of the base, and then decorative elements are fixed to the sticky surface.
Among the disadvantages are the following:
- Increased consumption;
- High price;
- Incompatible with colored laminated panels.
Liquid Nails
The most successful option for use with plastic panels are colored fixing compounds, which are called liquid nails. They not only perfectly fix PVC tiles, but also allow you to mask joints on sheets of any color; just buy glue of the desired shade.
Due to the characteristics of this product, it is enclosed in special tubes for the gun. The required amount of adhesive to be applied depends on the weight of the tile and, usually, contour coating is quite sufficient. Due to the low consumption of this product relative to the total square footage of the ceiling, it is not much more expensive than acetate glue.
Recommendations for selection
You can drown in the stream of recommendations for choosing tiles, there are so many tips. Some relate to technical characteristics, others to operational ones. When studying the technical parameters, you should pay attention to:
- on the integrity of the panel. Here they look at the back side - there should be no shells, depressions or swellings. If they exist, the technological process is disrupted; there may be hidden defects in the products that will appear during operation. Then the edges are inspected - they should be perfectly smooth, especially in seamless models. After all, the slightest chip will hurt your eyes;
- quality. The easiest way to check is to slowly lift it around the corner. A high-quality panel should rise, slightly bending, without a network of cracks;
- scope of application - the manufacturer indicates for which premises the tiles are intended;
- geometry - the diagonals of a square or rectangle must be the same in length. A millimeter discrepancy will lead to the formation of noticeable seams, which are difficult to hide;
- material safety. The marking shows flammability (G), flammability (V), smoke formation (D), toxicity (T). The class should be within 0 or 1. It is better to refuse a higher value. You can always find a good alternative;
- availability of certificates so as not to run into counterfeits or products that do not meet sanitary standards.
When it comes to performance characteristics, experts advise:
- for the bathroom and kitchen, choose moisture-resistant finishes;
- For modern style, metal and polystyrene with an original shape and seamless connection are better suited. In the classic interior design, only white polystyrene foam tiles with stucco relief or golden inserts do not disturb the harmony;
- suspended ceilings look good with relief tiles. Coffered - with wood, which has decorative recesses and perforations;
- with noisy neighbors above, tiles made using injection technology will help (you can tell by their thickness - more than 10 mm);
- a small room will be visually enlarged by finishing with a 3D effect;
- for frequent repairs, it is better to buy panels that can be painted repeatedly;
- thin slabs are translucent. There are two options here: buy transparent glue or thicker panels.
Pros and cons of ceiling tiles
Plastic ceiling tiles (PVC, polystyrene) are a modern finishing material with its own strengths and weaknesses.
- small mass. Thanks to this, the material is easy to transport and lift into the apartment, and can be glued to weak (dilapidated) floors. And the glue consumption is minimal - 5-9 dots;
- long service life - from 15 years (budget options) to 100-150 years (expensive tiles);
- price variability. Can be purchased for 18 rubles/piece. - finishing as a whole will be cheaper than painting and wallpapering (with the exception of thin paper wallpaper), slightly inferior to whitewashing, and it can cost 529 rubles per piece, which not everyone can afford;
- good heat and sound insulation properties. The porous structure of the material perfectly dampens sound waves (especially important with noisy neighbors above) and conducts heat poorly - in multi-storey buildings there is no need to carry out additional work to insulate the ceiling space;
- simple installation - all work can be done with your own hands without help. In addition, complex, expensive tools are not needed;
- small thickness (4-14 mm) - the ceiling height will decrease by only 1-2 cm, which is important when finishing ceilings in old “Khrushchev” buildings and private houses with low ceilings;
- hides minor defects in floor slabs and rough wooden ceilings using finishing acrylic putty as an adhesive;
- easy care - can be washed with a damp cloth, rags or sponge with neutral detergents (care instructions below);
- the ability to update or change (if you get tired) the color scheme - just paint with water-based paint;
- fits into any interior design style in all rooms of a house or apartment: living room, bedroom, children's room, kitchen, corridor, etc.;
- wide choice according to: texture - you can buy smooth, rough, embossed, mirror or laminated tiles. Expensive types can imitate wood, leather, textiles, metal, and gold-plated inserts. As a result, it is easy to select ceiling plinths, corners, sockets; form - allows you to implement non-standard design solutions; color and pattern - the variability of colors and patterns simplifies the selection of tiles for the finished interior;
- resistance to fire - treatment with fire retardants transfers the material to the self-extinguishing class: it melts and smolders without maintaining an open flame;
- resistance to high humidity. Can be used in the bathroom, kitchen;
- easy dismantling.
- fragility of material in the budget and mid-price range - special care is required during transportation and work (cutting and adjustment): cracks, chips, and dents may appear;
- Porous tiles require careful selection of adhesive. There are two problems here. The first is that the liquid composition comes through the micro-holes, spoiling the appearance (it cannot be removed unnoticed). The second is that polystyrene shrinks under drops of glue, which is also not good;
- when burning (smoldering), it releases substances hazardous to health;
- low vapor permeability (does not apply to porous materials), which is not significant for reinforced concrete floors, but is critical for wood - it rots intensively;
- deforms at elevated temperatures. Therefore, simple incandescent light bulbs should hang at least 30 cm, and powerful ones - 40 cm;
- Cheap types of tiles absorb odors, soot, and volatile fats, which are almost impossible to remove. In addition, the white color turns yellow over time. The problem is eliminated by painting;
- Not all manufacturers have calibrated tiles - difficulties arise in fitting due to different sizes in edge length and thickness.
Tile layout options
Installation of slabs is often performed from a corner. This method is only suitable for ceilings with ideal dimensions. If the apartment is typical, then you can try diagonal placement. Thanks to this method, the space will be visually increased.
If a white ceiling seems uninteresting, you can give preference to multi-colored slabs. Most often, consumers choose close or contrasting shades. All products are laid in a checkerboard pattern or in the form of a serpentine.
In some cases, it is advisable to glue panels onto a wooden or metal frame. Thanks to this, you can hide utility lines or disguise an uneven ceiling.
From the center of the room
This method is used most often. Its popularity is explained by its neat appearance and symmetrical arrangement of finishes. Installation begins by finding the center of the ceiling and applying markings to the surface. The first four tiles are laid so that their corners meet at this point. If there is a chandelier, its position should coincide with the center of the room.
From the chandelier
If the chandelier is not in the center of the ceiling, the design using the two previous methods may not look aesthetically pleasing. Therefore, the light source acts as a reference point from which gluing begins. The first four tiles will converge at the fixture's mounting point. A hole for the chandelier is cut out at the joining corners. You can also make a hole in the middle of the tile and start laying from there, as in the previous method.
From the corner
In small rooms, gluing of tiles begins from the corner that is most visible from the door. This avoids wastage of material. Otherwise you need to cut a lot of panels.
Ceiling markings
Marking begins by determining the center of the room by pulling two tapping threads from one corner to the other diagonally. The intersection of the lines will be the desired point. After the center of the room has been found (can be shifted to where the chandelier is located), it is set aside and perpendiculars to the walls are applied to the surface.
Then, based on the size of the tiles and the selected layout scheme, you can draw the entire ceiling in fragments. This will help work out possible mistakes before the finish sticks tightly. For beginners, experts recommend transferring the room plan onto paper and drawing up a preliminary drawing.
Preparing the surface for gluing ceiling tiles
The final result of pasting the ceiling depends on the preparation of the ceiling.
The whitewash from the ceiling is completely washed off. Wet the ceiling with a wide brush and remove the whitewash with a spatula. The work is dirty. Make sure there is as little trash as possible. Cover all furniture with film. Cover the floor with newspapers in several layers. With these preparations you will save yourself from unnecessary cleaning. Covering the floor with newspapers is more convenient than with film. After removing the whitewash, when all of it remains on the floor, all that remains is to carefully roll up the newspapers.
You can glue tiles on old wallpaper, if it holds well and does not lag behind the ceiling. If the wallpaper is coming away from the ceiling, it needs to be removed. Wet the wallpaper with warm water and remove it with a spatula.
Prime the plastered or painted ceiling. Ceilings that have been cleaned of whitewash or old wallpaper are also primed. A ceiling from which the wallpaper has not been removed does not need to be primed.
Placement methods and markings
Squares on the ceiling made of foam plastic or polystyrene are placed with their edges along the walls or diagonally. When gluing diagonally, the material consumption is greater - there are more scraps and not all of them can be used, but visually it looks better - it is more difficult to notice the seams.
Gluing most often starts from the chandelier. In this case, it is easier to “fit in”, since the edges of the plates can be trimmed a little, and the resulting gap will then be closed by the chandelier socket. But not all rooms have a chandelier - often there are several lamps and they can be located on the walls. Then they start gluing from one of the walls, most often from the one opposite the entrance. With this approach, most likely the outer row will be cut off, and it will not be so noticeable near the entrance.
If you need to glue tiles to the ceiling from a chandelier, markings are necessary. In a square room everything is simple - we find the center and start from there. To do this, take a painting cord, one end in one corner, the other in the opposite corner, pulling the cord and letting go, we get a line on the ceiling. We repeat the operation with another pair of corners. We found the center, it’s easy to glue tiles from it. For diagonal gluing, there are already guides, but for parallel gluing you will have to make two more stripes - through the center to the opposite walls (in the figure above).
But this is a very rare case. More often the rooms are rectangular, and the chandelier is not located in the middle of the ceiling. Therefore, you will have to do more complex markings.
To begin with, we also find the center of the room (painting cord along the diagonals). If it coincides with the place where the chandelier is attached, great, we’ll “dance” from it. If not, move the starting point to the chandelier. The rest of the markings are the same. We measure the distance from the starting point of installation to the nearest wall. Using this value, draw squares as shown in the picture above (use painter's cord). By drawing the diagonals, we get guides for laying continuous tiles. Using them we level the edge of the first row. The more accurately we set this row, the easier it will be to glue the tiles onto the ceiling further.
Layout schemes
Ceiling tiles are glued in three ways: in even rows, offset to the floor of the element, and diagonally. Depending on the layout scheme, a different visual effect and perception of the room is obtained. Let's consider each option in more detail.
In straight rows
This is a classic layout when the edges are parallel to the walls (in a rectangular or square room). This method allows you to hide small unevenness in the ceiling if you lay tiles of two shades in a checkerboard pattern.
With offset
The option resembles the classic cladding method, but the tiles are shifted by half an element relative to the previous row. This requires more precise marking. The original design gives the room some lightness, but the products must be chosen with a chamfer, since it makes no sense to glue tiles in this way without seams.
Diagonally
The main advantage of the layout is the visual increase in space. The circuit requires the most effort because it requires a more precise fit. In addition, material consumption increases. The diagonal laying method allows you to hide the slight curvature of the walls.
Gluing seamless ceiling slabs
Before you start gluing seamless tiles to the ceiling, you need to know what types of ceiling tiles there are and draw up a plan for the arrangement of the elements. To do this, use a tape measure to measure the parameters of the room, but it is important to remember that the room may not be standard, so the length and width of the ceiling in different places may differ. A pattern is drawn on paper, and the number of tiles in length and width is calculated in accordance with the resulting pattern.
Next, the markings are transferred to the ceiling; here a ruler, square, marker or pencil will come to the rescue. The ceiling space is first divided into four parts diagonally or along the middles of opposite walls. You can make the marking process easier by using ordinary thread.
The next step will be the actual laying of the tile elements and their stickers. The installation process is as follows:
- Packages of finishing materials, including wood-effect ceiling tiles, should be opened and left for a while. In this case, the tile takes on the room temperature and does not deform during use.
- After a certain time, the adhesive composition is applied to the back side of the tile in dots. The glue must be in the center of the tile element and along its edges. It is allowed to distribute the adhesive over the tiles using a spatula.
- After application, the liquid adhesive composition must be dried by waiting for some time. Most often, the manufacturer indicates such information on the packaging.
- The prepared ceiling tiles are applied to the ceiling in the designated place and pressed with little force. It is important to remember that polystyrene foam tiles are highly brittle, so strong pressure can damage the element. The laying of the first tiles begins in the central part of the room, and one element should be glued on each marked area.
- Before gluing, the tiles must be laid evenly, pressed and left for some time so that the adhesive composition adheres to the surface of the main ceiling.
- Similar actions are performed with all solid seamless injection ceiling tiles. During the installation process, make sure that there are no gaps between the tiles. If excess glue comes out when pressed, you should remove it immediately. After drying, the adhesive composition is quite difficult to remove.
- Cut tiles are laid along the edges of the ceiling.
- It is recommended to seal the joints of the elements with acrylic sealant. You can use a silicone compound for this purpose, but during use it may acquire a yellowish tint.
With the help of beautiful polystyrene foam ceiling tiles, you can make high-quality and inexpensive ceiling repairs, and the correct choice of material helps to increase its service life.
Material calculation
It is not difficult to calculate the number of foam tiles for the ceiling. To do this, you will need to calculate the area of the ceiling surface. The standard dimensions of the segments are 50x50 cm. To cover 1 m² of ceiling you need 4 such parts. Therefore, to determine the number of tiles, the area of the ceiling surface is multiplied by 4 segments.
Calculation
Before gluing foam tiles to the ceiling, it is necessary to determine how many and what tiles will be needed, why, make a calculation, purchase the required quantity, and prepare the ceiling surface for installation.
- Method 1: mathematical
To correctly calculate the number of tiles needed for repairs, you need to know the length and width of the room. Multiplying these numbers will give the ceiling area, but you shouldn’t buy tiles based only on this number. Since some of the tiles may be damaged when cut, and the shape of the ceiling is not ideal, excess material consumption is inevitable. Therefore, be sure to provide a reserve of at least 15% of the total area.
For example, in a room measuring 2x3 meters, the ceiling area is 6 square meters. To cover 1 square meter you need 4 tiles of a standard size of 50x50 cm. Thus, you will need 24 tiles to cover the entire ceiling, and another 2-3 tiles as a reserve. In total you will need to buy 26-27 tiles.
- Method 2: on paper
On a piece of paper you need to draw a plan of the room, maintaining the scale. Next, you need to draw diagonals and place the tiles with maximum accuracy from the central part to the edges of the room.
If there is a gap of less than 1/2 tile left on the wall, then 1 piece of tile will cover 2 such gaps. If the gap is more than 1/2 of a tile, then it should be noted that a whole tile will be used up.
Glue
Foam tiles are attached to the ceiling using glue, and when choosing it you need to know some subtleties. So, it is very important how quickly the glue sets, how long it takes for it to dry completely, and also how thick it is. All this will affect the quality, speed and complexity of the work.
- Choose thick glue; it will not “bleed” from the tiles and get dirty. Moment Liquid Nails glue, for example, has the right consistency and also sets in 10 minutes - which means you don’t have to stand for a long time with your arms outstretched, waiting for the moment when you can release the tile. In addition, the consumption of this glue is small - on average, about 6 ml is consumed per square meter, or four tiles. Thus, for a medium-sized room, one tube with a capacity of 400 ml is enough, but it is more profitable to take a tube with a volume of 450 ml - these come with a gun, with which it is easy to apply glue, in addition, some reserve is needed for gluing the ceiling plinth at the end of the work.
- Another suitable glue is “Titan”. It is very durable and sets quickly, but there is one subtlety in its use: after applying it to the tile, it must be applied in place, and then removed, and left in the air for one minute, after which it must be applied again to the same place and pressed tightly. The main difficulty in this case is to get exactly to the same place, especially at the beginning of work.
- You can glue foam tiles to the ceiling using cheaper adhesives such as “Dragon”, “Eltitans”, “Power”. They are made in China and are not of high quality. The main disadvantage of these adhesives is the long setting time, so you have to stand for a long time with your arms raised up, which is quite difficult for untrained people.
Glue selection
To attach tiles to the ceiling, several types of glue are used:
- Universal compositions . Elitance glue is suitable for working with wood, plaster, and concrete. It is convenient because it forms an elastic seam, however, the composition takes a long time to dry. Titan glue is more common; it has a viscous consistency and sets quickly. The composition of Master glue is similar, but the strong smell and longer drying time are the main disadvantages. The advantage over Titan is its affordable price. “Moment” is an expensive but high-quality glue. It grips quickly, but the consumption is higher than its analogues. The packaging is in the form of a syringe, so it requires a gun. Universal adhesives also include “Dragon”, “Power”, “Anserglob”.
- Liquid Nails . This type of glue is often used by professionals. Liquid nails are thick, so they are placed in a thick layer on uneven areas. For tiles, choose a white adhesive, without solvents, especially when working with thin materials. It is also used to decorate seams. The most famous brands are “Moment Montage” and “Tytan”. For application you will need a construction syringe.
- Polyvinyl acetate glue . PVA and Bustilat practically do not give off an unpleasant odor, but they take longer to set, and the consumption can be quite large, since the glue is applied both to the tile itself and to the ceiling.
- Finishing acrylic putty . This is a non-standard, but effective use of a product that has the desired viscosity. When glued to putty, the seams turn out white and no gaps are formed. The surface can be painted. To work you will need a spatula.
Tool
You need few tools to work with foam tiles, and they are all quite accessible.
You will need:
- painting cord for marking the ceiling before gluing;
- scissors or a special mounting knife for cutting tiles;
- spatula (as well as putty) for leveling the surface of the ceiling before gluing;
- application roller and primer;
- thread, tape measure and pencil for marking tiles;
- a brush (or gun) for glue, a clean cloth to remove excess glue.
Marking
In order to glue foam panels efficiently and beautifully, you must first apply markings.
You need to decide where to start finishing the ceiling:
- from the corner of the room;
- from the center of the room.
In the first case, you should measure 50 cm from the wall and draw a line to the opposite wall. Next, perpendicular to it, after 50 cm, mark the lines and complete the marking according to the appearance of the chessboard. It is better to start from a noticeable corner and end at the door. It is convenient to apply straight lines using a painting cord.
In the second case, you need to find and mark the center of the ceiling. To do this, just apply diagonals. At their intersection is the center of the ceiling. You can use another method.
From the middles of opposite walls, beat off perpendicular lines with a paint cord. They intersect in the center of the ceiling.
Preparatory work
Before you begin laying foam tiles, the ceiling surface must be prepared. The main thing in this matter is to completely get rid of the remnants of the old finish. Depending on its type, cleaning methods differ.
- The wallpaper is moistened with water, wait until it is saturated and damp, and then removed from the ceiling using a narrow spatula. Afterwards the surface is cleaned of glue residues.
Removing wallpaper from the ceilingOther devices and tools for wallpaper removal
- A narrow putty knife can also be used to remove old ceiling tiles or plaster.
Removing whitewash from the ceiling - The whitewash is washed off with plain or soapy water in two or three steps.
Whitewash is washed off with a sponge - A fairly old layer of oil paint is removed (or rather, scraped off) with a spatula.
- Water-based paints are washed off with water, like whitewash.
- For paints that cannot be scraped off or washed off with water, various solvents are used. But after their use, the ceiling should be about class=”aligncenter” width=”800″ height=”800″[/img]Prestige remover, gel, 0.8 kg
Advice! If the layer of plaster does not chip off or collapse when lightly tapped with the handle of a spatula (or other tool) and does not have large differences in height, this layer of finishing can be left and seamless ceiling tiles can be glued directly onto it.
Step-by-step description of preparatory work.
- The ceiling is inspected, all kinds of defects and height differences are identified.
- Chandeliers and other lighting fixtures are removed, the wiring is isolated or de-energized, if possible.
- If the difference is more than 4-5 millimeters, then the ceiling must be leveled using putty.
Preparatory and installation work
inexperienced person can handle the work of decorating a room with foam ceiling tiles . No special tools are required. The main thing is to do everything according to plan.
Calculation of the number of tiles and choice of glue
To calculate, you need to draw a layout plan on paper and calculate the required quantity, or measure the area of the ceiling and look at the packaging with the material to see how many square meters it is designed for.
In any case, you need to purchase a little more tiles. After purchasing the material, it must be kept in the room where installation will take place for 1 to 3 days. otherwise, due to temperature changes, the tiles may become deformed. Tile adhesives come in different types, from universal to polyvinyl acetate. Solvent-free liquid nails and acrylic putty are also suitable. The glue must be white.
Preparing and marking the ceiling
Both of these stages are mandatory to improve the quality of finishing and facilitate further work. They are as follows:
- removal of old paint, whitewash and other finishes. The surface should be especially carefully cleaned of water-based paint;
- smoothing out large defects using putty. Minor irregularities do not need to be corrected;
- primer _ It is optional, but desirable for protection against fungus and mold and for better adhesion;
- determining the center , which will be the starting point of installation. Ideally, this is where the lamp is mounted. Even if the lamp is not located in the geometric center, it is recommended to start installation from there.
Facing
The installation itself, after all the preliminary work, is quite quick and simple. To avoid dirt from getting on the panels, it is better to carry out it with gloves. The cladding is carried out according to the following scheme:
- Applying the adhesive solution to the ceiling and then to the tiles. Usually 20-25 drops are enough in the corners and perimeter of the panel. If the glue does not set immediately, you need to apply it to several tiles and a large surface area.
- Pasting. To do this, each tile is pressed tightly against the ceiling with the palm of your hand and held for some time. More force must be applied when gluing extruded products. Excess glue is immediately removed with a napkin, otherwise it will be difficult to do this after it hardens.
- Filling the resulting seams with sealant or acrylic putty if necessary.
- Fastening the baseboard with glue.
DIY installation technology
Expanded polystyrene is convenient in terms of processing and installation. All actions can be performed independently. To decorate the ceiling with foam plastic boards, you will not need a frame, and you will not need to coordinate its parameters with the dimensions of the panels. A reliable adhesive with the characteristics of polystyrene foam, liquid nails or polyurethane foam adhesive is sufficient. But due to the smooth surface of the foam, adhesion has to be increased.
Extruded options are initially planned to be as smooth as possible; their adhesiveness is even lower. Accordingly, the technology of fixing tiles requires high-quality priming. The response surface also has its influence. Standard concrete, for example, also does not have sufficient adhesion properties. This coating is almost always covered with plaster before installing the tiles. This is not relevant for other counter surfaces, but if there was a layer of plaster initially, then it is not removed.
In general, the following components of the process should be highlighted:
- Preparing the ceiling.
- Selection of materials.
- Marking for tiles.
- Installation of slabs.
- Seam finishing.
Marking the ceiling for sheets of foam tiles
For this step we will need some marking cord. Its device is very simple - it is an ordinary rope, which is tinted with powder dye. These materials are sold at a hardware store or market.
Before marking, decide how the tiles will be arranged on the ceiling: in longitudinal rows or diagonal. If you do not want to complicate the installation process, then a longitudinal arrangement is quite suitable, and if you desperately need to visually expand the room, then it is worth sacrificing your convenience during work for the sake of a better appearance later.
The initial marking of the ceiling should be carried out with the participation of your friend or family member. The marking cord must be pulled from one corner of the ceiling to the one that lies opposite, that is, draw a diagonal. This should be done with a little force, and after pulling it, pull it a little away from the ceiling and release it. Do the same with the other two corners. Having drawn both diagonals, find the point of their intersection, which will show the center of your ceiling.
After this, at a certain equal distance from the center, leave marks along the diagonals of the ceiling. After that, connect them with lines using a marking cord. After this operation, a square or rectangle should be formed. The opposite sides should not differ by more than 5 millimeters, otherwise you will have to re-mark and connect them.
If everything went well, then use a tape measure to find the middle of the sides and use a marking cord to make axes along which the tiles will be glued. All these steps apply to the longitudinal arrangement of sheets.
Now let's talk about diagonal markings. The axes along which it is necessary to glue the tiles must be placed at right angles to each other and pass from one corner to another (if the room is rectangular in shape, but not square, then the axis will not accurately fall into the second corner, it will intersect one of sides). If the 90-degree angle is not clear, then in the midst of work a failure may occur, as a result of which all the work will go down the drain.
Applying glue
Depending on the glue used, its application may vary, but the general principles remain the same. For example, glue is applied either dotted or in a solid line to small protrusions on the inside of the product. If there are none, then it is applied in the corners and in the center.
It is best to apply putty or glue directly to the tiles so as not to overlap the ceiling markings. This is best done with a comb used for tiling. If there are uneven surfaces up to a centimeter, use a comb with a large tooth of 11 millimeters or more. In the event that you see that the applied glue will not be enough, you can carefully apply it to the ceiling. This must be done in such a way that the drawn axes are not erased, and the direction of spreading the glue on the ceiling and on the tiles is opposite. For example, if you applied glue on the tiles towards the door, then on the ceiling you need to spread it in the direction away from the door.
Special glue, for example ELTITAN, needs to be applied differently. Since you need to wait 15-20 minutes before laying, you can save your own time if you apply glue to a whole batch of tiles at once - 3-5 at a time.
Gluing tiles to the ceiling
After marking the ceiling and applying glue, you can move on to the culminating step - fixing the tiles. At the very beginning, you need to check whether the pattern on all sheets is the same, or whether it is slightly different. This is what determines the pattern in which you will glue the tiles (for more details: “How to glue ceiling tiles: useful tips”).
Be sure to start pasting from the center of the room, gradually filling the remaining space with the material. Installation should be carried out only after completely disconnecting the electrical wiring and wearing gloves. Without gloves, there is a risk of staining the white sheet, which shines with its purity.
The last glued pieces may not fit into the remaining space, so don't be afraid to trim them. But do it carefully, measuring the length to the nearest centimeter. The same should be done if you need to cut out a place for any fasteners that cut into the base ceiling. But we should not forget that in this case it will be more difficult to determine the correct position of the sheet, so pay your attention to this part of the work. During gluing, the tiles should be pressed firmly against the ceiling, although not to such an extent that dents remain.
But you shouldn’t glue all the tiles at once. It is advisable to remove any remaining glue after each glued batch, the dimensions of which you determined earlier, so that it does not dry out. The gap between the wall and the glued tiles should be closed with a ceiling plinth.
How to seal seams between slabs
Minimum equipment required:
- foam sponge;
- small capacity;
- putty knife.
Ideally, seamless options are used, but if the choice is on another material, then you should not leave joints. Putty is usually used as a grout. The mixture is poured into a container with water and stirred to a thick consistency. There is no need to be afraid that the composition will become too dense. Subsequently, take a small amount of putty on your finger and fill the joints evenly. After processing 4-5 tiles, their seams are cleaned of excess mixture. Use a foam sponge and clean water. The pressing force should be minimal. Then, when all the voids are filled, you will need to wait 10-12 hours until it dries completely. Then the entire ceiling is thoroughly cleaned, again with a sponge soaked in clean water. After 1-2 days, it won’t hurt to go over all the seams with a sponge and detergent. At the same time, the material should not have contraindications for the use of cleaning agents.
Installation of frieze
First, draw lines around the perimeter - guidelines for installation. In this case, use a ruler or a small piece of the frieze itself (baguette). In the case of gypsum friezes, it is necessary to make notches on the ceiling and wall at the installation site for a strong grip. Scratches are left with a trowel or the corner of a spatula. Decorative corners are often sold along with baguettes. They solve the problem of sloppy connections at internal and external corners. The installation of decorative elements is facilitated by paper templates and jigs, which are sold along with the frieze. Some corners have edges for direct butt mounting to the strips. Then the installation of the frieze begins by applying glue to the surface of the wall - under the corner. Then a straight frieze strip is glued to the wall, simultaneously connecting it to the fixed corner. Ceramic tile adhesive is used to install the baguette. Subsequently, the entire perimeter is assembled, cutting off the excess parts of the planks.
Installation of panels
Material calculation
To purchase the required number of panels, you must complete all calculations in advance.
So, you can draw on paper the surface of the ceiling where the panels will be installed, maintaining the scale. This method is considered the simplest and most convenient. Even if the calculations have been completed and carefully checked, it is necessary to take the material with a reserve. This is very important, because anyone can encounter accidental damage to the material.
Glue selection
Regular PVA is suitable for installing polystyrene foam boards. It does not have a pronounced unpleasant odor, but it takes quite a long time to dry. To avoid having to hold the stove under the ceiling for 10-15 minutes, you should carefully insert pins into the corners.
If desired, you can use universal glue. The disadvantage of this composition is that it takes a long time to set. If you want to speed up the installation process, you should prefer “Moment”.
Many manufacturers prefer to use liquid nails. They are great for uneven surfaces. The main thing is that the composition does not contain solvents.
Some craftsmen prefer to make their own mixture based on polymer putty and water. These components are carefully mixed, after which you need to add a little PVA.
Stages of work execution
- First you need to prepare the ceiling surface. So, you should remove the old finish. Then you need to apply 1-2 layers of plaster and primer. Thanks to this, it will be possible to improve adhesion, remove construction dust and avoid the formation of mold.
- Laying the slabs must begin with the chandelier so that a clear pattern is obtained in the central part of the ceiling.
- During the installation process, you need to look at the inscriptions or arrows located on the back of the panels. This marking indicates the direction of installation. If there are no arrows, then you should draw them yourself using a pencil.
- The glue is applied around the perimeter in small dots. For a more durable fixation, you can apply the composition diagonally. Then you need to wait a little and glue the material to the ceiling. Since the polystyrene foam board is thin, you should press it with your entire palm. Excess adhesive is immediately removed with a clean cloth.
- The position of the panel must be checked and adjusted if necessary.
- If the installation process begins from a corner, then the products are glued in rows. If the first slabs were glued in the central part, then they are glued with 2 products in each segment. In other words, the installation is carried out in a circle, in the center of which is the chandelier.
- When all the boards are glued, it is necessary to determine the size of the gaps. If it is less than 25 cm, then half the panel should be glued in this area. Very small gaps between products must be sealed using finishing putty.
Expanded polystyrene ceiling tiles do not require special care. It is enough to periodically vacuum the products. If these are laminated panels, then they can be wiped with a cloth soaked in a soapy solution.
vote
Article rating
How to stick ceiling tiles to an uneven ceiling
If the differences are insignificant, then gypsum putty is used for gluing. The building material performs two functions - fastening and leveling. The step-by-step installation process looks like this:
- Dilute the dry mixture with water in the proportions specified by the manufacturer.
- The putty is applied in a layer of 3–5 mm to an area of the ceiling equal to four tiles.
- Using a notched trowel, run over the putty to leave grooves on the surface.
- Apply the panels.
- Use a building level or rule to gently press down the tiles, creating an even finish.
- The remaining elements are glued in the same way.
If the differences between the ceilings are strong, it is recommended to first level the ceiling with starting putty or using plasterboard sheets.
Which is better: suspended ceiling or ceiling tiles?
The undoubted advantage of ceiling tiles is the ability to cope with the work without professionals. It is enough to buy the appropriate brand of glue and calculate the amount of material, and the gluing process will not be difficult. Also, the advantages include low cost. Perhaps this is all that can be said about the benefits of this material, now let’s talk about the disadvantages:
- Cannot be used in the kitchen: the surface is difficult to clean from the inevitable layer of soot and dirt.
- The products are flammable and do not comply with fire regulations. Expanded polystyrene is “famous” for its record-breaking short combustion period - less than 4 seconds.
- It cannot be installed in the bathroom, as the material has a low moisture protection threshold. If there is a leak from above, the adhesive may break down and peeling may occur.
- Installation requires a flat surface, only minor cracks are allowed.
- It should not be used in new buildings where the building is subsiding, leading to peeling of the ceiling covering elements.
- The glue does not erode for a long time, an unpleasant odor is felt, and air toxicity increases.
- It will not be possible to reliably hide communications, for example, electrical wiring.
- Even a slight increase in temperature is undesirable. Lighting fixtures get hot, so they need to be mounted as far as possible from the ceiling (minimum distance - 30 cm).
- The aesthetic appearance of the room suffers. The seams between the elements are noticeable and yellowness appears. Tile finishing does not fit into most interior solutions due to its excessive decorativeness.
Stretch ceilings, on the contrary, are distinguished by their aesthetics and ability to fit harmoniously into the interior. A smooth surface is provided, without the slightest defect. The widest choice of colors and the possibility of photo printing are attractive.
Installs within a few hours. Easy to clean: wipe with a soft cloth dampened with a small amount of detergent. It is environmentally friendly and not harmful to humans and animals.
When starting a renovation, everyone decides for themselves what is better - a suspended ceiling or affordable ceiling tiles. It is worth considering that in most respects, an environmentally friendly stretch ceiling is superior to a coating made of foam elements, creating a beautiful modern interior and maintaining health.
Is it possible to glue ceiling tiles in the bathroom?
It must be taken into account that there is always a high level of humidity in the room. Therefore, it is impossible to cover the ceiling with stamped tiles here - they do not tolerate such an environment. After installation, you can paint the surface with waterproof paint, but there is a more practical option.
Extruded laminated tiles are suitable for bathrooms and bathrooms. But the packaging must indicate that the product is resistant to humid environments. To do this, the manufacturer coats it with compounds with hydrophobic properties.
Flaws
Foam ceiling tiles differ in the production method, quality and price. Cheap tiles quickly turn yellow when exposed to ultraviolet radiation, and in some cases are destroyed by dampness. In order to protect it from exposure to light and moisture, it is enough to paint the mounted ceiling with water-based paint.
The main disadvantage is impermeability to moisture vapor. If you cover the ceiling of a room with foam tiles, the walls of which are covered with vinyl wallpaper, the humidity in the room will sharply increase, which can lead to the appearance of fungus.
The best manufacturers of polystyrene foam boards
Craftsmen prefer trusted manufacturers, because for a fragile material, the first among indicators is reliability. The Armstrong company produces tiles with improved performance properties. She specializes in making options of any shape, from classic to non-standard. The German manufacturer Ormit produces a wide range of moisture-resistant options. Pays extra attention to the range of shades and sizes. The Antares brand produces a variety of products, from all types of ceiling tiles to decorative corners and baseboards. The Chinese company Matrix has focused its activities on the production of thin tiles. Another Chinese manufacturer, Angara, follows approximately the same policy. Produces affordable options with a thickness of up to 8 mm.
Along with the goods, buyers are also given quality certificates.
Criterias of choice
When choosing ceiling tiles, you should carefully examine the product, in particular:
- there should be no dents on their edges;
- the angles must be straight (exactly 90 degrees), otherwise uneven seams will form during installation;
- the drawing must be clear, without flaws.
You can check the strength of the product in the following way. You need to take it by one of the corners and hold it horizontally. High-quality tiles will withstand the test and will not break under their own weight.
It is important to consider the specifics of the room when choosing a specific type of panel:
- Extruded is suitable for any room, but often has profile defects and an uneven back surface.
- Injection is suitable for rooms where it is necessary to achieve the appearance of a seamless ceiling. It is durable and fireproof, easy to paint and easy to maintain.
- Pressed is suitable for rooms with minimal requirements for heat and sound insulation. The material is inexpensive, but fragile and sensitive to moisture.
Having assessed the features of all types of tiles, you can choose it for your own needs in accordance with the specified parameters. After which you can proceed directly to the installation itself.
Rules of care
It is not enough to properly glue foam panels to the ceiling; you need to know how to properly care for them. Otherwise, in a year, maximum two, they will lose their original appearance, and you will have to make repairs again. Care requires compliance with the following rules:
- laminated tiles can be wiped with a damp cloth, and dry cleaning can be carried out using a soft brush or vacuum cleaner;
- Small stains can be removed with a simple eraser.
And remember that the surface of the slabs is afraid of UV radiation. The abundance of sunlight will have a negative effect on the coating.
When installing lighting devices, maintain a minimum distance from the ceiling to the lamp - at least 30 cm.
How to clean foam tiles
There are no special difficulties in caring for foam tiles. To clean the surface from dirt, you can use a damp cloth. If the ceiling is in the kitchen and is constantly exposed to grease and stains, it is necessary to use a special detergent. The use of ceiling tiles in the interior is quite common. This is due to its advantages and performance properties. To ensure the quality of installation is as high as possible, it is important to follow the instructions and adhere to the installation rules.
Minuses
In addition to the advantages, foam ceilings also have disadvantages:
- unnaturalness, under the influence of elevated temperatures they release harmful substances;
- instability to fire. Strong heating will have a detrimental effect on the decorative finish, the material will melt and catch fire. Therefore, it is not advisable to install such ceilings near heating devices, or to install lighting devices with high-power incandescent lamps next to the tiles. For example, horn chandeliers with bulbs pointing upward towards the ceiling;
- afraid of mechanical influences. The surface of the segments has a soft structure and is easy to damage;
- instability to UV rays. When exposed to direct natural light for a long time, white tiles turn yellow, and colored tiles lose their original shade;
- Before finishing, the ceiling base will require careful preparation - leveling, puttying, applying a primer;
- low decorative properties. Regardless of the pattern on the surface of the parts, it will not be possible to create a luxurious interior with this type of finishing;
- After installation, seams remain visible on the surface, which will require sealing with sealant.
We read: is it possible to paint foam ceiling tiles?
Calculation of the quantity of purchased material
Now we finally come to the practical part. We hope that the photos that will accompany the process of describing it will help you better understand the essence of the processes taking place. If you have definitely decided on the choice of material, and you are attracted by foam plastic tiles for the ceiling, then you can proceed to the first step of installation work. It involves calculating the surface on which the tiles will be glued. The amount of material purchased and other calculations will depend on this.
First you need to measure the width and length of one room. Multiplying them, we get the area of the room. If you plan to carry out renovations in several rooms, perform the same calculations in them, and then add up all the resulting numbers. Now you need to divide the resulting number by the area of one tile of material. It depends on the type you choose, the dimensions of which are usually indicated on the packaging. Now we divide the surface area of the room by the area of the sheet and round the number up. Be sure to add one tenth of it and round up again. The resulting integer will be the number of sheets needed.
How to glue foam tiles to various surfaces
Any rough ceiling must be prepared for gluing. If we are talking about a surface whitened with chalk, it must be cleaned by washing away the chalk to the base. It is useless to glue tiles to chalk - they will very soon come off and fall. If the ceiling is covered with lime, you need to run your hand over it and check the condition of the lime. Peeling areas should be removed with a spatula. If this procedure is neglected, the tile will come off in the same way as from a chalk base. Only after cleaning the ceiling can you start priming it.
As for ceilings made of concrete, plasterboard and wood, everything is much simpler here. These bases do not need to be cleaned; they should be immediately covered with soil.
The primer for this procedure must have deep penetration. Shake the container well, pour the primer into a paint tray, and then apply a thin layer to the ceiling using a roller. After the first layer has dried, the procedure should be repeated. Careful priming will improve the adhesion of surfaces, and therefore contribute to more durable adhesion of the ceiling tiles.
The next stage is marking the ceiling. If the tiles are glued in a straight line, it is enough to mark the center of the room - it will be at the intersection of lines running from the middle of the sides of the ceiling. If you plan to glue the tiles in a diamond shape, the center is marked by the intersection of diagonal lines originating in the corners of the room. For marking, it is most convenient to use a painting cord - it will allow you to immediately remove the gluing lines.
When choosing adhesive for foam tiles, you should avoid aggressive solvents in its composition, as they will simply corrode the product. It is also better to avoid water-based glue if gluing is done on a lime or chalk surface.
The best option would be the so-called polymer-based liquid nails. It is best to start pasting from the middle of the room. The adhesive must be applied in a strip around the perimeter of the tile and dropwise in the center. Having glued a square of the first four tiles, they should be aligned relative to each other and the marking lines. Since liquid nails are quite thick in consistency, this step will not be difficult. This way the entire ceiling is covered. The final tiles along the walls are trimmed if necessary before gluing.
At the end of the work, the seams between the tiles must be puttied. A narrow spatula works well for this purpose. It will create the appearance of a uniform surface without seams. Finally, the tiles are primed and painted in two layers of water-based paint.
Distinctive features and diversity
Installing ceiling tiles in most cases means making your ceiling more modern and attractive. Foam ceiling tiles, although not the most common type of ceiling finish, are still holding their own and have the same market share as before.
Ceiling tiles come in different types, and the features of each depend only on. First of all, it is distinguished by its shape.
Foam ceiling tiles can be:
- rectangular;
- square;
- diamond-shaped;
- hexagonal.
The most popular remain square-shaped products, which have become, figuratively speaking, the standard for all materials for ceiling cladding. And indeed, it so happens that the square shape is one of the most natural for a person, without distracting him from work and other activities.
It is also divided into several types according to the type of front surface:
- simple;
- laminated;
- waterproof;
- embossed;
- painted to resemble the texture of wood, leather or stone;
- with imitation of carving or stucco.
The type of surface is individual for each room and depends on its purpose. For example, in a bathroom, nothing can replace waterproof tiles, otherwise moisture will seep through the surface of the ceiling and spoil the materials inside it. Laminated tiles would look nice in the kitchen, as they will enhance the shades of the applied paint.
And the tiles also differ in the way they are made:
- stamping method (stamped);
- sintering method (injection);
- and extrusion method (extruded).
Basically, the first two types differ in their thickness. Stamped tiles have a thickness of 6-7 mm, injection tiles - from 9 to 15 mm. By the way, it is worth noting that injection tiles themselves are almost waterproof. Extruded tiles are approximately the same thickness as stamped tiles, but can sometimes be even thinner. They are very reliable and varied, but their cost leaves much to be desired. We will look at each of these three types in more detail below.
Caring for any type of foam tile does not require much effort. As a rule, it is enough to occasionally vacuum the surface of the ceiling, and the laminated material can be washed with a regular soapy dishcloth. But remember that any type of tile cannot be wiped with a solution containing even a small amount of solvent, as this will negatively affect the condition of the film, and subsequently may even corrode part of the material (read also: “How to remove tiles from the ceiling: tips”).
Frieze installation
The final stage of work on your ceiling will be the installation of a frieze. There are an unimaginable number of them - in a variety of sizes, shapes, colors and designs. Choose the option for yourself according to the size of the room and its design. It is not necessary that different rooms with the same tiles have the same friezes. Create variety and be more unique!
Although you can glue the baseboards before starting work, it will be much easier for you to stick them on after installing the tiles. Then you won’t have to adjust each sheet with millimeter precision and be afraid of making a mistake by a hundredth of a degree. The baseboard should be the element that will save you if something goes wrong.
Therefore, you should not be afraid of mistakes. Panic can only hurt. Try to do your work efficiently and know that any shortcoming can be eliminated, but it all depends on the cost. Be successful and all the best to you!
Ceilings
0 votes
+
Vote for!
—
Vote against!
The domestic market is saturated with a variety of materials for ceiling finishing, offering the consumer many options. These can be plastic, wooden, metal panels or hanging and tensioning systems; in any case, each coating, one way or another, performs its own decorative function. However, there is a material that combines environmental friendliness, ease of installation, low cost and durability. We will talk about foam ceiling panels, which have recently regained their former popularity.
Foam products are widely used in construction due to their high technical and operational properties. Elements for finishing and decorating premises are produced from it. These can be ceiling panels, baseboards, and sockets that serve as an addition or are used independently.
Production of foam ceiling panels
It should be immediately noted that ceiling panels made of foam plastic are most often produced in a square shape with dimensions of 30x30 or 50x50 cm; less often, a rectangular slab is offered on the construction market. Based on manufacturing technology, they can be divided into 3 types.
Pressed
- Here, stamps are used into which prepared foam plastic slabs are placed. The form is passed through a press, forming an imprint of a relief design on the front side. With this manufacturing method, the graininess of the material is preserved. Products can only be produced in white.
- After installation, the slabs can be given any shade by covering them with water-dispersed paint diluted with the desired shade of color. Panels made using this method can be laminated in any color palette.
- This technology makes it possible to produce a product with precise geometric parameters, therefore, the ceiling surface is almost ideal. Due to their porous structure and thickness (up to 8 mm), the slabs have decent heat and sound insulation properties.
Extruded
- With this method, the main raw materials are subjected to heat treatment. The polystyrene foam is melted and then a strip is made from the resulting mass, which is later transformed into a tile through vacuum-thermal molding.
- During the melting process of the material, a dye can be added, which makes it possible to produce similar products in any color range.
- Low porosity makes this ceiling panel more durable. However, it should be clarified that in such production the equipment must be configured as accurately as possible. Otherwise, the product may end up with deviations in size. Which will undoubtedly create difficulties during installation.
- These products come out with a glossy surface. They are produced in a wide variety of embossed patterns, with clear relief patterns, and with complex, sometimes voluminous, decoration. It is very easy to care for such panels.
- After gluing the extrusion plates, the seam between the elements is quite noticeable. In addition, such products cannot be additionally painted, since their surface is not able to absorb the coloring matter.
Injection
- This manufacturing method involves steam treatment of the main raw materials placed in the molds. The result is a white cast slab with a thickness of 9-14 mm, which is of higher quality.
- Valuable properties of ceiling panels made by this method are water-repellent and noise-absorbing properties, which allows them to be installed in wet rooms (bathroom, kitchen) and rooms with thin walls.
- This type of tile has regular geometric shapes and a deeper and clearer texture. When installed, the material forms a single sheet without visible seams.
Advantages and disadvantages of foam ceiling panels
- Despite the different manufacturing technologies, the weight of the tiles does not exceed 200 g/m², which greatly facilitates the transportation, storage and installation of products.
- During the production process, foam plastic boards are treated with fire retardant components, which reduce the flammability of the material. Thanks to this, the flame is held for no more than 4 seconds. In addition, when burning, foam releases 8 times less heat than wood.
- Products made by extrusion are characterized by resistance to alkaline, alcohol and saline solutions, building mixtures based on gypsum, lime, and cement. This allows their installation on surfaces made of any materials.
- However, contact with organic solvents such as gasoline, turpentine, kerosene, and acetone should not be allowed. Oil-based paint products can warp and melt foam panels.
- It is impossible not to note the safety of the material in environmental terms, where the toxicity indicator does not exceed 0.027 mg/m³, which is fully consistent with existing standards.
- Foam panels are not subject to rotting and mold, and can withstand a wide range of temperatures. The thermal insulation coefficient exceeds that of wooden products, not to mention materials such as brick or reinforced concrete.
- Such products can be installed in almost all rooms for any purpose, but only if there is a reliable ventilation system.
- A significant advantage of foam ceiling panels is their low price and large assortment.
- The only drawback of this facing material is its unsuitability for expensive interiors or premises decorated in an ultra-modern style. Although today manufacturers are trying to expand the range of products as much as possible, where every consumer can purchase panels to their taste.
How to choose foam ceiling panels
- First of all, when purchasing, you should study the geometric shape of the product. The angles must be strictly 90°, the edges of the slabs must be smooth, without wrinkles or rounding. Such selection conditions will make it possible to perform installation where the junction of the edges will be invisible.
- The density and thickness of the ceiling panel should be the same over the entire surface. Crumpling of edges is unacceptable. If you are purchasing a stamped product, then take it by the corner and shake it slightly; if it does not break, it means that the production technology has not been violated.
- The relief on the slab should be the same, and the ornament (pattern) should be clear, without blur.
- Of course, products made by extrusion have the most attractive appearance. However, during operation, their gloss can become very intrusive; such a product is quite capable of “distracting” attention from the main elements of the decor.
- Owners of small kitchens should approach the choice of this material with caution, especially if the room has poor ventilation and there is no exhaust hood. In this case, the warm air emanating from the stove will stagnate under the ceiling, which will lead to grease penetrating into the porous surface of the ceiling panel. After some time, the product will turn yellow and lose its shape.
Calculation of the required number of panels for the ceiling
Material calculations can be done in two ways.
First way
- The surface of the room intended for pasting with panels is drawn on paper. The scale must be maintained here. Since foam ceiling panels are usually mounted from the middle of the ceiling, first you need to draw diagonals. Next, you need to “place” the material with maximum care from the central part to the edges of the room.
- If, when placed near the wall, there is a gap equal to less than half of the slab, then one piece will cover two similar areas. If the gap is more than 25 cm, then you should know that the whole tile will be wasted;
Second way
- The calculation can also be done mathematically, where the length and width of the room are divided by the size of the slabs. For example, there is a room with a width of 4.5 m and a length of 3.8 m, the purchased product has dimensions of 50x50 cm. This means 4.5: 0.5 = 9 tiles, 3.8: 0.5 = 7.6 tiles. The results obtained are multiplied and as a result we get the final amount of material - 68 whole pieces.
- It doesn’t matter which method was used to calculate the cost, you should purchase 10-15% more material. This is necessary in case of an erroneous cutting or deformation of the product, because you don’t really want to run to the store and abandon the repair. In addition, if some time has passed after the acquisition, then it may well be that this collection will no longer be available.
Glue selection
Before attaching foam ceiling panels, it is important to choose the right adhesive.
- These works can be performed using the well-known polyvinyl acetate glue “Bustilat” or, for example, “PVA”. They do not have a repulsive odor, but unfortunately they take a long time to dry. If for some reason the choice fell on such adhesive compositions, then, in order not to stand under the ceiling for 10 minutes carefully supporting the tiles, it is recommended to use safety pins, sticking them carefully at an angle in the corners of the product.
- You can also use universal adhesives such as “Titan”, “Master” or “Eco-naset”. The polymer included in the presented options provides fairly good adhesive properties, but the setting itself takes quite a long time.
- “Moment” stands out against their background, which fully corresponds to its name - it glues instantly. Of course, it is a little more expensive and you need to additionally purchase a construction gun, but it is worth it.
- The thick consistency of Liquid Nails is perfect for these purposes, especially if the surface is not ideal. Here you should read the composition; there should be no solvent among the components.
- You can prepare the adhesive mixture yourself. To do this, you will need a polymer putty (preferably acrylic-based), which is diluted with water until it is as thick as sour cream. At the kneading stage, add a little PVA. It is recommended to mix such a solution in small portions so that it does not have time to harden during the work process.
- It is worth saying that the stamped product is glued easier than tiles made by extrusion.
Methods for arranging foam ceiling panels with photos
Sticking foam plates can occur from the corner - the method is relevant for rooms with ideal parameters, which in itself is rare. If this work is carried out in a typical apartment, then it is likely that the longitudinal seams of the tiles will shift and will be clearly “visible” from the front door.
- The placement can also be diagonal. This option is preferable, because this arrangement allows you to visually enlarge the room. In addition, all the flaws and cut off wedge-shaped parts of the slabs will go to the walls.
- If someone finds the snow-white ceiling too boring and ordinary, then you can stick on multi-colored slabs. For a combination, a pair of compatible shades is selected, or, conversely, a “game” is played on contrasts. Selected products are laid out in the form of a serpentine or chessboard.
- To create an individual project, the panels are painted with acrylic or water-based paint diluted with color. You can paint the entire surface of the ceiling or only selected elements in the required order.
- Sometimes the panels are glued to a frame made of wood or metal; this method is more suitable for curved surfaces. The design allows you to hide communications or create a ceiling of complex shape.
Installation of foam ceiling panels
- Designers advise in any case to start laying the facing material from the chandelier, thereby obtaining a clearly structured pattern in the central part of the ceiling. To do this, you need to draw a straight line from any corner passing through the point at which the main lighting fixture is located. Usually this is a chandelier and, as a rule, it is not located in the center of the room.
- The second line should be drawn perpendicular to the first. This will result in a surface divided into 4 segments.
- But before this, standard organizational work is carried out to prepare the ceiling, including cleaning of the previous coating or peeling putty. Remember, if thin tiles were chosen, dark spots will be visible through them. Therefore, it is better to plaster the surface at least once to give a uniform white color.
- A primer is required, which suppresses the growth of mold and mildew, removes construction dust from the surface, which significantly improves adhesion.
- Next, the ceiling is marked, where perpendicular diagonals are drawn, serving as guides for laying the panels. After carefully checking the accuracy of the angles and the evenness of the lines, you can begin to apply the sticker.
Here you will need a minimum set of tools:
- a mounting, clerical or regular sharpened knife;
- pencil, tape measure;
- soft fabric;
- the tile itself and the glue.
Stages of work
- It doesn’t matter how the slabs will be laid: parallel to the walls, that is, from a corner or from the central part of the ceiling diagonally, remember, the first 2-3 panels determine the appearance of the entire surface. Therefore, special attention should be paid to the correct location of foam products - according to the markings.
- Pay attention to the arrows or embossed inscriptions depicted on the back of the slabs. They indicate the direction in which installation should take place. If there are none, then immediately after opening the package, you need to mark them down yourself, for example, with a simple pencil, but in no case should you use a marker. There are 2 reasons for this: firstly, in daylight the panels will differ significantly in shades - from white to deep gray. This is especially true for smooth products. Secondly, there are often slabs where one of the sides may differ by a fraction of a millimeter, seemingly not much, but when laying 10 elements, it “runs up” up to 0.5 cm. There is no doubt that in the future there will be no need to talk about perfectly even seams. Therefore, if you glue foam panels strictly in one direction, the difference will be unnoticeable either in the work or in the final result.
- As a rule, the glue is applied pointwise along the perimeter of the panels; for more reliable fixation with the adhesive composition, the diagonals of the product can be marked. Afterwards you need to wait a few minutes and only then glue the slab.
- The material itself is quite thin, so pressing should be done not with your fingers, but with your palm. Excess glue is carefully removed with a cloth immediately after installing the slab. Next, the location of the slab is checked; it must be strictly parallel to the marked line. If necessary, the placement of the ceiling panel is adjusted.
- Subsequent panels are mounted in the same way. When laying products from the corner, gluing is carried out in rows. If you have chosen the option where installation begins from the central part of the ceiling, then it is recommended to glue 2 slabs alternately in each segment, that is, in a circle relative to the chandelier. In this case, noticeable displacement of the seams will be avoided.
- When working, it is important to ensure that there is no difference in the height of the product, which is possible due to an excessive or insufficiently thick layer of glue.
- When all the whole slabs are fixed, the distance to the wall is measured and the required part is cut off using a knife. Each panel should be measured separately, since the room often does not have the correct dimensions. If there is a gap of no more than 15 mm between the wall and the whole panel, then it is not necessary to close it; here it will be hidden by the fillet.
- If, after completing the installation of foam plastic ceiling panels with your own hands, you find gaps between the slabs, you should not be upset; here you can mix a little finishing putty and carefully seal the gap with your finger. Excess mixture is removed from the product using a damp sponge.
Such slabs do not require special care. Here it is enough to wipe laminated products with a damp cloth and soapy water from time to time. Other tiles can be vacuumed using a soft attachment. Alcohol will help get rid of greasy stains, and small stains can be easily removed with an eraser.