PVA glue is a popular product in construction, repair, and office work. With its help you can glue any products made of paper, cardboard, it is even suitable for fabric, foam and other lightweight materials.
What can be made from PVA glue in children's creativity? There are a lot of interesting recipes and master classes on making toys and educational crafts. PVA also has a number of other non-standard applications, for example, it is suitable for making paints and varnishes at home.
Main parameters of PVA glue
PVA glue is actively used in everyday life. Thanks to it, you can glue various materials: wood, leather, fabric, paper and others.
The adhesive composition has a number of positive characteristics:
- excellent adhesive ability;
- small consumption rate;
- resistance to temperature changes;
- flexibility of the adhesive seam;
- no toxicity;
- resistance to high humidity;
- low cost.
All these parameters allow you to effectively and variably use glue in various areas of life.
Methods for preparing the mass
The master class for preparing papier-mâché recommends that novice craftsmen use a mixture of glue and paste. The sticky mass cannot be frozen, but can be stored for several days. If the mass releases liquid, you need to squeeze it out and add glue.
Newspapers, toilet paper, and all types of papers that are easily saturated with water are suitable for preparing the mixture. The paste can be stored in the refrigerator, cover the container with cellophane.
| Preparation of the mass | 1. Tear sheets of paper, put them in a small container, and fill them with water. 2. Mix the paper and water thoroughly by hand or with a stationary blender, since it will not be possible to mix evenly with an immersion blender. If you knead by hand, add hot water and leave to soften for 3-4 hours. 3. Take a sieve (colander) and drain the water through it. 4. Mix the adhesive composition (a mixture of glue and paste) into the resulting mass. 5. Finish cooking when the mixture begins to stick to your fingers and looks like plasticine. |
| Preparation of paste | 1. Pour 2 tbsp into water. l. flour and starch (take 3 parts water for 1 part flour), mix in a glass. 2. Bring water to a boil, pour in the resulting mixture. If lumps form, crush them. Wait until it thickens. The density of the paste depends on the amount of flour and starch. 3. Use the mixture after it has cooled to room temperature. |
Snowflakes
Snowflakes made from PVA glue are suitable for decorating windows, rooms, or even a New Year's costume. They will also look good on a Christmas tree.
Stages of work:
- Snowflakes drawn or printed on paper are placed in a plastic file (multifor) or a stationery bag.
- If the bottle of glue has a spout, then trace the contours of the prepared snowflake on the file. If there is no spout, then they resort to using a syringe, doing the same thing.
- When the glue dries, sprinkle the snowflake with multi-colored glitter.
- We remove the craft to dry for 12 hours.
- Carefully peel the dried snowflake off the file.
- If the contours are blurry, you can trim them with scissors.
- Can be glued to glass.
Glitter is used to make the snowflake clearly visible after drying. You can add gouache to the glue, then you don’t have to sprinkle it with glitter - the snowflakes will just turn out colored.
If you turn the snowflake over and do all the work from the back side, the craft will turn out voluminous. It can be hung on a Christmas tree.
Useful tips
The mass of papier-mâché can be stored simply in a plastic bag for the first 5 days. Over the next week and a half, it is better to put the substance in the refrigerator. It is important to pay significant attention to drying the finished product. Since the figurine is made on the basis of paper, that is, a flammable material, it would be a bad idea to keep it near an open fire. In principle, there are instructions for drying in the oven, but this method is still intended for experienced craftsmen.
Papier-mâché will dry well in the open air near a radiator, in the sun, not far from an electric heater, and also in an extinguished heated stove.
If the product is formed from several layers, then it is recommended to dry it several times - approximately every 3-4 layers.
The easiest way to decorate the finished work is by brushing it with a layer of paint - variegated packaging or regular colored paper. A more complex, but also more attractive method is primer. The figurine is first sanded to make it smoother, and then covered with primer. When this layer dries, it can be coated with paints. A thick paper product can be painted with a marker or felt-tip pen, and then decorated with sparkles and rhinestones. It can also be decorated with pieces of fabric, braid or mesh. By the way, throughout the entire process it is preferable to work on a table covered with oilcloth. Since interaction with adhesives will be carried out with bare hands, you will need to prepare a piece of dry cloth for wiping.
Sources
- https://handskill.ru/479225a-pape-mashe-svoimi-rukami-dlya-nachinayuschih-opisanie-tehniki-foto-izdeliy
- https://AlfaLady.org/rukodelie/394-kak-sdelat-pape-mashe.html
- https://daynotes.ru/pap_e_mashe_svoimi_rukami_dlya_nachinayuschih/
- https://handsmake.ru/pape-mashe-master-klass.html
- https://VseProKley.ru/podelki/kak-sdelat-pape-mashe
- https://vplate.ru/pape-mashe/dlya-nachinayushchih/
[collapse]
Animal figurines
Children usually love animal figures, especially bunnies, bears, cats, and dogs. How to make a craft from PVA glue? As easy as pie. Every student learned the papier-mâché technique at school.
To create three-dimensional figures you need plain paper. To begin with, glue is applied liberally to the inflated small ball. The top is covered with paper cut into pieces.
Layers of glue and paper alternate about ten times. Each layer of paper should be allowed to dry slightly before applying the next.
Next, roll the balls and attach them to certain places on the craft, forming paws, ears or a tail. It is better to make the last layer from clean paper and paint the figure with paints.
Painting papier-mâché
To create papier-mâché with your own hands, you can immediately use colored paper or dye newspaper by dipping it in a solution with dye and then letting it dry. But it’s much more interesting to decorate the product yourself with paints.
Paints should be oil-based - this way our creation will look more expensive and brighter. In addition, such paint will protect against external influences and provide additional strength. At the end, the product can be varnished for greater shine.
But if papier-mâché is just fun for children and you don’t want to spend a lot of money, you can always use gouache and not bother too much.
You can paint products in different ways: with a spray bottle, with your fingers, with brushes - the standard method, painting with markers and much more. Everything depends only on your imagination, like everything else in such an activity as papier-mâché. That's why it's so exciting!
Christmas balls
To obtain a neat and beautiful toy, you must follow the technology.
- A balloon with a volume of no more than 10 cm is inflated.
- A needle with a thread threaded is used to pierce the bottle of glue right through so that the fibers of the thread are thoroughly saturated with glue (the needle should be slightly thicker than the thread).
- The ball is wrapped with threads in different directions until the gaps are closed.
- The end of the thread is secured by threading under the previous layers on the ball.
- The craft is left to dry for a long time.
- After complete drying, the ball is pierced and carefully removed.
The result is a light frame made of threads in the shape of a ball. Next, if necessary, tie a ribbon and place the craft on the New Year tree.
Using exactly the same technique described above, you can make toys in the shape of a snowman and animals. To create this simple toy, you don’t need to look for a video of making crafts from PVA glue. The technique is simple. Balls of thread are fastened together to obtain the desired shape, and decorative elements are added.
Specific Recommendations and Cautions
The following recommendations are made:
- In order not to get confused by the number of layers, you can separate them with colored paper. If you plan to make a white craft, finish with 5-6 layers of white paper.
- To prevent material from remaining on your hands while sculpting from the mass, use gloves and wet them periodically with cold water.
Dry the product under normal room conditions. Do not use a hair dryer or place the craft on a radiator. High temperatures can cause cracks.
- You can use any household items as a frame, or you can make it yourself in any shape. To make the base, use plaster or plasticine.
- To paint products, use thick paints: gouache, acrylic.
We recommend watching the video instructions:
Unusual lampshade
Using the technique of making New Year's balls, you can make an unusual lampshade for your home lamp. A ball of the required size is inflated and wrapped in woolen threads.
Placed on a stand (mug or cup) and covered with a layer of PVA glue. After drying, the ball is pierced and removed from the craft through the hole left for the lamp.
Snowman
Stages of making a snowman from PVA glue and cotton wool:
- The cotton wool must be torn into pieces and formed into three balls of different sizes.
- After this, the glue should be mixed with water in a ratio of 2:1. You can add glitter to this mixture if you wish.
- Each ball is covered with an adhesive solution.
- Once dry, the balls are fastened together with glue, forming a head and body. You can make snowman hands out of balls.
- Next, the figure is given a nose from cotton wool and a toothpick, eyes from buttons or beads, and prepared twigs are inserted into the hands if desired.
You can tie a scarf to a snowman by cutting a strip from any fabric. Make a hat on your head from the same fabric or knit it from yarn.
Toys
Making real toys from scrap materials is doubly useful and entertaining. The child will be happy to build a paper ship or a shooting pistol with his own hands, and then find a use for such products in the game, imagining himself as a captain of a ship or a brave soldier.
A boat made of colored paper
Lovers of nautical themes will definitely appreciate the lesson on folding colorful boats. All you need for this is sheets of thick colored paper. Instructions:
- Take an A4 sheet of paper and cut it on one side so that it becomes a square.
- We outline the central lines horizontally and vertically.
- Fold the bottom half of the square in half separately.
- Turn the workpiece over.
- We bend the sides outward towards the line in the center.
- We create the side of the ship by bending the lower squares to the sides and forming triangles from them.
- We move the top of the paper structure to the bottom wall, then bend it upward, leaving a fold along the border of the main part of the vessel.
- Again we narrow the upper parts towards the center, having previously folded the side corners, and open the figure along these lines.
- We unfold the boat from the outside and paint it with multi-colored pens and felt-tip pens.
Shooting gun
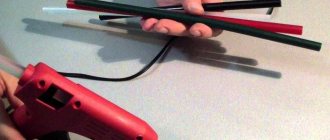
A shooting paper pistol is an unusual craft that every boy would be happy to make. In addition to colored sheets, you will need the following materials and tools: hot glue, thin tape, a ruler, a spring from a ballpoint pen and rubber bands for money. Manufacturing technique:
- We take a sheet and twist it into a tube diagonally, starting from the corner, and secure it with tape so that it does not unwind.
- Making the pipe thicker. To do this, we wind another sheet over the first tube and secure it with tape along the entire length. After this, the tubes should be disconnected.
- Repeat the same steps two more times to get three wide straws.
- We cut them so that the output is: 7 pieces of 5 cm each (for the handle), 2 pieces. 15 cm each (for the trunk) and 1 pc. 8 cm long (for the trigger).
- We make the handle of the gun by gluing short sections diagonally.
- We glue the “trigger” so that its right edge protrudes about 3 cm beyond the handle.
- Glue the remaining 2 tubes 15 cm long on top. The base for the gun is ready.
- Let's move on to assembling the trigger mechanism. To do this, twist two narrow tubes.
- Carefully bend one of them into a U shape and insert one end into the trigger and the other into the outermost tube of the handle. We cut off the excess.
- We use the second to create a safety bracket. We attach the tip to the second handle pipe from the top. And we glue the free edge to the bottom wall of the barrel, preserving space for the trigger.
- We twist the long tube and flatten it. With the resulting strip we paste the handle and trigger guard around the entire perimeter.
- Now we insert a spring into the upper tube of the handle, and then a hook for release.
- You will need another tightly twisted tube. We bend its edge, place several rubber bands on the fold and glue the structure well using a hot-melt gun and tape.
- We place the made part in the lower barrel tube.
- We stretch the elastic band and hook it between the front walls of the tubes.
- Paper weapons are ready! We load it with bullets or balls rolled out of paper and select it at the target!
Acrylic paints
Few people know that PVA glue is excellent for making acrylic paints. Therefore, for those who want to save money, you can use a cheaper option. The resulting mixture is perfect for drawing, as well as for painting crafts made from different materials.
To prepare, you will need to combine PVA glue with gouache. The ingredients must be mixed on a palette in a 1:1 ratio.
Glue gives gouache paints strength and allows them to spread evenly on the work surface. Such paints retain their durability for a long time, unlike gouache.
What you need for work
Work table . You need enough free space for a container with glue, water, paper blanks and the product itself.
Oilcloth, newspapers or plastic film to protect the workplace from splashes of glue and water.
An apron and gloves to protect your clothes and hands from glue.
Paper or cardboard - depending on the chosen method of work.
Glue . The ideal option is PVA. You can use wallpaper glue - you need to dilute it according to the instructions on the package. If you don’t have either one or the other at hand, make a paste. Mix a glass of flour thoroughly with two glasses of water and a teaspoon of salt, put on fire, bring to a boil, stirring regularly and cook for 10 minutes. Cool and the glue is ready.
Form . You will need it if you create the product using the first method - by gluing paper onto the form. Most often, balloons, plates, jars or plasticine blanks are used if the molds at hand are not suitable.
Mixer . You will need it if you have chosen the method of working with paper pulp.
Sand or cookie molds, a knife, a fork are the minimum sculptor’s kit for shaping products made from paper pulp.
Scissors, a punch, a paper cutter, heavy objects - if you are gluing the product under pressure.
Primer for preparing the surface of a product for painting.
Sandpaper for sanding the surface of the product.
Paints and varnish - for coloring the product. Acrylic and oil paints do not necessarily require varnish, but it will add shine to your craft. If you are using unstable watercolors or gouache for coloring, varnish is necessary to protect the color.
A glue gun, fabric glue or epoxy glue is useful for attaching decorative elements to the surface of the product.
Decorations . The product can be decorated with beads, foil, gold leaf, coins, buttons, plant seeds, cereals or coffee beans.
Drawing with PVA glue
Another use for glue is as a canvas for improvisation. Unusual applications bring special interest to the process.
- Instead of a paper sheet, take a lid from a jar and pour PVA glue into it evenly. The glue layer is slightly less than 1 cm.
- Acrylic paints are dripped onto the surface of the glue.
- Using a skewer or toothpick, draw out patterns and create a design.
The technology for creating crafts from PVA glue is quite simple. It does not require large financial costs, and during the manufacturing process you will need a little patience and a flight of imagination.
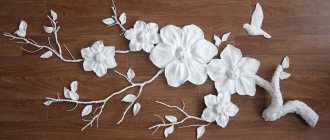
Openwork decorations for flower pots
Butterflies and dragonflies are ideal hot glue crafts for beginners. They are good for training your pistol handling skills. Flower pots are decorated with such insects during the period when plants are not blooming.
To make a butterfly, you need to draw four separate wings, a body and antennae with glue (using a template or freely). Then, with the same glue, all the parts are glued into a single butterfly. It can be painted with acrylic or spray paint, decorated with beads and sparkles. The finished butterfly is pricked onto a wooden skewer. Now it can be planted in a flower pot.