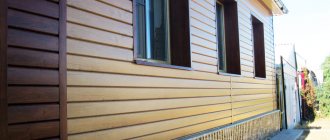
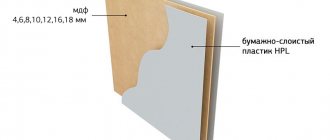
Are you planning to renovate or build a new home and are wondering what kind of exterior finishing you should do? Pay attention to vinyl siding - a very interesting and popular option for facade design. The material is well suited for both an expensive country cottage and a simple country house. However, siding panels alone are not enough for finishing - you will also need other parts, which are called additional elements. And today we will consider one of these elements - the finishing strip for siding.
Finishing strip for siding
Finish siding strip
Finishing strip and other additional elements for siding
First, let's get acquainted with the appearance and functions performed by the finishing strip and other additional siding elements.
Table. Finishing strip and other additional finishing elements with vinyl siding.
| Item name | Why is this element needed? |
Starting bar | Installed at the bottom of the trim and serves as fastener for the first siding panel. The starting strip itself is fixed to the sheathing using self-tapping screws (it is also acceptable to use nails if the frame is made of timber). When connected to the first siding panels, this additional element is usually closed - it will not be visible from the outside. |
Connecting H-bar | Sometimes the length of the walls is longer than the length of the siding panels. In this case, it becomes necessary to increase their length by installing sections of certain sizes. An H-shaped strip is used to seal them tightly with the main siding panels. It is attached to the sheathing on the left and right using self-tapping screws. The outer side of the H-shaped strip after joining with the siding panels remains visible, so the choice of its color should be approached responsibly. |
External corner strip | A strip for joining siding panels on both sides of the outer corner. Conventionally, the product can be divided into visible and invisible parts. The first covers the ends of the vinyl siding panels, the second is used to fasten the plank to the wall. It is desirable that the color of the product be the same as that of all other additional elements. |
Internal corner strip | In its design and function, this additional element is similar to the previous one, but is used not for external, but for internal corners of the house. |
J-bar | This additional element is intended for edging and giving a finished look to window and door openings in the house. Also, J-shaped strip is used in some cases for gable edging. |
Window strip | In some cases, the windows in the house are “recessed” into the opening. To finish them in such situations, a window strip is used, which plays the role of a slope. |
Finish bar | It is used when finishing a house using siding to hermetically fasten panels in a horizontal position. The finishing strip is installed under the roof eaves. Also sometimes used to secure window trims when working with openings. |
Drain plate | Installed above the walls of the house, it allows rainwater to drain to the ground without moisture getting on the siding panels. |
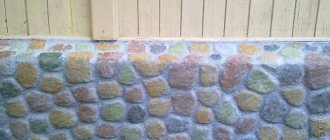
Hinged bar | This additional element is fixed at the bottom of the finish if the house has a protruding base. The hinged bar closes it and protects it from moisture. |
Soffit | Used to cover the inside of the cornice. As a rule, some of the soffit strips are perforated for the purpose of ventilation and to prevent the formation of condensation and dampness. |
Important! Corner external siding strips can be used not only at the corners of the house, but also at the junction of wall trim and window openings.
In the figure you can see the main dimensions of the most important additional elements for siding
All additional elements for siding, their appearance and location in the exterior of the house
How much do you need to buy
In order not to overpay extra money and not to purchase excess material, before installing the siding, you should make accurate calculations of the quantity of each element, including the J-profile. It’s easy to calculate: if you plan to use it only to design window openings, then calculate the perimeter of each window and each door, sum up all the resulting numbers and take so many meters of profile to cover all the perimeters. The number of parts can be easily calculated by dividing the final figure by the length of one profile.
Window opening measurement
If a soffit is installed, then the sum of the side lengths of the soffit is added to the resulting figure after calculating the sum of the perimeters.
If you plan to use the J-profile also on the end parts of the house and roof gables, then additionally measure the lengths of both sides of the gable, as well as the height of the wall to the roof from each corner. For one corner of the house, instead of one special corner profile, two J-profiles are used. That is, as a result, double the number of J profiles goes to the ends of the house.
The J-profile is attached to the walls using nails or self-tapping screws. At the same time, to install 100 m2 of siding panels, quite a lot of them are consumed - about 1600 pieces. The same fasteners are used to fasten the J-profile. In this case, nails should be purchased with a head of about 8 mm and a length of at least 40 mm, and self-tapping screws should be purchased with a head of at least 25 cm and a head diameter of 8 mm.
Installation of siding panels
Basic rules for transporting and storing finishing strips and other additional elements
The durability and attractive appearance of siding trim directly depends on the quality and condition of the panels and additional elements. Before installation, you will be able to preserve them in the same form in which they arrived from production if you follow the rules of transportation and storage. So let's get to know them. First, let's look at the basic provisions that must be observed when transporting siding panels, finishing strips and all additional elements.
- It is advisable to use covered transport to transport the finishing strip and other siding parts.
- The length of the body of the vehicle used must correspond to the length of the siding panels and additional elements - they should not hang outward.
An example of what not to do
- Transportation of finishing elements without packaging is undesirable. If for some reason it is not there, then the panels and additional elements must be laid face up, placing fabric or thick polyethylene between the individual parts.
- When loading all parts of the siding trim into the back of a truck, the following order must be observed: panels should be at the bottom, and finishing strips and other additional elements should be at the top.
- After loading the package with siding panels and other parts, be sure to secure them well to prevent them from moving in the body during transportation.
- When transporting siding panels and finishing strips, the temperature in transport should not fall below -50°C or rise above +50°C.
Suitable body for transporting finishing strips and other additional elements
Similar requirements apply to the storage location of the finishing strip and other parts of the siding trim.
- The place for storing the finishing strip should be covered - direct sunlight on products for siding finishing is undesirable.
- Also, stored panels and additional elements should not be exposed to precipitation.
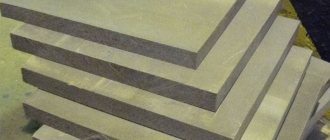
- During long-term storage, the finishing strip and other parts should be placed on wooden pallets.
Base siding panels and accessories for them are supplied in original boxes made of durable corrugated cardboard
- In the room where the finishing strips are located, the temperature should be in the range from -35°C to +50°C. Permissible humidity – no more than 60% and no less than 40%.
- Vinyl siding should not be located near stoves, radiators or other heat sources.
- Packages with panels, finishing strips and additional elements should be placed no more than 5-10 in a stack.
- It is unacceptable to store additional elements and siding panels by installing them “on the butt”.
- It is prohibited to bend or throw packages with finishing strips and other finishing parts.
Storing siding trim elements
Important! Separately, it is worth saying that when carrying and working with finishing panels in low temperatures, you need to be careful - vinyl becomes more fragile and brittle, therefore the risk of damaging finishing elements increases significantly.
DIY home decoration
Professionals in the field of building cladding will complete the work much faster than the average person, but it is so interesting to try your hand at all areas of construction, especially if the house was built with your own hands.
Installation of siding begins with the preparatory stage, namely cleaning the walls from overhanging elements. Everything needs to be removed - drainpipes, trim, shutters. Then precise markings are made according to the building level and the building is sheathed using a thin beam. They are attached to a wooden house with self-tapping screws, to a brick or stone house using a hammer drill using dowels.
After this, the rest are attached - in the corners and for cashing doors and windows, you need to set the j option. In this case, it is necessary to leave a small distance to the lower and upper edges of the building, since the profiles can be cooled or heated and either shrink or expand due to temperature changes. If the latter happens and the product rests on a hard surface, then it may crack and burst, and this will lead to deformation of the entire cladding. It is better to fasten the profile to the wooden casing with press washers, since when using nails, a hammer can also damage the material. They need to be slightly loosened so that the gap allows the product to move easily when the temperature changes.
The correct installation of j profiles for doors and windows is as follows: first attach the vertical strips and only then the horizontal ones. At both ends, the upper material is bent and placed on the vertical ones.
All preparatory work has been completed and only now the installation of siding panels begins. First the bottom one, which will close the starting profile, and then the subsequent ones. They are inserted into the products and snap securely, and are also fixed with press washers. One of them is pushed into the oval slots of the panel in its center, which is also not screwed in, as in the case of fastening profiles.
The j type is mounted under the roof slopes, and the starting type is mounted on the eaves. Work continues, as with the cladding of the house itself. The panels can be overlapped, but it is better to use an H profile.
Tools needed to work with finishing siding strip
Before you begin installing siding and finishing strips, you need to prepare not only the materials, but also the tools to work with them. All of them are shown in the table below.
Table. Tools needed to work with siding panels and trim strips.
| Tool name | Why is it needed? |
Construction plumb line and nylon rope | To control the vertical evenness of walls. Without these tools, it is impossible to make high-quality sheathing for siding and finishing strips. |
| Level | To control the position of certain elements of sheathing and finishing horizontally and vertically. |
| Roulette and ruler | To measure length and distance |
| Metal scissors | For cutting metal sheathing profiles for siding |
Fine-tooth hacksaw | For cutting vinyl siding and its additional elements, including trim strips |
| Hammer pliers | For punching holes in siding panels for their installation and fixation with the finishing strip. |
Hammer | For driving dowels and adjusting some parts |
Hammer | For drilling holes in the wall for dowels that hold the sheathing in place |
Screwdriver | For tightening self-tapping screws when installing finishing strips and other finishing elements |
Screwdriver | For additional tightening or, conversely, unscrewing screws when installing the finishing strip |
Prices for popular hammer drill models
Hammers
Important! When performing construction work, do not forget about personal protective equipment - goggles and gloves. Be sure to use them when cutting metal and drilling walls when installing siding.
Safety glasses and gloves
Video - Installation of finishing siding strip
How to make lathing for siding with your own hands
One of the most popular facade finishing options today is siding. The quality and durability of such finishing is ensured not only by the use of good material, but also by the presence of a strong and reliable frame. Do you want to gain basic knowledge on how to make your own siding sheathing? Then check out this article.
Installation of J-profiles on gables
Let's consider how this element will be installed on a gable roof. A gable roof is the same gable roof that is familiar to us. In houses with such roofs, the walls often smoothly transition into gable walls. Therefore, the pediment of such a structure is often called a gable.
Tong
Usually, installing a profile in this case is not difficult, but in general terms the installation process is worth describing. Particularly difficult here is the junction of two profile parts at the ridge of the roof - the angle here will not necessarily be 45 degrees. On the contrary, he is more likely to be stupid.
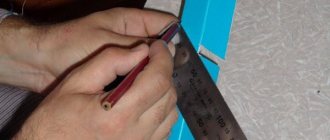
In order not to make mistakes when cutting the J-profile, prepare a joint template from two unnecessary profile trims. One of them is applied in the area of the roof ridge, and then the second piece is placed closely under the roof overhang. On the first section of the J-profile, mark the roof slope line with a marker. The template is cut as indicated in the diagram.
Installing the J-profile on the tong
Next, according to the prepared pattern, a section of the J-profile is measured, which will then be used on the left side of the roof. Place the template at a 90-degree angle, face up, on a section of the J-element and make a mark, then cut off the excess completely along the drawn line.
Turning the homemade template face down, mark the second segment of the J-element. Once trimmed, it will be installed on the right side of the roof.
The resulting sections of profiles are joined and secured to the wall using self-tapping screws, the first of which is screwed into the top point of the uppermost hole for fasteners. Other screws are screwed into the central part of the nail socket. The pitch between fasteners is about 25-30 cm.
The siding must be fastened in the center of a special hole.
Installing siding on the gable
Installing the finishing strip for siding under the eaves - step-by-step instructions
We will describe the process of installing the finishing strip for siding in the form of step-by-step instructions.
Step 1. Prepare the walls of the house for installation of sheathing and siding - get rid of old paint and plaster, remove all protruding elements.
Step 2. Form a smooth and strong sheathing from a wooden beam or metal profile on the surface of the walls.
Step 3. Insulate the walls of the house with mineral wool. Place it between the sheathing elements and secure it with disc-shaped dowels. Stretch a steam and windproof film over the insulation on top.
Step 4. Proceed with the siding installation process itself - install the starter, corner and H-shaped strips, and begin laying the panels themselves between them.
Installation of siding panels
Step 5. Start installing the finishing strip after installing the penultimate panel. Determine how many pieces of this additional element you will need and what their length should be. Cut using a fine-toothed hacksaw.
Finish bar
Step 6. Go under the eaves along with one of the sections of the finishing strip and install it there so that the surface with the mounting holes is facing down, the lock for the siding panel is facing up.
Fastening a piece of finishing strip
Important! For your own safety and ease of work, install the finishing strip for siding on a stepladder, or, even better, on scaffolding.
Step 7: Secure the finish strip in place using screws or nails. Fasteners must have an anti-corrosion coating or be made of appropriate materials. Wrap screws and nails in the middle of the holes made on the finishing strip. They are necessary to compensate for the longitudinal expansion and contraction of the additional element when the temperature changes. The interval between fasteners should be from 3 to 5 such holes.
The finishing strip is screwed on with self-tapping screws
INSTALLING AN OUTER (INTERNAL) CORNER
- Fix the corner profile on both walls, stepping back from the overhang (soffit) 1-4 mm.
- Align and secure the strip with self-tapping screws, maintaining a pitch of 200-400 mm. Please note that the bottom edge should be 4-6mm below the edge of the starting strip.
- If the length of the corner element is not sufficient in height, it is necessary to install the next plank with an overlap (25 mm), cutting the perforated part of the plank so that the distance between the elements is 5 mm.
- Arrangement of oblique angles occurs due to the opening or narrowing of the strip.
Cornice and pediment overhangs and their purpose
Depending on the shape of the roof of the house, roof outlets can be implemented both in the eaves area (hip and hipped structures) and on the gable side (gable roofs).
The eaves overhang is formed by a rafter system that protrudes relative to the walls of the house at a certain distance. Its value is determined by the project or can be set at the request of the developer. If there are additional vertical supports, the eaves outlet can serve as a canopy over the porch or a small veranda.
The gable overhang is made from the end (side) side of the building. Its optimal width is 60-70 cm, the minimum is 30, the maximum is no more than 100 cm. The carrier for the outlet is the roof sheathing, so it is not recommended to make it too wide.
Roof extension options: on the left - cornice, on the right - pediment
In both cases, overhangs serve not only as a decorative finishing element for finishing the house, but also protect the walls, base and foundation of the building from excessive wetting. This point is especially important when using plaster as a façade material, which is more sensitive to moisture. Therefore, it is necessary to hem the gables and cornices under the roof. Otherwise, the protruding part of the roofing “pie” becomes vulnerable to rain and wind. Exposed wood construction and insulation may deteriorate. Strong gusts of wind in an unprotected place can weaken the roofing fasteners or completely tear off the material. Proper finishing of the overhanging part of the roof does not require further maintenance over a long period of operation.
Types of cornice filing
In accordance with the architectural preferences of the developer, the installation of roof lining along the eaves can be done in two ways.
- Along the rafter system (without box)
- Perpendicular to the wall of the house.
In the first case, the rafter legs extending beyond the walls are lined from the inside with lathing for further decoration of the overhang with boards or soffits. Thus, it looks more aesthetically pleasing due to the natural continuation of the roof.
Option for hemming along rafters
But this method is not always convenient, because... Most specialized finishing materials and components are made for the horizontal finishing option, where the roof overhang and the wall are located perpendicular (at an angle of 90 degrees) to each other. To do this, a special box is mounted, onto which finishing material is subsequently stuffed.
Roof release with box
In the photo on the left, the cornice box ends flush with the wall, and on the right it continues to the gable projection.