Often you have to look for ways to repair parquet floors without using heavy-duty methods such as re-laying and sanding and scraping. Most often, there is simply no need for this, since parquet boards, with proper care, retain the quality of their installation. Therefore, a more competent solution would be to renew the old parquet without sanding. In this case, the volume of work is less, and the time required to complete the restoration is reduced significantly.
Most of the work will have to be done manually
Do-it-yourself parquet repair and restoration
For a long time, parquet has been considered one of the most expensive materials for floor finishing, since natural wood is used for its production. Properly laid parquet looks aesthetically pleasing and attractive, and its service life is significantly longer than that of other coatings. The question often arises: how to keep parquet in perfect condition? Parquet repairs will not have to be carried out frequently if you constantly take care of the coating and eliminate them when defects appear.
If the installation of parquet was done correctly, then this coating can last for many years.
Eliminating squeaks
One of the disadvantages of parquet flooring is the appearance of squeaks that occur when moving. If the floor creaks, there may be several reasons for this: either during installation the individual planks were not secured well enough, or over time the planks have become deformed and do not fit tightly to the base and make a corresponding sound when stepped on.
To quickly repair a squeaking floor, you must first find the place that responds to movement with a squeak. The easiest way to eliminate squeaking is to screw a screw into the parquet panel to a depth of no more than 5 cm. If the parquet is attached to the base using mastic, then you need to use a hair dryer and heat the “creaky” place. After this, the parquet strip should be pressed down with something heavy. Once the floor has cooled, the squeaks should disappear.
If the base for the parquet board is plywood, then the parquet panel must be attached to the base using a pneumatic gun. You can also drill a hole at a 45-degree angle between the parquet planks and insert a wooden dowel soaked in wood glue into it.
Basic types of do-it-yourself parquet restoration
Before raising the issue of restoring parquet boards or parquet, you must first analyze the condition of the floor covering and, if specific problems are identified, make a decision on the need for repairs. To do this, you should think through the main stages of the work, approximately calculate the waste, so that during the repair process you do not encounter the problem of a lack of funds. Only after a preliminary assessment can work begin.
Before restoring the coating, it is necessary to assess its condition.
Depending on the degree of complexity of parquet repair and restoration, the work carried out can be divided into 3 types:
- Major renovation. It is carried out mainly after the expiration of the warranty period of the floor covering and in the event that the cost of restoring the parquet will be higher than the cost of a major replacement of the boards.
- Average renovation. It is planned when obvious defects have appeared on the floor that require elimination, for example, a change in the color of the surface, the appearance of stains, the mobility of some elements or squeaking when pressed. The work consists of replacing parquet or restoring individual tiles of the coating.
- Routine repair of parquet floors. This measure is more likely to be preventive; it allows you to postpone major repairs for a long time.
Note! Parquet is one of the most stable coatings. With proper operation and timely repairs and maintenance, it can last for several decades. Moreover, most of the restoration work can be performed locally.
Repairs of average complexity include general restoration of parquet or replacement of individual boards.
What are the defects?
In some cases, surface renovation is carried out simply after a certain period of time. Typically, such work takes place simultaneously with the change of other coverings - wallpaper, ceiling installation or others designed to improve the appearance of the room. However, sometimes it is necessary to carry out repairs due to the appearance of certain defects. For example:
- The creaking of dried floorboards of the base, if it is made of wood.
- Deformation of floor elements and the appearance of cracks due to this.
- Subsidence of the surface due to improper preparation of the base for the coating.
- Swelling of the plane due to a sudden change in humidity in the room.
- The plane loses its color, spots or duller areas appear.
- Mechanical defects.
All these shortcomings can be eliminated yourself if you do everything carefully and don’t rush anywhere.
It is important to remember that repairs in the case of parquet boards are almost always possible and they can cost less than a complete replacement of the coating or its components
The main reasons why parquet floors lose their appearance
The need to repair and restore parquet will arise sooner or later in any case, and the main reason here is constant and long-term operation. After all, people not only walk on parquet flooring in house shoes, they also move furniture on it and damage the flooring with sharp heels or rough soles. Other causes of defects include:
- Constant excess humidity. Wood is distinguished by its ability to swell when wet, the same applies to wooden parquet blocks. If this is a basement floor and a special waterproofing layer is not laid under the parquet, then the coating will sooner or later swell and walking will be accompanied by squeaking.
- Excessively dry air. Constant high temperature in the room causes the wooden elements to dry out, which is likely to cause deformation and distortion of the base.
- Improper cleaning. Frequently carried out wet cleaning with a regular mop or steam cleaner leads to the accumulation and retention of liquid in the crevices, which can cause the wood to rot.
- No processing. If the purchased parquet has not been pre-treated with special agents that prevent the growth of fungus or wood pests, then such a floor will quickly become unusable, even with proper care.
Parquet flooring can deteriorate due to high humidity or excessive dryness in the room.
Among the main reasons why you will have to repair parquet boards is surface discoloration. This happens mainly due to the use of unsuitable detergents, excess moisture or the ingress of aggressive chemicals, such as ammonia. The main problems also include:
- Appearance of cracks. The main reason is considered to be dry air, which often occurs in winter with active use of heating devices. The preferred humidity in a room with parquet is 40-50%.
- Blistering of boards. It is formed due to the accumulation of water under the surface of the board or due to improper repair of the parquet after the room has been flooded.
- Lack of heat resistance. Associated with improper installation of insulation or poor processing of joints, and can also be caused by insufficient preparation of the base.
- Displacement of boards when walking. It occurs due to a violation of the screed technology, the absence of a soil layer or the formation of mold on the inside of the boards.
- Peeling of parquet from the base. The problem occurs when there are uneven surfaces on the floor, due to uneven application of the adhesive mixture, as well as when the dies are incorrectly attached to the wooden base.
- Gaps between boards. The main reason for the appearance is the use of too wet material.
- Glue protrusion. Occurs as a result of applying a very thick layer, improper laying of boards or due to incorrectly sized sheets.
- Scratches and dirt. This happens mainly when the floor covering is not used carefully.
The appearance of defects on the parquet may be the result of improper cleaning.
The most common problem that causes the need to replace parquet is subsidence of the floor, which occurs due to the destruction of the screed under heavy load.
Dry cleaning
Parquet flooring should be cleaned without any noticeable stains, without resorting to detergents. This type of cleaning should be carried out as often and regularly as possible. This is done with a regular mop with a soft attachment, which collects particles of debris and accumulated dust.
You can also resort to using a vacuum cleaner. Some manufacturers equip devices with special attachments. The most common brand is Karcher. The price tag for such a unit is quite significant, however, if you want to preserve the coating for a long time, this is the right investment.
Preparing the premises for the main types of repair and restoration of parquet flooring
Any repair or restoration of parquet in an apartment should begin with preparing the room. To do this, you need to remove all furniture and interior items from the room. If you replace the boards locally, you can repair the parquet without removing the furniture, but in any case it is better to cover it with film to protect it from dust settling. During a major replacement, you should completely vacate the room, because any type of repair will be accompanied by dusty work, especially if you need to adjust the boards to size using a jigsaw.
It is also better to immediately identify all damage; you can even outline them with chalk so that during the repair process you do not miss defective areas. After assessing the condition of the coating, you should make sure that you have some tools, especially if you will be restoring the parquet yourself. These include:
- surface grinder or parquet sander;
- angle grinding;
- cycle;
- sandpaper with varying degrees of abrasiveness;
- vacuum cleaner;
- chisel and plane;
- jigsaw;
- putty for wooden structures;
- finishing coating, which includes varnish, wax or oil.
After assessing the condition of the parquet and determining the type of restoration, you need to stock up on all the necessary tools.
We should not forget about personal protective equipment, because some types of work should be carried out with gloves, and when using a jigsaw, it is recommended to cover your eyes with safety glasses.
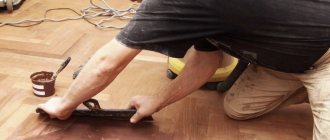
Replacing damaged parquet boards
It will be more difficult to cope with such work on your own, since it requires special equipment and experience. Local replacement of damaged coating is carried out in the following order:
To work, you will need a hammer, chisel, vacuum cleaner and circular saw. The saw blade should be a millimeter less than the thickness of the board. We cover the lower part of the circular saw with construction tape so as not to damage the floor covering. We do the same with the parquet boards lying around the perimeter of the place where the parquet flooring will be replaced. We connect the vacuum cleaner to a circular saw and saw through the damaged die around the perimeter. We also make several longitudinal cuts in the central part and several cuts across. Using a hammer and chisel, remove the damaged die. Work carefully so as not to damage the surrounding floor covering. The outermost part of the element usually comes off on its own, so you won’t have any difficulties removing it. After this, thoroughly clean the base from any remaining adhesive mixture and vacuum it. Prepare the new element by cutting it exactly to size. From one longitudinal side and from one end it is necessary to carefully cut off the fastening tenon. To do this we use a circular saw. To glue a new board, use a two-component polyurethane-based adhesive. It is the most reliable and durable. Using a notched trowel, apply the glue evenly to the base. Next, we lay the new parquet flooring so that the tongue of the already laid element, which we saved when removing the damaged coating, fits into its groove.
We snap the lock, and lower the rest of the element onto the base. The die is loaded with something heavy on top, with a protective pad placed so as not to damage the coating. If the parquet flooring is not chamfered, then pay special attention to the place where it meets the old coating. If it sticks out a little, take a heavier load
For elements with a chamfer, this is not necessary, since the chamfer hides a small difference in height.
You can see one of the ways to replace a damaged element in the proposed video:
https://youtube.com/watch?v=PRd_0tdEdBg
Spot repair of old parquet: eliminating cracks and restoring loose boards
The cost of parquet repair will primarily depend on the extent of the damage. Often, local replacement of some elements will cost a little less than a major overhaul, because it will be necessary to fit new parts to those already installed. The duration of operation of the floor covering without additional measures is influenced by the quality of local work.
The most common reason for minor parquet repairs is the appearance of cracks due to loosening of the planks. This problem is relevant due to the fact that wood is a capricious material, which is characterized by swelling and shrinking. Therefore, preventing the occurrence of cracks is considered a rather difficult task, since it is not always possible to maintain constant humidity and temperature in the room.
On a note! When large gaps appear, the first thing you need to do is pull the planks together and place a piece of wood in the free space, which will be enough to close the gap. If there are a lot of cracks, it is better to completely lift the covering and lay it again. You need to be prepared for the fact that some of the planks will need to be replaced.
Local restoration of parquet will cost much less than major repairs.
It is recommended to take into account that if, when loosened, only a certain number of planks are replaced, there is no guarantee that over time the same defect will not occur in another part of the floor. Step-by-step instructions for repairing parquet with your own hands:
- Using a chisel, remove any loose dies. If the element does not come out well, you can try to split the part with a sharp end by inserting a chisel parallel to the fiber structure. After splitting, the element is taken out in parts.
- Remove the remaining adhesive mixture and clean the base on which the removed boards were located.
- If strong unevenness occurs, use putty.
- Remove the side edges from the dies requiring replacement and level the ends using a plane.
- Sometimes, in order to install several strips, the parts adjacent to them are also replaced.
In some cases, when replacing several elements, the picture is assembled separately and then placed in its entirety in the resulting space. At the same time, it is necessary that the details match perfectly with the rest of the parquet in pattern and color and fit into the overall picture. When replacing individual parquet boards, you can use special glue or bitumen mastic, which requires heating before use.
Parquet blocks that are loose are removed using a chisel.
After a certain section of parquet has been replaced, a weight should be placed on top. In this case, it is necessary to additionally capture small areas located next to the long-glued elements. If there are glue residues on the sides of the edges, they must be removed immediately, because after drying it will be impossible to remove the glue without leaving traces.
When the boards adhere tightly to the base and the glue is completely dry, restoration work will need to be carried out. To do this, you need to clean the treated area with sandpaper, then remove the dust and cover the new parquet with varnish, oil, mastic, or the same composition that was used to treat the entire surface.
Restore original shine and beauty
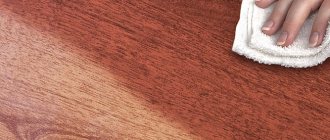
Renewing parquet without sanding is not as difficult as it might seem at first glance. Before starting work, it is worth understanding what the reasons for such deviations lie. Most often, it is improper care that leads to scratches appearing and the coating losing its former appearance. To avoid repeated defects after restoration, you need to follow simple operating rules:
It is worth treating the entire area with wax or special means once every four weeks.
More attention is paid to places with active movement of people. There are special spray varnishes. They are suitable for those areas where burrs have already appeared. There are products to restore shine - they can be used once every 14 days. When the parquet board is not too thick, maintenance should not be wet
Or you can use oil or wax as a base - this composition helps it last longer. Treatment - once every two weeks.
If you follow these rules and perform basic care procedures, the service life will double. Those people who choose this particular finishing coating must understand how it is done.
How to get rid of squeaks and other problems that require restoration of old parquet
The problem of a creaking floor is familiar to many, because it is considered one of the most common; it arises due to the friction of the planks relative to each other under the influence of weight. In this case, you can try to repair the parquet yourself using any type of fastener. These can be screws, self-tapping screws or other options screwed flush with the coating. After screwing in the element, the installation site is hidden using putty of the desired color.
Another reason for unpleasant sounds is the separation of the floor covering from the base. Here, an important task is to return the boards to their original position.
In some cases, in order to eliminate the squeak, you will have to completely or partially remove the parquet.
To repair creaking parquet flooring you may need:
- self-tapping screws, with the help of which individual strips are tightened to the base;
- an adhesive mixture injected into the gap between the slats using a syringe or syringe with a thin plastic tip;
- Polyurethane foam, due to its strong swelling, is recommended for use least often.
The most expensive parquet repair will involve complete or partial dismantling of the planks, after which they are re-installed, and the most unsuitable parts are either adjusted or replaced with new ones.
The third reason for the friction of the boards against each other is considered to be a violation of the technique of laying the dies and an incorrectly calculated distance between them. In this case, local repairs of the parquet are not allowed, because in any case it will be necessary to completely remove all elements, as well as move the logs, after which the coating will be laid again.
On a note! If one joist moves during assembly, do not lift the entire parquet completely. It is necessary to disassemble the adjacent part of the covering, use a hammer to knock the joist into place, and then reinstall the parquet.
If some parquet tiles have peeled off, you can fix the problem using self-tapping screws and a screwdriver.
In addition to the reasons listed, creaking sounds can also be caused by the absence of an expansion joint, which should be located between the edge of the parquet and the wall. In order to properly make a seam, after laying it is necessary to cut off part of the covering to form a small gap, the optimal size of which is 1-1.5 cm. There are other reasons why it may be necessary to repair panel parquet or conventional plank covering.
The appearance of a difference between shields or individual elements. In this case, it is necessary to sort out a significant area, because the cause of the violation may be deformation of the base. If a step of small height has formed, you can try to raise the protruding planks, cut off part of the coating at the base, or sand it.
Darkening of the surface. The main reason why old parquet has to be restored is considered to be the contact of aggressive chemicals on the surface, which quickly penetrate deep into the wood. Another reason is the wrong type of tinting or other coating. In this case, the only option for parquet repair is scraping and sanding, after which varnish, tonic or an oil-wax mixture is applied.
Eliminating the squeak
Most often, you have to deal with just such a defect. There are several ways to get rid of this scourge and each of them solves a specific problem:
- If the cause of the creaking is the planks touching the wall, getting rid of the unpleasant sounds is quite simple: you just need to remove and slightly trim the parts touching the wall.
- In cases where the creaking is heard due to neighboring coating elements rubbing against each other, you need to determine the point from which the sound comes and mark it in an accessible way. After this, the creaking area is treated with a special lubricant or the familiar WD-40 compound, which can eliminate the problem. Lubricant must be injected using a syringe with a needle or other similar instrument.
- The most difficult case will be a squeak due to improper preparation of the base. You will have to disassemble the entire surface, remove any unevenness by sanding, and then reassemble everything again.
- Sometimes the cause of such unpleasant sounds is loose screws. They need to be unscrewed and replaced with new ones, screwed in again, after first cleaning the existing holes from various contaminants.
The squeaking problem is the most serious and common one. There are many ways to solve it and you can combine different methods to get the best result. For example, you can disassemble not the entire plane, but only part of it, replacing damaged or deformed parts, and then treat all joints with lubricant.
What is the restoration of parquet after flooding?
Exposure to large amounts of water on parquet is considered one of the destructive factors, because wood is a natural material, and moisture almost instantly enters the pores and microcracks. As a result of flooding, the boards not only swell, but also lose their shape and their structure is disrupted. In addition, other problems arise:
If the parquet is flooded, you need to quickly remove the liquid and dry the coating, for example, with a hairdryer.
- blackening of the coating;
- development of fungus and mold;
- formation of cracks, differences or chips;
- warping and swelling;
- change in color of seams and joints.
To avoid having to carry out a major overhaul of the entire floor covering, you should try to remove and saturate all moisture as quickly as possible, using fans, heat guns or any other methods. In this case, the cost of repairing parquet after flooding will directly depend on the wet area, as well as on what kind of base was used to lay the covering.
If local swelling occurs, you can try to dry the area with a regular hairdryer, which will melt the mastic. The appearance of the smell of mastic indicates that you can try to return the parquet to its original place, after which you need to evenly distribute the load not only over the restored area, but also grab at least a meter on each side.
Note! In a situation where minor flooding has occurred, but the water has spread over the entire floor area, everything will depend on the speed of response. If you immediately begin to dry the surface and get rid of moisture, there is a high probability that swelling and re-laying of the floor will be avoided. If the floor was seriously flooded, major repairs cannot be avoided.
The consequence of the flood may be the appearance of mold and mildew, as well as a change in the color of the coating.
If, as a result of flooding and soaking, the planks have become detached from the base, you should immediately prepare to replace the covering with a new one. If individual dies that remain firmly attached to the surface are deformed, you can try to carry out restoration work.
When repairing parquet (consumer reviews contain such information), you can encounter situations where, after pouring, the parquet dries on its own in 3-7 days, takes on its previous appearance, and the planks take their original position. Therefore, you should not immediately begin major repairs. In any case, if you make a complete replacement, it is quite possible to wait a few days.
If the parquet boards have dried well, but still do not take their place or remain swollen, you will need to perform a complete overlap. After replacing the damaged area, the parquet is sanded using a sanding machine, after which the damaged area is sanded and re-varnished. You also need to take into account that even if a little more than 30% of the floor covering has been damaged, experts will still recommend performing a complete covering. In some cases, the cost of repairing parquet per m2 of damaged area may be higher than the cost of laying new parquet per square meter.
Terms of work
| up to 20 m2 | 20-30 m2 | 30-50 m2 | 50-70 m2 | from 100 m2 |
| 1 day | 2 days | 3 days | 4 days | from 5 days |
Sources
- https://remontami.ru/kak-obnovit-staryj-parket/
- https://fb.ru/article/282007/kak-snyat-staryiy-parket-kak-vosstanovit-staryiy-parket
- https://bouw.ru/article/obnovlenie-parketnoy-doski-svoimi-rukami
- https://www.parkett-service.ru/parketnye-raboty/remont-i-restavracia-parketa/
- https://remoskop.ru/vosstanovlenie-starogo-parketa-svoimi-rukami.html
- https://parketovo.ru/uslugi/restavraciya-parketa/
- https://LaminatePol.ru/9648-obnovlenie-parketnoy-doski.html
- https://PolProfy.ru/pokrytiya/parket/restavraciya-parketa.html
Features of parquet repair without sanding
After laying parquet or parquet boards, scratches are inevitable, because the floor is constantly damaged by shoes, furniture legs, animal claws, as a result of children's games or when heavy objects fall onto the surface. In some cases, you can try to restore the parquet without sanding, using a retouching pencil or putty that matches the color of the main coating. If the area is small, you can do without sanding and using varnish.
If the defect is minor, you can use a special putty or pencil.
Damage and scratches from the boards are removed using cosmetic putty, which is applied using an ordinary thin spatula. Finding the right color is not difficult, because retail establishments offer a wide selection of materials.
On a note! The second name for parquet putty is restoration paste. If you can’t find the desired option on store shelves, you can try making the paste yourself.
To make decorative putty, you need to mix crushed sawdust and epoxy varnish in a ratio of 1:4. After this, the required amount of dye is added to the mixture. The finished paste is applied to the damaged area, which is then treated with fine sandpaper.
Sometimes, after restoring oak parquet, in order to create a complete picture, it will be necessary to imitate joints in some areas using an ordinary awl and a metal ruler. Work should be carried out when the restoration paste is partially dry; it should not be very hard, but it should not stretch. Step-by-step instructions for repairing parquet with your own hands:
Cosmetic putty is applied to the damaged area using a spatula.
- Using a ruler applied at the end, make a small indentation at the joint.
- Using an awl, apply the end false joints along the attached ruler.
The final stage of such a restoration is considered to be varnishing the parquet. It is appropriate to use any type of varnish here: alkyd, epoxy, acrylic or water-based. Before using the composition, it is recommended to study the application features specified in the instructions. You also need to take into account that to obtain a perfectly smooth surface you will need to apply at least 2-3 layers of varnish. After the varnish has completely dried, to obtain a better result, it is recommended to rub the surface with mastic, after which the restoration of the old parquet with your own hands without sanding is considered complete.
Repair and restoration of parquet: sanding, sanding, how these types of work differ
Sanding is the process of leveling the surface of the floor covering by removing the worn layer from the parquet using a cutting tool. By grinding we mean almost the same process, only in this case the surface layer is removed by using an abrasive material.
Today, the processes are considered almost identical, which is due to the frequent use of machine scraping, which requires the use of an abrasive material. Parquet repair (grinding or sanding) is carried out using various equipment, the selection of which takes into account the following factors:
Using scraping, the top old and damaged layer of the coating is removed.
- Scale of work. Sanding and restoration of parquet are carried out if it is necessary to process a small area and are mainly carried out using hand tools. If you need to organize work over a large area, it is better to use a grinder.
- The original state of the parquet before renovation. If the coating is in a disrepair, repairing the floor yourself using hand tools will be quite time-consuming, but a sander will help to significantly reduce not only time, but also labor costs.
- Performer experience. Parquet repair (scraping) is often performed by people who do not have much experience working with sanding machines. Professional craftsmen rarely use hand tools during the repair process.
On a note! If you want to repair the old parquet flooring in your apartment faster with your own hands, you don’t have to immediately buy a sanding machine, because it is not only expensive, but also quite expensive to maintain. The best option in this case is to rent the device for the duration of the repair work.
For grinding, devices with abrasive materials are used.
Nuances of color choice
A wide range of shades is available for tinting. Modern pigment substances, when combined, are capable of realizing the wildest flight of imagination of a designer. Manufacturers of paints and varnishes offer complete complexes for tinting.
Recommendation: Shade palettes are usually displayed on stands in home improvement stores. It’s worth taking with you a picture from the interior design or even samples of materials to figure out how a particular color will fit into the overall picture.
These palettes are also presented on manufacturers’ portals, but there is a pitfall here: not all monitors reproduce colors equally.
The usual calm colors for tinting are:
- golden;
- dark brown;
- Dark red;
- amber.
They are close to the shades of natural dyes that have been used for centuries for decoration. In the 20th century, designers began to widely use strong colors such as
- white;
- shades of blue;
- dark gray, black
- bright shades of red, blue, green, yellow.
White
A popular color allows you to visually enlarge a room and fill it with light. It is recommended to paint the floors in bedrooms, children's rooms, and rooms on the second floor white. On white, dust is less visible, but other dirt becomes immediately noticeable.
White tinting of parquet floors
Requires complete removal of the old layer of paint or varnish and careful preparation of surface leveling.
Dark
Black, chocolate, and brown shades visually make the room smaller; the choice of such tones must be approached with caution. Look good with light walls. They help to mask small defects in the wood surface. Widely used for solutions in the spirit of minimalism, in the Scandinavian style.
Grey, beige
Neutral shades have a calming effect on the eye, instilling a feeling of balance and comfort. Popular among fans of Provencal, Mediterranean, country style. Recommended for bedrooms and children's rooms.
Reds
The color of blood and fire has high energy. When properly combined with other interior elements, it conveys a feeling of warmth. But you have to be careful - its compatibility with other colors is limited, an excess of red tones looks aggressive.
Brown
A traditional, universal shade for painting floors. By enhancing the natural texture of wood, it makes the floor look more expensive. Psychologically creates a feeling of security and peace.
Attention: If you have chosen paints and varnishes from a little-known supplier, before purchasing the full volume, it is better to buy a small jar and try to apply it in an inconspicuous place. If the result is unsatisfactory, you will not have to repair or even replace the entire parquet.
What tool is used to restore and repair old parquet: sanding
The main tool for manual scraping is considered to be a scraper, the task of which is to scrape, rather than plan, a wooden covering. The device itself is a simple design and consists of a metal plate sharpened at an angle with a fixed handle.
Main technical characteristics of the device:
- Blade thickness. It is selected based on the height of the coating, taking into account the applied paint layer. A blade with a thickness of 0.7-0.8 mm is considered optimal; in this case, the size of the peeled layer should not exceed a few millimeters.
- Blade width. The wider the base, the larger the layer you can remove in one pass. Experts recommend purchasing a tool whose width does not exceed 45 mm; If the blade is wider, the scraper will be difficult to work with.
- Handle length and material. It is more convenient to control the pressure if the tool has a short handle. Recommended length – 45 mm. The material is chosen based on personal preferences, but still many note that when working with a wooden handle, the hand sweats less than after working with a plastic one.
Manual scraping of parquet is carried out using a special tool - a scraper.
Additionally, for ease of use, many product options are equipped with a pressure handle, which allows you to increase the pressure on the working tool. Separately, we should highlight the figured cycle used in the repair of block parquet to decorate the figured wooden plinth. The estimated cost of the device, depending on the characteristics, varies from 100 to 200 rubles. If a blade breaks during operation, it can be easily replaced by purchasing a new one. At the same time, the price of blades ranges from 30 to 50 rubles.
The main advantages of using cycles:
- low cost of the device;
- the ability to carry out repairs in hard-to-reach places;
- maintaining the appearance of the coating;
- absence of dust during operation.
It should be noted that when repairing artistic parquet, the use of cycles makes it easy to carry out actions, observing the correct direction of the wood fibers.
In addition to the advantages, there are also some disadvantages:
- time-consuming work;
- removing a fairly thick layer of coating;
- the need to exert a large amount of physical effort;
- working in an awkward position.
Work is done much faster and easier using a sanding machine.
Subsequence
This procedure is simple, but as a basis you should choose any available instruction and follow it:
- There should not be high humidity in the room, otherwise it will not be possible to create the required conditions. This figure should not exceed 50%.
- The plinths are dismantled and only after that wedging begins.
- If old wedges were installed, they are removed.
- At a distance of about 40 centimeters, new ones are laid out.
- After which, over the course of 7 days, it is worth periodically sealing the inserts, while checking the surface for squeaks.
When this period of time is not enough to correct the situation, the reason lies in more serious deviations. You will have to carry out complete dismantling or come to terms with the presence of such sound. It is believed that the simplest task is to renew the varnish on the parquet. After a little time during operation, it “goes away” in places of active movement. It is not difficult to eliminate such a defect.
How sanding is carried out: the cost of repairing old parquet
As for grinding, you can use a variety of abrasives. Sandpaper is considered the simplest. Of course, doing the work manually is quite long and difficult. To speed up the restoration, some people attach sandpaper to the base of the shoe, but this method is not widely used due to the fact that it is difficult to control the work of the legs and maintain the same pressure.
A more advanced repair option is the use of a drum-type sander. The device is mainly used for deep sanding, because coarse abrasive cannot leave behind a perfectly smooth wooden floor. In one pass, the machine removes 1.5-2 mm of coating. To prevent dust generated as a result of removing the coating from spreading throughout the room, the device is additionally equipped with a dust collector. The most popular model of parquet sanding machine is considered to be SO-206, the price of which varies from 56 to 70 thousand rubles.
During the process of both grinding and sanding, scratches may appear when large abrasive grains leave marks. This is especially noticeable on soft types of wood, such as pine. In this case, you can re-grind or cover the damaged areas with restoration paste. After completing all restoration work, you need to apply a protective varnish coating, which not only makes the parquet attractive, but also protects the surface from mechanical damage.
A drum sander is best suited for sanding parquet.
On a note! It is recommended to repeat floor polishing at least once a year. The more layers, the stronger the coating. All work on applying the varnish layer must be carried out in a respirator.
As for the price of restoring old parquet, it directly depends on the original condition of the coating. If the parquet is in satisfactory condition and you only need to go over it with a sander and also restore the varnish layer, then the cost will be about 850 rubles/m². When you want to make the floor covering perfect, you need to carry out a variety of work: sanding and sanding with a drum machine, re-sanding with a surface grinder, tinting and applying varnish. Such work will not cost less than 1250 rubles/m².
Parquet is an expensive floor covering that has long been admired. Even the cheapest parquet option will always look better and last longer than the most expensive laminate. In order not to have to carry out major repairs of parquet, it is recommended to carry out restoration and restoration work from time to time, which can extend the life of the material. Even a simple application of an additional layer of varnish will help refresh the parquet and restore its shine.
Removing old floors: secrets of successful renovation (read more)
How to apply putty
Puttying parquet is used if the floor is planned to be coated with varnish; in other cases, this procedure does not bring much benefit. The process itself is no different from applying putty if you need to restore wooden floors.
The only limitation is the width of the slot. It should not exceed 5 mm for old parquet and 2 mm for new flooring. Otherwise, especially large gaps have to be closed with sealant or even caulking the joint.
If the floor is not planned to be sanded, then it is best to apply the putty in small portions, pressing it in the corner with a spatula, without spreading the material widely over the surface. Restoring and cleaning areas of parquet contaminated with putty will be quite difficult and time consuming.
When using a sander, most of the putty material remaining on the joints after drying would be cut off by the machine flush with the surface of the parquet flooring. Since in this case it is planned to restore the parquet without the use of complex operations, the dried putty will have to be removed using hand sanders.
The remains have to be cleaned up with a knife or a block wrapped in sandpaper. The main thing is to cut in small sections so as not to scratch the surface of the parquet. Periodically, before attempting to repair the seam, the treated area will need to be wiped with a damp cloth or blown with a vacuum cleaner.