"Hot glue" – an irreplaceable thing in any home. This is a modern version of PVA glue in the form of a hot-melt gun, which has undeniable advantages over its predecessor. Specialists in the fields of construction, repair and design have already fully appreciated its advantages, which is why they use this type of glue not only at work, but also at home. The device has a high speed of gluing two parts (from 40 seconds to 3 minutes), is suitable for various materials (wood, plastic, metal, glass, porcelain, ceramics, leather), provides strength and reliability of gluing, and is safe for use at home . Manufacturers of adhesive fillers (rods) have created a wide range of colors so that everyone can choose the right shade to connect two parts of a certain color. It is worth noting that a glue gun is often used to create crafts from hot glue.
- Hot glue snowflakes
- Slicker glove (Furminator) for a cat
- Anti-slip shoes without pads at home - life hack
- Hot glue button
- Hot glue vase
- Hot glue bracelet
- Hot glue crafts: butterfly
- Let's sum it up
If you don't already own hot melt adhesive, we advise you to purchase one as soon as possible. Has the plastic back of your office chair fallen off, a photo frame chipped, or your wallpaper peeled off? You can't fix everything with hot glue, but you can fix a lot. The use of this device is not limited to repairing faults. Crafters and creative people have found it an excellent material for hot glue crafts and other creative ideas. The only limit here is your imagination. In this article we will tell you how to make glue for crafts, look in detail at easy ways to create crafts with your own hands at home, describe the most unexpected ways to use it and give valuable recommendations for effective use in practice.
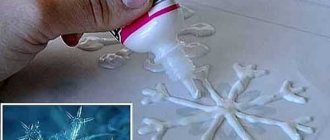
Hot glue snowflakes
Do you want to give your home interior a fabulous atmosphere? Create decorations for the holiday, original hanging decorations for furniture and doorways of your home yourself. Crystals, bunnies, Christmas trees and other New Year's crafts made from hot glue will be one of a kind, and if you involve a child in the process, their making will turn into an exciting game.
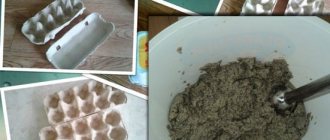
To make snowflakes from hot glue, you will need:
- pencil with soft lead – 1 pc.;
- electric glue gun;
- metal tweezers – 1 pc.;
- wax paper - 2-3 sheets;
- nail polishes – 3-4 jars of different colors;
- cosmetic sparkles (glitter) – quantity to choose from.
Let's start making crafts. Start by laying a sturdy wax-soaked sheet on the table. Foil and cardboard will not work - under the influence of the high temperature of the glue, they will firmly stick to the work surface and ruin it. Below are seven templates for your convenience.
Tip: the working surface can be replaced with heat-resistant baking parchment.
Transfer the depicted figures with a pencil from the drawing to the sheet or use your own stencils. Then grease with sunflower oil, this will make it easier to remove the crafts. To make glue, just heat the rod in the gun. Draw patterns, clearly following the lines. Some of the decorations can be painted with paint and nail polish. To do this, wait until the glue has cooled and then paint the figures to your taste.
To decorate the rest of the figures, sprinkle glitter on a piece of paper. Don't let them cool completely or the glitter won't stick. Next, take each figure with tweezers and carefully roll it in grains of sand on both sides.
Tip: if you haven’t had time to decorate your crafts with sparkles, grease them with PVA glue and cover them with glitter.
To make a hanging decoration, string the toys on craft thread or lurex cord. In addition, by gluing crafts to threads and tying them to a hoop or other ring, you can make a round garland (mobile). This craft will be great fun for children and a unique gift for a loved one.
Watch how to make such a craft from glue in the video:
Acrylic paints
Few people know that PVA glue is excellent for making acrylic paints. Therefore, for those who want to save money, you can use a cheaper option. The resulting mixture is perfect for drawing, as well as for painting crafts made from different materials.
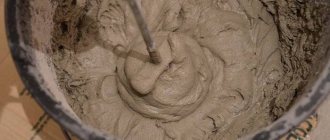
To prepare, you will need to combine PVA glue with gouache. The ingredients must be mixed on a palette in a 1:1 ratio.
Glue gives gouache paints strength and allows them to spread evenly on the work surface. Such paints retain their durability for a long time, unlike gouache.
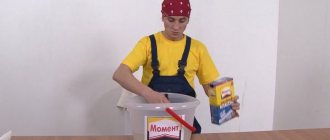
Slicker glove (Furminator) for a cat
Combing a cat's fur is a thankless task, and if your pet could talk, he would certainly say a few kind words to you for annoyingly manipulating a strange object. However, if you neglect this procedure, then the need for constant cleaning arises. Cleaning carpets and clothes from pet hair is long and tedious, especially since it must be done often. You can simplify the procedure for combing a mustachioed purr if you create a convenient furminator with your own hands and at home. To do this, you need a detailed description and two components:
- thick rubber glove – 1 pc.;
- electric glue gun.
It's easy to make glue; to do this, insert the rod and turn on the heat gun. Next, apply small drops of glue to the glove. They can be arranged as you like: chaotically, in a row, or in a checkerboard pattern. Wait 3-4 minutes for the glue to cool and dry. When the beads on the glove become hard, the work is complete. Test your homemade cat brush in practice: stroke your pet with it during the shedding period, while ridding it of shed fur without any extra effort.
Bulk fruits
Different technologies are suitable for making paper fruits. The easiest way is to cut out 3 outlines, fold each piece in half, and glue different elements into halves. You can connect a rope inside the structure. Then the product can be hung.
Another version of the craft is performed as follows:
- Strips are cut out of paper. You need a pair of parts 18 cm long and 4 cm wide. Another 4 elements are made with a length of 23 and 28 cm.
- Each strip is folded like an accordion. To do this, bend equal sections.
- Paired parts are glued together, closing them into a ring. This results in 5 elements.
- The resulting rings are glued in the middle. The sockets are assembled together, fastening all the parts with glue.
Note!
DIY paper crafts: TOP-200 photos of exclusive ideas and craft options
DIY paper origami craft step by step: ready-made diagrams for creating beautiful origami at home (90 photo ideas)
Children's paper crafts: 110 photos of the best ideas for creating unusual crafts with your own hands. Master class + step-by-step instructions
The finished figurine can be decorated by gluing a twig or leaves. The products are used as decoration.
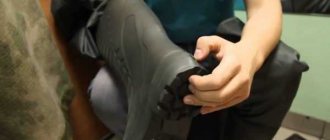
Anti-slip shoes without pads at home - life hack
You bought your daughter or son beautiful shoes, but they slip. The unscrupulous shoe manufacturer did not worry about the main thing - their safety. The sole turned out to be so slippery that you have to constantly catch the baby as he walks and worry that the child does not get injured. This story is familiar to many mothers. What to do if your child constantly slips in new shoes?
We recommend the fastest and simplest solution to this problem. No preliminary preparation is needed, you will need hot glue. Description of work: take slippery shoes and apply glue to the sole in the form of several transverse lines. If you want to interest your baby, use a pistol to draw an inscription or a funny picture. Additionally, you can glue rhinestones to the edges of the soles. We guarantee that in this case the boots will become the child’s favorite shoes. Wait for the glue to dry. Shoes with anti-slip coating made from hot-melt adhesive are ready.
Lizun
Slime is a toy that resembles smart plasticine, only more liquid, viscous, and slimy. It can be prepared according to the recipe described above, adding a smaller amount of sodium tetraborate. There is another method for creating slime using PVA glue:
- squeeze about a handful of shaving foam into a bowl,
- add any dye, mix the mass well,
- add one tube of PVA glue (125 ml),
- add sodium tetraborate drop by drop so that the mass thickens,
- mix the slime and use it for play.
Hot glue button
Every person sometimes suddenly needs something that is not in the house. What if you lost a button and there are no more fasteners? This problem can be easily fixed with a heat gun. Create a beautiful glue button that can be used to decorate a child’s outfit before the next matinee. To do this, prepare:
- glue gun;
- glitter (sparkles) of any color – 1 jar;
- toothpick – 1 pc.
The manufacturing process is simple and consists of only four steps.
- Scatter the glitter onto a cutting board, then use a plastic drink lid to gather it into a circle.
- Heat the glue in the gun and fill the glitter circle with it.
- While the craft is still wet, sprinkle a small amount of glitter on top of the glue.
- After the glue mixture has dried, take a toothpick or gypsy needle and poke holes in the button. Your button is ready.
Details about practical material
When preparing everything you need to create a craft using a glue gun, it is important to know that to realize your plan, you can use a lot of uneven surfaces, these include:
- Wood.
- Glass.
- Leather pieces.
- Paper of different densities.
- Rubber blanks.
- Ceramics.
- Any types of fabrics.
- Plastic and foam.
You can verify the ease of use of the device from your own experience; using your imagination, you can collect exclusive things.
You can decorate your interior with such products, give them to a relative or parent for a holiday, and significantly diversify the game with friends.
Hot glue vase
This original vase will dilute the restrained design of the apartment and refresh any interior. As a bright accent, a handicraft item will attract the attention of every guest in your home. To make a candy bowl with your own hands, prepare:
- baking parchment – 1 sheet;
- spray paint for decoration;
- deep glass container – 1 pc.;
- hot glue gun;
- hand cream.
Step-by-step manufacturing instructions:
- Cover the surface with parchment and place a glass bowl there upside down. Coat the outside of the container with cream.
- Turn on the glue gun and wait for the glue to heat up.
- To make the bottom of the craft stable, apply glue in a continuous layer of the same thickness. If desired, the bottom of the product can be made shaped, but in this case, nothing heavier than candy should be placed in it.
- Now you need to decide on the design. Show your imagination and draw your own unique ornament, or use the drawings that we have prepared (see above).
- Start from the base of the craft: carefully draw the selected pattern.
- When the glue is finished, wait until it dries completely. It is impossible to predict the exact hardening time, since it depends on the quality and properties of the rod used.
- The craft has cooled and dried, thanks to the cream it can be easily removed. Grab the edges of the vase and slowly release it from the container.
- So, the almost finished product needs to be given color. To do this, paint over the craft with spray paint.
The glue vase is ready. This method is suitable for making a candlestick and a candy bowl, a stand for pens and pencils. The vase can be placed on a light bulb as a lampshade, creating a cozy and romantic mood in the room.
Before you get started, we recommend watching a video on how to make a vase from hot glue.
Rules for working with a glue gun
Although a heat gun is a simple and easy-to-use device, there are a few simple rules that will make working with it more enjoyable and safer. Don't neglect them:
- Choosing a craft glue gun that's right for you is an important task. If the gluing volume is small, a miniature device will be sufficient. The main thing: a comfortable narrow spout and a button that can be pressed smoothly. These little things have a huge impact on the quality of work and the pleasure of the process!
- After purchasing a gun, purchase glue sticks of the appropriate diameter for it.
- Do not trust a child to work with a heat gun without adult supervision!
- Choose a stable surface to work with the device on, otherwise it may fall at the most inopportune moment.
- Cover this surface! The glue is easy enough to clean off immediately after it cools, but you probably won’t want to do this while working. It will be much more difficult to do this later!
- Do not touch the metal nose of the gun with your hands, it is very hot!
- The melted glue gets very hot, which can cause pain if it comes into contact with exposed skin. It is best to work with fabric gloves if the volume is large. Or just be more careful.
Hot glue bracelet
For an adorable hot melt glue bracelet, making glue is quick and easy. This craft will not leave your daughter indifferent and will be a wonderful gift even for an adult girl. Prepare:
- empty tin for drink;
- hot glue;
- materials for decoration - stones, sequins, sparkles, bouillons, rhinestones, beads, liquid pearls to choose from.
Follow the complete manufacturing instructions to ensure the craft is a success. First, heat the glue in the gun. Lubricate the surface of the jar with sunflower oil to prevent the glue from sticking, then apply several horizontal rings parallel to each other. Don't overdo it: the number of strips and the gap between them determine the width of the finished product. Use a heat gun to fasten the horizontal rings together by drawing vertical or zigzag lines, and additionally wrap a colored thread around the can. While the craft is still warm, decorate it with the prepared decorations. You can also use a can of spray paint to give your decoration the color you want.
When the work is finished, wait until the glue cools and hardens, then very carefully remove the craft from the container. This product will take one of the first places in the list of your best crafts.
Interior decoration
Paper creations can easily be turned into real interior decorations. It is enough to try hard when completing your masterpiece. Handicraft panels can easily replace the work of masters. Before starting an activity, be sure to carefully plan the plot and select a color scheme.
The paper can be glued randomly or a template can be pre-drawn. The details of the picture are cut out of paper and glued to the right places. It is better to take thick paper or a sheet of cardboard as a basis.
Hot glue crafts: butterfly
A cute decoration will decorate a pot of flowers, tulle curtains, lampshades of table lamps and many other home furnishings. If you attach a winged beauty made of hot glue to a magnet, it will become a bright accent on the refrigerator. Glue the decoration to the tip of a child's pencil and your child will be delighted with the unique innovation. To make this decor with hot glue, you will need:
- glue gun;
- glass;
- wire or unnecessary hairpins;
- hand cream;
- sequins, rhinestones.
Decide on a work surface; it would be wiser to choose a kitchen table. Lubricate the glass with cream for easy removal of finished crafts. Before you start, you need to make some glue. Heat the hot glue stick, then draw each part separately. First, draw the body - it should be solid, then the antennae. Outline the contours of the wings, then fill the void with diagonal lines. Choose the pattern yourself: vertical or horizontal lines, as well as wavy ones, are suitable. The main thing is to fill and fasten the contours of the wings so that they do not change shape in the future.
Don’t waste time, make several of these decorations at once. When the crafts have frozen, carefully remove them from the glass. Glue all the parts together, then secure the bodies with pins or wire. Decorate the products with sequins and rhinestones, if desired, paint them with nail polish or acrylic paint. The best crafts created at home are ready.
We recommend watching a video on how to make a butterfly from hot glue at home:
Adhesive
Depending on the composition of the glue, it can be either safe or dangerous to human health. Hot melt adhesive is a rather dangerous substance.
The influence of such substances leads to depression of the nervous system, and if handled carelessly, the likelihood of getting burns increases.
Wardrobe fragrance
A pleasant smell in your wardrobe is important, because fabrics tend to absorb all odors. It is for this reason that housewives usually use sachets or other flavorings. And you can use your favorite perfume, and a glue gun will help with this again.
PHOTO: YouTube.com Draw an adhesive mesh on a polyethylene backing and wait until the composition hardens
PHOTO: YouTube.com Make two identical meshes, and prepare a hook on one of them using the same glue. Place a piece of fleece or felt between the meshes and connect them along the edge
PHOTO: YouTube.com All you have to do is hang the improvised sachet on a rod in the closet and sprinkle it with your perfume
Creating Individual Elements
Using hot glue, you can independently create a wide variety of figures: these can be crafts in the form of animals, various flowers and plants, birds, snowflakes, etc.
Snowflake
For joint creative activities with your child, you can start with something very light, for example, a snowflake.
To make it you will need:
- dry shine of any color;
- acrylic paints or nail polish;
- glue gun;
- wax paper or any cellophane.
To facilitate the process, a silhouette of the future snowflake is drawn on paper. Next, glue is carefully applied to the drawing. Be careful not to go beyond the outline of the drawing. After the glue has completely dried, after 2-3 minutes, we begin the process of decorating the snowflake. This can be done using regular glitter, acrylic paints or even nail polish. It all depends on the materials available, and of course your imagination.
figurine
To create a figurine you need to prepare:
- glue gun;
- acrylic paint or nail polish;
- additional elements for forming a muzzle (button - nose, heart - decoration);
- magnet;
- Keychain mount.
The outline of the future figure is applied to wax paper or a bag. Next, using hot glue, all voids are filled and contours are formed. With the help of additional elements, you add “liveness” and individuality to your craft. If you plan to make a magnet, then before the part has cooled down, you need to attach a magnet to the back of it. The nose can be made from a small button or formed from the same hot glue.
Using the same principle, you can make an unusual individual badge by simply attaching a pin to the back of the figure.