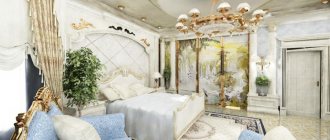
The task was to make a plaster molding for the living room, similar to the one that was in the “Dacha Reply” program - a plaster lamp in the form of a branch with large flowers, which went from St. Petersburg to Tver. The flowers are additionally illuminated with LED strip. Here I will describe in detail the process of making this stucco molding with photo and video accompaniment.
I would be happy to make a similar plaster lamp to order , or with even greater pleasure I would come up with something completely new and unusual. Contact us!
TOOLS AND MATERIALS
I will list the tools and materials that I used in this particular work .
- Plaster . We choose gypsum, I always took Rotband , sometimes Fugen, but fugen sets very quickly (for me) due to fine grinding and the application layer is smaller at one time. This time I decided to try Pufas, I was attracted by the fact that a layer can be applied in one go up to 15 cm! I have never seen anything like this before. But the price is much more expensive - 400 rubles for 5 kg. In the end, I sculpted all the flowers with Rotband, but it didn’t work out with Pufas (I violated the technology at some stage and the test flower crumbled)
- PVA
- Wire
- put
- Twine
- Acrylic paint (I have white Tikkurila Jocker)
- Tools for modeling: spatulas, palette knives, tablespoons and teaspoons, stationery knife, food foil
- Sanding tools: sandpaper of varying abrasiveness.
- Painting tools: sponge, large and smaller
- Small stationery stapler
- Drill
Painting plaster crafts
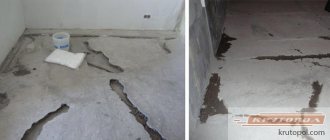
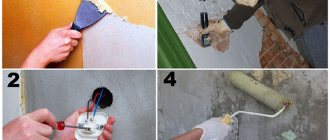
Before you start painting, you need to start treating the surface of the workpiece, for which special compounds are used.
After sanding off excess irregularities and removing dust from the workpiece, it is covered with putty, which ensures good adhesion of the paint and improves hygroscopicity.
Powder and other paints are used for painting; you can cover the surface of the product with them manually.
If the craft is quite voluminous and has many details, it is easy to use special spray systems or paint and varnish materials in cylinders.
Small details and elements that require drawing are performed using the technique of manual paint application.
Before this, it is best to draw the boundaries of the image with a pencil and light lines, and try to paint as carefully as possible, without going beyond the contours of the details.
SKETCH
First of all, a sketch is developed , I always make several, the first one is always bad), as well as for the possibility of choice for the customer. I offered 3 sketches with different options for the arrangement of flowers, branches and birds, as well as with different sizes of flowers. We settled on the second option, but it had to be modified, because in the first sketches I did not take into account that all the colors have the same size centers for organizing the backlight. A very interesting task - to make beauty functional
Assembling figures
Silicone molds are easy to remove: bend one edge and slowly pull it out. Forms made from other materials need to be turned over, lightly tapped, and then slowly, without sudden movements, lifted and pulled out.
If the figure consists of several parts, then these parts are glued together. Smooth surfaces to be glued are cleaned with sandpaper, cleaned of dust, and glue is applied to both surfaces (several layers). Then the parts are pressed against each other, fixed and left for several hours.
The glue for connecting different parts of the craft must be special, moisture-resistant, and resistant to temperature changes. The resulting voids in the craft, when it is removed, are covered with gypsum solution in a ratio of 2 parts gypsum and one part water.
STENCIL
To make stucco molding in full size exactly as in the sketch, you need to print it with these dimensions. You can, of course, draw it, but it will take much longer and there will be an error in the drawing. How I did: 1. photographed a small sketch, 2. scanned it, 3. cropped it in Photoshop along the edges of the pencil and changed it to the desired size 150 cm wide, 4. created a new A4 document (important!!! with the resolution as on the scan sketch!!!) 5. Dragged the large sketch into a new document A4. It only holds a small piece of the sketch, that's what you need. 6. Now I move the sketch in the resulting A4 window and print each piece. The result is a puzzle with a slight overlap. 7. I assemble the stencil and glue the sheets together with tape.
Features of caring for garden plaster decorations
If the manufacturing and processing technology is followed, plaster figurines will last for many years, but proper care is integral to preserving the appearance of the products. Therefore, you should consider:
- when cold weather sets in and the air temperature drops to below zero, as well as during prolonged rains, you need to remove garden figurines from the garden for storage in a warm and dry room;
- It is best to place the figures on a base made of natural stone or concrete, which will prevent insects from being exposed to moisture near the base;
- The varnish on the figures should be renewed every 2 or 3 years, which will protect the color of the products.
Proper care is the key to maintaining the bright color of plaster figures
FRAME FOR BRANCHES
In order for the parts of the bas-relief to fit together during assembly, you need to start with the elements that are in the background, in my case with the branches. Therefore, the next stage in preparation is making a frame for the branches. I will make it from wire and fibrous material like tow, it will make the structure light. There is another option to use polyurethane foam, but I didn’t get used to it, although I used concrete contact, the adhesion was not very strong and there is a possibility that the plaster could be pressed through, so I didn’t experiment in this case.
- I take the wire and bend it in several layers according to the sketch in the shape of branches, then twist it across to secure it. I also made loops for attaching to the wall with self-tapping screws.
- I wrap a thick branch with tape tow, securing it with an ordinary small stapler at random, as long as it doesn’t fall apart. I don't touch thin branches.
- I wrap it tightly with twine. Thin branches are very dense, in some places in 2-3 layers, thereby immediately creating a natural look and texture of the branches.
- Primer with a mixture of PVA and plaster.
- I cover the largest branch with a thick layer of plaster using a spatula. The bark of the tree somehow appears by itself) I did not cover the thin branches with plaster, because... due to a small layer of application, it would fall off (flexible wire)
- I paint all the branches with white paint. I added a little plaster directly into the paint, this gives it even more matte and in places the desired roughness.
Bas-relief on the wall
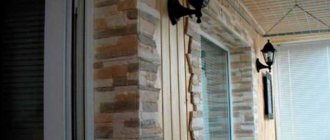
To decorate walls, many resort to bas-relief. If you want to do everything yourself, you need to be prepared for the fact that this is a very labor-intensive process. It may be better to use the services of professionals. If you decide to make flowers from plaster on the wall yourself, then you can use stencils and forms that are sold in construction stores. Following the instructions, we bring our work to life.
This composition will look amazing in your room and bring style and richness to the interior. You can also create a wall composition yourself, without templates or forms. To do this, it is enough to cut out the necessary details of flowers, leaves and additional accessories from cardboard and foam plastic. Plaster everything and use glue to assemble the bas-relief on the wall. If the parts are quite large, then you need to place a wire inside, it will act as reinforcement. Small details can be sculpted by hand and also attached to the wall. These can be small leaves, berries, bunches of grapes, etc.
The next step is to seal all the seams. They can be hidden with either plaster or white sealant. We treat the finished product with a primer; it will prevent the bas-relief from getting dirty and crumbling.
MODELING FLOWERS
I sculpted each flower-lamp and its details separately.
- Petals. First I sculpted the main part of the flower with petals. I primed the stencil with PVA glue so that it would not become too deformed and let it dry. And yet it was deformed)) First, I blinded the main volume of the flower without detailing. When the plaster has set, I made sharp edges and additional folds, and when this layer hardens, there will be adjustments, smoothing out irregularities, and sanding. After complete drying, I drilled 3 holes in each flower with a drill: for attaching screws and pulling the wires of the LED strip.
- Columns – fastenings for LED lighting . Then I made columns for the “stamens”, around which the LED strip would be wrapped. I took a cylindrical tube of vitamin C and poured a plaster solution into it. When the plaster had hardened, I cut the tube, took out the resulting rod, and cut it into several parts. The posts were glued to a mixture of plaster and PVA glue. To ensure they held tightly, I randomly scratched the gluing areas.
- Caps-stamens of a flower. On the inside, a recess is needed for a column with LEDs, so before sculpting, I formed a small dome from ordinary food foil, on top of which I applied plaster in two layers: first, a basic plaster, and when it hardens, clarifying the shape, details, texture, sanding... If you need to remove excess, you can moisten it with water and trim with a knife.
- Painting. Before painting, you need to prime it with either acrylic primer or PVA, but if the product has not been sanded, you can do without a primer (this is how I painted the leaves)
Preparing the form
The gypsum mass sets quickly. Therefore, you need to prepare a mold (mold with textures) in advance. To do this, you need to lubricate the inside with a special solution using a brush (so that the craft does not stick to the mold). Composition of the special solution:
- 2 parts liquid soap;
- 1 part vegetable oil;
- 5 parts plain water.
The gypsum mass is poured into the mold slowly so that voids do not appear in the figure. At the same time, place pieces of foam or plastic bulk objects so that they do not touch the walls of the mold.
MOLDING LEAVES
I sculpted the leaves with a palette knife on a cutting mat (you can use any smooth surface, such as a cutting board or glass, so that you can easily separate them after drying). They will be attached to the wall using ordinary tile adhesive or plaster solution.
That's all
Useful tips
If the sculptor plans to create large bas-relief details, then for additional stability it is better to use wire. The frame will also simplify the sculpting process. The top of the bas-relief can be coated with a layer of primer or water-based paint. For alabaster, such a coating will only add gloss, but for more fragile plaster or sensitive plaster it will provide additional protection. While working, it is better to use a professional set of stacks that will help you create even the smallest details.
Choose the bas-relief not only to the style, but also to the character of the room. Culinary themes are suitable for the kitchen: voluminous still lifes, flower arrangements or panoramas of ancient cities. Stylish images of natural elements will look organic in the bedroom: bouquets, trees, animals. In a children's room, with the help of relief, you can create a real fairy tale, and its scenes decorate the entire perimeter of the room.
Professional decorators recommend not using false walls, arches or furniture to zone small studios. Bas-reliefs are perfect for these purposes; in combination with color differentiation, without further ado, they will make it clear where the functional zones are divided.
Bas-reliefs are not very often used in design. It is much easier to cover a wall with photo wallpaper with the desired image. Many people are intimidated by the complexity of the process. If you have patience, you can find hidden talents in yourself and decorate every room of your apartment with three-dimensional paintings, making its design original and unique. To get inspired, you can study the magnificent sculptures decorating Moscow's Bolshoi Theater or the numerous houses on the streets of St. Petersburg.
Briefly about the main thing
Do-it-yourself bas-relief is not science fiction! All it takes is a little artistic flair and diligence. You will end up with an exquisite masterpiece that friends and relatives will be happy to appreciate.
Decorating the walls with bas-relief will make your home truly original and elegant. Aerobatics is the competent framing of the scenery with lighting.
The painting can be used to zone the space of a room. Decorate the headboard in the bedroom, come up with funny scenes in the nursery, and decorate the living room with floral patterns or lilies.
Construction stores offer tools and ready-made mixtures that make it easy to start sculpting.