The task of preparing the material, how to perform a semi-dry floor screed with my own hands, oh..., feet, has been in my portfolio of orders for a long time. But everything didn’t work out. And not because there was no time or the soul was not in the mood for work. Everything became more prosaic: I was not sure that I would correctly grasp all the nuances of the technology. The articles on this topic are completely inconsistent.
Okay, a theory where mistakes are not fatal. So the practice is covered in contradictory ways. For example, some experts categorically assert that technology cannot be mastered without small-scale mechanization, but rumors among builders refuted this point of view. They say that there are a couple of teams that perform high-quality work without any mechanisms. This inspired optimism, but did not solve the problem.
There was no consensus in the articles reviewed on the amount of water used when stirring the solution. For example, this is a recommendation: pour 3 buckets of water into the dry mixture. What kind of buckets: 5 l, 8 l, 10, or maybe 12? What consistency should I bring the solution to? Some argue that when the ball rolls, water should come out, others are categorically against such advice. The series can be continued ad infinitum, there are so many incomprehensible nuances.
The StroyGuru website team decided that until someone has real experience working with semi-dry screed technology, they will not return to the article. Chance helped, twice. During the week, the author managed to ask to be present and help a little with the work of two teams at once laying semi-dry floor screed in an apartment. I helped for free, but the experience gained was priceless. After all, experts are not born. They become one after gaining the necessary knowledge and experience. Before this, I had to sit down with the theory again, so as not to look like a black sheep among the workers.
Features of semi-dry screed, its pros and cons
Theoretical research began with the elementary: trying to figure out what a semi-dry screed is. The screed is understandable. This is a durable, even layer between the subfloor and the finishing coating. But why is it semi-dry? Wikipedia to the rescue. And here the first surprise awaited me. The encyclopedia says that a semi-dry screed is a combination of a dry and a wet screed. The bottom layer is expanded clay, the top layer is CPR (concrete). We've arrived.
Some explanations were given by articles on construction sites. But sometimes they write things that make you don’t know whether to laugh or cry. Therefore, there is no complete trust. Moreover, on forums some visitors claim that such technology is impossible in principle. They refer to studies of the effect of the amount of water on the strength of concrete. In their opinion: if there is a lack of moisture, the process of formation of cement stone (in scientific terms - hydration) will stop halfway.
I had to look for other sources. As a result, the following emerged. Scientists and practitioners did not even think that CPS could turn into stone with a small amount of water. But in the former Yugoslavia they noticed that the almost dry cement mixture turns into a solid material similar to concrete.
We started experimenting. The result was a new technology called semi-dry. Scientists clarified: semi-dry unbound cement-sand screed. Its difference from “wet” is in the amount of water: three times less than the classic one. That's all.
Surface preparation
- Carefully inspect the floor: tap with a hammer to find loose areas of cement, remove them using a hammer drill, and fill the resulting voids with cement mixture. Expand and restore cracks, knock down noticeable bulges.
- The interface lines between the floor and walls must be treated with cement mortar, even if there are no cracks in these places.
- After this, remove stains of oil paint and grease from the base and vacuum it thoroughly.
Advantages and disadvantages
About two years ago, I already prepared a material where I considered the strengths and weaknesses of semi-dry technology (you can see it here). Practice has made its own adjustments: something had to be removed, something had to be added.
The advantages include:
- strength. A number of experts claim that it is higher than that of concrete due to the absence of cavities (voids) that remain after the evaporation of excess, unbound water. This point of view is refuted by the density of the material: it is higher in concrete. And at school they taught that the higher the density, the stronger the material. You can easily check: stand on a thick layer of foam rubber and 2-3 mm metal. What is deformed? That's it. Therefore, such statements can be explained by advertising of semi-dry technology. However, a little less strength is enough for residential premises. The exception is a fireplace (not all types) and a stove;
- durability. Experts talk about an operational life of 50 years or more. It has not yet been possible to test it in practice - the technology found application in the mid-90s of the last century (not even 30 years ago);
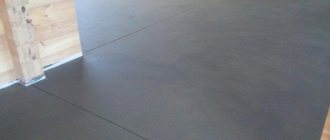
- a smooth surface after the solution has set - obtained after grouting by machine or manually;
- the ability to walk directly on the screed. You can walk, but only in special shoes: concrete shoes;
- there is no risk of spilling water on neighbors below. It simply isn't here;
- The installation process does not leave any dirt. After the completion of the work, literally in 10 minutes the auxiliary premises were restored to their original condition;
- high speed of work completion - the three of us, although what kind of assistant am I, in a room with an area of just over 24 m2, the work was completed in about 6 hours;
- installation can be done on any floor surface: be it concrete, rough wooden floor or soil. My doubts about the soil (as it subsides, concrete collapses) were dispelled by the foreman. Concrete is brittle, which is why it cracks under low bending loads, while cement stone has much higher bending strength. Tested in practice. I understood this in my own way: a thicker, yet reinforced screed is naturally more stable. Analogy with reinforced concrete floors;
- There is no shrinkage or cracking of the surface. I agree about shrinkage, there is practically no shrinkage (at least I haven’t seen it) if the solution is well trampled (compacted), but cracks appear in the absence of fiber reinforcement. The mesh doesn't help either. By the way, she has completely different tasks;
- compatibility with “warm floors” - all operational characteristics allow this;
- You can hide communications in the leveling layer. No problem;
- repairs can be continued after 72 hours - ceramic tiles and porcelain tiles can be installed with glue without any questions; other types of flooring will have to wait. In some cases, laminate, up to a month.
disadvantages , but they are contradictory:
- Experts unanimously say that without knowledge, experience and the presence of small-scale mechanization, laying a semi-dry screed with your own hands is extremely difficult, or rather, impossible. I wrote about this too. I repent. From personal experience I was convinced that, if desired, everything lends itself to skillful hands and a bright head;
- Another expert statement: the slightest errors in the amount of water in any direction negatively affect the strength of the solution. But what do we mean by the slightest mistake? In one team, 17 liters of water were poured onto a bag of cement, in another - 20. The result was the same. In passing, I note that with the mechanized method of preparing the solution, 15 liters of water are taken per 25 kg of cement;
- continuity of the technological process. This applies only to mechanized pouring - you need to have time to distribute the supplied solution throughout the room within an hour, tamp it down and rub it in at the same time. When working manually, you can smoke, but only between batches;
- strict requirements for sand - it must be of a certain fraction (therefore river sand is not suitable) without clay and stones.
Types of semi-dry screed
The second surprise awaited me when I started to find out what types of semi-dry screed there are. It turned out that the authors’ fantasies are off the charts—they counted more than a dozen options. There are actually three:
- bound - this is when a semi-dry mortar is poured directly onto the floor slab and adheres to it;
- floating - the formed cement stone does not have direct contact with either the ceiling or the walls. At the bottom there is foam plastic (insulation) or soundproofing material, and a damper tape is attached to the walls;
- on the separating layer - something intermediate between the first and second types: with overlapping contact there is no - a thin polyethylene film (waterproofing) is laid, and damper tape is placed on the walls. In passing, we note that when laying rolled waterproofing with a thickness of more than 1 mm, the screed is already floating.
But this is a theory. The classification has no practical significance, although many experts argue that the bound screed need not be reinforced. I saw a slightly different difference - the concrete base must be carefully treated with a primer so that it does not draw out the last water from the solution.
I did not find any difference between the floating screed and the separating layer. In both cases, the technology of semi-dry floor screed is one to one.
Isolation device
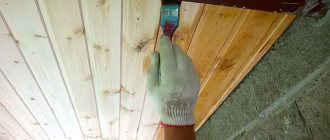
Before leveling the floors, it is necessary to glue polypropylene tape along the entire perimeter of the walls in the room where the work will be carried out. This will create an expansion joint that will neutralize deformations and prevent sound transmission from the floor to the walls. Polypropylene tape can be glued using liquid nails. You can see exactly how to do this in the photo below or watch the video.
Apply polypropylene tape
Materials and tools
The third surprise awaited me when I studied the need for materials and tools. Almost every article about semi-dry screed talks about a concrete mixer and a trowel. I naively believed that teams that do the work manually rent these machines. Imagine my surprise when, upon arriving at the site, I saw:
- several bags of M500 cement;
- a pile of sand;
- large sieve;
- several packs of fiberglass;
- plastic film;
- a stack of metal reinforcing mesh;
- a screwdriver with an incomprehensible hook;
- underlay for laminate;
- construction gun with hot glue;
- twisting copper wire;
- laser level;
- rule;
- roulette;
- construction pencil;
- bucket;
- plastic cup;
- two plaster floats;
- shovel;
- several metal pipes about 3 meters long;
- metal hook about 1.5 m long;
- construction knife;
- two pairs of concrete shoes.
These are concrete shoes.
No concrete mixers or trowels.
The presence of some tools and devices was surprising. I could not understand their role in the technological process. Even while changing into work clothes, I bombarded the builders with questions. I received detailed answers.
Cement. To get a solid base, it must be in a semi-dry mixture of the M500 brand. As a last resort, M400, but with a shelf life of no more than 2 months. No M300 brands. I knew why the foreman focused on the shelf life - every 6 months of being in the warehouse, the grade of Portland cement drops by 100 units. Was M500, sat for six months, became M400.
Sand. You need quarry sand - only it has a fineness modulus of up to 2.5 units. A little clarification is needed here: according to GOST, such sand must first be sifted through a sieve with a hole diameter of 25 mm, and then 14 mm. Everything that did not pass through the last sieve must be used. There should be no clay in the sand, or rather, no more than 3% of fine clay inclusions are allowed; accidentally introduced plant debris is completely excluded. The humidity is natural, which means any.
For information: the teams, as if by agreement, sifted the sand only once, through a fine sieve. Large pebbles rolled off the mound of cement as it was mixed. They were constantly being removed. It’s faster, but it doesn’t affect the quality of the work.
Fiber fiber. The reinforcing mesh does not prevent the appearance of cracks on the surface, but rather prevents their growth. Therefore, polypropylene fiber is introduced into the solution, which ensures the integrity of the surface.
Screwdriver. The hook inserted into the cartridge allows you to quickly twist the copper wire when tying the reinforcing mesh. This is the first time I have encountered this, although I was assured that this method has been used for quite a long time.
Pipes. Used as beacons. Only they do not deform when driven into an already laid solution.
Shovel. There are several types of shovels. There must be a scoop (popularly known as a shufel, hence the name “shufel”).
Substrate - used instead of damper tape. I cut it into strips and attached it to the wall. It's much cheaper that way.
Hook. SNiP recommends laying the reinforcing mesh on the screed layer and covering it with a second layer on top. The team works differently - they place a mesh on the base of the floor, pour a bucket of mortar onto it and use a hook to lift it up a little so that it is inside the screed, in its lower part. Simple and fast. A beautiful solution to a technological problem.
Hot-melt adhesive - glue the cut backing to the wall.
Glass - pour water into the solution, or rather onto a hill of sand and cement.
Copper wire - needed to bind the metal mesh.
Plastic film - the solution is first prepared on it, and then the screed is covered with it.
The purpose of the remaining tools is self-explanatory.
Calculation of material requirements
The required amount of materials is calculated using the following algorithm: the thickness of the screed is multiplied by the area of the room in square meters. This gives the volume of fill in m3. Next, look at the table, which shows the amount of cement per 1 m3 of mortar grades M150 and M200 and multiply by volume. We divide the results obtained by the weight of the material in the package and determine the number of bags of cement and sand after rounding up.
Table 1. Consumption of cement and sand per 1 m3 of solution.
| Cement brand | Material consumption per 1 m3 of solution | |||
| Solution grade M150 | Solution brand M200 | |||
| Cement, kg | Sand, kg | Cement, kg | Sand, kg | |
| M400 | Z90 | 1310 | 490 | 1350 |
| M500 | 370 | 1350 | 410 | 1400 |
Making beacons
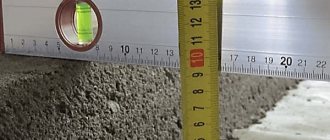
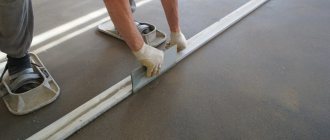
The laser level is installed in the room where the work is being done. Use a grater to level the area and use a ruler to record the distance from it to the laser beam.
Use a ruler to record the distance
Two meters from the site, another one is made at the same distance from the beam.
Two meters from the site
Having applied the rule, a line is created between the sites. This will be a lighthouse. It needs to be done from one wall to the opposite.
Preparatory work
Among professional builders who carry out the installation of dry screed using a mechanized method, the work is carried out step by step a little differently, which was seen when teams worked without small-scale mechanization. There is no point in completely copying the experience of one of them. Each has its own discoveries in performing individual works, which greatly simplify the entire process. So I took the best from each of them and combined them into one. As a result, the technology for a semi-dry screed looks like this:
- preparatory work - includes foundation repair, waterproofing and insulation;
- gluing damper tape;
- finding the screed line;
- laying reinforcing mesh;
- preparing the solution;
- installation of beacons;
- laying the screed;
- care of the surface of the solution.
Once again, may site visitors forgive me, about the base of the floor: it must be solid. It could be:
- rough floor made of unedged boards with minimal gaps on wooden joists or on 2-T metal beams (“Stalinist” houses, cottages with lightweight ceilings);
- well-compacted soil with bedding (sand or expanded clay) in the basements and first floors of private houses;
- any monolithic ceiling.
To describe the technology, a floating screed is taken - the most complex. It will be poured onto a reinforced concrete floor. When pouring onto a wooden floor, ventilation must be provided. Otherwise everything will rot and fail. But more on that another time.
Any preparatory work begins with a thorough cleaning of the work surface. Construction waste is collected in bags, tools are taken to another room, the base is swept, and even better, use a construction vacuum cleaner instead of a broom.
The surface of the slabs, if there are cracks, chips, or pits, is sealed with classic TsPR or the cheapest tile adhesive. Cracked seams are also subjected to the same procedure. Using special repair solutions is expensive, but the results are the same. The main thing in this process is to obtain a surface that is fairly even, even to the eye (small waves do not interfere with making a screed). It's not worth working to the point of fanaticism. Anyway, the leveling layer will hide all the imperfections.
There is no point in describing in more detail the technology for preparing the subfloor for screed. There is a separate article on the site. You can find it at this link.
And again everything is carefully swept.
In this form, the base is in principle ready for laying the screed. But there are important nuances:
- 1. Concrete, like a pump, will pull out the small amount of water from the semi-dry screed composition, as a result of which the bottom will turn into small granules that are not connected to each other. It is also not possible to simply wet the surface to saturate the ceiling with moisture - the water ratio of the screed components will be disrupted. No one can predict how the hydration process will go in this case. Therefore, waterproofing of the ceiling or repeated treatment with a deep penetration primer is necessary. You can also use “Betonokontakt”, but this is an expensive pleasure.
- Semi-dry screed has an unusual property: by itself, it dampens noise quite well. But when laid directly on reinforced concrete, on the contrary, it increases noise. Therefore, a layer of noise-insulating material is needed, unless, of course, the owners of the apartment want to put their family life on public display. Sorry, bugging. Insulation with soundproofing properties, for example, basalt wool “Rockwool” TF-Board, will help solve the problem. You can also use expanded polystyrene (foamed PSB-S-35 or, better yet, PSB-S-50; extruded grade 35) - it dampens impact noise well, but not in combination with laminate.
A small note: that’s why the floating screed.
One more clarification: waterproofing, as a rule, is not carried out in living rooms (living room, children's room, bedroom) in apartments, starting from the second floor and above, if insulation or soundproofing material is installed. People say that “you can’t spoil porridge with butter.” Therefore, the site team recommends that waterproofing work be carried out there as well. God forbid there is flooding with water escaping beyond the bathroom or kitchen.
One team made the waterproofing with bitumen mastic and laid basalt wool slabs on top, the other with roll materials (they used elastic roll material from the TECHNONICOL company - “UNIFLEX EPP”), and PSB-35 foam was chosen as insulation and noise absorber. By the way, this team discovered an interesting thing: when using rolled materials, it is recommended to roll them with rollers. The workers did not roll in, but rather trampled on the floor. It takes a little more time, but the adhesion to the base is much better.
Each option has its pros and cons. Links to articles will help you choose exactly what to choose and how to carry out the work:
- “Waterproofing the floor before the screed”;
- “What and how to waterproof a bathroom floor?”;
- “Which insulation is better to choose for the floor?”
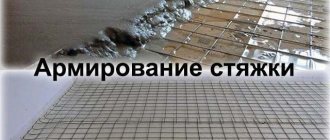
As a result of properly carried out preparatory work, you should get something like this cake (see photo):
1 - reinforced concrete floor cleared of debris and restored; 2 — bitumen primer for roll waterproofing; 3 - rolled waterproofing material; 4 - insulation; 5 - reinforcing mesh.
Private questions
There are many questions on the forums with conflicting answers. I will answer some of them using my experience.
How long does it take for a semi-dry 7 cm screed to dry? A semi-dry screed dries according to slightly different rules than a regular CPR. In the latter, with increasing thickness of the poured layer, the amount of time for full strength gains increases. A semi-dry mortar has one standard: it takes about 10 days to gain 70% strength, and 28-30 days for maximum strength.
Minimum and maximum thickness. The minimum thickness is 4 cm. With a smaller layer, the water will leave faster than the solution gains strength. The maximum is limited by the following factors:
- weight - must withstand the ceiling;
- speed of pouring - the entire thickness must be laid and compacted in several layers within one day;
- financial capabilities of the owners - a screed thicker than 7-8 cm is ruinous.
In fact, the maximum thickness is 10-15 cm. The most common is 7 cm.
Does it need to be reinforced? A mesh on a floating screed is a must. Fiber fiber - optional. In extreme cases, it can be replaced with a “helicopter” (iron coating of the surface with cement dust).
In what cases is a semi-dry screed not suitable? Weak floors are not suitable for semi-dry screeds due to their high specific gravity.
How long will it take to dry? Full strength gain lasts 28-30 days. But you can start working much earlier:
- walk after 12 hours;
- lay the tiles after 3 days;
- lay linoleum every other week;
- Laminate and parquet work in a month. Previously this was not possible due to the high humidity of the screed.
Semi-dry or regular screed. Semi-dry and “wet” screeds have their own strengths and weaknesses. It is difficult to give preference to any method. Even the comparative analysis carried out (can be viewed here) did not allow us to give an unambiguous answer. Recommendations only.
Laying the finished mixture
The beacons are set, the fiber reinforced solution is mixed, and you can get to work. The semi-dry screed starts on its own from the wall opposite the entrance. The distance between the two installed beacons is filled and using the rule it is pulled to the right and left towards itself.
You should not be afraid to close slightly exposed beacons, since most often they remain forever in solution. Sometimes the profiles are taken out, and the voids are filled with the finished mixture, after which it must be compacted. The thickness of the screed is usually made at least 40 mm. Much will depend directly on the evenness of the base.
Once the screed is laid out throughout the room, it should be compacted. The best option is if this process is performed by another person while filling the solution. This will save some time and you won’t have to be distracted by other work.
Stages of performing a semi-dry screed