There is significantly less water in a semi-dry screed than in the classic wet version, which determines the main feature that affects the entire work - rapid drying with its own nuances that require more attention.
Hardening is more dependent on the specified than that of a wet screed: it must correctly correspond to the time of removal of moisture from the mixture. Drying should not precede hardening.
And also the increased density increases the tension of the binding ingredients, which is why, with excessively rapid evaporation of moisture, chips and cracks very easily appear.
It will be necessary to ensure special stability of temperature and humidity for uniform drying. Let's consider the rules of maintenance and care for semi-dry screed after its installation, how to create an optimal environment and microclimate, and control moisture.
Need for special care
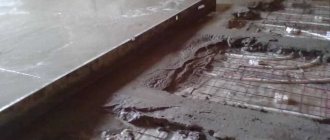
The semi-dry screed solution is thicker, denser, and therefore heavier. Placing the mixture on the surface is something between pouring and backfilling: the heavy mass is tipped out and placed on the prepared site.
For such a consistency , special machinery is usually used . A small amount of water (a quarter or a fifth of the total volume) and a large weight create tension in the binding ingredients inside the solution, and the mixture tends to dry out faster.
This increases the predisposition to deformation phenomena, there is a risk of peeling and weak hardening, which is why it is so important to slow down the evaporation of moisture.
It is especially necessary that the processes of drying and hardening (gaining strength) coincide correctly in time, which is achieved by creating an optimal microclimate (stable, sufficient air humidity and temperature, moistening the mixture). That is, in our case, climatic conditions are more important than for a wet screed.
When there is a change in temperature or air humidity,:
delamination;- chips;
- cracks;
- elevation changes;
- bubbling.
is also why semi-dry screed is placed with :
- fiberglass;
- with plasticizers;
- stripes with compensation gaps, which are especially important if there is a warm floor underneath.
The semi-dry screed itself is less prone to cracking and unevenness, since it has almost no shrinkage. There is no excess water, so the formation of voids, uneven drying, and porosity are eliminated. But there is a feature that largely neutralizes this advantage - rapid drying, which can provoke the above, and especially peeling.
It is because of this nuance that it is recommended that the thickness of such a coating should not be less than 4-5 cm in order to slow down this process. Rapid hardening increases strength and promotes uniform distribution of loads, but if the composition dries faster than it has time to firmly adhere, it will be weak, brittle, and peeling will appear.
For a semi-dry screed, it is necessary to ensure, first of all, that drying is not premature, and it must be uniform, which is achieved by creating and maintaining certain stable conditions and a microclimate.
The process of cement hydration must occur slowly, without jerks, at a certain temperature and humidity level not only in the mixture itself, but also in the air. Due to the rapid drying (reduced amount of water) in a semi-dry screed, this is especially significant. The main thing is not to allow this process to end before hardening.
If, if the conditions are violated, the liquid is distributed unevenly (this is also possible if it is added in excess of the norm), then islands of accelerated expansion of the composition will appear on the floor - the surface will budge and be hunchbacked.
How long does it take for a floor screed to dry - is it possible to artificially speed up the process?
The subfloor must be durable and meet the quality declared by the manufacturer. To do this, you must strictly follow some rules for laying and preparing the mixture. Usually all recommendations and proportions are given in the instructions and written on the packaging.
The process is not quick, since the screed must dry completely. This may take 10-15 days or 3-4 months. It all depends on the thickness of the layer, the solution used and other factors.
To speed up drying, some unscrupulous specialists resort to various “tricks”:
- create drafts in the room if work is carried out in the summer;
- In winter, they increase the temperature in the room using radiators, heating devices, etc.
This cannot be done! Such methods are fraught with irreversible consequences, since all the work will have to be done again. Such a coating will not have strength, and the floor itself will become covered with cracks.
Permitted methods of acceleration include:
- Adding expanded clay, basalt or other components that can absorb water to the mixture. Thanks to these additives, the screed becomes half dry and the drying time is reduced by a week.
- The use of additives that can slow down the setting of the solution on the surface to allow moisture to evaporate from below.
- Use special components in the compositions that form pores through which moisture will escape.
- Use “fast” cements with added plasticizers or modifiers. They will speed up the drying process.
Why is it necessary to dry the solution layer completely?
The base must be completely dried to remove any water. Otherwise, moisture will begin to rise and ruin the finish. Regardless of what kind of covering is used (laminate, tiles, parquet flooring, linoleum, etc.), it will have to be removed if the screed is not dried. It is clear that condensation will not destroy the tile or linoleum itself, but it will damage the glue that holds the finishing material in place.
According to the repair technology, before pouring sand concrete, waterproofing material is laid so that the floor is warm. And since the moisture will have nowhere to go, it will soak it, and eventually the top layer will peel off.
The screed must be dry before carrying out the final work.
What and how affects the hardening time?
The basic rule is that the screed should dry slowly and steadily , that is, in calm conditions without changes in temperature, humidity, and without drafts. Let's take a more specific look at how different factors influence a semi-dry floor screed.
Temperature
Must be stable within a certain average range, neither cold nor hot. At abnormally high values, the drying process occurs faster than required, which should not be allowed under any circumstances.
The water evaporates more intensely, thereby significantly deforming the mixture, cracks appear, and in addition, the solution does not have time to harden, it dries weak and brittle.
At minus values, freezing will occur, which will also provoke the above, the appearance of humps. It is necessary to work only at positive temperatures from +5° C.
Humidity
Low air humidity (recommended value 60-70%) will speed up drying, which is extremely undesirable, since such an environment will intensively remove moisture from the mixture. The consequences are the same as if the temperature is too high.
But high humidity is quite acceptable in this case - it is almost insignificant within reasonable limits, and even useful, since it is better for the mixture to dry somewhat slower than faster. In addition, the screed is even slightly moistened in the first days, and this procedure is not just recommended and possible, but mandatory (however, in some cases, if the environment is “wet”, you can do without it).
On the other hand, if such an increased parameter makes it impossible for residual drying out, then this is not very good, but this is usually observed only when the house is located on wet soils, in the same climate. The problem is solved with a vapor barrier primer.
Changes in temperature and humidity are often more unsafe than deviations from the norms of environmental parameters within reasonable limits, since the frequency of expansion/contraction, weakening/increasing tension caused by them aggravates damage, cracking, the appearance of unevenness, and fragility.
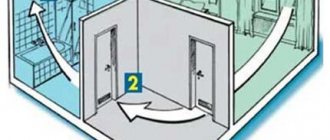
Drafts
One of the dangerous factors that causes jumps in environmental parameters is a draft, so this must be avoided.
Materials that absorb moisture speed up drying, such as:
- sawdust;
- dry cement;
- gypsum;
- simple wooden boards and the like.
Therefore, the above should not be present in the same room.
Other factors
Compositions that evaporate chemicals will have an extremely .
Water may be present, since high humidity within reasonable limits during the hardening period is considered normal in this case; sometimes dishes with it are placed on site if the microclimate is too dry.
In no case should you accelerate the maturation and drying of semi-dry screed under normal conditions. You can only slightly adjust the microclimate - turn on the heating if the temperature is below -5 ° C (heat flows should be directed to the ceiling), humidify the air, and these measures should be without jerks or jumps.
The task of the master when caring for the screed during the period after it has been poured is to create an optimal balance of environmental characteristics and maintain them stable. In this case, drying will not be ahead of hardening, which will exactly fit within the recommended time frame and will be of the highest quality.
The maturation time of the screed may vary slightly due to slight deviations in temperature and humidity levels: within reasonable limits, within the recommended standards or with a slight violation of them, this is allowed. But in any case, it is better for the base to dry more slowly than quickly.
Types of screeds by consistency
Semi-dry screed has recently become very popular in apartments and private houses.
The drying period of the floor is primarily determined by the screed installation technology and its consistency. It can belong to one of three main types:
- Wet - is a liquid composition of sand, cement, synthetic additives and water. This mixture takes the longest to dry, with a minimum curing period of approximately 10-14 days;
- Dry - made from bulk materials (expanded clay, granulated concrete), after which it is covered with particle boards. Since water does not take part in the process of preparing and installing the screed, no time is required to dry the subfloor;
- Semi-dry - is something between a wet and dry screed. The semi-dry mixture is diluted with a limited amount of water, sufficient to hydrate the cement molecules. In this regard, it takes no more than 7-8 days for the subfloor to completely dry.
Maintenance materials and tools
What is needed to care for the screed during its maturation, hardening, and drying:
Covering material .
Typically, 80-100 micron polyethylene film is used; a thinner, less flexible material will also work, but it is not very comfortable when laying. Agrofibre, any fabrics (except synthetic ones that are completely sealed, without absorption properties) are not suitable, as they “breathe” and absorb moisture.You can cover with plastic sheets and the like, but the material should be as light, dense, smooth, and even as possible.
The edges and edges of the screed must also be covered. The film can be pressed down with light wooden planks, but their weight should be light enough not to leave any marks;
- Humidification devices during the first few days of drying. This can be done manually, but uniformity and not abundance is important here, so the best effect is achieved by sprinkling or spraying water.
Ideal for this measure are manual or automatic (with an electric pump) spray guns, spray guns; in extreme cases, you can moisten an ordinary broom;
- Water at room temperature or the same temperature as the medium being served can be taken a little warmer, but only a few degrees, to avoid rapid evaporation, which deforms the mixture. Too cold a liquid will penetrate into the solution more slowly and be unevenly distributed in it;
- Moisture meter. To find out how drying occurs under certain conditions and whether they need to be adjusted. The analysis will show whether you still have to wait or whether it is already possible to lay the floor covering, and whether to take additional measures in the form of piece drying or vapor barrier primers.
You can also determine the level of this parameter using traditional methods - spreading a paper napkin on the surface. But this method provides only limited information: if the material is wet, then the screed is still drying; if not, then you need to wait a few more days.
That is, it is difficult for them to track the detailed dynamics and speed of the process, and this is important in some cases, since exceeding the permissible value by even 1% can cause the flooring adhesive to hold poorly, mold, mildew, and deformation on sensitive materials, for example, will appear. , on the parquet. However, if the napkin is completely dry, then with some confidence we can say that the base is ready;
- Shoe pads . It is not recommended to walk on undried screed, but for the semi-dry version this is possible after 6-10 hours or the next day with a light tread for a person weighing up to 100 kg. But still, it is advisable not to do this on the first day, and if the need arises, then before walking, attach wide boards-overlays to the shoes, like snowshoes;
- Grinding machine or hand floats for polishing hardened screed.
Sand concrete
When a floor is formed using sand concrete (CPC), grade 300 cement is used. It is this composition that is considered the most universal. This material is actively used to produce a solution that can serve as a floor leveler. Read more about floor levelers in the article.
To accurately determine the readiness of a screed made of M300 sand concrete, it is necessary to focus on the recommendations for cement compositions. All time parameters are almost the same. Here you can read about floor screed made of sand and cement.
Ideal conditions
The parameters of the optimal environment for drying a semi-dry screed are as follows:
Additional hydration in the first 7-10 days. Moreover, this should not be pouring, but rather splashing a small amount of water.- Preventing the natural removal of moisture (evaporation) by covering with film or similar material for 3-4 days after backfilling; the overlap of the material along the edges should be 30-40 cm.
- Indoor humidity is about 60-65% (ideally 70%).
- The temperature is about +20° C. Higher or lower values are allowed (for example, in the south in summer it can reach +25 or more, in the northern regions it can be close to +5). But in any case, the value should not be lower than +5, otherwise the process of gaining solidification hardness will be stopped, and the final material will be loose, as it will freeze.
If the temperature is excessively high, then more abundant humidification will be required to ensure high air humidity. That is, these problems can be solved by corrective measures.
- It is necessary to ensure that the room is as hermetically sealed as possible, if possible, so that a special humid microclimate is created in it. However, if this is not possible, then a high-quality polyethylene cover solves the problem.
- There should be no drafts, changes or jumps in environmental parameters. Stable conditions are a guarantee of uniform, high-quality hardening.
- The absence of moisture-absorbing substances (fabrics, wood, plaster, etc.) and releasing chemical components (oils, petroleum products, acids) in the room. Evaporation of pure moisture is acceptable and even desirable.
It would be more correct to call the process of screed becoming ready not drying, but hardening in a wet state. Of course, the material dries at this time, but this process should not be completed before reaching a certain level of hardness. If you speed it up, the base will crumble.
Why should you not use it before it dries?
When installing a semi-dry screed, it is important to wait for it to dry completely. When laying a finishing coating on the surface of a raw cement-sand mixture, a number of negative consequences may arise, namely:
- Drying of the material is inevitably accompanied by a gain in design strength. If some amount of water remains in the porous structure of the screed, the surface may not have the proper load-bearing capacity, which will cause its local destruction under mechanical stress.
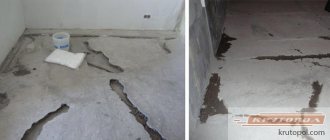
Rice. 6. Destruction of a screed that has not gained strength
- If water remains in a freshly laid structure, it continues to evaporate even after the installation of the finishing material. Parquet boards or laminates absorb moisture well, which entails their swelling and loss of decorative properties.
Rice. 7. Swelling of parquet
- When installing linoleum, PVC panels or other moisture-proof materials on top of a damp screed, moisture may stagnate between the two surfaces, which causes the growth of bacteria, the appearance of fungus and mold.
Rice. 8. Mold on the surface of the screed
- Due to the low moisture content, semi-dry screed is practically not subject to shrinkage. At the same time, the material decreases slightly in volume, which causes hairline cracks to appear on the surface. This results in cracking or peeling of the ceramic tiles.
Rice. 9. Shrinkage of semi-dry screed
The main problem with premature installation of a clean floor is the general increase in humidity in the space being used, which negatively affects the condition of the furniture, as well as people’s health.
How to properly care after pouring?
Care and maintenance of semi-dry screed after it has been poured before and after final hardening:
- Immediately after backfilling, cover with plastic film, with an overlap of material (extending beyond the edges) of 30-40 cm, it is advisable to press the ends to minimize the gaps and the penetration of air inside, which accelerates the removal of moisture from the solution.
- Moisten by spraying after 3-4 days, cover again. This is especially true if the heating is turned on in the room, which is recommended to be turned off for this period, of course, if temperature maintenance is not required.
- The optimal temperature is +20…+24° C. Other values are allowed, but it must be taken into account that the hardening time may vary slightly. If the value is below +5° C, then it is necessary to increase it with heaters and heating. In this case, heat flows absolutely cannot be directed towards the solution; they are directed towards the ceiling (devices are deployed, enclosing sheets are installed).
If the air dries out, it is recommended to place dishes with water in the room. Hardening and drying cannot be forced. Artificial drying is possible only after final hardening, when the moisture in the solution remains constant (due to the humid climate, soil) and is not suitable for a certain type of floor covering;
- If the air humidity is below 60%, then it can be increased by placing dishes with water in the room or periodically using humidifiers from sprayers. You can also increase the moisture content of the solution itself.
Drafts and changes in humidity and temperature should be especially avoided for two weeks during the hardening of the screed.
The screed is ready for work - how to determine
The readiness of the coating is determined by two points:
- the material for the bundle has already set;
- the coating is ready for any job.
The first stages of processing are carried out almost immediately – within a day. It is important that the entire area is uniform in color and has no deviations. However, avoid placing large objects with enormous weight on the surface.
An experiment to determine whether the treated surface can be loaded can be carried out at least after a week. If you start doing this earlier, the mixture will begin to collapse, and the work will be pointless.
Drying time and operating instructions
Drying too quickly should not be allowed, so it is necessary to moisten the laid solution after the first 3-4 days .
If the temperature at the facility is high with low air humidity, then after 2-3 days. The surface should be sprayed several times throughout the day.
Let us remember that this is relevant, since a semi-dry mixture contains less water, and the solution should harden wet and remain so for as long as possible during the process of slow maturation. For the same reason, the evaporation of moisture from the mixture must be stretched out over time as much as possible by covering it with film.
After 1 week, or 8-10 days in high humidity, the screed covered with polyethylene should dry without any intervention.
Ensuring humidity is of great importance - this is the basis of quality , it is especially important to maintain it in the first week, and preferably for 8-10 days. It is during this period, at about +20° C, that the mixture will gain 70% of its hardness; and cement will acquire a maximum of 90% strength within 1 month.
Moreover, even after laying the final floor covering, due to the peculiarities of hydration processes, the solution will still draw moisture from itself and from the environment for quite a long time.
One of the advantages of a semi-dry screed: after filling the mortar, you can walk on it, but carefully (with a light tread), preferably with special wide pads on your shoes, after 6-10 hours.
After this period, the material is already able to withstand a person of average build, and other loads of up to 100 kg are also possible. However, some experts recommend waiting at least 12-18 hours. The composition can be exposed to stronger influences after 4-6 days.
You cannot load the surface with a weight exceeding 100 during the first 10 days. Finishing work can be done, but during this period it is not recommended to place scaffolding or stepladders on the screed.
Heating cannot be used unless it is required to maintain the temperature above +5. In any case, you cannot turn on the heated floor for 30 days, even to maintain the microclimate, since it is located too close to the base.
Average hardening time for semi-dry screed:
- 35 mm thick from 7 to 10-13 days;
- for a layer of 40-50 mm – a little more than 2 weeks;
- for 70-80 cm – 3 weeks;
- 100 mm and more – 4 weeks.
The hardening time in our case is both one of the advantages, since it is much shorter than that of a traditional wet base, and a factor that determines more thorough maintenance.
Warm floor
In order to answer how long it takes for a heated floor screed to dry, it is important to determine its time for each type of screed. Usually, when buying a package of the mixture, you can determine how long it will take on average to wait.
Plaster
If we are talking about a gypsum screed whose layer is no higher than 4 cm, then it can set immediately within 4 hours. But it will take about a week to start arranging it and laying the finishing coating. You need to lay ceramic tiles, then start doing this in 4 days.
Plaster
Of course, thicker layers will take more time. Each centimeter takes an average of 42 hours. This is for the first four. Next, the countdown starts at 90 hours for the next centimeter. How long does it take for a 10 cm floor screed to dry? About a month.
How long does it take to lay cement-sand screed in an apartment?
What can be said about the hardening of cement screed for underfloor heating? How thick should it be? How to make a screed in special conditions?
It takes about a week for 4 centimeters to dry, then 15 days are added for each centimeter.
For sand concrete, the drying time is the same. To reduce drying time, use all kinds of additives.
Cement
Thanks to them, the time is reduced significantly. For example, thanks to a proprietary screed, a cement floor can be ready within a few hours.
How long does it take for the dry mixture to harden?
How to make a dry screed, what kind of dry mixture should be prepared, how long will it take for a dry floor screed to dry? Pretty fast. However, while this is convenient, it does have its drawbacks.
For example, the base will not be wet enough, and therefore you cannot lay tiles or laminate on it . What makes dry screed dry so quickly?
Dry
There are several factors that speed up this process:
- converter. Thanks to it, the drainage function is performed. This helps remove moisture from the inner layer faster;
- accelerator. Thanks to it, there is no need to add a lot of liquid to the solution;
- thinner. The consistency of the solution will become even more plastic. This way, not much liquid melts into the solution - it’s not really needed there.
Thanks to these features, it will take just a few days – 3-7 – for the screed to dry completely.
More information can be found on the manufacturer's packaging.
Checking the humidity level
A popular way to check whether the screed has dried is to take a paper napkin, place it on the surface, and press it with a hard object of the same shape (for example, a tile). If after 24 hours the product remains dry, then you can begin laying the flooring.
Special devices for measuring humidity:
- Carbide hygrometer , a similar sophisticated laboratory equipment. Gives extreme accuracy, indicators in cm%, analyzes within the thickness of the material. But these are not very practical devices; they are mainly available only to companies that are constantly engaged in such work. The devices violate the integrity of the mixture (you have to stick probes in), they are expensive. Buying them for rare, single use is not particularly advisable.
- Electronic moisture meters . Indicators are not in CM, but in %. As a rule, it is precisely such devices that are used to analyze screeds in everyday life, since they are simple in themselves and in use, not too expensive, and do not violate the integrity of the object. They analyze only the surface, the accuracy is somewhat less, but for the vast majority of work in private construction they are more than suitable.
- Conductometric devices are not used because they cannot measure humidity below 5%.
For a finished screed, instrument readings should not exceed CM 2% and CM 1.8% if there is a heated floor. But these are indicators in CM% for carbide hygrometers and similar complex laboratory equipment, which are used less frequently due to their complexity and high cost.
We are still considering this measurement scale, since such indicators are indicated in GOSTs and other standards, and we need to convert them into the values shown by ordinary household, more common moisture meters.
Humidity standards in “CM%” are indicated in official standards , and these are units of complex laboratory methods that are not used in real conditions due to cost. More often, the dielcometric method and household moisture meters with other units of measurement are used.
Therefore, we make a translation: 2SM% corresponds to 3.4%, and we correlate the remaining norms in the same proportion. That is, the maximum for the readiness of a semi-dry screed according to a household moisture meter, which should not be exceeded, is 3.4%, and in the standards of some CIS countries this figure is 4%.
Compliance with the norms for the humidity of the solution is important, first of all, for the subsequent floor covering, since if the value is violated, it will absorb moisture, deform, the glue will not harden, adhesion will decrease, and mold and mildew will appear. In this regard, stone materials are more stable, therefore the moisture level in the base under them is higher.
Important Tips
Measuring the moisture content of the screed using a moisture meter
Since the drying time for the above types of mixtures is approximate, it is better to determine the moisture level of the coating before finishing the floor. This can be done with:
- Carbide hygrometer - with high accuracy determines the degree of drying of not only the top, but also the inner layers of the coating;
- Moisture meter - allows you to determine the moisture content of the base without introducing the device into the layers of the coating.
If you need to at least approximately find out the degree of humidity of the screed, use the folk method:
- Place a paper towel on the subfloor;
- Press down the napkin with a small weight;
- Cover the prepared structure with polyethylene;
- If the napkin is not wet the next morning, it means you can install the finished floor.
What to do if it doesn't harden?
For example, the layer thickness is 8 cm, measurements were carried out with a dielcometric apparatus, that is, only the surface was analyzed, indicators of 3.3-3.4% were obtained, which corresponds to SM 2%. At first glance, everything is fine, but inside the thickness of the solution the figure may be equal to 5.7...6.3%, which is unacceptable.
If abnormal humidity persists on the surface, and especially in the thickness of the screed, you can wait longer and dry the material individually, but this will not always help, since, as a rule, this phenomenon is caused by the humidity of the climate or soil.
It is more expedient to make a vapor barrier with epoxy special primers (TDE GPIEP-2K, Uzin PE 480) in at least 2 layers. These products block any residual moisture and prevent the appearance of fungus.
Concrete
Experts use a simple calculation of the hardening time of a floor screed made of concrete. For each 4 cm layer you need to wait 7 days. If you are pouring a thicker screed, then you need to double the time for every additional centimeter. Based on this, we can safely say that to dry a concrete floor with a thickness of 8 cm you need to wait 12 weeks.
Actions after final drying
After the final hardening of the solution, it is polished with special graters and machines.
Immediately after filling , the holes and recesses from the beacons and screws are sealed with a ready-made solution , and then the maintenance is standard: wetting, grinding. When cracks appear, gaps, after the screed has matured, special mixtures are used to smooth them out, but we especially pay attention - only after final hardening.
You can turn on the heated floor, as well as use artificial drying, only after reaching the maximum hardening period - after 4 weeks.
Cement
As a rule, the drying time of the cement screed can be determined on the packaging. However, in addition to this, there are many parameters that influence how quickly a floor made of cement will harden. To calculate the time of full readiness, it is necessary to include in the calculation such parameters as the thickness of the coating layer. The duration of readiness is directly dependent on the atmospheric conditions in the room or outside.
The duration of this process can reach up to a month. In addition, the drying time is influenced by the material used. It is impossible to determine the exact drying time of the cement screed. On average, the hardening process can last 2.5 -3 weeks.
After just a few hours, you can walk on the completed screed without causing any harm. However, it is not recommended to carry out cladding measures in this case. The duration of readiness will depend on the temperature, thickness and type of material. The cement screed sets after 10-12 hours.
Laying
Under laminate
Taking into account all the standards, the surface for installing the laminate should not have differences of more than 3 m by 1 m. If you are performing a wet screed under the laminate, then you must use special mixtures that are capable of self-leveling. Thanks to them, it is possible to facilitate the process of preparing the base. You can also use reinforcing fiberglass mesh for leveling. The floor must be poured in small sections and leveled using a special device.
When the screed has dried, you can proceed to sanding. The screed under the laminate takes about 2 weeks to dry. But here everything depends on the layer being laid. The process of installing the laminate is carried out after it has gained 50% strength.
Consequences of using wet screed and factors affecting its drying
Any construction and repair work of a different nature is very similar to each other in that the deadlines are always running out. And almost everyone is overcome by the tempting desire to start laying the final layer of flooring, much earlier than recommended. But you shouldn’t hope for “Russian luck” in this matter, because in 20 cases out of 20, an unsatisfied basis makes itself felt in a bad way. You can observe one of 5 consequences, or all at once:
- Large and fast shrinkage;
- Cracking of both the screed itself and the facing materials. It manifests itself especially quickly on self-leveling floors;
- Rotting and the appearance of fungal mold;
- Finish peeling off. This often happens with ceramic tiles;
- Untidy stains appear on laminate or linoleum that cannot be removed.
Therefore, do not neglect building codes and recommendations that were developed through bitter experience and always maintain the drying time of the screed.
You also need to know 5 main factors influencing it:
- Compliance with the solution preparation technology. At this stage, you need to find a middle ground between the convenience of pouring (which provides a more liquid composition) and a rigid concrete solution (the less moisture in the mixture, the faster the drying process);
- Types of materials used for preparing the solution and type of finishing cladding;
- Thickness and number of layers. The greater their quantitative value, the more difficult it is for the ceiling to dry;
- The type of base determines how long the floor screed should dry. If the house is located in a low area or there is a damp cellar underneath, then a waterproofing layer is simply necessary. And ordinary film will not be enough. In addition, with a concrete screed, its integrity will be compromised within a couple of years. When moisture comes from under the floor, the drying time significantly increases;
- Humidity and temperature indicators of the room itself. High humidity levels and low temperatures prolong the drying time of the concrete screed.
Also, do not confuse two very similar states of the screed: setting and complete drying. The first process lasts on average from 5 to 8 hours, after which you can walk on the screed and carry out any other construction work. But it is highly not recommended to load it with furniture. But the required moment of drying, after which finishing can be carried out without fear, occurs from two days to several months.