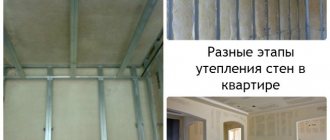
In the construction environment, plasterers are considered to be among the elite of finishers. And this is not surprising, since plastering work is the most complex of all types of finishing. At the same time, the most problematic stage of the technological process of leveling walls is the installation of beacons. Therefore, many who like to do everything with their own hands do not risk taking on this work. However, if a beginner manages to understand all the intricacies of how to correctly place beacons under plaster walls, then he will definitely be able to perform other types of work.
Correct installation of beacons with your own hands for perfect plaster of all types of walls
Among the finishing works, the most important and labor-intensive stage, requiring highly qualified performers, is considered to be plastering the walls.
And if the repair is done with your own hands, the biggest difficulty is installing beacons on the wall under the plaster. This is not surprising: although, in theory, it is clear to everyone that the beacons should serve as guides for the vertical movement of the rule that is used to level the mortar, there are a large number of questions that confuse the inexperienced finisher: how to attach the beacons to the surface of the wall? How to ensure that the wall is level after plastering? Do I need to remove beacons after plastering the walls?
Of course, before you start work, you need to carefully study all the technological aspects.
conclusions
- Beacons are necessary elements in order to make the wall smooth, without bulges or irregularities;
- Most often, beacons made of plastic and stainless steel are used in repair work. The latter are more in demand, since they do not need to be removed after the alignment procedure;
- V-shaped elements are used for corners, T-shaped ones are intermediate beacons;
- You need to select several mounting points for one beacon so that it fits tightly to the wall;
- Beacons are attached to the wall with a mixture of cement, sand and alabaster, or using regular drywall adhesive.
Preparatory work
First of all, the wall is thoroughly dusted and primed.
Attention! The most important stage in plastering work is determining the amount of deviation of the walls from verticality. To do this, use a level, preferably a water level, a laser level, or a long bubble level.
You can apply a rule with a built-in level. You will also need a plumb line - a cord with a weight at the end, a cord or thick thread and screws with a dowel.
The main task of measurements is to determine the most and least protruding points of the walls. Beacons are usually installed in increments of about one and a half meters, since it is inconvenient to work with a longer rule. A novice plasterer may need to install beacons more frequently. It should be noted that it is the marking stage that is the most critical. If the marking is done poorly, with a violation of verticality, the wall surface will not be able to be properly leveled, which will entail an increase in putty consumption and an increase in the cost of further types of work.
How to set the markings correctly to mount beacons
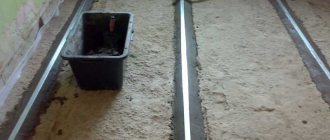
In the places where the beacons are supposed to be installed, vertical lines are drawn on the wall. Such markings begin 20 centimeters from the corners.
After the most protruding section of the wall, which is usually called “zero,” has been determined, you need to mark the level of the future outer surface of the plaster. To do this, holes are drilled in all four corners of the wall, dowels are driven in and screws are tightened. The height to which the screw leg protrudes above the wall should be equal to the amount of deviation of the wall in this place from “zero”. To achieve this, you need to stretch the cords between each pair of screws horizontally and vertically, and ensure that they are even, without kinks, and spaced 2-3 mm from the most protruding part of the wall. The diagonals of the resulting rectangle should be equal to each other.
Calculating the number of beacons is simple: you need to count the number of marking lines - this will be the required figure. Beacons are produced in lengths of 2.5 m and 3 m, so for plastering work in rooms with a ceiling height significantly greater than 3 m, you will have to calculate the total footage of the beacons and divide it by the length of the beacon. There are several options for installing beacons for plastering walls. Let's look at the three most common ones: using putty, using self-tapping screws, and molding beacons from gypsum plaster.
How to check the flatness of a surface with a laser level
When leveling walls using a laser level, it is worth noting only the installation of slats. You need to turn on the vertical plane of the device and fix it so that the projected plane runs strictly parallel to the wall. In this case, the laser does not build the leveled wall itself, but a plane parallel to it.
If the laser is interrupted and does not reach the end of the wall, then the surface is not perfectly flat. The instrument should be moved slightly and the change in the laser observed. To clarify differences on the wall, a wooden or metal meter with a millimeter scale is best suited.
To ensure that there are no moving parts on the instrument, this may cause inaccurate measurements (for this reason, it is better not to use a tape measure).
Next, you should select vertical sections at a distance of several centimeters from each other and install the measuring instruments perpendicular to the surface. It is necessary to note the measurements through which the laser will pass and repeat the procedure after 70-100 cm. Based on these data, you can approximately imagine the degree of curvature of the wall.
If the laser is interrupted and does not reach the end of the wall, then the surface is not perfectly flat.
Option 1: installing beacons on gypsum putty
This method is most common. It is simple, quick and allows you to install the beacons yourself without any problems, as well as easily remove them after completing the plastering work.
Materials and tools
For this installation option you will need:
The working process
Following the instructions on the package, mix the putty solution. You should not knead a large amount of the mixture at once, as it sets within about 40-60 minutes, during which time you need to use it all up. Immediately before starting work, thoroughly moisten the wall using a sprayer.
The installation of beacons begins with corner lines. Small portions of the putty mixture are applied to the marking along the entire length of the line in increments of 15 - 20 cm. The greater the deviation of the line from the vertical, the thicker the layer should be.
The beacon is placed on top of the solution strictly along the line, adjusting its position using a level. To align it in a vertical plane, press the side that needs to be brought closer to the plane of the wall, checking the level and the stretched cords. If the height of the lump of gypsum putty thrown onto the wall is not sufficient, carefully remove the beacon from the wall and add mortar.
The second corner beacon is installed in the same way. Until the mixture has set, it is possible to adjust the installation of the beacons.
After this, allow the gypsum putty to dry and check the correct installation of the beacons using a level. Then intermediate beacons are installed, the tops of the profiles of which must be in the same plane with the stretched cords.
Completion
The gypsum putty is allowed to dry thoroughly before plastering. After the wall is plastered, the beacons are carefully removed, and the grooves that form in the places where they are installed are smoothed out with a small amount of solution. It is believed that this is not necessary if the wall is plastered under tiles, but in the case of painting or wallpapering, it is recommended to remove the beacons without fail, since traces of rust may appear on the finished surface of the wall. This happens because during the plastering process the rule repeatedly passes with force along the tops of the beacons. Thus, even though the lighthouses are galvanized, after finishing plastering the room, the coating on all the upper edges of the lighthouses is torn off. This is what opens the way for corrosion.
Calculation of the number of beacon lines
The number of lines depends on how long the rule is. Its ends should rest on the beacons, but so that there is 15-20 cm left to the edges. So, if the length of the rule is 1.8 m, then the distance between the profiles varies from 1.4 m to 1.5 m. Marking begins from the corners , from which they deviate at least 10 cm. Subtract 20 cm from the total length of the wall and divide by 1.4 or 1.5 to obtain the number of lines.
If the last gap is longer than the rule, it is divided in two.
The number of beacon lines is determined based on the length of the rule
Option 2: installing beacons using self-tapping screws
The advantages of this method are the speed of installation and the ease of setting the level of the future plaster surface. It is especially good for beginners, as it allows you not to worry about the time it takes for the putty to set and the violation of the verticality of an already installed beacon as a result of accidental contact with a hand or tool.
Materials and tools
For this installation method you need:
The working process
On each marking line, six holes are drilled with equal spacing, 8 mm in diameter and 50 mm in depth. Then dowels are hammered into them and screws with a length of 50 to 80 mm are tightened, depending on the calculated maximum thickness of the plaster layer.
Attention! The depth of screwing is determined by the level and plumb line so that their heads are in the same plane with the marking cords.
Then a special mount for the beacon is mounted on the screw. Fastenings come in plastic and metal of various designs. After these elements are secured to all the screws, the beacon is installed in their sockets. All beacons are mounted in this way, with constant control of the verticality of their installation.
Completion
Plastering can begin immediately after the installation of the beacons is completed. This is the most important advantage of the method using self-tapping screws.
When it is necessary?
Even expensive and high-quality finishing materials look bad on uneven walls. Expensive wallpaper, ideal tiles from the latest fashion collections, Venetian plaster, and other finishing methods require smooth surfaces. Due to the incidence of light on the plane, any deviations from the surface level will create shadows that will appear as spots or significant defects.
Therefore, you first need to plaster the walls, and with increased precision, so that you get an even plane in all areas and points of the surface. No other devices or finishing techniques can cope with the task better than guiding plaster beacons. After all, leveling without plane level control is a time-consuming and thankless task.
The reasons why you still need to use plastering products to get the job done efficiently are the following:
- Saving time . Even those workers who professionally engage in finishing work still recommend using beacons. This will significantly reduce time costs, because it is easier to make a plane at the same level from the first layer than to adjust it several more times, including the drying time of each applied layer.
- Saving solution . The maximum distance from the wall level, even in places with certain recesses, will be approximately the same. Errors and the creation of unevenness due to the application of too thick a layer of plaster are practically eliminated. Movement of the rule exactly according to the level of the guides automatically removes excess, leaving only a flat plane.
For those who have not done such things before, beacons are a must-have tool. After all, without experience, it is difficult to determine “by eye” where more solution needs to be applied and where it will be superfluous.
Option 3: rubbed plaster beacons
This option is used if you need to apply a minimal layer of plaster. A prerequisite is that the plaster itself must be gypsum; this method is not suitable for cement-sand plaster.
Materials and tools
The working process
Dowels are installed on the marked line and screws are tightened, 5-6 pieces per line. Then, using a level or rule, the screw heads are aligned in the plane of the outer surface of the plaster. The entire line is covered with a fairly thick layer of gypsum plaster mortar, then the plasterboard profile is pressed against the wall until it comes into contact with the screw heads, and the excess mortar is cut off with a spatula. The profile is left in this position until the solution begins to set. After this, the device is removed, and the remaining beacons are formed in the same way.
Completion
The beacons are left until completely dry. The advantage of this option is the minimum layer of plaster and the absence of the need to remove the beacons after plastering the walls.
Of these three options, each master can choose the most preferable: if the budget is limited and you need to spend as little plaster as possible to level the wall, it is recommended to use gypsum beacons.
Attention! When a beginner takes on plastering walls for the first time, it is worth using the method of installing beacons on self-tapping screws and special fasteners, since this option does not require high qualifications, it is the simplest and fastest.
If the walls are being prepared for painting, it is advisable to use a method that involves installing a metal beacon on gypsum putty, which allows you to remove the beacon after plastering to prevent rust from penetrating the surface of the painted wall.
Source
Pros and cons of lighthouses
This table will help you choose the appropriate type of guides to create a perfect plane.
| Name of beacons | pros | Minuses |
| Metal | They are inexpensive, available in different sizes, and easy to use. | It is necessary to remove from the wall after use due to the appearance of rust, easy to bend and deform. |
| Wooden | “Old-fashioned” cheap method, for those who do not need a perfectly flat surface. | It doesn't always turn out smooth and neat. |
| Plastic | Easy to install, non-corrosive, light weight, can be left in the wall. | They are used only indoors, they react to frost with brittleness and deformation, and cannot withstand mechanical loads. |
| Reusable steel | Rigid and durable, not subject to deformation, can be used repeatedly. | They are expensive, heavy, very thick, they are removed from the plaster that has not hardened completely, otherwise they will be deformed, and the plaster will be seriously damaged. |
| Homemade | A cheap option, they cannot be dismantled, as they are completely covered with plaster. | They may not turn out completely even. |
| Strings | A budget option, mounted on walls of different heights and lengths. | If fastened incorrectly, the plane will turn out uneven. |
| Laser | The beacons are positioned perfectly evenly on all planes. | The device is not cheap and requires careful handling. |
After weighing all the pros and cons, you can choose exactly the option that is most acceptable in a given situation.
Why is it necessary to display beacons?
The beacons form a flat plane, which in the future will be the plane of the plaster. These elements create a kind of reference level. The lighthouses themselves are made of steel or wooden slats. In most cases, galvanized steel slats are used.
The beacons are attached to the wall with a certain pitch (800 - 1300 mm), the distance should not exceed the length of the rule, otherwise the whole point of alignment with the beacons is lost. A solution is thrown between the slats, then it is usually supported on two adjacent beacons and pulled from the floor to the ceiling. The rule cuts off excess plaster, resulting in a smooth surface.
Linear parameters of the created beacon system
What rules should be followed when placing a beacon system on the floor surface:
- First of all, direction. As a rule, the direction of the beacon lines or installed guides is always (with rare exceptions) parallel to the long side of the room, i.e. exactly the way it will be poured. If the configuration of the room requires changes in the direction of pouring at its final stage, then the beacon system can repeat this pattern.
- The distance from the outer guide to the parallel wall should not exceed 250 ÷ 300 mm. If this is not observed, when pouring, areas with a low level may appear along the wall - dips that will have to be added additionally.
The rule must move freely along the guides with a certain margin on the sides
- The distance between adjacent lines of beacons is, in principle, arbitrary. They are approximately evenly distributed across the width of the room, but taking into account that the rule by which the screed will be leveled protrudes on both sides of the beacon lines by 150 ÷ 200 mm.
There are, of course, exceptions to this issue. So, for example, to lay a dry screed, you may need 6 ÷ 7 support guides per 3 meters of room width, regardless of the length of the existing rule.
What to make beacons for plaster from
For lighthouses, straight steel or wooden slats are usually used.
Wooden elements are rarely used, since when exposed to moisture from the solution, the wood can swell and deform.
Steel beacons are usually made of galvanized steel and have a T-shaped profile. There are also slats without galvanized coating. They rust faster, but it is important to understand that it is not recommended to leave any beacons inside the plaster.
Gypsum beacons are rubbed from the plaster mixture, no auxiliary means are used - nothing needs to be removed from the wall.
Product selection criteria
To determine which elements are most suitable for renovating your home, consider the classification of devices according to various parameters:
- Materials: plastic, stainless steel. Plastic beacons are used if you plan to remove elements after the plastering procedure. Plastic beacons cannot be left in the wall, as this material is not reliable enough. Stainless steel products are a completely different matter. This metal is resistant to moisture, harmful fungi and chemical building materials. Therefore, installing stainless steel beacons for plastering walls is the best option, in which it is possible to avoid subsequent dismantling of the elements;
PVC plaster beacon
Galvanized plaster beacon
Attention! In order not to dismantle steel beacons after completion of work, they must be of high quality. Otherwise, as a result of oxidation and the appearance of rust, stains and stains will appear on the final finish!
- By size : there are beacons ranging in size from 3 to 30 mm. The choice of product according to this parameter depends on the depth of the depressions or bulges in the wall or on the thickness of the plaster layer. That is, the more plaster mixture needs to be applied, the larger the size they should be. It is worth noting that most often in construction products of sizes 3, 6 and 10 mm are used;
Classification of lighthouse guides by size
- By length: products are distinguished from 2 to 6 meters in length. Guides 2-3 meters long are often used for renovation of classic residential buildings. Six-meter devices are used for plastering warehouses, industrial premises, etc.;
- Shape: There are V-shaped and T-shaped guides. The first ones are mounted in the corners of the room, while the second ones are installed on a regular wall plane.
V-shaped beacon
T-rail
The above classification of lighthouse guides will help you choose the most optimal products that will solve the problem as efficiently as possible.
Materials and tools
Before selecting a tool, you need to determine how to install the beacons. We list everything that may be required, but the number of materials and tools may vary depending on the installation method.
A laser level will greatly facilitate your work, but its readings often need to be compared with other devices.
There are ways to install beacons without using a laser level; in this case, only plumb lines and twine are used. This method is quite complicated for beginners, so even if you don’t have a laser level, it’s better to purchase one.
Preparatory work for the installation of beacons
Before the actual installation of the beacons, it is necessary to carry out preparatory work.
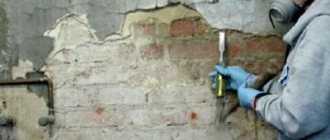
Preparing the wall
Preparing the wall begins with cleaning the base: you need to remove dust, grease stains, mold, and whitewash. If there are traces of fungus on the wall, then these places need to be treated with fungicides. If the base is old plaster, then it needs to be tapped to reveal voids. When the surface makes a dull sound, in professional parlance “bangs”, it means you need to remove the old base, since in the future such an unreliable finish may move away from the wall.
If there are protruding pieces of old mortar on the wall, they need to be removed using a spatula. These pieces will interfere with the normal installation of beacons.
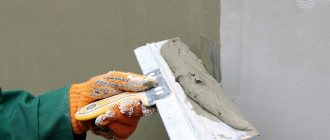
Surface primer
The surface is primed before installing the beacons. This is important, because otherwise the wall under the lighthouses will not be able to be processed.
The soil is selected depending on the type of base and the composition of the plaster that is planned to be applied.
For porous surfaces such as aerated concrete, moisture absorption should be limited. For this purpose, stabilizing compounds are used that form a film on the surface.
Fragile substrates that do not have a strong structure should be treated with deep penetration primers. These compounds impregnate the surface and strengthen the material.
For gypsum plasters, concrete bases must be treated with concrete contact. This quartz sand-based primer helps improve substrate adhesion. It forms a rough layer on the surface, which allows the gypsum plaster to grip and not slide off the wall.
It should be understood that concrete contact from most manufacturers (with the exception of Ceresit C19) is not intended for use with cement-sand mixtures. The principle of hardening of cement plaster is based on its growth into the base structure, so a layer of concrete contact will only complicate this process. Also, the adhesion of this type of primer is lower than that of cement plaster, so the finishing can simply tear the primer away from the wall when it shrinks.
Beacon markings
With any installation method, it is important to establish a reference point - this will be the most protruding part of the wall. In this place the layer of plaster will be minimal and all other points of the wall must be adjusted to this position.
There are several ways to determine the most prominent point, by marking with twine or using a bubble level.
In the first case, you need to find the upper corner points; they are marked at a distance of 10 cm from the wall and ceiling. Then holes are drilled at these points and screws are tightened. You should not screw the hardware all the way, it should be 3-5 cm away from the base to form a plaster plane. A plumb line is attached to the self-tapping screw, which shows the vertical. We set aside a similar distance of 10 - 20 cm from the floor, and also place a self-tapping screw at this point. We twist it according to the plumb line.
This operation must be carried out on both sides of the wall. The screws are connected to each other using twine. It turns out a rectangle with diagonal lines, this is the flat plane of the wall.
We find the locations of the first beacons; to do this, we make 10 cm indentations from the vertical sides of the rectangle. We divide the horizontal distances between the outer beacons into segments of 80 - 130 cm. The beacons will be located in these places. If there is a door or window opening on the wall, then you need to make an indent of 10 - 15 cm from it and mark another beacon.
To determine the most protruding point of the wall, take a square and measure the distance to the threads that mark the plaster plane. Measurements can be taken on paper or directly on the wall. The place with the smallest distance to the plaster plane is the most protruding. The first lighthouse is usually attached to this location.
If we have a laser level, the device does all this work for us; it creates a vertical or horizontal plane invisible to the eye, which is projected onto objects in the form of lines.
The second method is based on the use of a laser and bubble level. We apply a long bubble level (2 m) in different directions to the plane of the wall. This is how we find the most protruding area. Then we find a protruding point relative to the vertical. The vertical in this place can be marked with a level, or with a plumb line, as in the previous case.
After marking the outer beacons, you need to mark the intermediate ones; the distance between them should not exceed the length of the rule. At this stage, you already need to determine the installation method, since further work will be different.
Before starting work, you need to decide which method of installing beacons will be used, because this will at some points affect the progress of work.
Installation of beacons on mortar cakes
This method does not involve the use of auxiliary fasteners and screws, and the person performing the work requires certain experience and skills. Small mortar cakes are applied to the places where the lighthouse is attached. A lighthouse is glued to them on top.
What will you need?
This method does not require additional auxiliary means, only a solution is needed. In this case, it will be very useful to have a laser level.
Advantages of the method
Disadvantages of the method
Installation of beacons on screws and gypsum plaster
The installation method using self-tapping screws involves installing hardware that will serve as a support for the lighthouse. They will play the role of a “zero point”, below which the lighthouse cannot be sunk. This method involves the preliminary installation of self-tapping screws. The most protruding point on the wall will be the place where the first hardware is attached; we drill a hole in it and hammer in a dowel. Use a screwdriver to tighten the self-tapping screw until the end. First, you need to stick a piece of masking tape on the screwdriver. When the self-tapping screw is tightened, we make a mark on the tape on the plaster level, which is marked with ropes or a laser level mark.
Having this mark, we tighten the screws under the other beacons, aligning the mark on the screwdriver with the laser line or rope. The further steps are no different from the first method; we apply a solution to the screws, into which we press the beacon.
What will you need?
In this method, in addition to all the tools, you need self-tapping screws, dowels and a drill for drilling holes.
Advantages of the method
Disadvantages of the method
Installation using a platform for a lighthouse
This method involves the use of various fasteners for beacons; they are installed on self-tapping screws and provide a more reliable fixation than in the first two methods. In this case, after installing the screws, we immediately attach the beacons to them using fasteners. The solution here acts as an additional retainer so that the rail does not dangle.
The solution must be applied locally near the fastening points so that the beacon is fixed and does not sag. In this case, there is no need to make a continuous layer of mortar on both sides of the lighthouse; such separation of plaster layers on different sides will lead to uneven hardening.
What will you need?
The kit is similar to the previous installation method: self-tapping screws, dowels, and a drill for drilling holes. Mounts for beacons will also be needed.
Advantages of the method
Disadvantages of the method
Rubbed plaster beacons
This method does not involve the use of plaster or steel beacons; instead, gypsum plaster is used. The installation method is quite complicated for beginners. For insurance, self-tapping screws are sometimes pre-installed. At the same time, you need to understand that the screws are then difficult to remove from the wall, and leaving them in the plaster can have negative consequences: the appearance of traces of rust, getting into the fasteners when drilling the wall.
To remove self-tapping screws from a rubbed beacon, their heads must be visible on the surface of the beacon.
In most cases, rubbed beacons are made without screws. To do this, plaster is applied to a narrow plane of the rule and glued to the place where the lighthouse is attached. Press the rule to the laser level mark. The protruding mortar is cut off from the edges with a spatula. To separate the rule from the wall, use a thread that is pulled between the solution and the plane of the tool.
What will you need?
A set of tools, as in the first installation method. The difference is the presence or absence of self-tapping screws.
Advantages of the method
Disadvantages of the method
Preparing the surface for installing beacons
Preparatory work begins with cleaning the surface; you need to get rid of all types of dirt and, if any, old finishes. If repairs are carried out on a surface where there is already an old plaster layer, then it needs to be checked for quality. By tapping, the presence of voids is revealed; if they are found, then such finishing must be removed so that over time it does not move away from the surface and spoil all new work.
Protruding defects can be leveled using a spatula. The wall must be primed before installation; the composition is selected taking into account the surface material. If work is carried out on an aerated concrete base, then it must be coated with a moisture-repellent composition. For fragile types of substrates, it is necessary to choose a deep penetration primer.
The applied compounds must dry before the beacons can be placed.
The wall must be primed before installation.
How to install beacons on a wall for plaster?
Candidate of Sciences, permanent expert of the site, a real, and not abstract (unlike other resources) person.
In the construction environment, plasterers are considered to be among the elite of finishers. And this is not surprising, since plastering work is the most complex of all types of finishing. At the same time, the most problematic stage of the technological process of leveling walls is the installation of beacons. Therefore, many who like to do everything with their own hands do not risk taking on this work. However, if a beginner manages to understand all the intricacies of how to correctly place beacons under plaster walls, then he will definitely be able to perform other types of work.
Beacon design
A beacon for leveling walls is a long strip made of galvanized steel or aluminum with perforated holes. It is preferable to use a galvanized beacon profile, since it does not rust and can be left in the plaster for a long time. The holes in the beacon are needed to better fix the profile.
In cross section, the lath resembles an inverted letter “T”; its upper edge serves as a guide when applying plaster, and the legs are used to secure the beacon in the solution.
Marking
Installation of beacons begins with the most difficult thing - determining the zero plane and the plaster plane. Professionals have two ways to determine the degree of curvature of a wall:
Classical. Let us immediately note that in textbooks and a number of publications based on the classical canons, this method is described in a complex manner. Its implementation in practice also looks difficult.
Here the problem is created artificially - the technology requires ideal line geometry: blue horizontally and diagonally and green, which takes time and confuses (see figure). In fact, a simplified version is possible, since only the plane formed by screws A, A1, B, and B1 is important. Everything else is secondary.
The classic process of finding the zero plane in the language of professionals is also called “sagging”, from the old Russian “weight”, which in our understanding is a plumb line.
Work begins by hammering in a dowel in the upper corner of the wall at a distance of 10 cm from the adjacent wall and 10-20 cm from the ceiling (point A in the figure). A self-tapping screw is screwed into it. You can leave 3-5 cm above the wall surface (during the hanging process it will find its screwing depth).
A plumb line is attached to the head of the self-tapping screw and two more points for hardware are marked on the wall (A1 and A2): in the middle and below, at a distance of 10-20 cm from the floor. After the screws are screwed into the dowels, they are brought into one plane by screwing in and out of the hardware. You need to control the process using a plumb line.
A similar operation is carried out at the other end of the wall. After this, all the screws are connected with fishing line (twine) horizontally, and the upper and lower ones - diagonally. If everything is done correctly, then in the middle the threads will touch each other. This creates a plane from which calculations will be carried out.
The next step is to determine where to attach the beacons. First, along the line A-B, at a distance of 10 cm from point A, a self-tapping screw is screwed into the dowel driven into the wall until a single plane with points A and B is formed (control is carried out along the stretched line between the upper screws).
There is also a point of the other extreme lighthouse (D), at the other end of the wall. After this, the distance between the newly formed points (C and D) is measured. The resulting length is divided into equal spans of 80-150 cm. This is how the location of intermediate beacons is determined. There are two of them in the picture.
Important: if there is a window (door) on the line of the intermediate beacon, then instead of one beacon, two are placed on the sides of the door frame or frame at a distance of 10-15 cm from them (see figure).
Again, along a stretched fishing line between points A-B, we screw in screws on the lines of the beacons - marks E and F. The process of forming the auxiliary plane is completed by installing screws along the line of the beacons, i.e. vertically. The operation completely repeats the process of placing points A, A1 and A2 in one plane.
After this, a fishing line is attached to the intermediate beacons. If the work is done meticulously, then the threads marked in red in the figure will touch the fishing line stretched diagonally and green, passing through the middle of the wall.
Attention: if part of the wall comes out through the auxiliary plane, all screws are unscrewed one by one until the auxiliary plane covers it. You need to unscrew it with a screwdriver and count the number of turns. All self-tapping screws must be the same.
By measuring the distances from the wall surface to the stretched threads (fishing line), the most convex place is sought from which the zero plane will be formed. It is easier to do the work not with a tape measure, but with a construction square.
It is advisable to write down the measurement results on the wall with a marker (chalk) or in a notebook on the diagram. After this, measurements are taken along each line of the lighthouse (red), where the most convex place is also looked for. There are two scenarios here:
Here you need to count very carefully.
For the first case. Given:
We count. If you screw in a self-tapping screw on the beacon line at the highest point, the surface of the guide will overlap the zero plane by 10 mm, i.e. 5 mm more than required (6 mm (clip thickness) + 10 mm (profile thickness) - 6 mm (difference between points)). This is a lot.
Excessive consumption of plaster mixture will cost more than one thousand rubles. Here it is necessary either to replace the guides - take a height of 6 mm -, or to abandon the clips and attach the beacons with plaster mortar.
For the second case, only the difference between the control points will change - 26 mm. We count again . From the point on the beacon line to the plane of the plaster layer, 31 mm is obtained (26 mm height difference + 5 mm plaster layer).
The beacon with the clip will be 16 mm (6 mm clip + 10 mm profile). In this case, when screwing the self-tapping screw into the dowel, 15 mm of hardware should remain on the surface (31 mm - 16 mm).
Having received in both cases the control point for the location of the screw head, we build the base plane of the beacons along it, according to the already familiar pattern.
How to install beacons on a wall for plaster using a “spider”? There is one difference from the classical method - instead of hanging, a horizontally stretched thread is used, which moves along the side guides. The instructions are simple:
Determining the locations of the outer and intermediate beacons is carried out in the same way as when hanging a wall. Calculations are carried out exactly according to the same scheme as given above.
Expert advice
To ensure a smooth surface, you must adhere to the following recommendations::
- install beacons only on a previously cleaned, prepared wall (why is it necessary to remove old plaster and how to quickly remove it?);
- treatment with antiseptics is required, which will prevent the development of fungus and mold (they can develop under a layer of plaster). Read about how to get rid of mold on plaster once and for all here;
- a primer is mandatory because it increases the adhesion of the wall, raising the level of adhesion of the solution to the surface;
- it is advisable to make the minimum allowable distance from the wall, i.e., focus on the most protruding area, but no more, since plaster in excess layers will not only increase the costs and cost of the work, but will also reduce the space of the room;
- a second layer of plaster is required when the desired result cannot be achieved after the first one.
For simple and quick plastering of walls, beacons are used - metal and plastic guide profiles. They must be installed using a certain technology and method for quick, effective alignment of walls.
Installation
Attaching beacon profiles to the wall can be done using devices or using the adhesive method. The most famous devices are:
Latch "Kremmer"
This type of fastening is made in the form of a rectangular galvanized plate with a slot in the middle designed to capture the head of the screw. Attached to the profile plane by bending the ends onto the beacon.
The presence of slots at the ends of the plate makes it possible to bend the ends by hand, without the use of special tools. When all the fasteners are installed, the beacon is pressed against the screws, and the Kremmer is pushed onto the hardware until the head of the screw is fixed in it.
Having many advantages over other types of fastenings:
It is not as popular as the other two devices. The reasons are the shortcomings. Minuses:
"Ushastik"
This type of fastening, like the Kremmer latch, is made of galvanized steel. It is a rectangular plate with a hole in the middle for a self-tapping screw and ears for bending onto a metal profile.
How to install beacons for plastering walls on the “eared”? The technology is the simplest:
Clip
This type of fastening is made of polypropylene. Consists of two parts:
The clip (abbreviated as KDM-2) has a thickness of 6 mm, which is most acceptable for rough plaster, when its layer should be at least 12 mm (6 mm clip + 6 mm profile).
How to attach beacons to a wall under plaster using clips? The plug is removed from the mount. Its base is fixed on the head of the screw. The beacon is inserted into the clip and closed with a plug. The operation on the entire profile takes 3-4 minutes.
Fastening with glue (plaster mixture)
In a situation where there are no special mounts for beacons, you can use:
Attention: the use of plaster mixtures with gypsum in the bathroom, toilet and kitchen is not recommended.
How to install beacons for plastering walls with mortar? For this you will need:
The instructions for this technology contain only 5 points.
The walls can be plastered only after the adhesive has completely dried. For gypsum this is 2-3 days, for other types of mortar - at least 8 days. Therefore, professional plasterers very rarely use this method of attaching guide beacons. If the apartment is being renovated on its own, the extra few days do not play any role.
Mortar beacons
If you want to save money and not bother with removing metal beacons from plaster, beacons can be made from mortar.
How to place beacons under plaster walls made of mortar? There is nothing complicated here either. The only requirement is that the beacons must be made from the same mortar that will be used to plaster the wall. The step-by-step process looks like this:
Work can be continued only after the mortar beacon has gained strength. If you do this earlier, the possibility of destruction of the lighthouse during leveling of the plaster with the rule cannot be ruled out.
Attentiveness and strict implementation of all recommendations will allow you to correctly install the beacons, which will serve as the key to well-executed plaster.
Types of fasteners
On the market you can find special mounts for beacons that greatly simplify the installation process. Among them, the most popular are Ushastik, Kremmer fasteners and clips. They differ somewhat in the method of fastening, but beacons are easily placed on them, so this type is preferable for beginners.
In addition, beacons are often attached to the adhesive solution, as well as to the plaster mixture itself, which will be used to plaster the entire surface. Installing a guide on these mixtures is more labor-intensive and requires skill; if you wish, you can do it yourself, but you need to follow the instructions. Next, the operating technologies will be described.
On the market you can find special mounts for beacons that greatly simplify the installation process.