Are you just about to build your house and are looking for an unusual and energy-saving project? Then it’s time for you to think about a pitched roof, which is also called asymmetrical or asymmetrical. This differs from a regular roof in that its two slopes have different lengths or angles of inclination.
Most often, a gable roof with different slopes is implemented when it is necessary to create a single complex from a house and an extension, although recently the classical canons of roof construction have begun to be forgotten and about ordinary architectural tasks. Want to know why? This is interesting!
House with a multi-level roof and beautiful nature
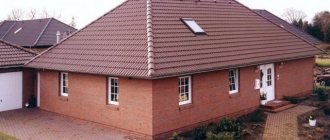
A wooden house made of pine beams, white joinery and a brown gable roof is a traditional combination for a country cottage in country style
Before you start building a house and roof, you need to develop a project, think through all the details and pay special attention to every detail. At the stage of project formation, you need to choose the type of roof, resolve design issues, and also choose the material that will be used for the construction of the roof and its roofing
The end result should be successfully combined, harmonized, creating a single picture that suits both externally and functionally. When choosing materials, you need to focus not only on their external data, but also on functionality, especially installation. The roofing material should not only be attractive, but also reliable, because you need to live in this house. You can carry out the work yourself, but you can hire professionals who guarantee the quality of work and reliability of the structure
It will cost more, but the result will probably be good, which is very important when building a house.
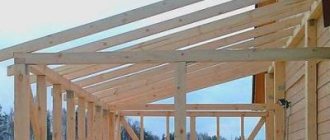
As a rule, such structures have one slope, which is significantly larger in area than the second. It is this part that is supported on the protruding load-bearing wall, transferring the ridge to its top. The fulcrum for the second, smaller slope is a beam reinforced at the level of the ceiling of the first part of the house.
Marking corner elements
Marking the corner elements of the rafter system for hip roofs is carried out in several stages:
- We mark the junction of the marking contour with the upper inner part of the trim; We measure the distance from the intended location to the marking contour, as well as the distance to the nearest intermediate element of the rafters, which will allow us to calculate the horizontal projection. This will help us calculate the rafter length of the corner element of the system; A marking strip will greatly simplify marking work. With its help, the markings of the side walls, which have already been completed, can be transferred to the end walls of the house. In addition to saving time, this will also allow you to maintain precise distances between the central elements of the rafter system.
Useful: for greater convenience of measurements and markings, it is advisable to make a special template, for example, from an unnecessary sheet of plywood that has right angles.
For example, if we have a slope value of 612, the template needs to be marked as follows: at one end of the corner we mark 30 cm, and at the other – 60 cm. After this, by connecting the marks we obtain the required triangle, a sheet of plywood is cut along its contour.
After this, you should attach a beam measuring 50x50 mm to the larger side of the resulting figure. In addition, we mark the slope coefficient of the slopes.
What is good about a roof made of two slopes?
The roofs of private houses with one or two floors are very often made with gable roofs. And the point here is not only the low cost and simplicity of the design, but also its design and technical features. The biggest advantage of a roof made of two inclined slopes, connected along the ridge line and resting on the mauerlat, is the compensation of multidirectional forces. The rafter system of pitched roofs is designed in such a way that the pressure from the weight of the roof itself, insulation, sheathing and roofing material is evenly distributed on the load-bearing walls (central and side).
The design of pitched roofs is carried out in such a way that the rafter legs are not connected with each other and with other structural units of the roof - they are not fixed to the ridge and the Mauerlat, the strength of the structure is achieved through mutual compensation of pressures from the two slopes and balancing the forces with spacer elements (braces, crossbars, slopes, beds). You need to understand that the rafters of gable roofs are not fixed until the sheathing is filled and insulation, waterproofing and roofing material are laid - they are held in place independently, thanks to precise calculations of resistance. The advantages of gable roofs over other structures are obvious:
There are no downsides to a gable roof, otherwise it would have long ago been supplanted by modern complex structures.
With all the undeniable advantages, an attic roof requires that you pay special attention to the condition of the load-bearing walls, since they are not always able to withstand such a load.
A rod that is used for measurements
Before you start taking measurements and applying markings, you first need to study in detail all the elements that make up the roof: the hip, the slopes, and so on. Having studied its structure, it is also necessary to foresee in advance a way to connect the parts of the rafter system to each other.
After we have figured out how the hip roof is constructed, we can begin making the slats that will be used for measurements.
For greater convenience of marking the roof, when the mark is located on the batten at a great distance from the builder’s eyes, the width of this batten should be more than 5 centimeters.
For greater convenience of marking the roof, when the mark is located on the batten at a great distance from the builder’s eyes, the width of this batten should be more than 5 centimeters.
In order to mark the location of the intermediate elements of the rafter system, it is necessary to attach the lath to the mauerlat of the side wall.
It is also necessary to directly measure the thickness of the wall, which will make it possible to make the correct selection for the supporting element of the rafters and roof overhang.
In order not to take all the measurements several times, it is necessary to put on the rail all the dimensions that are used for marking.
In order not to take all the measurements several times, it is necessary to put on the rail all the dimensions that are used for marking.
This will save time, and, unlike measuring with a tape measure, you will avoid errors of several millimeters.
Such seemingly minor errors can result in inconsistencies in the entire rafter system, which will require correction and additional work.
In addition, you need to prepare in advance a complete list of all the coefficients that are used when marking the rafter system. This will allow you to make the roof structure as accurately and correctly as possible.
Such coefficients include such indicators as: the ratio of the length of the rafter elements used to their location, as well as various proportions, characteristics of various slopes and slopes, and so on.
House project with multi-level space
A special feature of this project was the idea of a multi-level space, due to the presence of a built-in garage, above which an intermediate floor is formed.
First floor
The first floor of the cottage is reserved for common areas and recreation. There is an entrance hall with a wardrobe, a front hall with a three-flight staircase, a living room, a kitchen-dining room, a bathroom and a sauna. The living room and kitchen-dining room are combined in one space, without partitions, which significantly visually enlarges the room, making it spacious and bright. The cooking area is marked by a kitchen island with a built-in hob. There is a food pantry conveniently located not far from the island. The sofa area with a fireplace is visually separated from the kitchen by a large dining table. From the kitchen-dining room there are two exits to a glazed covered veranda, from which there is access to a partially covered terrace. Thanks to this solution, it will be equally convenient to serve lunch both in the dining room and on the veranda, and all household members will be able to go out onto the veranda without interfering with the housewife’s work in the kitchen.
From the front hall there is an entrance to the bathroom adjacent to the sauna. Under the top flight of stairs there is a descent of three steps. Here you can go to the workshop adjacent to the garage and boiler room. This connection with the garage is very convenient when in bad weather you don’t want to leave the house, but want to get straight into a warm car. It will also be convenient to return home with shopping by car.
Second floor
On the second floor there is a master bedroom and two children's bedrooms, a bathroom and a laundry room. The master bedroom has its own wardrobe and bathroom, as well as access to the loggia. All children's rooms have high sloping ceilings formed by the slope of the roof. This will allow you to develop interesting design solutions by organizing the space on two levels.
The ascent to the second floor will be very comfortable, since the staircase is well lit by Velux roof windows. From the intermediate landing you can get to the playroom and guest rooms located above the garage.
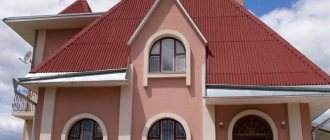
Facades
The facades of the cottage are designed in a modern style, with clean geometric shapes and laconic decor. The porch of the main entrance is recessed between two vertical projections in the form of pylons, and is covered with a balcony on top. Thus, the entrance is well accentuated on the main facade and reliably protected from wind and precipitation. The simple gable asymmetrical roof is decorated on the side facades with pediments, which give the building a slender appearance and increase the height of the rooms inside.
The plaster facades are enriched with wooden inserts that connect the windows of the first and second floors vertically. The wooden texture looks very good against the background of light walls, giving the facades the necessary graphics.
Clear geometric shapes, light colors, a flattened silhouette - such a cottage will fit well into any natural landscape, provided that the proportions of the site correspond to the dimensions of the building.
Mansard roof
The attic roof will not only complement and decorate the architectural design of the house, but will also add square meters to the living space. This is a very convenient solution, because such a building is cheaper and easier than building another floor. At the same time, the allocated space can be safely used to create a wonderful, cozy bedroom or living room. If you are on the verge of a major roof repair, which includes a complete replacement of materials, be sure to take advantage of the opportunity, since the costs compensate themselves in full: - You get additional thermal insulation - the living space is much more It will retain heat better than an empty attic or an ordinary roof. At the same time, care should be taken to ensure proper ventilation in order to avoid excessive accumulation of moisture; - Modern furniture is sufficiently mobile and concise in order to use the resulting meters as rationally as possible. In general, to decorate the attic interior, turn to styles such as Scandinavian, minimalism or rustic - within these trends you will find many variations for arranging a comfortable and functional room; - Large window openings will provide the room with abundant daylight. With all the undeniable advantages, the attic the roof requires special attention to be paid to the condition of the load-bearing walls, since they are not always able to withstand such a load.
Project Features
A multi-level ridgeless roof is perceived as unusual and relevant - a practical and economical alternative to the flat roof common in modern style. The house, elongated in plan, is formed by two volumes of different heights, and thanks to this “step” the massive building seems lighter and more compact.
The protruding risalit brings symmetry to the overall composition and focuses attention on the entrance area.
The design of the mansion is practical and functional, every centimeter of space is used as efficiently as possible.
The originality of the layout lies in the fact that all the rooms, without exception, face the site, while the neighboring site faces an almost blank façade with small windows in the bathrooms and staircase hall. This solution provides the necessary privacy and comfort for residents.
Ground floor
The house's economic services are allocated to the ground floor, leveling out the difference in levels on the site. There are storerooms, boiler rooms, a workshop and other rooms with large capacity. There is also an attic above the extended part of the building, where the owners can equip an additional storage area, which is very important for a large family.
First floor
The hall on the first floor logically divides the space into a residential part with two bedrooms and bathrooms and a public area formed by a living room with a fireplace and a kitchen-dining room. From the kitchen there is access to a large terrace, where in good weather you can have family dinners or relax while admiring the garden.
Facades
Basic equipment:
Pre-finishing equipment:
Turnkey package:
Materials used during construction:
Soil bearing capacity: 1.3 kg/cm2 Foundations:
Walls: Aerated concrete block, density: D600, D500, D400. Block sizes: 600x250x300, 600x200x200, 600x250x385, 600x250x100. Roof coverings:
Number of floors: 1.5-2 Ground floor floor:
Height of the first floor: 2.5 m-3.0m Height of the attic wall: 2.5 m-2.7m Ceiling of the first floor:
Combined roofs are the most complex type of structure. They are a unique combination of half-hip, hip, slope, cone, and attic elements. Such a roof is undoubtedly a decoration of the house.
Layout of rooms in a two-story house
The daily entrance to the house begins with a small terrace. Behind the front door is the first room - the hallway. From the hallway the path leads into the corridor, from which all the paths further lead to all the rooms in the house.
The first door on the left is a full bathroom on the first floor of 5.5 sq.m. And the first door on the right leads to the living room (12.6 m2). The next large double door on the right leads to the largest room, a 23 square meter hall. It is no coincidence that a large double glass door is used here; with its help, the lower part of the staircase is illuminated with daylight. The hall and living room are connected by a large doorway so that the house can accommodate a large number of guests on holidays and important family events. According to sanitary standards, per guest there should be 1.8 sq.m. area. Thanks to this approach, these two rooms can easily accommodate 20 guests. It is important to note that from the hall through the main entrance to the house there is free access to a large terrace (20 m2).
Directly down the hallway is a spacious and bright kitchen with two large windows. One window opens directly onto a large terrace. Thus, directly from the kitchen through the large window, you can serve desserts or cool drinks to those vacationing on the terrace in the summer.
The last small door in the hallway is a storage room that covers part of the usable area under the landing. The storage room can accommodate household items or foldable garden furniture for the terrace.
Design of truss structure
The calculation of load-bearing structures in construction is usually performed using the limit states method, i.e. at the moment of loss of resistance by the structure under the influence of external loads up to destruction or unacceptable damage.
The rafter system reaches its limit state if:
- the strength of the structure is completely exhausted and it collapses; Deflections of the elements of the supporting frame provoke unacceptable violations in the nodes of the rafter system, and further operation of the roof is impossible without repairs.
According to building codes, the maximum permissible deflection of a rafter leg or tie is 1/200 of the length of the element. To ensure high reliability of the structure, it is recommended to design the roof taking into account the maximum permissible deflection of 1/250 of the rafter length.
The calculation of the roof truss structure is carried out taking into account the maximum loads from:
- own weight; wind pressure; snow weight; the weight of people servicing or repairing the roof (the load from a person is usually taken as 80 kgf/sq.m).
To obtain information on the basis of which calculations are made, it is necessary to have:
- SNiP for roofing structures; table for calculating the cross section of the rafter leg; table of cross-sections of rafters; climate map of the region (determination of wind and snow load).
The cross-section of the timber from which the elements of the rafter structure are made is calculated using a special formula, which takes into account the length of the rafter leg, the pitch between the rafters, and the resistance of the selected type of wood to external loads.
Tables for selecting sections of elements are used when designing simple roofing structures. Developing a roof project of complex shapes requires a professional approach.
Gable roofs
The gable roof structure is most often used for a private house in our climate zone. The angled design prevents water and snow from accumulating. The angle of the pitched roof is determined based on the level of precipitation in the current region - the more precipitation, the greater the angle of the pitched roof.
Gable roof diagram Classic version of a house with a gable roof
The disadvantages of a gable roof in a private house include:
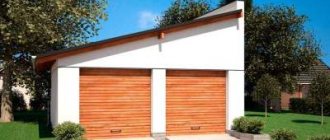
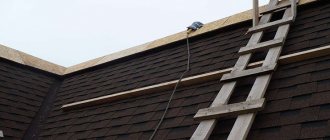
The roof is flat, but it is also pitched
Frame house with a pitched roof - country design
Attic under a pitched roof - there is very little space left at the bottom of the slope
Basics of geometry
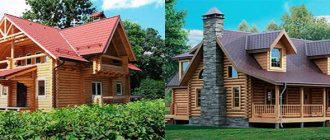
To understand how such a roof is constructed, you need to consider these properties and compare photos of the two types of structures. Since we are talking specifically about the gable variety, in a profile section this shape always forms a triangle. The upper ceiling of the building is the base of the figure and serves as the supporting surface of the structure. The roof slopes are the sides of the triangle.
Looking at the symmetrical roof (first photo), you can see that the inclined surfaces are equal in length and are at the same angle to the base of the triangle. The ridge, hiding the intersection of the slopes, is located exactly in the center of the building and passes through the axis of symmetry. A multi-slope design is characterized by different lengths of slopes and different angles at the base (second photo). This concept is the result of a geometric transformation. There is a proportional relationship between the elements of the triangle. If you change one, all the others are changed.
Photo No. 1 - gable roof with identical slopes
Based on this dependence, the roof structure under consideration has two main parameters: the length of the slopes and the slope. Using this name, the latter value would be correctly calculated as a percentage. To do this, you need to calculate the tangent of the angle at the base of the roof, multiplied by 100%. However, for convenience and quick understanding, degrees are most often used as a unit of measurement. Thus, each slope of an asymmetrical roof is characterized by a separate length and slope.
Photo No. 2 - roof structure with different slopes
Properties of a pitched roof
To understand whether such a roof is suitable, it is worth weighing its advantages and disadvantages.
The roof is flat, but it is also pitched Frame house with a pitched roof - country design Attic under a pitched roof - there is very little space left at the bottom of the slope
There are no critical shortcomings. If the project is drawn up correctly and construction standards are observed, a building with such a roof will serve no worse than others.
The joists, trim and subfloor are treated with a bio fire protection solution (in winter, separate conditions are specified), mostly red, but colorless treatment can also be used.
Criterias of choice
The roof is an important architectural element of the house, designed to protect against the destructive effects of precipitation and retain heat.
The design features of gable and hip roofs determine some differences in their operational and aesthetic characteristics. These characteristics are the main selection criteria.
When deciding what kind of roofing structure needs to be provided in this particular case, the owner needs to take into account the following nuances:
Features of the project .
Moreover, it is necessary to pay attention not only to the design of the building itself, but also to the plan of the surrounding area. By weighing and evaluating all of the above factors, you can answer the question of what the roof structure should be and choose the most suitable type of roof and roofing material.
Delivery to the Moscow region
| City | Distance, km | Price, rub |
| Aprelevka | 613 | 49040 |
| Balashikha | 595 | 47600 |
| Beloozersky | 650 | 52000 |
| Bronnitsy | 635 | 50800 |
| Vereya | 595 | 47600 |
| Vidnoe | 615 | 49200 |
| Volokolamsk | 502 | 40160 |
| Voskresensk | 674 | 53920 |
| Vysokovsk | 495 | 39600 |
| Golitsyno | 579 | 46320 |
| Dedovsk | 560 | 44800 |
| Dzerzhinsky | 600 | 48000 |
| Dmitrov | 540 | 43200 |
| Dolgoprudny | 560 | 44800 |
| Domodedovo | 620 | 49600 |
| Drezna | 660 | 52800 |
| Dubna | 500 | 40000 |
| Yegoryevsk | 700 | 56000 |
| Zhukovsky | 620 | 49600 |
| Zaraysk | 770 | 61600 |
| Zvenigorod | 570 | 45600 |
| Ivanteevka | 590 | 47200 |
| Istra | 550 | 44000 |
| Kashira | 700 | 56000 |
| Wedge | 490 | 39200 |
| Kolomna | 690 | 55200 |
| Korolev | 590 | 47200 |
| Kotelniki | 600 | 48000 |
| Krasnoarmeysk | 610 | 48800 |
| Krasnogorsk | 570 | 45600 |
| Krasnozavodsk | 600 | 48000 |
| Krasnoznamensk | 610 | 48800 |
| Cuban | 630 | 50400 |
| Kurovskoe | 680 | 54400 |
| Likino-Dulyovo | 670 | 53600 |
| Lobnya | 550 | 44000 |
| Losino-Petrovsky | 610 | 48800 |
| Lukhovitsy | 730 | 58400 |
| Lytkarino | 620 | 49600 |
| Lyubertsy | 600 | 48000 |
| Mozhaisk | 570 | 45600 |
| Moscow | 550 | 44000 |
| Mytishchi | 580 | 46400 |
| Naro-Fominsk | 640 | 51200 |
| Noginsk | 630 | 50400 |
| Odintsovo | 590 | 47200 |
| Lakes | 730 | 58400 |
| Orekhovo-Zuevo | 670 | 53600 |
| Pavlovsky Posad | 650 | 52000 |
| Peresvet | 600 | 48000 |
| Podolsk | 620 | 49600 |
| Protvino | 700 | 56000 |
| Pushkino | 590 | 47200 |
| Pushchino | 700 | 56000 |
| Ramenskoye | 630 | 50400 |
| Reutov | 590 | 47200 |
| Roshal | 740 | 59200 |
| Ruza | 560 | 44800 |
| Sergiev Posad | 610 | 48800 |
| Serpukhov | 680 | 54400 |
| Solnechnogorsk | 510 | 40800 |
| Old Kupavna | 610 | 48800 |
| Stupino | 690 | 55200 |
| Taldom | 530 | 42400 |
| Fryazino | 610 | 48800 |
| Khimki | 560 | 44800 |
| Khotkovo | 600 | 48000 |
| Chernogolovka | 630 | 50400 |
| Chekhov | 650 | 52000 |
| Shatura | 720 | 57600 |
| Shchelkovo | 600 | 48000 |
| Elektrogorsk | 650 | 52000 |
| Elektrostal | 630 | 50400 |
| Elektrougli | 620 | 49600 |
| Yakhroma | 560 | 44800 |
The cost of delivery of materials depends on the distance to the construction site - the tariff is 80 rubles / km from Veliky Novgorod. The price calculation using the calculator is only approximate - for large-area projects it is necessary to send 2 trucks, accordingly the cost will increase 2 times. If you have not found your locality, use the map search or write by email If a construction technology has survived many generations and is still in use, then it is a good technology. We have been building houses from profiled timber since 2007 and have made great progress in this direction. SK Smirnov uses 2 features when assembling a log house, which most companies do not spend time on:
What is lap beam?
Almost all construction companies targeting the middle class purchase from the same base. We make the timber ourselves. Our feature is an elongated influx on the sides of the bar. When assembling a log house, the influx of the upper crown covers the lower one by 2-3 cm. This is enough to ensure a tight connection and prevent the appearance of inter-crown cracks during shrinkage. This is very important for budget construction from timber with natural moisture, which without any options will give a high degree of shrinkage.
What is drill assembly?
The main problem with timber houses is shrinkage, after which cracks as thick as a finger appear in the log house. This happens when they build from cheap raw timber, placing the crowns tightly on nails (wooden or metal - it doesn’t matter). We spend time on assembly and drilling. That is, we place the beams on metal nails and drill a hole in the upper crown for each head. Therefore, during shrinkage, the bars do not hang on the nails, deforming the frame, but slide freely along them. The technology is labor- and time-consuming, but the result is amazing - even in log houses made of raw timber there are practically no cracks.
From the first call to our manager to the start of construction, it can take from a month to a year - it depends on the complexity and approval of the project. Let's talk about a typical order:
Calculation
Before starting work, you need to make a design calculation. It makes no sense to calculate the cross sections of all elements. In most cases they can be accepted constructively:
Calculations are usually performed only for rafter and slope legs. It is necessary to select the height and width of the section. The parameters depend on:
- roofing material;
- snow area;
- pitch of the rafters (selected so that it is convenient to lay the insulation; for mineral wool, there should be 58 cm of clearance between the elements);
- span.
You can select the cross section of the rafters using general recommendations. But in this case it is recommended to make a small reserve.
The calculation is usually performed for rafter legs
If you don’t want to delve into the intricacies of calculations, you can use special calculators.
If you plan to make a warm roof, then the height of the cross-section of the legs is selected taking into account the thickness of the insulation. It must be mounted so that it does not protrude above the supporting beams. You also need to take into account that for mineral wool a ventilation gap of 2-4 cm is made between it and the coating. If the height of the rafters is not enough for this, provision is made for installing a counter-lattice (counter battens).