Material rating
20 out of 5 Price
16 out of 5
Practicality
16 out of 5
Appearance
20 out of 5
Ease of manufacture
12 out of 5
Labor intensity when using
20 out of 5
Environmental friendliness
final grade
4.3
4.3 out of 5
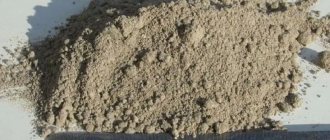
Clay is perhaps one of the most common and accessible materials.
The scope of its use is very wide:
- Cosmetics industry;
- Construction;
- Concrete production;
- Production of ceramic products;
- Brick production;
- Pottery;
- Medicine;
- As a dietary supplement for livestock.
What can be made from clay - from bricks to medicines:
Firing clay
Clay bricks can be either unfired or fired. At the same time, the latter have the greatest strength and properties useful in construction, so it is recommended to buy exactly this type of brick, or burn it yourself in the case when making adobe yourself.
Of course, it is better to buy a kiln, since such devices allow you to bake the material not only from above, but also from the inside.
There are 2 types of ovens:
- Chamber. Provide for internal arrangement of heating elements;
- Muffle. Here they are located around the muffle container.
The first type of device is preferable, as they provide the best baking of bricks.
Possible mistakes
When arranging a protective clay castle, sometimes irreparable mistakes are made: as a result, the created waterproofing is of poor quality. The most common ones are the following:
- It is often difficult to obtain clay for waterproofing yourself, so you have to buy it. To save money, some people replace it with regular soil. The latter is excavated during the formation of a ditch.
- Inexperienced builders build a castle from insufficiently crumpled and poorly compacted clay. Improper preparation of the material, compaction of layers only with feet, entails a significant deterioration in the waterproof properties of the clay mass.
- The blind area is laid too early, which subsequently often leads to subsidence of the crushed stone base and partial destruction of the coating.
- Violation of the required dimensions of the clay castle can lead to a decrease in the protection of the foundation.
The use of high-quality clay for waterproofing basements, wells, and foundations allows you to reliably protect various buildings from the destructive effects of water.
If you don’t follow construction technology when creating a clay castle, then you shouldn’t count on an effective result Source i.ytimg.com
House made of clay and straw
This material is quite cheap and can even be made independently, which allows almost everyone to significantly reduce the cost of construction. In houses that are built from adobe brick, there is always good humidity, air, and temperature in the summer. However, in winter it does not retain heat well, which is why the house will need additional heating.
If construction is to be carried out in a humid climate, then it is worth taking into account the properties of the material to strongly absorb moisture, which is why the bricks, especially on the outside, begin to crumble quickly. This can be avoided if fired clay bricks are used as cladding. The internal walls will need to be covered with a vapor barrier layer.
The adobe bricks are stacked on top of each other and connected with a mortar of sand and clay in the same proportions that were selected for making bricks. In this case, waterproofing must be carried out in the first row, and the corners are reinforced with reinforcing mesh. It is also important to distribute the load from the floor beams evenly, since adobe will not be able to bear a point load.
The video will tell you about the features of building such a house:
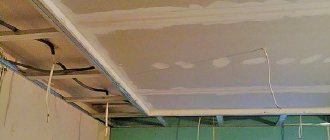
Foundation
Building a foundation on clay necessarily involves the use of important components such as crushed stone and gravel, since they provide the best strength. Since such soil has a very strong ability to shrink, it will be necessary to take this fact into account during construction, accurately calculating the entire load.
At the same time, it is important to know the groundwater level, since the farther they are located, the cheaper and stronger the foundation will be. In the same case, if they are close to the surface, then it is better to give preference to the pile type of foundation. You will first need to build a crushed stone or gravel bed, as well as build a drainage system.
Briefly about the main thing
It is impossible to unambiguously recommend one or another foundation on loam - which is better and which is not suitable at all - without accurate information about the characteristics of the soil at a specific construction site. Soils with a high clay content are considered the most problematic when choosing and constructing a foundation that needs to be stable and able to withstand vertical and lateral loads. But now you know what types of foundation you will have to choose from, and you will be able to demand that the contractor strictly fulfill the design requirements.
| Additionally The exhibition of houses “Low-Rise Country” expresses sincere gratitude to the specialists for their assistance in creating the material. (Royal Pile Factory) – expert in pile foundations. If you need more detailed advice, you can use the following contacts: website: kzs.ru email: tel.: 8-800-222-76-17 |
Ratings 0
Read later
How to make a clay brick with your own hands
Clay bricks made by hand are called adobe. This material is one of the most environmentally friendly.
To make it yourself, you will need the following components:
- Sand;
- Straw;
- Water;
- Clay.
There are no clearly established proportions, and they will be added to the bulk only depending on what density the solution needs to be obtained. The amount of other components will also depend on the quality of the clay and its fat content.
Preparatory work
Before you start making bricks, you will need to clean the clay from all debris and foreign impurities. If you plan to make a large number of them, all the clay can be placed in a bunch under the film, gradually using small parts.
The properties of the rest of the clay will only improve over time. You will need to take coarse-grained, clean sand, but the straw can be absolutely anything. The water must also be clean, since the quality of the resulting brick will depend on this characteristic.
You will first need to make a mold for adobe. It can be made of plastic, wood or plastic. There should be no bottom, and the optimal thickness is 36 mm. Once the drawing is prepared, boards of the required size are cut.
They are fastened together using self-tapping screws. In this case, the form can include several cells. For convenience, it is better to attach handles along the edges. It is important to carefully adjust the corners and make the inner surface of the boards sufficiently smooth.
This will be required so that the dried, formed adobe comes out of the mold well. Additionally, you can sprinkle the wooden parts with a layer of straw to prevent it from sticking.
Technology
The whole process can be divided into the following stages:
- To mix the clay mass, you will need to dig a hole and then line it with waterproofing material. The bottom should be level and the walls vertical. In this case, the tarpaulin or awning must extend beyond these walls by at least 50 cm.
- As soon as the hole is prepared, it will need to be filled by a third with water and poured in the selected proportion. After this, kneading is done with your feet. The liquid solution should not have any lumps.
- Gradually you need to add straw to the mass, but only after it becomes homogeneous. If you add it earlier, it will not combine with the solution and will remain on the surface. You need to add straw exactly until the clay-sand mass becomes very plastic and thick. You should not allow puddles to remain in the pit, but you should not allow the solution to dry out either.
- The adobe is loaded into a wheelbarrow and delivered to the location of the molds. They are pre-wetted, after which the mass is loaded into the mold with a shovel or pitchfork. Excess is removed with any flat object.
- Before placing the next part of the adobe in it, you will need to wet it again, and then install it away from the already formed bricks in order to ensure air flow to them.
- Subsequent batches are made in the same way, but you need to carefully measure the size of the batch and not leave a large amount of it in the pit. As soon as it dries, it will need to be diluted with water, but in this case it can lose most of its strength.
The brick dries within a week, but it will need to be protected from possible rain. The rate at which adobe dries will depend on how high the temperature and humidity are. Bricks can be stacked on top of each other for greater convenience.
How clay bricks are made on a production scale can be seen in the video:
Video
There are no trifles in the baking business. The final result equally depends on all components: adherence to technology, quality of source materials. Among these important points, it is worth noting the masonry mortar. The durability and strength of the oven largely depend on how it is prepared correctly. Therefore, due attention should always be paid to the preparation of masonry mortar.
How to coat a stove with clay
To coat the oven with clay, you can use a classic solution. To prepare it you will need to take sand, fireclay clay and straw. To prevent cracking, it is recommended to chop the straw and use additional horse manure. This makes the mixture more homogeneous and the particles smaller. In this case, manure can be replaced with table salt, which will need to be added in the amount of 300g/10l of solution.
Some experts recommend pre-soaking the clay and leaving it overnight so that by morning it mixes better and more uniformly with the sand. Immediately before coating, the oven will need to be moistened with water, which will ensure better adhesion of the materials. You can apply the solution either with a spatula or by hand, and it can be leveled using a trowel.
After coating it will need to be left to dry. In this case, it is better to constantly circulate air in the room for better drying. This can be ensured by first opening the windows and doors in it.
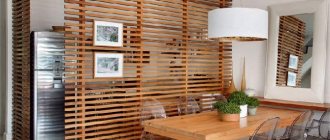
Decorative clay plaster.
Clay is not inferior to other binders: it can be used in almost all decoration techniques. No plasticizing additives required.
To speed up its drying, cement or gypsum is mixed into the clay-sand mortar. In the first case, the plaster becomes more durable and wear-resistant. In the second, it sets and dehydrates faster.
Clay plaster easily absorbs primers and has high adhesion to paints. But, if there is a need to preserve its ability to regulate the microclimate in the room, only “breathing” paints are used. Otherwise, the vapors will not be able to freely saturate the wall and leave it when the air dries.
Preparation for painting may include sanding with emery cloth.
To obtain the smoothest possible base, the finest sand is used to mix the covering mortar. data-matched-content-ui-type=”image_stacked” data-matched-content-rows-num=”2″ data-matched-content-columns-num=”3″ data-ad-format=”autorelaxed”>
Furnace mortar
Clay mortar not only provides the best adhesion between bricks, but also best withstands constant exposure to heat. The masonry seams should not exceed 4 mm, otherwise the clay will lose its heat treatment properties and collapse.
The solution that is prepared for this purpose must be moderately fatty and plastic. If the mixture is too oily, then after drying it will crack, and the thin one will not be strong enough. That is why the amount of one or another component in the solution is always selected individually, taking into account the quality of the clay.
The clay mass for masonry is mixed in exactly the same way as in other cases, with the exception of straw. It should not only be uniform, but also not stick to the shovel or trowel. You can check the quality of the resulting solution by applying it to a brick and placing a second one on top. If after a few minutes it becomes very difficult to separate them, then the quality of the resulting clay is excellent.
Clay mortar for stove repair, preparation:
Flaws.
In general, any properties can be called neutral. Under certain conditions they can become advantages or disadvantages.
- Moisture capacity. Saturation with water molecules changes the structure of the clay. This entails a change in its technical characteristics:
- Strength and hardness are reduced;
- Swelling leads to an increase in volume and mass;
- Soaking violates the integrity of the formation, which changes its geometric configuration - it becomes deformed;
- Shrinkage is a consequence of swelling. The clay is so plastic that it shrinks gradually and does not break. However, sudden drying can cause destruction (cracks, craquelure). Clay mortar for plastering walls is used with filler, which increases the strength of the layer.
- Thermal conductivity. For comparison: cement-sand plaster – 1.2 (W/m2K), cement – 0.93, lime plaster – 0.698, gypsum – 0.3. Clay – 0.7-0.9. A little “warmer” than cement. However, this property is used when finishing heating panels - the better the plaster conducts heat, the higher the heat transfer of the stove.
Lime is one and a half times less thermally conductive and gypsum is 3 times less thermally conductive and better protects the wall from heat loss. True, with an insignificant thickness of the plaster, this indicator is not important.
The main drawback is durability. Clay plaster is relatively soft, easily scratched and chipped (compared to cement).
Clay plasters are not hard enough compared to cement plasters and are “colder” than gypsum plasters. They are not suitable for finishing plinths, but can be used in combination with other binders.
There are many varieties of clays, depending on their mineral composition and the amount of impurities. In Russia, the most common are red and white.
Clay floor
Before forming a clay floor, you will definitely need to lay a layer of gravel, since the vapor barrier layer in this case will not help to avoid the formation of condensation. The floor can be made cast or compacted.
To form a cast floor, you will need to make the same mixture as for making adobe bricks, but with the addition of gravel. It is important to choose all the proportions correctly, since an excessively large amount of clay will allow the material to crack, and a small amount will lead to looseness.
The mortar is laid in layers, and each of them must be even to prevent cracking. The first layer is the stickiest, while the second should be smooth. To obtain smaller particles, you can use chopped straw or, for example, horse manure.
A compacted floor is not considered a simple way to form a floor, but it can dry much faster than a cast one. The first two clay layers will need to be compacted with a special hand roller, while the third is poured and impregnated with a special solution. It is important that the clay mass required to form a compacted floor contains slightly less water and straw, but more crushed stones.
Technology for making a clay floor in a private house:
Compacting clay
The best way to compact clay is still considered to be compaction in formwork. At the same time, wooden boards are installed on it, after which clay solution is poured into the resulting form in layers. At the same time, you can use pebbles, small crushed stone or polymer as additional material. In this case, compaction can be done either manually or using a vibrating plate. However, when making bricks from this material, a brick press is used, and a manual roller is used to form the floor.
Autumn crafts
Autumn is an inspiring time of year and a time for children's crafts. Clay is a material from which you can create a beautiful thing. This craft will remain for a long time and will not wither, like a bouquet of autumn leaves.
What to sculpt:
- Gifts of autumn. Pumpkins, carrots, eggplants, apples, pears, plums and grapes. Bright vegetables and fruits can be placed in a wicker basket. By the way, a basket can also be made from flagella.
- Leaves. To begin with, let's take a walk through the park and collect fallen leaves without holes, with a beautiful outline. They will be needed to create the relief. Roll out a layer of polymer clay. You can arrange several flowers next to each other. When rolling out, you will get beautiful transitions. We apply the leaves with the back side, roll them well again so that the relief is imprinted. Using a thin knife or blade, cut out the sheet, following its outline. Bake or wait until the craft dries. From the resulting leaves we make an autumn panel, magnet or decoration.
- Figurines. Hedgehogs with an apple or mushroom on their back, squirrels with cones.
- Mushrooms. Another autumn gift. Boletuses, boletuses, trumpet mushrooms and honey mushrooms. Dangerous, but incredibly beautiful - fly agaric. Place the prepared mushrooms in a basket. With kids you can make a fabulous mushroom-umbrella, under which the animals took refuge from the downpour.
Clay blind area
The formation of a clay blind area has been known for quite a long time, since this method made it possible to protect the foundation from moisture seeping into it. Construction from this material is most effective in a private home. In addition, it will be less expensive than using concrete.
We can highlight the step-by-step steps required to build a blind area:
- Around the built foundation you will need to dig a not too deep, but wide enough hole with a slope from it;
- Sand and a small amount of gravel are poured onto the bottom, which will serve as a kind of cushion that prevents water from penetrating through it;
- A solution of clay and sand at a ratio of 2:1 is poured gradually, in layers. Each layer can be sprinkled with small pebbles and compacted. The clay mass must be sufficiently strong and thick;
- If you plan to make a path in the top layer, you can pour gravel onto the clay. But it is also permissible to leave it, since later grass will grow on it anyway.
A blind area made of clay is very good in its qualities, since this material, having absorbed water, will immediately stop letting it pass further, which will perfectly protect the house and foundation from moisture.
Available materials for modeling
- Metal string . It is great for separating the part that will be needed for work from a large piece of clay. The string should be of medium thickness: a thin one can easily injure your hands.
- A special knife for separating small pieces of material. It is best to take a blade from an old kitchen knife and wrap it in the handle area with insulating tape. You should not take the blade from stationery knives (for cutting paper) or construction knives. Their blades will quickly rust when working with clay. In addition, they are too thin and therefore too sharp - they are easy to cut. You should not use plastic knives either. Their blades do not make a sharp, even cut, but seem to press through the clay. The knife must be well sharpened.
- Wooden boards of different sizes on which you will have to roll out pieces of clay.
- Wooden rolling pin for rolling out.
- Fabrics with a rough texture , with relief patterns that would be well imprinted on clay when it is rolled out on such fabric.
- You can purchase a set of sculpting stacks .
- All kinds of stationery stuff . Simply: the trash that we usually throw away when cleaning up our desks: marker caps, used ballpoint pen refills, glue tube caps and other little things. The surface of some of these seemingly unnecessary things can leave very interesting imprints on the clay when pressed. Even popsicle sticks and lollipop sticks can be used!
- Household sponge , which is usually used in the kitchen for washing dishes. To make it more convenient to work with, the sponge should be cut into 4 parts.
Smoothing out unevenness with a damp sponge