- Starting preparation for a successful finish
- Materials for ceiling putty
- Tools needed by the performer
- Primer – adhesion optimization
It is necessary to thoroughly clean the working surface of the ceiling from flaking finishing material and whitewash. Using a spatula, remove the layer of old putty; you can also use a small hammer, chipping away excess layers with light and gentle blows.
Important! It is imperative to follow safety precautions and carry out preparatory work only with safety glasses to avoid dust and small particles of finishing materials getting into your eyes.
Particular attention should be paid to the presence of large and sudden level changes on the ceiling surface. To check, you can use a flat rod, which should be applied to the plane.
Using starting putty, it is necessary to fill out the depressions located on the surface, even if they do not exceed one centimeter. If there are small protrusions on the ceiling less than 0.5 centimeters in size, then they can be easily leveled. Assessing the evenness of the ceiling surface is important to obtain a good final result.
Materials for filling the ceiling?
- Starting putty - consumption will be approximately 3 kg per square meter of surface;
- Finishing putty - consumption reaches 1 kg per square meter;
- Deep penetration primer.
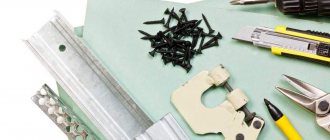
Tools needed by the performer?
Ceiling putty tools
- Several spatulas of different widths;
- Electric construction mixer for preparing putty solution;
- Roller and brush for applying primer;
- Container for diluting putty solution;
- Abrasive mesh or sandpaper;
- Portable lamp for illuminating the ceiling surface;
- Bandage nylon mesh intended for gluing ceilings covered with multiple cracks;
- Bandage tape for strengthening single cracks.
Primer – adhesion optimization?
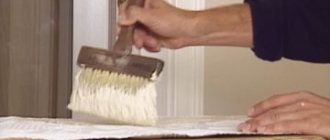
First you need to treat the ceiling with a deep penetration primer. Detailed information about material consumption is contained on the packaging.
The primer solution is applied to the ceiling with a roller or brush. To treat the surface with a primer, you can use a spray bottle. The main disadvantages of this method are significant waste of material and uneven application.
It is important! When applying primer using a spray bottle, a respirator must be used to provide respiratory protection.
This stage allows you to achieve good adhesion of the putty to the ceiling surface.
When carrying out this type of work, it should be taken into account that the primer is very difficult to wash off. In practice, it is removed from the hands every half hour, and from the face every ten minutes. The solution that gets on the walls or windows must be washed off after completing the priming work.
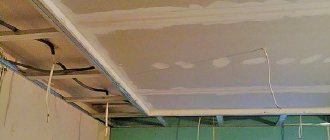
Working with plasterboard ceilings
A distinctive feature of a plasterboard ceiling is its almost ideal base, on which there are many irregularities in the form of screws and seams between the sheets. In addition, the easy-to-use material is often used when installing multi-level planes, which causes the formation of internal and external corners. They also need to be sealed without fail.
It was already mentioned earlier that before properly plastering the ceiling, it is necessary to perform work to level the plane. This minimizes the subsequent time spent on hardening the applied composition. In this case, the role of “irregularities” is represented by holes left by self-tapping screws pressed into the plasterboard sheet.
Important! Before puttying, the surface must be treated with a primer.
Puttying with a medium spatula Source kraskaok.
Ceiling putty – www.alvikgroup.ru
The choice of primer and putty, as well as the number of putty layers depends on the degree of curvature and any existing unevenness in the ceiling. However, for better quality work, it is still recommended to use ilmax starting and finishing putties; they are ideal for these purposes.
Since all these putties have a fine fraction, they can be applied in a thin layer and are very easy to sand. To determine the degree of unevenness of the ceiling, it is recommended to use a level, regular, laser or plumb line. If there are unevennesses of less than 3 mm on the ceiling, then for a more reliable adhesion of materials to each other, it is recommended to use only deep penetration primers, which contain antifungal additives.
What kind of ceilings can be puttied?
Large differences in height, curvature and bumps cannot be leveled using putty. It will help level out unevenness of no more than 3 mm, which means it can be used on a fairly smooth surface.
If the ceiling is only slightly “imperfect” and the differences are no more than 3 cm, it is recommended to plaster it using fiberglass mesh. Reinforcement increases strength and prevents the formation of cracks. In more serious cases, only a suspended ceiling or plasterboard covering will help. Then you can hide even large defects by first laying communications and installing mortgages for lamps.
Preparation of the solution
For high-quality puttying, it is very important to prepare the correct solution, in which there should not be any, even the smallest, lumps, since they are difficult to mix and if you do not have certain skills in puttying, they will greatly interfere and can greatly complicate the process.
According to the technology, the starting putty is mixed as follows: for 12 liters of water - 30 kilograms of putty. Then the mixture is quickly mixed using a construction mixer with a wide whisk until the mixture is homogeneous; the mixture should resemble sour cream in thickness.
Required tools and materials
The putty mixture can be used on different types of substrate: concrete, plasterboard, brick and others. But for work, the set of tools and materials will be similar. To putty the ceiling you will need:
- Putty mixture, two types of mixtures for finishing and starting. To get a ceiling without flaws, you should choose high-quality mixtures;
- Primer solution, it is recommended to choose putty and primer of the same brand;
- To prepare the solution you will need a suitable container, two pieces;
- A tool for mixing components, a drill with an attachment, or a construction mixer;
- Priming will be carried out with a roller (preferably with a long handle), a ditch for the solution, and a brush;
- Cleaning the ceiling will require sponges and a spatula;
- Narrow and wide spatulas for surface treatment with mortar;
- Sandpaper;
- Seam tassel;
- Level;
- Ladder;
- A lighting device for checking the result obtained.
For work, the set of tools and materials will be similar.
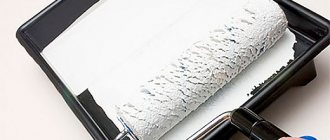
Applying starting putty
The work must be done quickly, as the solution quickly sets and hardens. The starting putty is applied to the ceiling using a wide and narrow spatula. Using a narrow spatula, apply the starting putty onto a wide spatula, and then use it to press it tightly and apply it to the ceiling.
If the base is flat, and the amount of work is quite impressive, then the easiest way is to apply the starting putty in large and sweeping strokes using a large spatula, and it is necessary to press the spatula as tightly as possible to the ceiling. We leave the resulting stains as they are, then simply remove them using a grout mesh. After complete drying, we rub the joints and apply a second layer of starting putty.
Starting and finishing putties: what is the difference
During the initial treatment, severe defects are smoothed out. This can be done with starting putty, which can be applied in a layer of up to 5 mm.
Finishing materials have a finely dispersed structure. They are used for final leveling where unevenness does not exceed fractions of a mm.
High-quality mixtures have high adhesion, crack resistance, elasticity and resistance to water. They do not emit harmful substances into the atmosphere, do not burn and do not contain radionuclides in doses exceeding the norm. When dry, they can be sanded, and after 7 days they gain full strength.
Applying finishing putty to the ceiling
Applying finishing putty can significantly improve the quality of decorative finishing and will make it possible to create a good microclimate in the room, since it contains only environmentally friendly ingredients.
Before applying the finishing putty, it is necessary to perform simple preparatory work. To level the surface of the ceiling, it is necessary to treat it with a sanding block with a mesh tucked into it. After this, we prime the ceiling surface.
The primer solution is applied to the ceiling using a roller or wide brush. Let the ceiling dry thoroughly. To prime the surface, we recommend using ilmax 4180 primer.
While the ceiling is drying, you need to prepare a solution of finishing putty.
To complete this task, we follow the instructions. Then, using a construction mixer with a wide attachment, mix everything thoroughly until a homogeneous mass without lumps is formed. The mass should be moderately elastic and not flowing.
We take a wide stainless steel spatula in our right hand; we will use it to apply putty to the ceiling. We take a smaller spatula in our left hand; we still need it to apply the putty on the large spatula. You can also use Swedish grout as the main trowel, which has a width of no more than 600 mm.
We apply putty to the main tool and begin to cover the ceiling with a thin layer of mortar, starting from any corner.
Smooth out the resulting sagging with a spatula. The optimal angle of the spatula to the ceiling is considered to be from 45 to 60 degrees. It is very important to monitor the angle of inclination of the spatula, since changing it will necessarily entail a change in the thickness of the applied layer.
After applying the putty to the ceiling, you need to let it dry thoroughly. Then sand it with grout; to do this, you need to install a mesh on it with a coarseness of at least 120 units. Then we prime the ceiling again and it is ready for painting or wallpapering.
Ceiling putty for painting
If paint is used as a finishing material, then puttying walls and ceilings has a number of features. Sometimes unpleasant problems arise during work - for example, when painting the ceiling, pieces of putty may stick to the tool. Of course, as a result, unevenness will appear on the surface of the ceiling - and the point of putty is precisely to eliminate such imperfections. It is not possible to simply glue the fallen putty back into place, so you need to look for other ways to solve the problem.
To paint the ceiling without any problems, putty should be carried out as follows:
- The final finishing must be done using a special waterproof putty. A distinctive feature of such materials is reliable protection from moisture, which is part of the paint. If necessary, you can add a special primer with water-repellent properties to the regular dry mixture. Of course, you need to add it when mixing the working composition. The mixture must be stirred in the same way as usual - the main thing is that there are no solid pieces in it. The composition dries completely after an average of three hours, so it must be worked out before this time.
- To make your task even easier, you can apply a waterproof primer to the ceiling after applying putty, but before painting. Thanks to the primer layer, the ceiling putty will not be destroyed during the finishing process.
- When painting, you need to very well control the degree of pressure on the roller. In addition, it is not recommended to go over one area several times - monotonous movements can cause the coating to peel off, and after some time you will have to repair the ceiling again with putty.
Applying putty yourself
Home Wall repair Applying putty with your own handsApplying putty with your own hands
The ceiling surface on which paint or whitewash is applied is not always smooth and even.
Of course, it is possible to whitewash and paint such a ceiling, but this will not smooth out surface unevenness, but will only emphasize them. If you want to have beautiful ceilings in your home, then after plastering you need to level them with putty. In order to achieve high quality painting or whitewashing, putty should be applied in several stages.
Each type of paint uses its own putty, but chalk is an indispensable element in each putty.
It must be dry, sifted through a fine sieve. The consistency of the putty should resemble a not very stiff dough. Please note that the thicker the putty, the more difficult it will be to level it.
The putty is applied with wooden or metal spatulas. To putty hard-to-reach places, use hard rubber strips of the required width. The edges of the rubber strips can be smooth or shaped.
Before starting work, put the putty on a baking sheet and cover it with a wet rag, cellophane, etc., thus protecting it from drying out.
When getting started, place the baking sheet at approximately chest level. Using a spatula, scoop up small portions of putty and apply it in a thin layer in separate strokes. After the putty has already been applied, it needs to be leveled, for which, pressing the spatula, move it along or across the ceiling, thus leveling the layer of putty.
The spatula must be held at a slight angle to the ceiling surface. It is much easier to clean a thin and even layer of putty, so it is recommended to press the spatula harder. The stronger the pressure, the thinner the layer of putty being leveled.
Sometimes you have to apply putty in two or even three layers. The number of layers depends on the condition of the surface. Before applying each subsequent layer, the previous one must be cleaned with fine sandpaper.
Before applying the second layer of putty, it is recommended to prime the first layer, then dry it and only then putty again. Then the second layer is applied more easily and lays down in a thinner layer.
After applying the putty, it must be cleaned. Cleaning is carried out using either dry or wet putty, depending on its type: dry - if the putty is adhesive, wet - if it is semi-oil or varnish. After wet sanding, the surface is much smoother than after dry sanding.
You can clean it with pumice or fine sandpaper. Sanding with sandpaper is done in different directions or in a circle. The paper must first be folded in several layers or wrapped around a wooden block, which will greatly facilitate the stripping process.
Before you start working with pumice, you must first prepare its surface. To do this, pumice is sharpened or rubbed. The process of cleaning with pumice is no different from sanding with sandpaper.
If after cleaning there are any unevenness or scratches left on the surface, you should putty again and clean the surface again.
Main requirements for finishing materials
Which putty is best for the ceiling? You can make the right choice based on a number of criteria. A good putty should meet all these requirements.
- High-quality material for both ceilings and walls must have an elastic, homogeneous base and high adhesion. At the same time, it should not contain large particles.
- When working, the putty should be easy to apply and not dry too quickly so that you have time to make adjustments.
- Good putty never cracks or crumbles after drying.
- The softness of the material is no less important - the elastic, pliable mixture is quite easy to work with.
Which ceiling putty is best? Craftsmen always advise giving preference to materials from trusted brands that have proven themselves well in the construction market.
Semi-oil putty on natural drying oil.
Heat 200 g of a 10% glue solution and add 20 g of liquid or finely ground soap to it. Having mixed the soap-glue solution well, pour 1 kg of drying oil into it in a thin stream, then 250 g of solvent (turpentine or varnish kerosene is used) and 50 g of drier.
All these components should be added while continuously stirring the solution. Then, without stopping stirring, add about 2.5 kg of chalk, mixing the putty to the desired thickness.
No solvent is added to semi-oil putty based on oxol drying oil.
Step-by-step description of the workflow
Now let's figure out how and in what sequence the work is carried out.
As you might understand from the name, the whole process is divided into 5 components:
- Necessary materials;
- Work tool;
- Preparation of the base;
- Sealing joints between slabs;
- Surface putty.
There are no trifles here, any deviation from technology or savings on the quality of materials will lead to the ceiling becoming covered with cracks or starting to fall off in pieces within six months to a year, or even earlier . Therefore, please read all sections of this review carefully.
Stage 1 - purchasing the necessary materials
The list may differ, I will analyze the option in which you need to seal the joints and equalize the level difference. You may not have these problems, so buy only what is needed for your situation.
The composition is ideal for concrete surfaces
| Material | Recommendations for selection |
| Basic putty | With its help, we will carry out the initial leveling of the surface and, if necessary, fill the joints between the slabs. Personally, I most often use the Osnovit Bassilk composition; it has very high adhesion and excellent resistance to cracking, which is very important in our case. The putty is sold in 20 kg bags and costs approximately 310-320 rubles per package, the quantity depends on the scale of the work |
| Finishing putty | Here we need an elastic, well-grinding composition with a fine structure. I recommend choosing Vetonit KR, it has very high properties and remains viable for 24 hours, now you don’t need to rush when applying - everything can be brought to perfection. The price of a bag weighing 20 kg today is about 380 rubles, but in different regions it, of course, may differ |
| Polyurethane foam | It is needed in cases where you have to seal deep seams between slabs. The advantage of this composition is that it fills space very well and creates a structure that is resistant to damage. The amount of foam depends on the scale of the job |
| Serpyanka mesh | Used to reinforce joints between slabs, it is best to use the 90 mm wide option; a narrow 45 mm mesh is of little use; often the joint is almost the same size. The mesh is sold in rolls of different lengths, choose the option that suits your situation |
| Adhesive primer | All experts know that concrete is not a good base; finishing does not fit well on it, and in order to correct this shortcoming, it is necessary to first apply a special contact primer. It is made on a polymer basis and contains a quartz filler, thanks to which surface adhesion increases significantly. A package weighing 4 kg costs about 300 rubles, the composition is sold ready-made |
| Strengthening soil | These are common compounds widely used in plastering work. The already finished ceiling will be treated with primer to strengthen it and reduce absorption before painting or other finishing. |
Adhesive primer is an important component when plastering a concrete ceiling with your own hands.
If you have level differences on the ceiling of more than 5 mm, then it is advisable to pre-plaster them. For this, a plaster composition and a reinforcing mesh made of fiberglass are used; unevenness of more than 3 cm should not be repaired; such a layer of plaster can cause injury if it suddenly falls off the surface; in this case, it is easier to make a ceiling from plasterboard.
Fiberglass mesh allows you to strengthen the surface when applying a thick layer of plaster
If in your region you do not have the compositions that I recommend, then consult with finishers about the quality of the products presented. They will give you much better advice than salespeople in a store.
Stage 2 - collecting the necessary tools
Ceiling putty is one of those types of work that cannot be carried out without a certain set of devices.
In our case, you don’t need anything expensive, so even if you have nothing, you won’t spend a lot of money:
- To mix the solution, it is best to have a drill or hammer drill with a mixer attachment on hand. In all more or less large cities, there is no problem renting a tool, and you can also choose a special electric mixer with high performance. You can get by with an ordinary stick, but you will spend a lot of effort on mixing the mixture, and the quality of the solution will still be lower than when using a special tool;
The mixer attachment fits any drill or hammer drill; it can be purchased separately
- The container for preparing the composition must have a suitable size and configuration. Special troughs made of soft, oval-shaped plastic with low sides are best suited; it is convenient to prepare the mixture in them and convenient to use it. But you can adapt any bucket or basin, here you decide for yourself what to do;
The most convenient option for 30 liters costs approximately 350 rubles
- To apply putty, we need a set of two spatulas, 10 and 30 cm wide. The wide version is used as the main one, and the narrow one works well in hard-to-reach places; it is also used to distribute the mixture over a large spatula. When purchasing, check whether the working blade is even; very often you have to go through 5-10 pieces until you find a good tool;
These are our main working tools, so please choose them carefully
- The primer is applied using a roller; in order for the composition to be evenly distributed over the fur coat, it is better to immediately purchase a paint bath. This way you can remove excess primer from the roller and use both the primer and the paint that will be applied later more economically;
It is best to buy a roller immediately with a bath
- The only measuring tool you may need is a rule or a long level; the slabs are usually flat, and only a level difference can be a problem.
Stage 3 - preparing the base
If everything you need is at hand, you can begin preparatory work; they depend on the condition of the surface and its previous finish.
The following events are most often carried out:
- If whitewash is applied to the ceiling, it must be removed; this is done either with a spatula or using a special scraper. If the layer does not give in, then it should first be moistened with a sponge or roller, wait 20 minutes and only then begin work; if necessary, moistening is repeated again. It is necessary to completely clean the surface of whitewash; very often this stage takes the most time;
Wet whitewash is removed much easier than dry whitewash.
- If there was wallpaper, foam tiles and other finishing materials on the ceiling, then they must be completely removed; it is important to remove all remnants of old materials and adhesive from the ceiling. The nature of the work depends on the situation; you yourself must choose the option that will allow you to clean the surface quickly and efficiently;
- The joints between the slabs must be carefully inspected; if there are cracks and pieces of weakly adherent mortar, they must be removed. Sometimes this requires using a hammer drill or a hammer and chisel. It is important to completely free the seam, since this is the most problematic area; small particles of old mortar from the seams are easiest to remove with a wire brush;
The seam must be cleaned very thoroughly and all mortar that does not adhere well must be removed.
- When the surface is completely cleaned, it should be wiped with a damp cloth, this will remove fine dust that inevitably settles on the ceiling and improve the quality of further work;
- After the ceiling has dried, you can apply an adhesive primer or, as it is often called, “Contact Concrete” to it. The easiest way to distribute the composition over the surface is with a roller, and if your joints are also cleaned, then it is better to apply the primer to them using a brush. It is important that the soil gets everywhere, as it strengthens the surface and improves the adhesion of putty compounds;
Adhesive primer - ideal preparation for concrete ceilings for puttying
Typically, this type of primer dries for about a day, after which the surface can be considered ready for further work. It is not worth starting earlier, since it is important that the primer is completely polymerized before applying the putty.
Many developers worry that they may miss areas when applying primer. To eliminate this, you can use compositions with the addition of pigment; it has a brown color, so you will clearly control where the surface has been treated and where it has not yet been treated.
Stage 4 - sealing joints
If everything is fine with your slab joints, then you are very lucky and can skip this chapter with peace of mind. But more often than not, the mortar cracks at the joints and needs to be repaired. We will figure out how to carry out the work in such a way as to strengthen the seams as much as possible. If your house is not very susceptible to temperature changes, then cracks in the ceiling will no longer bother you.
The instructions for carrying out the work are as follows:
- First of all, you should figure out whether it is necessary to fill the seam with polyurethane foam, or you can do without it. Everything here is quite simple: if the joint depth is less than 10 mm, then you can immediately start putting putty, but if it is larger, then you will have to fill and strengthen the cavity with foam;
- The joint surface needs to be moistened; the easiest way is to use a regular household spray for this purpose, this will improve the adhesion of the foam. After this, the composition is carefully applied to the seam, do not worry if it comes out, then we will remove all unnecessary, the main thing is to fill all the voids. After the foam has completely hardened, you need to cut off its excess. This is done so that there is a depression of no more than 5 mm at the junction;
Polyurethane foam allows you to increase the reliability of the joint finishing
- The composition “Osnovit Bazsilk” or its analogue is prepared; the quantity should be small so that the composition does not harden and deteriorate. Fill the seam with the mixture approximately flush with the surface, try to fill the joint as best as possible - first push the putty in with lateral movements, and then remove the excess by running a spatula along the joint;
It is important to fill the joint as best as possible
- Immediately after filling the joint, you need to place a reinforcing mesh on top of it, which is slightly recessed into the surface. After this, it’s worth going over the putty again to hide the mesh and even out the seam. After this, the work can be considered successfully completed; all that remains is to wait for the surface to dry completely, this usually takes about a day;
The seam must be sealed before puttying, this is important
Stage 5 – putty and surface leveling
Now let’s figure out how to properly putty a ceiling for painting, because this is the finishing option that is used in 90% of cases. There is a lot of work to be done, so be prepared to spend a lot of time.
The workflow consists of many actions:
The scheme is simple at first glance, but there is a lot to be done
- First of all, you need to prepare the base composition. Ceiling putty should have a thick enough consistency so that it does not fall off the surface and is well leveled on it. In one pass, no more than 5 mm of the composition can be applied; it is distributed over a wide spatula using a narrow one, after which the mass is distributed over the ceiling. The spatula should be held at an angle of no more than 30 degrees;
It is important to evenly distribute the mass over the working surface of the spatula
If you have a difference of about 10 mm, then I recommend puttingtying the surface in 2-3 stages; thin layers apply much better and hold much stronger. Again, only the sunken part needs to be puttied several times; the rest of the ceiling can be covered in one layer.
- After the layer has dried, it is necessary to level it; a perfect result is not needed here; it is enough to go over it with a spatula and cut off all the sagging, and also remove all significant irregularities, if any, with a sanding block. It is important for us that nothing sticks out on the ceiling, depressions and damage are not scary, we will repair them with the next layer;
- Next you need to prepare the finishing putty, in my case it is Vetonit. In addition to all the advantages that this option has a lot, I highlight one thing - after preparation, the mixture retains its plasticity throughout the day. That is, you don’t need to rush to quickly use up all the finished mass and you don’t need to hollow it out of the bucket; if you are still late, you can make putty for several hours of work;
Which putty is best for painting a ceiling? Vetonit is simply ideal for these purposes.
- The putty is applied in a thin layer over the entire surface, try to distribute it as evenly as possible. Move the spatula with moderate pressure; it is best to start work from the wall. It is important to level the plane in general; small sagging is not a problem - they can be easily removed later;
The finishing layer forms the appearance of the ceiling, so it must be applied carefully
- Usually one layer of finishing putty is enough, but there are situations when, due to a little experience, many small flaws are discovered after drying. In this case, it is necessary to cut off all the sagging with a spatula and apply another layer in individual areas or on the entire surface of the ceiling;
- When the putty is completely dry (at normal temperatures this takes a day), you can begin sanding the surface. To do this, take a special block on which sandpaper or abrasive mesh P120-P150 is fixed. After this, you should treat the entire ceiling with gentle circular movements, removing all irregularities and achieving an ideal plane; the putty rubs in well, so even significant flaws are quickly eliminated;
When sanding the ceiling, so much dust is generated that if you do not stock up on safety glasses and a respirator in advance, you will have a very difficult time. Therefore, do not forget about protective equipment.
Sanding the ceiling makes it perfectly smooth
- To control the plane and notice even the smallest irregularities, you just need to hold a light bulb or spotlight under the ceiling while working. The light reveals all the flaws, and you achieve an ideal result without special equipment; leveling the ceiling well is much easier than it seems at first glance;
Bright light is the best way to identify unevenness in the ceiling
- After leveling the ceiling, you need to remove dust from it; for this you can use a slightly damp cloth, or you can also use a vacuum cleaner. The clean base is covered with strengthening primer, this is necessary to increase the strength of the putty. After the soil has dried, you can apply paint or finish it in another way.
We figured out how to putty the ceiling with our own hands, there is nothing complicated in the work, it is important to prepare the surface well and use high-quality compounds, then you won’t have to redo the work in a year.
Soap-adhesive putty.
To prepare this putty, you must first prepare glue and soap solutions. To prepare a soap solution, you will need 15 g of soap, which must be finely chopped and diluted in a small amount of water.
For the adhesive solution you need to take 1 kg of 10% glue and 25 g of drying oil. Add drying oil to the hot glue and mix the solution until a homogeneous emulsion is obtained.
Then the glue and soap solutions are mixed and chalk is added. The resulting putty is mixed well, adjusting the density with chalk. Soap is introduced to ensure an even layer of putty.
Review of finishing mixtures
Which ceiling putty for painting is better? Our review will help you understand this issue. In it we tried to leave only the highest quality and reliable materials for puttying the ceiling for painting.
- "Prospectors". Despite the affordable price, this mixture has decent quality. The material is suitable for finishing dry and wet rooms. You can putty it on any surface. Craftsmen note the plasticity of this mixture, its quick drying, low cost and lack of shrinkage.
- Weber LR+. This putty is perfect for painting, wallpaper and decoration. Consumers talk about the quick mixing of layers of the mixture, ease of application and preparation, high adhesion and good ductility. In addition, the material allows you to get an impeccably smooth coating. True, finding putty from this company is not so easy.
- Sheetrock SuperFinish. Don't know which ceiling putty is best? Then pay attention to this company, we are sure you will be satisfied with the result. This putty is produced in the form of a ready-made mixture, so you just need to mix it before use. The material dries in just 5 hours and is famous for its ease of application, lack of shrinkage, impeccable adhesion and ductility. Many craftsmen consider this putty to be the best in its price category.
Leading material manufacturers
Ceiling putty should be selected taking into account the characteristics of the room in which the ceiling surface will be leveled. To do this, temperature conditions are taken into account (for example, on a balcony or unheated loggia it is always colder than in the rooms), humidity (bathroom or kitchen).
Which putty to choose for the ceiling
It is better if the selected mixture is from a well-known manufacturer, whose high price for the product is justified by the quality of the material. These include:
1. Knauf - the price-quality ratio distinguishes this brand, which is in wide demand among consumers in the construction markets. Knauf not only offers high quality materials, but also provides practical advice and recommendations on the use of formulations.
Putty mixtures are presented in several versions, the price ranges from 350 to 1200 rubles for a standard 25 kg bag. You can choose any type of putty - starting, finishing, dry or ready-made.
2. Henkel Bautechnik is a brand under which dry and ready-made mixtures are produced. This material is distinguished by high German quality.
The choice of putty compositions at Henkel Bautechnik is not as wide as that at Knauf, however, there are clear instructions for each type, so questions related to the use and purpose of the mixtures do not arise.
The cost is from 600 to 1000 rubles for a standard 25 kg bag. 3. Weber-Vetonit is a quality standard among modern putty materials. High cost - from 550 rubles. for 20 kg of composition, depending on the purpose of the mixture, is fully justified by its excellent properties. All putties produced under this brand are flexible, have a long service life and are produced in two shades - white and gray. 4. Stabilll is a Polish brand that has taken a strong position in the Russian construction market.
Produces dry or ready-made mixtures. The quality is not bad, but lower than that of Weber-Vetonit or Knauf. The best option that brought the brand to popularity is Stabilll PG 41. Good kneading quality and the ability to maintain plasticity for 2 hours are the distinctive features of this variety. The price is from 600 rubles. for 25 kg.
Other bulk mixtures of this brand can be purchased at prices starting from 350 rubles.
for 25 kg, ready-made compositions are much more expensive - from 840 rubles. for 17 kg. 5. Sheetrock is an American brand that produces surface finishing compounds in Russia. In particular, in St. Petersburg. However, our products are of lower quality compared to foreign analogues. However, having once tried to use this type of “Russian” putty in their work, the craftsmen no longer want to look for other alternatives. But such pleasure is not cheap, so it is better to use Sheetrock for finishing surfaces. Thus, the price for 28 kg of the mixture is more than 1000 rubles, and a three-liter container can be purchased for 350 rubles.