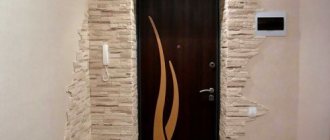
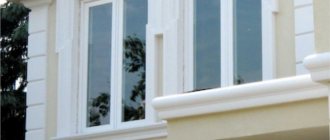
Wallpapering doors is another option for rejuvenating old doors. Not all of us have the opportunity to completely replace all doors or at least part of them for financial reasons. But there are other situations - you live in a rented apartment, in a hostel, that is, temporarily. I want to repair and refresh the finish, but not too expensive. Therefore, door wrapping is quite acceptable and inexpensive.
I had a similar situation a long time ago, when the children were small, and I lived in a small-family hostel while waiting for an apartment. Back then, interior doors mostly had glass. My boys were playing around and broke the glass. To prevent this from happening again, I inserted chipboard instead of glass and covered it with trellises. This was my first experience of how to wallpaper doors.
- Choose wallpaper based on the previous finish of the doors. The fact is that if the doors are painted with oil or varnished, then not all types of wallpaper will be suitable. This happens because the adhesive composition, when it dries, cannot be absorbed into the painted door. Moisture will evaporate through the trellises. That is why they should not be moisture resistant.
- The following types are suitable for pasting - paper, bamboo, non-woven and other “breathable” ones, which will decorate your door in a new design. It is desirable that they be elastic, then they will be easy to work with, and the wallpaper will ideally follow the plane of the doors.
- If you want to paste over with moisture-resistant types, then you need to know how to remove old oil paint.
- If you can’t stick it on paint, but you really want to stick a moisture-resistant material, then you can find a way out. An alternative is to stick non-moisture-resistant wallpaper onto oil-based paint, let it dry so that the moisture is gone, and then cover it with a moisture-resistant composition - varnish (a good option is acrylic), water-resistant paint.
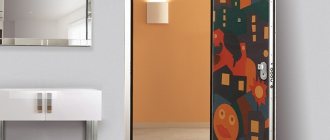
Photo wallpapers look great on doors, enliven the interior, visually expanding the space. When choosing, be guided by the style and purpose of the room in which the doors will be restored. This refers to the theme of the picture on the photo wallpaper - kitchen, for a children's room, and choose in the same spirit.
Door design options
- Pasting can be done with identical trellises for walls and doors in the room. Then you will get a unified style according to the color scheme of the room.
- Another example is to diversify and highlight the opening along the contour with a new platband, impregnated with stain and varnished. The casing is two tones darker or lighter than the tone of the canvas. You can get attached to the color of the baseboard.
- Combined design of paneled old doors with different trellises. With the right choice of wallpaper texture and color combination, you can end up with unusual and exquisitely designed doors.
- You can combine different wallpapers - make inserts or highlight only the protruding elements, and decorate everything else with self-adhesive film with the texture of natural wood, or simply update the trim with self-adhesive film. Cheap and beautiful.
Materials for finishing entrance door slopes
When finishing the slopes of the front door, several popular materials are used, each of which has its own distinctive features, advantages and disadvantages:
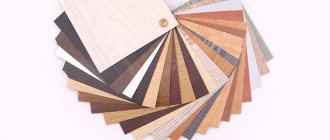
- MDF is a modern semi-synthetic material made by pressing wood waste using polymer resins.
Laminated MDF plank
- Painting with interior moisture-resistant compounds to match the decoration of the main hallway.
- The construction of polymer panels in white or with colored lamination is similar to the interior decoration of PVC windows.
Laminated PVC panels
- Wallpapering slopes - as a rule, the same material is used as for the hallway walls.
- The use of interior sandwich panels with a textured or smooth colored surface.
Interior sandwich panels
- The installation of a laminate is an original and practical solution that protects the slope from dust and mechanical damage.
- Plasterboard gluing and subsequent finishing of the element with finishing materials.
- Upholstering a slope with clapboard is suitable for a private home, provided that similar materials are used in the interior.
Framing the slope with clapboard
- Installing tiles is the most complex, expensive and durable solution.
- Installation of door panels, if similar elements are available in the door manufacturer's range.
Installation of door panels
Each of the methods and materials used in the design of slopes is described in detail below.
Technological stages of door pasting
- We start with preparing the canvases. We prepare the surface in the same way as described in the article covering doors with self-adhesive film. In my opinion, working with wallpaper is even easier, since you already have some skill. I can’t believe that any of my readers haven’t worked with them at least once in their lives. The thing is that the self-adhesive film sticks so much that you can’t move it, but move the wallpaper, take it off and reapply it, etc.
- If the door is painted with enamel and you do not want to clean it, then follow the following steps. Where the paint is peeling, clean these places. Sand the entire surface of the door with coarse sandpaper to remove the smoothness of the door. Then prime with primer and let it dry.
- It is easier to prepare the surface for wallpaper than for film. If they have a textured pattern, then all surface imperfections will be hidden, but the film is very thin and the preparation must be of better quality, otherwise any bump will be visible.
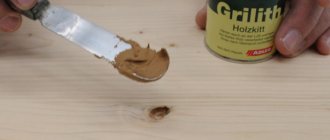
- We count and cut the trellises. Take your choice of adhesive composition seriously - let it be, for example, glue for vinyl trellises - it is perhaps preferable and has antifungal ingredients in its composition. To improve the adhesive ability of the glue, it is combined with PVA glue in a ratio of 1:2, that is, part wallpaper glue and two PVA. A killer option, I glued it myself. The door area is small, which means you will need a little glue.
- Further according to the usual scheme. Spread the wallpaper with adhesive and let it soak. Same with the door surface. Very carefully smooth out and remove bubbles. All other steps are the same as when gluing walls.
Of course, you will have to tinker, since wallpapering doors is not a solid wall. But the result should please you with the new design of your old doors. You will succeed.
If you decide to renovate your home, then wallpapering the walls will take up a lot of your time. The most difficult step in this difficult process is directly related to gluing wallpaper around doors and windows
. This is due to the fact that the most inaccessible places are located there.
We deal with undefined edges of canvases and external corners
I’ll say right away that the method I propose is the most natural collective farm, but it works, it has been tested repeatedly.
So, it happens that you glue a strip, everything goes fine, but for some reason its edges just don’t want to stick to the wall. Accordingly, the wallpaper seams look simply terrible. Or, for example, glue a wide sheet to the outer corner, but it always sticks out, no matter how hard you try. Liquid nails or (which is better) acrylic sealant will come to your aid. For non-stick edges, you will only need to apply the sealant evenly to the wall below the edge. That’s it, he’ll stick to you like he’s cute. In the case of an external corner, glue the entire sheet heightwise first to one part of the wall, then also apply a strip of sealant to the corner (here it’s already quite generous) and you can glue the rest of the sheet. Now it’s not the wallpaper that will stick to the corner, but the corner to the wallpaper)) It’s a joke, of course, but acrylic sealant really works.
There is a hypothetical risk that the sealant will show through the wallpaper if it is thin and light-colored. I don't know if this is possible. Most likely, no, because it is distributed under them in a very thin layer and is unlikely to affect anything.
In general, there are special types of glue for corners, borders and joints in the form of a thick paste. But no one really buys them. I’m not advocating my method, but it works.
Wallpapering doors and windows - from words to deeds...
Before starting work, you should prepare the surface of the wall with which you will work. Only after this should you start gluing wallpaper. It’s important to remember that you have to go side by side. When you reach the doors in the process, you should glue the roll with an overlap onto the door frame, both from above and from below. The same should be done when working with a window. This is where the similarities between window and door coverings end.
After the roll is glued to the door, you should take scissors in your hands and make an incision diagonally from the corner of the platband at an angle of forty-five degrees. Well, then all that remains is to cut off all the excess, leaving only a couple of centimeters, and push the wallpaper under the platband. It’s good if your apartment has inexpensive wooden doors Profile Doors, as they are easy to work with. When gluing wallpaper on windows, you should carry out all the previous manipulations with the exception of working with scissors.
In the case of windows, the cut must be made horizontally. If your window is recessed deep forward, then you should first paste over the slope, and then overlap the top with wallpaper on the wall. It may very well be that when cutting off excess paper from wallpaper, you will find that it will be inconvenient to get to hard-to-reach places. To do this you need to use small scissors.
It often happens that bubbles appear when gluing. To avoid this, you should use a special spatula. It is a piece of flexible plastic shaped like a trapezoid. Finally, I would like to say that by gluing wallpaper around doors and windows yourself, you save a lot on your family budget.
/
Windows and doors are the main obstacles to wallpapering. Taping around a doorway requires some skill, and taping walls around windows is simply inconvenient.
Combining tiles with laminate
We have sorted out the advantages and disadvantages of the material, now the fundamental issue is the possibility of combining tiles near the entrance door in the hallway with other materials. As mentioned earlier, this can be created, in some cases it is even necessary if we are talking about a large hallway.
A successful composition can provide some space division. For example, a good solution would be tiles near the entrance door in the hallway, while finishing the rest of the area with the rest of the material. Thus, ceramics will be in the zone of increased brutality (with all this, you don’t have to place a foot mat near the door), and at the same time it will become a signal that it is not allowed to walk further in shoes.
Also, in some cases, additional division of the room is necessary. For example, in a one-room apartment or studio, you can thus unobtrusively show the common area of the apartment and allocate space for the so-called hallway, which at the same time is part of the main room.
Another combination option is to make unusual masonry from tiles of various shapes and frame the pattern with parquet boards, and individually, this option looks great in a composition with natural stone tiles, which adds elegance to the room. In addition, you can repeat the sketch of the ceiling in this way (in cases where a suspended or suspended ceiling with twists is made).
Preparing for work
Accurate calculation of wallpaper guarantees a high-quality result. If the wallpaper has a certain geometric pattern, its discrepancy in the area of the window or door will be very noticeable.
In such cases, gluing begins in the area above the window. In this area, the discrepancies in geometry on the wallpaper are most noticeable, therefore, having pasted a fragment above the window, then paste it on the sides and only then on the bottom.
The starting point should also be chosen so as not to stick narrow panels at the doors and to avoid the edges getting into each of the corners of the window.
The wallpaper must be cut flush to the window frame, but there are often gaps left in the corners. To get the best results, start by sealing these gaps.
The gap must be cleaned of dirt and dust and sealed with acrylic mastic using a dispensing syringe.
Then they paint the window frame, taking in the previously sealed gaps and the plaster of the adjacent wall along the painting path.
Installation Features
It is not necessary to contact specialist craftsmen in order to make a threshold indoors. You can do the installation yourself, but you must remember that the standard height of this product is 30 mm. There is only a slight deviation from the norm, up or down.
In order to begin work, you need to make sure that the surface of the future threshold is smooth and dry. If this is not the case, the defects need to be corrected so that the finished product does not warp or become deformed.
It is better to make input options from the most durable materials. Using brick and concrete, you can make a threshold for the front door. Since concrete is a liquid substance, it is necessary to make formwork for it (from old or unnecessary boards), which is subsequently cemented with a compound. With this approach, it will not stand out from the general appearance of the room opening.
Performing gluing at the doorway
There is a door located in the corner of the room; a slight deviation from the rhythm of the overall pattern will not be noticeable. If the door is located away from the corner, the pattern must strictly correspond above the opening and after the opening. One way or another, the last full panel of wallpaper is pasted in front of the opening, and the next one is pasted so that it covers the casing.
Gently press the wallpaper against the casing so that the corner of the profile is exposed. Using scissors, make a cut diagonally from the edge of the canvas to the corner of the profile.
The canvas is folded along the cut and cut along the door slope itself. Excess pieces are removed, and the wallpaper is smoothed with a brush at the corners of the joints between the wall and the platband.
Measure and cut a small piece of cloth for gluing above the doors. Then the next canvas is adjusted according to the same principle as described above.
If the canvas should go into a corner, it is cut to the distance from the door to the corner, adding about another 3 cm so that the wallpaper can be folded onto the adjacent wall.
Polyurethane glue
Not all polyurethane compounds are intended for application to plastic surfaces, in our case, corners. When purchasing, you need to carefully read the instructions. An example of a suitable polyurethane-based composition that can be used to glue a plastic corner is “Supercontact”. Advantages - reliable gluing, the ability to adjust the strip if it is not aligned correctly.
The disadvantages of this type of glue are the strong odor and higher cost. Although a tube of such glue is comparable in price to a tube of liquid nails, its packaging is much smaller and the consumption is approximately the same. There are some peculiarities in application. You need to apply a thin layer of glue to the surface of the corner and wait for it to harden. You can press it to the wallpaper after 20–30 minutes. Setting occurs within 24 hours, and complete drying occurs after 2 days.
Carrying out gluing near windows
A canvas is glued to the side of the window so that it covers part of the window. An incision is made at the edge of the canvas, allowing the wallpaper to be folded onto a slope, and the canvas is trimmed along the frame.
A canvas is glued to the upper slope, bending 3 cm onto the wall and hiding them under a large canvas on the wall.
Before proceeding directly to the process of gluing vinyl wallpaper, it is necessary to carry out the traditional one.
Selecting tools for work
To start the wallpapering process you will need the following tools:
You will also need a tape measure, ruler and level.
Preparing the wall surface
Preparing the wall surface includes the same steps as for gluing conventional wallpaper.
Initially, you should remove the old coating (wallpaper or paint) from the surface of the walls. To remove old wallpaper, you can use a spatula after soaking it. You can remove paint from the walls using special liquids or simply go over it with sandpaper.
When the old coating has been removed from the walls, it is necessary to check them for defects. If unevenness is found, these areas should be puttied, leveled and then walked over them with sandpaper.
Surface priming
The next step in preparing the surface of the walls is priming them. This process is necessary to prevent the appearance of fungus and mold on the walls. We advise you to choose a special primer for gluing wallpaper, or you can use the selected wallpaper glue.
First of all, you need to decide on the type of wallpaper glue. When painting vinyl wallpaper, you should use a special glue. In most cases, the method of preparing wallpaper glue and its proportions in relation to water are indicated on the packaging.
To prepare the adhesive composition, the mixture must be gradually poured into a container of water, stirring constantly. When all the required amount of glue has been prepared, it should be allowed to stand quietly for a while. Then the resulting mixture is mixed again and left in the room for 13-15 hours.
Now that you have already prepared the surface of the walls and the adhesive composition, you can mark the wallpaper. To begin with, be sure to check the lot number on all rolls of wallpaper you purchased, and then you can start cutting the strips.
To cut strips of wallpaper, measure the height of your walls, and then, taking into account a margin of 5-7 cm, cut the required length. In this case, it is necessary to take into account the following fact: if there is a pattern on the wallpaper, then when cutting you need to take into account its size.
If you still have questions regarding cutting the required amount of wallpaper, read the article.
Which one to choose for work?
To make the installation and operation of decorative stone as comfortable as possible, the following factors should be taken into account before purchasing the material:
- If you buy an artificial material, it should match the color and texture of its natural counterpart.
- The color of the stone must match the overall color scheme of the room for which it is purchased.
- For the best effect, select a material that combines several colors.
- There should be no traces of undissolved color, small parts of filler or other defects on the front side of the material.
- The edges of the stone must be smooth. Small chips are acceptable, but no more than 4 mm. for invisible seams. With visible seams, chips of 6 mm are acceptable.
- When choosing an artificial material, pay attention that there are no heterogeneous inclusions inside it, as they will reduce its strength and give off unnaturalness.
Vinyl wallpapering
When the preparatory work stage is completed, you can proceed directly to gluing vinyl wallpaper.
Before applying the adhesive, read the instructions on its packaging: the adhesive composition can be applied either to the walls or to the wallpaper itself, or to both surfaces.
When applying adhesive to strips of wallpaper, coat the edges well, but make sure that the glue does not get on the front side of the wallpaper. After this, the glue on the wallpaper should be given a few minutes to soak in.
When applying glue to the walls, apply only the area of the surface on which the wallpaper will be glued.
It is better to start gluing vinyl wallpaper from the window. At the same time, it is better to first apply markings to the wall so that you can then refer to it.
The coated strip of wallpaper must be applied to the wall, in accordance with the markings. Then the wallpaper needs to be straightened in the direction from the center to the edges. If glue comes out from under the wallpaper, it must be removed with a clean rag or soft sponge. Excess wallpaper near the ceiling and floor should be trimmed with a sharp knife.
The next strips of wallpaper are glued end to end with the previous ones.
To paste wallpaper near the door, the strip that covers the doorway needs to be trimmed and then pressed tightly against the wall. All subsequent strips are cut to the appropriate distance above the frame.
- From the window
- From the door
- From the corner
- From any major landmark
- From several lines
- What else to pay attention to
- Useful tips
Replacing wallpaper is a mandatory step in every second renovation in a house or apartment. It is not enough to choose the appropriate material, glue and tools. To get the desired result, you can’t just open the roll and get to work. You need to prepare in advance, and also decide where to start gluing wallpaper in the room.
Sequence of work
Success, the speed of achieving results, depends on proper preparation for work. Purchase the necessary tools and available materials:
- Table for cutting and applying wallpaper glue.
- Step ladder.
- Clean container for glue.
- Grater with mesh for grinding.
- Sharp scissors, wallpaper knife with spare blades.
- Tape measure for measuring the length of panels and the height of walls.
- Level, wallpaper ruler.
- Wide wallpaper brush for applying glue.
- Painting fur, rubber roller for rolling wallpaper.
- Plastic spatula for wallpaper.
- Rags, sponge for removing excess glue.
- Hammer, insulating tape, pliers.
Choosing a starting point: why is it so important?
During the Soviet era, wallpaper was glued from the window. The canvases were glued overlapping because the material was thin. To make the joints invisible, work began from the window opening. Today, the range of wallpapers made from various materials is huge - from non-woven to balsa wood. Why is it so important to choose the right place to start gluing?
- Wallpaper indoors is glued in a circle - from point to point. The place to start work in this case is the very first canvas. However, if you act in this way, in the absence of experience, it is easy to make inaccuracies, and the last piece may not coincide with the first.
- The last strip of wallpaper often does not fit entirely, which means the pattern may not match. Therefore, it is better to choose the starting point for gluing in an inconspicuous place.
To hang the wallpaper neatly and evenly, you will have to carefully work with the first sheet. If it is glued somehow, the remaining strips will also lie crooked. You need an even vertical for the first strip of wallpaper, since when gluing the next strips it will become a guide.
Tools used to determine the evenness of the desired landmark:
- The building level is a simple and affordable device. The longer it is, the better the performance.
- Plumb line – suitable for vertical lines.
- A laser level is an expensive, but most accurate and convenient tool.
How to choose the right tile
To create the right choice and finish the slopes with such material, you need to take into account several main criteria:
- purpose of the premises;
- sanitary condition;
- design;
- the desire of the owner of the room.
For example, in the kitchen you should not decorate with artificial stone. Its uneven surface will be difficult to clean. This material is more suitable for a living room with a suitable design.
Laying tiles most often occurs in rooms with high humidity. Finishing door slopes in such premises helps to obtain a suitable interior and design.
Decorative textured slopes with granite tiles
From the window
The old Soviet method is still used, often, despite the ability of modern wallpaper to create a seamless finish. The method is popular because people are used to working this way, and the older generation advises the younger generation to do so.
The second reason: Soviet windows were smooth, unlike doorways or corners, the curvature of which is sometimes visible to the naked eye. Another advantage of this method: the window opening, as a rule, is deformed very slightly and is quite suitable for reference.
And one more argument in favor of the window opening. When gluing from another point, when it comes to the window, the solid canvas will most likely not fit near the opening and you will have to cut off a strip of the required width.
In addition, gluing wallpaper under the window is usually very difficult, since heating radiators are usually located there. If work starts from the window, these problems can be avoided.
Disadvantages
With all its advantages, this material has several disadvantages. Firstly, this is the highest cost. Secondly, laying tiles requires certain abilities and knowledge. This facing material requires great care and a lot of time when working. But the acquired result constantly compensates for all the disadvantages with its nice appearance and reliability.
Slopes made of clay tiles for the entrance door opening
From the door
Currently, builders, as a rule, strictly monitor the verticality of doors and corners. Unpleasant exceptions do occur, although they are rare. It is convenient to glue wallpaper from the door for the following reasons:
- the first and last strips do not have to be joined together;
- in areas such as a hallway or hallway, the doorway is often the only suitable landmark.
- if there is an unevenness somewhere, the door will cover it. This option is optimal when the pattern on the stripes must converge exactly.
It should be noted that even a very smooth-looking doorway will not hurt to check it once again with a good building level or plumb line.
Junction design options
Now we invite you to see how a hallway can look with tiles around the front door. Next, photos with design variations will be presented, and maybe one of them will appeal to you specifically and will be able to decorate your home:
What else to pay attention to
To avoid additional problems, you need to consider the following points:
- The relationship between adjacent corners and the door.
- The location of window openings relative to each other, the entrance to the balcony.
- Placement of heating elements: pipes, radiators, etc.
- Arrangement of furniture.
- Availability of other important interior details.
If the room has a stationary cabinet that is not planned to be moved to another place in the future, you can start gluing from it, so that the junction of the strips is hidden behind it. The same applies to the furniture in the kitchen.
Selection of tile design
And no less important factor is the choice of design. It is very necessary that the tiles in front of the front door not only match the design or complement it, but also comply with all design standards and rules. If, of course, you want your hallway to have a nice look, and not, on the contrary, repel guests.
First, let's look at a number of tips that are worth considering when choosing tiles:
- In the case of the design of a narrow and long hallway, you should pay attention to the use of colored tiles, or light ones. The introduction of black parts in this case will make the room dark and uncomfortable.
- For small rooms, light colors will help to slightly expand the space and visually enlarge the room, which will work to your advantage.
- In the case of a large hallway design, it is worth choosing tiles of different tones, textures, and not only shapes. This will help vary the appearance, at the same time put some accents in the room and hide any imperfections. The tile at the front door in the photo below clearly shows this option, namely the introduction of a pattern and mosaic inserts.
- If you want to make a typical tile pattern, then you should adhere to the style of the wallpaper, ceiling and furniture, and also adhere to the general style. The combination of tiles and doors will also be a key factor.
- Speaking specifically about the style in which to decorate the floor, it is worth seeing that with a serious traditional design of the room, a coating that imitates marble is perfect; in the case of an oriental style, Metlakh tiles would be a good option; in other options, a good solution would be to introduce eye-catching tiles, or light colors.
Maintaining verticality in uneven corners
This is especially important if the wallpaper has a geometric pattern that must match. There is a proven method for maintaining verticality. When wallpapering, you should mark a new vertical line on each wall using the method described above. In this case, the last strip of wallpaper on one wall will overlap the first fragment on the second by several centimeters.
- It is better to paste wallpaper behind radiators and vertical heating pipes right away, while you have fresh energy, so as not to suffer later.
- Before work, you need to turn off the power to the apartment, remove the covers from the sockets in order to glue the canvas directly onto them. After the wallpaper has dried, the holes are carefully cut out and the socket housings are put back in place.
- You can seal uneven joints near the ceiling using borders.
- When working with external corners, it is good to use a special plastic corner that matches the color of the trim.
Choosing the right “reference point” and strictly vertical orientation of the stripes are the key conditions for an accurate and high-quality finish.
Dear readers!
If it turns out that you do not have the tools and necessary skills to perform the actions and processes described above, you can always turn to professionals. We will tell you how much a comprehensive repair or individual work can cost. And also how long it will take and we will offer the best specialists in your city at the lowest prices!
To calculate the cost of work, fill out the form below. It's fast, free and without obligation!
We will call you and discuss all the details in detail!
Decorating doorways with wallpaper in Moscow
Choose reliable craftsmen without intermediaries and save up to 40%!
- Fill out the application
- Receive offers with prices from masters
- Select performers by price and reviews
Find artist
- Minor household repairs
Featured Artists
- Decorating doorways with wallpaper - masters on YouDo;
- experienced specialists in Moscow are ready to perform the service;
- You set the price for the task in the “Wallpaper finishing of doorways” category.
If you need high-quality finishing or doorway decoration with wallpaper, use the Yuda service to find a specialist. On our platform you will find affordable prices for services and an extensive database of trusted craftsmen who are ready to carry out wallpaper finishing quickly and accurately.
How the finishing works
Finishing a doorway is an important part in the development of interior design. You can decorate a doorway using a variety of materials, but it is the decoration of doorways with wallpaper that is especially popular.
Decorating a doorway with wallpaper has the following advantages:
- cheap material
- Doesn't take up extra space
- with the right selection of wallpaper it will help to hide or, conversely, highlight the doorway
- suitable for openings with and without doors
Also, a variety of wallpapers allows you to choose any color and texture. The door opening is decorated with wallpaper as follows:
- removal of old coating
- surface cleaning
- selection and purchase of wallpaper
- Finishing work
In order for the finishing and decoration of a doorway with wallpaper to be successful, you should hire an experienced craftsman who will carefully carry out all the preparatory and finishing work, as well as clean up after completion. The cost of the specialist’s services depends on the following parameters:
- urgency of the order
- total scope of work
- price of materials
If you have a limited budget, you can always negotiate with the master on a price that is beneficial for both parties.
Slopes made of tiles or ceramic tiles
If it is necessary to finish the slopes of windows or doors with elements with precise geometric dimensions, you must follow the instructions given below.
Laying
Before starting work, the slopes must be carefully leveled. The tiles will be laid with high quality only on a smooth, even surface . This must be controlled using a building level.
There are several methods for leveling slopes: using plaster, drywall or chipboard.
You can line the window opening with plasterboard
Below we will tell you how to lay tiles on a previously plastered and primed slope.
Before gluing the tiles, parts are laid out on the prepared slopes to assess their future position. Lay out the tiles starting from the corner. The principle is the same as when laying tiles on a wall - the first bottom row is laid out first.
Laying tiles begins from the bottom row
The glue is applied to the wall using a metal spatula. The texture obtained in this way will contribute to better adhesion of the adhesive and tiles. The joints are grouted after a day using a rubber spatula.
How to make a corner connection
At the preparation stage, it is necessary to install metal or plastic perforated corners under the plaster mortar to give the corner edges of the window opening a clear geometric shape.
The layout scheme must be selected in such a way that the width of the tiles on both sides coincides and the seams between the tiles coincide in all planes.
The seams between the tiles must coincide in all planes
The corner can be finished using grout. Therefore, fixing the tiles at the corners should be done in the manner shown below.
Corner finishing is done using grout
In another case, you can use a decorative corner.
What are door slopes
Door slopes are the space of the opening itself, around the door frame. If the doors are double, the jambs are located between them on three sides. A sloppily designed opening spoils the overall appearance of the room; the door structure itself also loses its attractiveness.
The main methods of finishing slopes:
- plastering;
- paneling;
- decoration with panels fixed to the frame.
To hide all this, you need to properly design the slopes.
Tip: often the coating is made to match the one with which the walls are decorated.
Stage 6. Installation of platbands
Photo 18. Measuring the length of the casing
We attach the casing and mark the required length. The size is set according to the angle of the internal intersection of the horizontal and vertical extensions.
Photo 19. Measuring the length of the casing
Similarly, we set aside the length of the second casher.
Photo 20. Measuring the length of the casing
We mark the length along the inner corner of the extensions.
Photo 21. Trimming the platband
We cut the trim using a miter saw at an angle of 45 degrees.
Photo 22. Filling the gap with foam
Polyurethane foam is used to fix the extension box. Gives the structure rigidity and additional sound and heat insulation.
Photo 23. Filling the gap with foam
It is important not to overdo it with the volume of foam, so as not to deform the extension.
At the same time, if there is too little foam, the opening will be leaky and not rigid enough.
To remove excess foam, you need to wait for it to cool and cut it off with a knife.
Try to avoid getting polyurethane foam on the boards, walls and flooring.
Photo 24. Installation of vertical trims
First we install vertical extensions, then horizontal ones.
We attach the casing to the trim using decorative nails.
Photo 25. Installation of vertical trims
To install the trim you will need about 20 decorative nails. They are clogged at a distance of 20–30 cm from each other.
On average, each vertical trim will require 7 decorative nails, and each horizontal trim will require 3–4.
Photo 26. Installation of horizontal trim
We measure the size of the horizontal platband.
Starting from the larger size, we cut at 45 degrees to reduce it.
The horizontal casing is fixed to the extension box and the vertical casing.
Photo 27. The final stage of installing slopes
We press the structure against the door frame and fix it with masking tape until the mounting foam hardens - for 1–2 hours. The exact time depends on the drying time of the foam, which can be found on the packaging.
After this, you can remove the masking tape. Your front door is ready!
Installation of wallpaper on walls
There are several ways to glue wallpaper (you can easily see them from photos or videos). One of them involves initially gluing all smooth walls, and then the corners. Other artists advise starting from the most visible corner in the room. There is no consensus on this issue - everyone can glue at their own discretion.
Wall preparation is mandatory for any method. The old coating must be carefully removed and cracks filled with putty. Then the walls are covered with a special primer or wallpaper glue. Only after the primers have completely dried do they proceed to pasting the walls.
At the location of the reference point, draw a vertical line; this must be done with a plumb line or a building level. The first strip is cut from the roll, the length of which is equal to the height of the wall plus 5-7 cm. The wall is carefully coated with glue and wallpaper is applied. Level the canvas with a plastic spatula or wallpaper roller, focusing on the vertical.
At the baseboard and under the ceiling, the wallpaper is cut with sharp scissors or a construction knife. Move on to the next lane.
How to cut the inner corner of a ceiling plinth. Installing a baguette in a corner using a miter box
First of all, you need to make sure that the angle being pasted is exactly 90°. This can be done using a professional protractor or a large square. If the measurement shows that the angle is straight or deviates very slightly from 90°, then a miter box will be the best device for adjusting corner joints.
How to cut ceiling plinths in corners? In order for two skirting boards to match perfectly, their edges should be cut at an angle of 45° in a mirror image with respect to each other. First, fix the miter box in a stationary state on a stable, solid support and then proceed with the operation, because if the rack shifts during cutting, the direction of the cut may be inaccurate and there will be a gap at the joint.