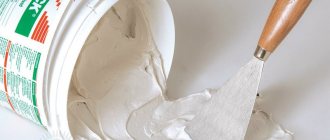
Putty is a building material that is used for final leveling of the surface before the final finishing. It comes in several types depending on the composition, application and other characteristics.
Before you start working with the material, it is worth determining how finishing putty differs from regular putty, whether it can be replaced with plaster or not used at all. This will help avoid common mistakes and subsequent rework.
Source denizliyapi.com
Finishing putty: 17 recommendations for selection, preparation and application
Michel
5888 0 0
Michel December 7, 2016Specialization: plumber with 10 years of experience, computer repair specialist, powerlifting coach. I have extensive experience in construction, interior decoration, and making homemade furniture. Hobbies: sports
Greetings, comrades! Today we are going to find out what finishing putty is and what it is used for. We will find out what varieties of this finishing material can be found on sale, how to properly prepare putty from a dry mixture and how to putty it on the ceiling and walls.
Puttying walls for painting.
What will you need for work?
In order to bring the walls into a perfectly even and smooth state, preparing them for decorative finishing, you need to buy high-quality putty and primer mixture. But the preparation is not limited to this - you must immediately stock up on a variety of tools and auxiliary elements. So:
- A plane will help remove all unnecessary protrusions and bumps on the surface, making it smooth and ready for putty;
- to prime the walls you will need rollers, brushes and a special paint tray;
- Spatulas of various sizes are useful for processing areas of varying complexity. A standard 50-centimeter tool can handle the main job—puttying open areas; in hard-to-reach places and corners a small spatula will be more effective;
- special spatulas for external and internal corners will help facilitate the processing of corner wall elements;
- A laser or water level will allow you to check the effectiveness of surface leveling;
- To bring the surface of the walls to a perfectly flat and smooth state, you cannot do without grinding - a grater and sandpaper will come in handy here. At the same time, products with coarser sandpaper are selected for the starting putty; fine sandpapers are more suitable for the finishing putty.
If you prefer to buy regular (dry) putty for interior or exterior wall decoration, the following will also be useful in your work:
- a construction mixer or drill, which will allow you to mix the dry mixture with water, obtaining a homogeneous mass without lumps;
- spacious container for mixing putty. Most often, buckets with a volume of 10 to 20 liters are used for these purposes.
First meeting
- How is finishing putty different from regular putty?
Smaller aggregate fraction size. For starting putties it is usually 0.2 - 0.3 mm, for finishing and universal putties it is no more than 0.15 mm.
The smaller the filler fraction, the smoother the surface can be obtained when filling.
The quality of the surface is determined by the grain size of the aggregate.
- What is superfinish putty and why do you need it?
It differs from the finishing one in the same way that the finishing one differs from the starting one - an even smaller grain size of the filler. For superfinish putty it does not exceed 0.08 mm, which allows you to get an even smoother surface. Superfinish finishing is used only for painting; putting it on walls under wallpaper makes no sense.
Shitrock Superfinish from Knauf.
Puttying for painting has one subtlety. Glossy paint is much more sensitive to the quality of the surface than matte: it emphasizes the slightest irregularities in the base. That is why superfinish putties are used mainly for gloss; For matte paint, pre-finishing is done with a regular finishing or universal finish.
Gloss is extremely demanding on surface quality.
Varieties
Astringent
- What types of binders are used to prepare finishing putties?
When finishing mineral bases the following are used:
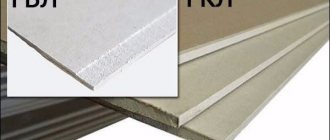
- Dry mixtures based on gypsum and cement binders;
- Ready-made acrylic putty.
Acrylic resins are used as a binder.
Less popular are adhesive, latex, epoxy, polyvinyl acetate and polyurethane finishing materials.
Putty on an oil-adhesive basis.
- Which binder is more suitable for facades and wet rooms?
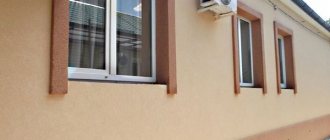
Cement. Facade acrylic putties also serve well in high humidity, but the relatively high price (from 50 rubles per kilogram) forces them to be used mainly for minor repairs.
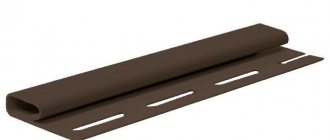
The external slopes of the window are finished with acrylic putty.
A caveat is worth making here. Gypsum binder mixtures cannot be used for exterior decoration of houses, but they are often used when renovating bathrooms, kitchens and toilets.
Their use in rooms with high humidity has only a couple of limitations:
- For trouble-free operation of the finish, the room must be ventilated. Constant dampness is detrimental to any mineral-based finishing materials - simply because mineral filler is a tasty food for fungus;
The hood in the ventilation duct can provide effective ventilation of the room.
- The final finish must be waterproof. It can be used, for example, tiles with epoxy or silicone grout, thick vinyl wallpaper or waterproofing paint.
Rubber waterproofing paint made in Sevastopol.
- Which putty to choose for finishing walls and ceilings in living rooms?
Unconditionally plaster. It is extremely easy to apply and sand, inexpensive (about 300 rubles for a 25-kilogram bag) and compatible with any mineral bases.
Dry gypsum mixture from Knauf.
Color
- How practical is white finishing putty?
In my opinion, this is an excellent solution that allows you to significantly reduce the time and money spent on finishing. White color allows you to get by with one or two layers of paint, while a dark base often shows through even after 3-4 layers. White acrylic putty is very convenient for repairing minor cosmetic defects in flows and whitewashed walls.
White color will make painting much easier.
Shrinkage
- What are the benefits of non-shrink finishing putty?
The fact that when it dries it does not crack, regardless of the thickness of the layer. In addition, the seams between finishing elements (for example, when leveling walls with plasterboard) can be filled in one pass.
Conventional gypsum mixtures require at least double filling: during the first pass, the joint cavity is filled, and during the second, the reinforcing material (sickle or fiberglass) is covered.
Non-shrinking gypsum mixture.
Briefly about the main thing
One of the most important things during renovation is finishing the walls. Before wallpapering or painting, the surface must be leveled and sanded. To do this, several layers are applied to the walls: plaster to correct large defects, starting putty for small cracks and final putty for final leveling.
Both putty options differ from each other in composition. The starter filler is coarser so that the mixture can fill in holes and chips. In the final one they are smaller, since its task is to make the surface completely smooth. Do not neglect putty even if it seems that the walls are smooth. Due to defects that are invisible at first glance, wallpaper or paint will look and hold up worse.
Question
Write in the comments what kind of wall decoration is in your house? Did you have to use plaster to level the walls or was putty enough?
Regulatory Requirements
- Is there a GOST for the production of putty?
Cement (as well as other building mixtures with a cement binder) are produced in accordance with GOST 31357-2007, gypsum putty mixtures are produced in accordance with GOST 31387-2008. For the convenience of the reader, I will present here the key requirements of the standards.
Cement mixtures
Any cement building mixtures must comply with GOST 31357-2007.
The document regulates:
- Humidity of the mixture. It should not exceed 0.3% for putties on a combined binder with an amount of cement not exceeding 80% of the total amount of binder, and 0.2% for mixtures with a large amount of Portland cement;
- The amount of aggregate with a fraction size higher than the maximum. It should not be more than half a percent. Estimating the amount of coarse aggregate is carried out extremely simply - by sifting through a sieve with the appropriate mesh size;
A simple aggregate size test.
- Water absorption after the finishing material reaches full strength. It should not be more than 15% for mixtures using a combined binder with less than 80% cement and more than 8% for mixtures with a large amount of cement;
- Adhesion to the base. The minimum permissible values are 0.4 MPa for exterior finishing and 0.25 for interior finishing;
- Packing method. Mixtures can be supplied in polyethylene bags, in multi-layer packaging made of kraft paper and in paper bags with polyethylene liners.
Typical packaging of cement mixtures.
Gypsum mixtures
Here are the standard requirements for gypsum mixtures:
- Humidity should not exceed 0.3% by weight;
- The maximum permissible aggregate fraction size is 0.2 mm, while the aggregate content of larger fractions should not exceed 0.3%;
- The beginning of setting should occur no earlier than 60 minutes from the moment the mixture is mixed;
In practice, long before setting begins, the mixture thickens and becomes unsuitable for application. The practical ceiling of its viability does not exceed 30-45 minutes.
That is why gypsum putty is prepared in small portions.
- After the putty has hardened, the tensile strength during bending should not be less than 1 MPa, and the compressive strength - less than 2 MPa;
- The adhesion strength of the hardened putty to the base must be equal to or exceed 0.3 MPa;
- The same types of bags can be used as packaging as for cement mixtures - polyethylene, made from multi-layer kraft paper and paper with polyethylene liners;
- The weight of one package should not exceed:
| Type of packaging | Maximum permissible weight |
| Plastic bag | 8 kg |
| Bag | 50 kg |
In practice, gypsum mixtures are sold packaged in 25-30 kg packages.
Calculation
- How much finishing putty is needed for 1 m2 of wall or ceiling surface?
With a finishing layer thickness of 1 millimeter, the consumption per 1 m2 is 1 - 1.2 kg of dry mixture. Accordingly, a 3-mm layer will give a consumption of about 3-3.6 kg, and a 30-kg bag will be enough for 8-10 square meters of finishing.
The thickness of the putty layer usually does not exceed 2-3 millimeters.
What is the difference between starting putty and finishing putty?
Starting putty is a mixture intended for rough processing of surfaces before the final finishing of walls/ceilings. The starting composition is something between plaster and finishing mixture. From here comes the direct purpose of the finishing material: processing the wall/ceiling in the interval between the immediate start of work and its completion. The composition of the starting putty can contain: cement, gypsum or polymer components. Regardless of the components, before starting to work with the putty solution, the surface to be treated must be cleaned of dirt/dust and treated with a special solution that ensures maximum adhesion to the surface. The best solution would be to use products from one manufacturer. This will optimize consumption and will not reduce the characteristics of the solution during operation. Advantages:
- used to eliminate cavities around openings, panel and ceiling cracks, after installation work on slopes;
- alignment of walls indoors, on building facades;
- elastic, durable;
- not afraid of contact with moisture;
- can be used in unheated rooms and rooms with high moisture concentration;
- does not lose its qualities when frozen;
- low consumption with minor surface errors;
- high adhesion to any material;
- optimal price-quality ratio.
Preparation
- How to dilute cement putty?
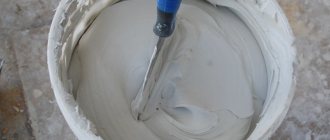
It’s extremely simple: add the amount of water specified by the manufacturer to the dry mixture and mix. For mixing, it is advisable to use a construction mixer, drill or hammer drill with a whisk. It is not advisable to mix the putty manually with a spatula: in this case, it is difficult to obtain a uniform consistency of the mixture.
When adding water, strictly follow the manufacturer's recommended recipe. A mixture that is too thick will not spread onto the base; a mixture that is too thin will flow down it.
Mixing cement putty.
- Is mixing gypsum putty the same way?
No, in this case the procedure must be strictly defined:
- Fill a clean and wide container (basin or paint bucket) with about a liter of water;
- Pour the dry gypsum mixture into the container, distributing it as evenly as possible over the surface of the water surface. And in this case, it is advisable to adhere to the proportion recommended by the manufacturer: how to dilute the putty is always written on its packaging. So, only 7 liters of water are added to a 25-kilogram bag of Knauf Fugen dry gypsum mixture;
Gypsum is poured into a container with water. If you pour water into a dry mixture, insoluble lumps will form at the bottom of the container.
- Wait about five minutes and thoroughly mix the swollen mixture with a mixer or whisk. After mixing, you need to wait another 3-5 minutes, and only then the putty will be ready for use.
Before preparing a new batch, always thoroughly wash both the container in which you prepare the putty and all tools. If this is not done, lumps of set gypsum from the old portion of putty will begin to leave untidy furrows trailing behind the spatula.
Advantages of using finishing putty
Finishing putty is a mixture intended for final processing of the surface before its further finishing/decoration. Finishing dry mixtures are usually used for wall finishing. Applying the finishing layer allows you to create a perfectly smooth surface without the slightest flaws.
For finishing repair and finishing work, the following are used: dry mixtures, ready-made putty, mixtures for machine application. The dry mixture requires proper preparation of the solution by adding water. The ready-mix is a solution that can be applied to the wall immediately after purchase. To do this, simply open the container and begin finishing work. Machine compounds are appropriate for facilities where there is a large area that needs to be processed in a minimum period of time. Advantages:
- the fraction of the composition allows you to create a perfectly smooth surface;
- minimum consumption over a large area;
- the snow-white shade will allow you to paint the surface in the lightest colors in one application or cover the walls with thin wallpaper in light colors;
- does not shrink during drying;
- allows the walls to breathe;
- regardless of the thickness of the layer, after drying, cracks do not form on the surface;
- minimal drying time;
- After applying the finishing putty, the surface can be left unfinished and the wall can be left in its final form without painting/pasting.
Where can I buy starting and finishing putty?
All the differences between putty materials are obvious. Therefore, which one to choose is up to you. The site stroyzone.com has these two types of putty from different sellers. Using the construction aggregator stroyzone.com you can:
- choose a putty material that differs in composition, method of use, purpose, packaging volume;
- compare prices and delivery conditions from different suppliers;
- place a wholesale order on favorable terms;
- arrange delivery by transport companies to any city in Ukraine.
Source
Finishing
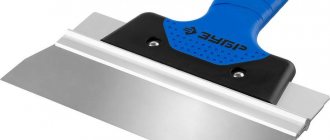
- What tools are used to apply finishing putty before painting?
Use a wide (30-35 cm) spatula - regular or rectangular. The putty is applied to it with another spatula of smaller width (10-12 cm). Application is carried out with sliding movements and spreading.
Container and tools for filling with gypsum mixtures.
If you are puttingtying the base in several layers, alternate horizontal and vertical movements of the spatula. This will leave fewer grooves on the surface.
Puttying the wall with gypsum mixture.
- Do I need to prime the base for putty?
The answer depends on what binder is included in the mixture and on what basis it is intended to putty. In general, it is pre-primed with strengthening primer for mineral bases; however, cement plaster under cement putty can simply be moistened with water.
Penetrating acrylic primer.
- Is it possible to apply putty over the finishing putty to eliminate surface defects that you missed earlier?
If they are on the same type of binder, it’s possible. Gypsum works well over plaster and cement mixtures work well over cement finishes. Acrylic putty can be used on any surface.
If you come up with the strange fantasy of applying starting cement putty over the finishing gypsum putty, this is also possible, but the base will have to be pre-primed with concrete contact (adhesive primer with quartz sand), which will make the wall rough and improve the adhesion of the finish to the base.
Concrete contact is an adhesive soil with the addition of quartz sand.
- Is it acceptable to apply putty over paint?
In general, no, all old coatings must be cleaned off before filling. The exception is acrylic putty over acrylic water-dispersion paint. It firmly adheres to the base, does not lag and does not bubble.
Before puttying, old coatings are removed.
- How long does it take to dry cement, gypsum and acrylic putty?
With a layer thickness of 2-3 mm - no more than a day for a cement mixture and 3-5 hours for gypsum and acrylic. However, drying does not mean the completion of hydration processes:
- Like most Portland cement-based mixtures, cement putty gains full strength only a month after application;
- Gypsum finishing can be painted with water-dispersion paints only two weeks after puttying. If you rush, you can end up with dark spots and streaks in areas where the plaster is at its thickest (for example, at the seams between sheets of drywall).
There should be at least two weeks between puttying with gypsum-based mixtures and painting.
- How to finally prepare the surface for painting after puttying?
After filling with plaster or acrylic, the walls are sanded with a hand float with a sanding mesh or a sander. My choice is an orbital sander and #80 mesh for the first pass and #120 for the second. You need to sand in bright, oblique lighting, which will highlight the slightest irregularities in the base with shadows.
After sanding, be sure to inspect the surface under the prevailing lighting in the room (natural or artificial). The appearance of a ceiling or wall can change noticeably depending on the angle of light.
Sanding the finish with a hand float.
Cement putty is not sanded, but rubbed with a hand float (wooden or polyurethane). Grouting is done on a hardened but not dried finish.
The next stage of preparation for painting is dust removal. You can get rid of dust using a vacuum cleaner or an ordinary broom.
The last stage is priming with penetrating primer. It will increase the strength of the finish, improve the adhesion of the paint to it, and at the same time reduce its consumption, reducing the absorbency of the surface.
Ceiling primer for painting.
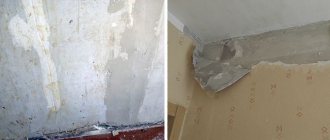
The initial stage - preparing the walls for puttying
The first thing you need to do is get rid of the old decorative coating. Paint, wallpaper, old plaster - we remove all this with a plane. We also carefully clean stains of grease and soot, if any, on the surface, making the surface perfectly clean. Next, we proceed to priming the walls, which will give them additional protection from negative external influences and fungi, and will also ensure better adhesion of the putty to the surface. After applying the primer, dry the walls.