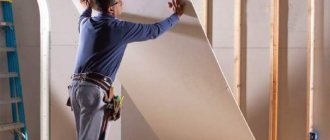
No construction can be imagined without finishing work, during which there is often a need to strengthen surfaces, for example, when waterproofing the floor and ceiling. To carry out this work efficiently, the use of special material is required. Fiberglass plaster mesh has gained great popularity in recent years. It is actively used by many professional builders and finishers, which is not surprising. After all, it has excellent performance characteristics, which were provided by the material - fiberglass threads in combination with special impregnation with various compounds.
Fiberglass mesh gives surfaces increased strength, protects against destruction, cracking and shedding of the finishing coating. If you are going to use this building material for the first time in repairs, then it would not hurt you to learn more about this mesh, what kind of work it can be used for, how to choose the right one and how this reinforcing material should be installed.
How to install?
The installation technology depends on the material from which it is made.
To attach the metal mesh you will need self-tapping screws, dowels, metal scissors and galvanized mounting tape.
All work should be performed in accordance with the instructions:
- Using metal scissors, cut a piece of mesh to fit the wall and degrease it. To do this, you can use any solvent or acetone.
- Using metal scissors, cut the galvanized mounting tape into small pieces.
- The mesh must be installed from top to bottom, placing the canvas horizontally, starting from the ceiling itself. The upper edge of the first row is secured with self-tapping screws. Considering that the metal mesh has large enough cell sizes so that the mesh does not jump off the screws, pieces of mounting tape are placed under their caps so that it presses one side of the cell to the wall. There are widened nuts on sale that can also be used for these purposes, however, they are much more expensive than mounting tape.
- If the mesh is installed on a concrete or brick wall, then the fastening must be carried out using pre-installed dowels. To do this, you can use ordinary plastic parts, which are quite inexpensive.
- Fastening must be done often enough in a checkerboard pattern so that the mesh fits tightly to the wall. The ideal distance between dowels is 500 mm.
- The mesh panels are attached over the entire surface of the wall with an overlap of 80-100 mm.
- Fastening fiberglass plaster mesh.
This mesh does not need to be attached over the entire surface: it is enough to securely attach it along the upper edge. It is also attached starting from the ceiling. The cell sizes of such a mesh are small, and it itself is light in weight, which makes it possible to use only self-tapping screws, without additional devices such as mounting tape or nuts.
It is important that there is a piece of mesh left in the corners to create a slight overlap. The greatest strength can be achieved if the mesh is applied to the wall as a whole panel
Therefore, beacons must be placed using a grid already attached to the wall.
The greatest strength can be achieved if the mesh is applied to the wall as a whole panel. Therefore, beacons must be placed along a grid already attached to the wall.
Ceiling mesh reinforcement
Several materials can be used to reinforce ceilings.
Just like for walls, they use a mesh made of fiberglass, metal, as well as shingles - a structure made of wooden slats:
- It is recommended to use plastic or fiberglass mesh if the expected putty layer is no more than 30 mm.
- For height differences of more than 30 mm, it is better to use a metal mesh. It is much more expensive than plastic, but much stronger.
- Shingles have been used for many years. For its construction, a 20*8 mm rail is used, which is attached to each other in the form of slats. This is the simplest method of reinforcing a plaster layer, but is only suitable for wooden bases of simple construction.
Before attaching the mesh, it is necessary to prepare a mounting tape, pre-cut into small pieces with metal scissors. The metal mesh should first be degreased using acetone or other solvents. As a last resort, you can simply wash it with any soap and detergent that can wash away oil or grease traces.
The mesh needs to be cut to the size of the ceiling
It is important to remember that one canvas must overlap the previous one by at least 12-15 cm
Fastening:
- The shingles are attached very simply: you just need to nail the structure at the tops of the cells to the ceiling.
- Fastening a metal or plastic mesh can be done either with nails or with dowel-nails. They need to be arranged in a checkerboard pattern at a distance of 200-300 mm from each other.
- If you do not use a mounting grid, you can use nails with large heads or use washers.
The use of plaster mesh when sealing joints in floor slabs
To carry out these works, a strip is cut out of the mesh along the width of the area, adding 5-10 cm on each side. It is attached in the usual way and sealed with mortar.
In any case, the application of the solution should be started from the middle of the room, moving evenly towards the walls.
Step-by-step lessons on plastering walls
Lesson 01. How to plaster walls. General principle Lesson 02. How to plaster walls? Tools and materials Lesson 03. Finding the largest bump on a curved wall before plastering Lesson 04. Trying to knock down a large protrusion in the wall Lesson 05. Plumb and building level Lesson 06. How to attach a plaster mesh Lesson 07. How to install the first plaster beacon Lesson 08. How prepare plaster mortar Lesson 09. Create a wall plane for plastering Lesson 10. Install all remaining plaster beacons Lesson 11. The little secret of leveling walls using beacons Lesson 12. Leveling walls with your own hands. What is the distance between lighthouses? Lesson 13. What to do if the plaster beacons are bent? Lesson 14. Checking the accuracy of installation of plaster beacons Lesson 15. Plastering walls with your own hands Lesson 16. How to remove beacons after plastering walls Lesson 17. How to plaster doorways Lesson 18. Warm plaster. How to work with it? Lesson 19. Warm (heat-insulating) plaster. Types and features
Did you like the article? Share with your friends!
Popular posts
- Chair for dressing table Chairs for dressing tables in Moscow - 189 Products Company from Moscow, delivery 29643 a In…
- Silicone sanitary sealant Silicone sanitary sealant white in Moscow - 1491 products Company from Moscow, delivery (tomorrow) 140...
- Shelf in the hallway Currently, there are a huge number of different options for shelves in the hallway, and this is directly ...
- Insulation of the floor in a wooden Insulation of the floor in a wooden house from below: materials and installation technology SHARE ON SOCIAL NETWORKS One of the common…
Step-by-step instructions for fixing plastic mesh
The durability of its operation largely depends on the correct implementation of recommendations for installing plastic reinforcing mesh on foam insulation. In all cases, do not rush, work carefully. We have already mentioned that there is no need to reinforce the entire wall height; it is enough to protect only the lower vulnerable area. But these are our recommendations; if you have doubts, protect the entire surface of the façade wall.
Fiberglass mesh
Any brand of glue is suitable for gluing the mesh. Study the instructions, it should have high adhesion to plastic materials. In most cases, a finishing layer of adhesive several millimeters thick is applied over the plastic reinforcing mesh. The final coating is done with facade paints or a thin layer of decorative plaster.
Glue for gluing fiberglass mesh to the facade
Step 1. Inspect the surface of the slabs. If they were fixed with dowels, then completely recess the caps and seal the recesses. You can close the gaps at the same time, but this is not necessary. The fact is that the cracks will automatically close during the application of the first layer.
Fastening sheets using umbrella dowels
Step 2. On the wall, draw a horizontal line along the height of the reinforcing layer. It will help you monitor the height of glue application. A thin layer of material dries quickly, and this not only causes an increase in material consumption, but also negatively affects the final leveling of the layer for painting.
Step 3: Prepare the glue according to the manufacturer's instructions. Always pour water into the container first, and then add the dry mixture. This technology will greatly simplify the mixing process. You can mix it manually with a trowel or using a mixing attachment for an electric drill.
Preparation of glue
The second method is not only easier, but also more effective. You need to stir for a few minutes, and then leave the mixture to stand for another 5-6 minutes. During this time, the moisture will be evenly distributed throughout the entire volume, and the smallest dry lumps of glue will completely disappear.
Step 4. The glue is applied to the wall with a spatula; the longer it is, the smoother the resulting surface is. Professionals work with spatulas up to 70 cm in size; beginners can initially use shorter ones.
Apply glue to the spatula with a trowel in the center of the tool. The quantity will be determined experimentally. While applying the layer, hold the spatula at an angle to the foam boards and press with medium force. Achieve a layer thickness of approximately 2–3 millimeters. Do not prepare a large amount of surface at once; for beginners, two meters in length is enough. If you do not have time to fix the mesh, the glue will harden, you will have to remove the old layer and make a new one.
Step 5. Try on the location of the plastic reinforcing mesh. If it does not fit into the window opening, trim the material.
Step 6. Glue one end of the mesh, align it horizontally to the length of the prepared section of the wall. Make sure that the mesh lies smoothly without distortions or bends; be guided by a pre-drawn line on the foam.
We attach the mesh with overlapping fabrics
Step 7. Use your hand to press the mesh onto the fresh glue in several places and check its position again.
Cut off the excess
How is fiberglass mesh attached to polystyrene foam?
Step 8. Using a spatula, begin to press the mesh to the surface of the insulation. Make sure that the glue of the first layer extends over the entire surface and evenly covers the mesh cells on the front side. If there are areas where the adhesive is not thick enough, reapply it over the reinforcing mesh. Such omissions may appear in inexperienced craftsmen. Over time, you will learn to determine by eye the optimal thickness of the glue and there will be no more gaps. Spread excess solution over free surfaces. You shouldn’t try to immediately make the surface perfectly smooth, but you need to strive for this result.
Gluing the mesh
Gluing the mesh with a spatula
Step 9. Allow time for the glue to dry. It is better to leave it overnight; finishing grouting of surfaces is recommended the next day.
That’s all the technology is, the surface of the façade wall is prepared for painting or finishing with other materials. We remind you once again that plastic reinforcing mesh on insulated facades is not used to prevent cracks on the surface of the adhesive, but to prevent mechanical damage to the foam. Keep this in mind when making your decision.
Types of plaster mesh
Reinforced mesh for plaster differs in the materials used for its production, the structure and size of the cells, and the methods of creation. According to the first criterion, the following varieties are distinguished:
- plastic;
- fiberglass;
- metal.
Products have all the advantages and disadvantages of the materials used to produce them.
A more detailed classification is presented in the table below.
| View | Cell size, mm | Characteristic |
| masonry (painting) | 5*5 | plastic sheet used when working outside and inside buildings using gypsum mixtures |
| universal: small, medium, large | 6*6, 14*15, 22*35 | the fine-mesh version is a suitable mesh for plastering internal walls, and the coarse-mesh version can withstand temperature changes and external loads well |
| fiberglass mesh | 5*5 | durable, resistant to moisture, cold and heat, chemical compounds |
| Plurima | 5*6 | made from polypropylene, chemically inert, used for external and internal work |
The nuances of installing a mesh with your own hands
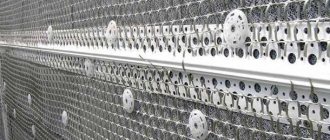
The metal variety weighs the most and requires secure fixation with screws or nails. It is degreased (galvanized steel is simply washed with water or wiped with a rag) and cut with special scissors into pieces of the required size, taking into account the obligatory overlap of 10 cm into adjacent areas. In some cases, holes for dowels are prepared in advance, the step is 25-30 cm, on average by 1 m2 requires 16 fasteners. If possible, the edges are fixed with mounting tape (when working with large-mesh options, its use is mandatory).
It is better to finish metal-reinforced surfaces in two layers (not counting the spray), the second, thinner and leveling one is applied after the first has dried slightly. This type must be reliably covered with the mixture; it is important to choose the correct cross-section and method of connecting the wire; the thickness of the coating cannot be reduced below the recommended value. When working with fiberglass and polypropylene meshes for plaster, the solution itself or self-tapping screws can act as fastening materials.
In the first case, the canvas is placed in the middle of two layers; to increase density, it is better to unwind it directly on the spot, rather than cut it into separate pieces (the exception is the finishing of foam plastic, where segments are better suited). Plaster from the middle to the edges
When working with fiberglass and polypropylene meshes for plaster, the mortar itself or self-tapping screws can act as fastening materials. In the first case, the canvas is placed in the middle of two layers; to increase density, it is better to unwind it directly on the spot, rather than cut it into separate pieces (the exception is the finishing of foam plastic, where segments are better suited). Plaster in the direction from the middle to the edges.
But the more reliable and correct option is to fasten the dowels to a still dry wall, followed by spraying and applying the first layer as a base. The number of fasteners is minimal (one per canvas with a uniform step of 1-2 m), with a significant level difference they are used for installing beacons. The first layer of mortar is placed along the width of the product; after laying it, they proceed to the adjacent one, tracking the overlap of 10-15 cm with each other. Plastering for the purpose of leveling should also be done from the middle to the edge. Avoid sudden movements with a spatula, especially when working with facade mesh, otherwise they will come off along with the finishing composition. Correctness is checked visually - if they are visible under the leveling layer, then it is better to increase it by 1-2 mm.
Material cost
| Name, basis | Special properties, brief description | Cell size, mm | Roll size, m | Price per 1 m2, rubles | Price per roll, rubles |
| Plaster woven mesh made of galvanized wire | Wire diameter – 0.25 mm | 0,63×0,63 | 1×30 | 468 | 14040 |
| 1×1 | 208 | 6240 | |||
| The same - 0.4 | 2×2 | 162,50 | 4880 | ||
| 4×4 | 143 | 4290 | |||
| The same - 0.6 | 10×10 | 1×60 | 65 | 3900 | |
| 15×15 | 1×80 | 62 | 4990 | ||
| Non-galvanized chain-link | Wire diameter – 1.2 mm | 6×6 | 1×10 | 240 | 2400 |
| Welded galvanized | Wire diameter – 1 mm | 10×10 | 1×25 | 240 | 6000 |
| Fiberglass mesh | Serpyanka with a density of 45 g/m2, white | 2×2 | 1×50 | 18 | 900 |
| Plaster, impregnated with alkali-resistant polymer composition, 60 g/m2, white | 5×5 | 21 | 1050 | ||
| For facade, 160 g/m2, blue | 31 | 1550 | |||
| Plastic mesh Station wagon S | Colors: khaki, black. Used for finishing and rough layers up to 1 cm thick | 6×6 | 2×100 | 14 | 2800 |
| Syntflex E | High-strength, flexible, biaxially oriented polypropylene, for reinforcing layers up to 5 cm | 12×14 | 65 | 13000 | |
| C1-3, polypropylene | Gray color, for reinforcing plaster (up to 2 cm) and masonry | 13×13 | 1×30 | 21 | 630 |
Shingles
In this case, we are not talking about the plaster network as such. However, without this building material it is almost impossible to finish walls made of timber or logs or boards. The shingles are sold in the form of narrow boards up to 2 m long with a width of 15-20 mm and a thickness of 3-5 mm.
Photo: shingles
Advantages and disadvantages
Pros:
- environmental friendliness, natural composition;
- small weight;
- resistance to changes in humidity and temperature;
- increasing sound and heat insulation parameters;
- ease of installation.
Minuses:
- the need for treatment with fire retardants;
- risk of rotting;
- high price.
The choice of reinforcing base is determined by the following factors:
- type of workforce used;
- material of ceilings, walls;
- scope of application - external, internal;
- thickness of plaster.
Modifications
The mesh is attached to a wooden base using nails. To do this, you simply need to remove the protective layer from the back of the mesh and press it to the surface to be treated, lightly ironing it with your hand or a spatula.
As a rule, the self-adhesive mesh option is used before applying thin layers of finishing putty. Fiberglass mesh is attached to wooden walls and ceilings using nails or self-tapping screws, since putty or adhesives do not stick well to wood.
Using fasteners, a wide-mesh mesh is also mounted, intended for applying a thick layer of plaster or pouring a leveling screed. It is attached to a concrete or brick wall with dowel nails or special plastic dowel “fungi” with a thick cap. For an interesting comparison of meshes from different manufacturers, watch this video:
To do this, holes are made in the wall using a hammer drill, into which the plastic sleeve of the dowel-nail is driven. Then the mesh is applied to the wall and fixed using self-tapping screws with washers screwed into the dowels. After the fiberglass mesh is securely fixed, you can begin to apply the solution to the base of the wall or ceiling.
Types of plaster mesh
The modern construction market offers the following types of plaster mesh:
- Masonry. It is made of plastic, and the cell size is 5 mm. It is suitable for finishing work on brick surfaces indoors and outdoors. This product is destroyed when exposed to alkaline media, so it is not recommended to use it with cement plaster. Another name is painting mesh.
- Universal small.
The cell size is 6 mm, and the manufacturing material is polyurethane. This product is perfect for relatively small layers of plaster – 20-25 mm. Such products can only be used for interior finishing work, but they are suitable for any type of mixture. Universal reinforcing fabric with square cells - Universal medium. All indicators are the same as the previous type. The cells in this case are not square, but rectangular with a size of 14x15 mm.
- Universal large. Rectangular cells with sides 22 and 35 mm. Well suited for decorating surfaces in large spacious rooms, such as warehouses or production workshops. The product can also be used for external work; it tolerates temperature changes and mechanical loads well.
- Fiberglass mesh.
These products are made from fiberglass. The cell is square with a side of 5 mm. The product perfectly tolerates high and low temperatures, as well as their sudden changes, and atmospheric influences. In addition, this material does not react with chemically active substances, so it is considered one of the best options for working with cement-based mixtures. The mesh is suitable for internal and external work. Fiberglass plaster mesh - Plurima. It is made from polypropylene. The main advantage is its low weight, making the material easy to work with. The cell is rectangular with sides 5x6 mm. The product does not react with chemically active substances. Can be used outdoors and indoors.
- Armaflex.
The reinforcing mesh for plastering walls of this type is made of polypropylene, but it is denser than the previous type. The cell is rectangular with sides 12x15 mm. This material is used when a thick layer of plaster is required. Well suited for external work. Reinforcing product – Armaflex - Syntoflex. Made from polypropylene in two versions. Cell dimensions 12x14 or 22x35 mm. This product is chemically inactive and has a relatively low weight. Can be used during work inside and outside the building, but is more suitable for the former.
- Metal mesh for plaster. It consists of metal rods that are connected by welding at the points of contact. Cell sizes may vary, as well as areas of use. Great for situations where you need to support significant weight.
- Galvanized mesh. The same as the previous type, but additionally protected from corrosion. The size of the cells can be different; it is used for external and internal decoration. This type is the most popular in the domestic market.
Galvanized mesh for plaster
Types of material
Mesh for walls under plaster has several varieties. To choose a material, it is recommended to familiarize yourself with the characteristics of each.
Polymer mesh
These are plastic mesh. This material is in high demand among finishers. The product is available in different cell sizes. Can be used even on uneven surfaces with large differences. The advantage of the product is its reasonable price.
Metal grid
This mesh is used primarily for exterior decoration. The material has increased strength and is used even for uneven walls with large differences.
Metal meshes are divided into several types:
- Woven mesh is a thin wire product that has increased resistance to mechanical damage and flexibility. It is used for reinforcing surfaces indoors and outdoors. Professionals advise using a mesh with a cell size of 1x1 cm.
- Woven mesh. Another name is chain-link mesh. Craftsmen use it to reinforce large-area building foundations. The dimensions of the cells are 2x2 cm.
- Welded - a mesh that is made from wire by welding. The rods are positioned perpendicular to each other and welded at the joints. The dimensions of the cells are 2x2 or 3x3 cm. The material is used if the object shrinks.
- Expanded metal is a mesh made of sheet metal. The material is made by rolling sheets on a special machine. The mesh can withstand the application of plaster in a thick layer. A distinctive feature of the mesh is that it increases the load-bearing capacity of the object.
Fiberglass mesh
Fiberglass mesh for plastering walls is a thin material with small or large cells. The first type is used for interior decoration. The mesh is fixed to the surface without large differences or defects. Usually the material is used for gypsum compositions. A fiberglass product with large cells is used for facades. Such materials can withstand increased loads.
PVC mesh
It is a thin fiber made of polyvinyl chloride. A distinctive feature is increased resistance to chemicals. How to plaster on PVC mesh is presented in video lessons.
Installation of grids
Each type of reinforcement, taking into account the characteristics of the material. For more information about the types of construction meshes, watch this video:
Lightweight plaster mesh does not require special fixation.
Fiberglass mesh for plaster is secured around the perimeter with a mortar rubbed in with a spatula.
The strips are connected to each other with an overlap of 150-200 mm, for which, before starting work, the mesh is cut into strips taking into account this overlap.
Coating with polymer sheets
In some cases, plastic sheets are attached in the same way as. In other fastening options, they resort to the use of dowels and self-tapping screws. The material is attached with an overlap, placing one strip over the other by 150-200 mm.
Metal coatings
Metal plaster mesh can withstand fairly thick layers of finishing. Due to the fact that such reinforcement has a significant specific gravity, the fastening of metal reinforcement must be especially reliable. Installation of metal wall coverings is carried out as follows:
- The pre-reinforced coating is cut into fragments of the required size, not forgetting about overlaps when connecting the mesh overlapping.
- If the canvases have been stored in a warehouse for a long time, they are treated with a solvent or rust reducer.
- Thin coatings are cut with metal scissors. Welded and expanded metal sheets are cut with a grinder equipped with a metal cutting wheel.
- The mesh is fastened with dowels. To do this, holes are drilled in the wall (if the wall is concrete, then this is done with a hammer drill). Plastic dowels are inserted into the holes.
- Reinforcement begins from one of the upper corners of the wall. Having attached the mesh to the wall, screw the screws and washers into the dowels. The washers act as fasteners.
- A distinctive feature is that during such work the canvases are fixed in such a way that there is a small gap of 3-5 mm between the reinforcement and the wall. This is necessary to place reinforcement in the body of the plaster layer, which gives the wall decoration greater solidity and high load-bearing capacity. For a detailed description of the process, watch this video:
Important Notes
We got carried away with the plaster mesh before installing the beacons, but there are additional works that need to be done even before attaching the plaster mesh. Can't you guess?
Remember where lesson #4 ended? You and I knocked down the biggest bumps on the wall. But at the same time, our wall became very dirty. And if we stretch a plaster mesh over this dirty wall and start throwing plaster on it, it will immediately fall off, therefore:
- After all the bumps have been knocked off the wall, we take an old vacuum cleaner in our hands and vacuum the wall, or use a wet rag and wash our wall. The wall must be clean. After the dirt has been removed and the moisture has dried, we dilute the primer and prime the wall once, and after 2 hours a second time. If you have forgotten how to do this, take a look at the article: How to prime the walls in an apartment.
- When attaching any of the meshes, try to use the shortest screws possible. Why? Because, we remember that you cannot screw a self-tapping screw into a concrete wall, you will have to install a dowel, see the article What is a dowel. And any installation of a dowel is dust, which is described in detail in the article: Construction dust. So it turns out that we primed the wall and then started drilling! Of course these are microparticles, but they will again be all over the wall. Therefore, we take small, short self-tapping screws and “5” dowels - no more. And we slowly drill holes, install dowels and attach the plaster mesh. It is advisable to carefully sweep it downwards in the drilling areas, without spreading dust.
- Some people prime the wall through the plaster mesh after drilling. I don't really like this method. The fact is that when priming, it is necessary to ensure that there are no formation of soil puddles on the wall, but if there is a mesh, this cannot be guaranteed, especially for fine-grained fiberglass mesh. Therefore, this is a double-edged sword, and it’s up to you to decide how to prime it more conveniently. But it is necessary to prime it before plastering, and definitely twice.
So, today we learned how metal and fiberglass mesh is attached to the wall when performing plastering work. Ahead of us is a very long-awaited lesson on setting up the first plaster beacon.
Advantages
The undoubted advantage of fiberglass reinforcement is its low weight, which makes it ideal for ceilings. Since the canvas is flexible, it can be used even on uneven surfaces. Compared to reinforcing metal products, glass fiber material is not subject to corrosion, so even after a long time, rust does not appear on the coating.
This product also has disadvantages, and you need to know about them:
During the work process, care should be taken, since small particles of glass dust can provoke allergies; It is difficult to work with the material alone, especially when finishing the ceiling - this can lead to insufficient tension of the canvas, its sagging and the appearance of air bubbles; When priming and puttying work, a large amount of solution is required due to high absorption.
In addition, construction mesh is very expensive. On the other hand, it is a necessary material that significantly increases the service life of any coating.
Scope of application
During external work, fittings of any type are operated in extreme environmental conditions. Therefore, it is ideal to opt for basalt and fiberglass products when applying plaster with a layer of up to 3 cm. If the working layer is thicker, you can use metal reinforcement or a double network based on basalt and fiberglass, that is, a reinforced version.
Photo: composite mesh for plaster
For interior work, lightweight reinforcement is preferred, for example, chain-link, polymer or fiberglass. When leveling the walls, plaster is applied to them with a layer of at least 2 mm. For ceiling surfaces, a gypsum plaster mixture is recommended with an overlap of at least 10 cm and careful reinforcement of the joints of the ceiling and walls.
The oven is reinforced with metal mesh with perforation 25×25 - 50×50 mm with a rod diameter of up to 2 mm. Basalt reinforcement is also used. The use of fiberglass and polymers is excluded - they melt at high temperatures.
Each type of fittings can be installed in accordance with several technologies. Let's look at the main ones.
The familiar chain-link mesh
Today, chain-link is made from carbon, high-alloy, galvanized steel wire, which can often also have a polymer coating. PVC-coated chain-link is more durable, as it is not subject to corrosion and withstands external influences well, but this type of mesh is usually used to create fences and is produced in a variety of colors.
A chain-link is made by twisting wires with a diameter of 1÷3 mm in a spiral, and then together into a common mesh sheet.
This type of metal mesh is often used to cover walls built from adobe or clay before applying plaster solutions to them. The mesh creates a reinforcing relief layer that is capable of holding a large volume of plaster, and the thicker it should be, the larger the cells should be.
The tables below show the main types of chain-link used for plastering work:
Chain-link woven mesh made of non-galvanized wire
| Cell size, mm | Wire diameter, mm | Roll or card size, m, (width/length) | Weight m², kg |
| 6 × 6 | 1.2 | 1 × 10 | 1.11 |
| 8 × 8 | 1.2 | 1 × 15 | 0.94 |
| 10 × 10 | 1.2 | 1 × 10; 1,5 × 10 | 3.55 |
| 15 × 15 | 1.2 | 1 × 10; 1,5 × 10 | 3.03 |
| 20 × 20 | 1.4 | 1,5 × 10 | 1.55 |
| 6 × 6 | 1.2 | 1 × 10 | 1.25 |
| 8 × 8 | 1.2 | 1 × 15 | 1.52 |
| 10 × 10 | 1.2 | 1 × 10; 1,5 × 10 | 3.55 |
| 15 × 15 | 1.2 | 1 × 10; 1,5 × 10 | 3.03 |
| 20 × 20 | 1.4 | 1,5 × 10 | 1.55 |
Braided chain-link mesh made of galvanized wire
| Cell size, mm | Wire diameter, mm | Roll or card size, m, (width/length) |
| 10 × 10 | 1 | 1 × 10; 1,5 × 10 |
| 15 × 15 | 1.2 | 1 × 10; 1,5× 10 |
| 20 × 20 | 1.4 | 1,5 × 10 |
| 25 × 25 | 1.6 | 1,5 × 10 |
| 35 × 35 | 1.8 | 1,5 × 10; 1,8 × 10; 2,0 × 10 |
| 45 × 45 | 1.8 | 1,5 × 10; 1,8 × 10; 2,0 × 10 |
| 50 × 50 | 1.8 | 1,5 × 10; 1.8 × 10; 2,0 × 10 |
| 50 × 50 | 2.5 | 1,5 × 10 |
| 50 × 50 | 3 | 1,5 × 10; 1,8 × 10; 2,0 × 10 |
Welded mesh
Welded mesh is produced by spot welding the intersections of wire rods laid perpendicular to each other. For its manufacture, wire or reinforcing bars of various diameters are used, and its cells can also have different sizes. Usually this is indicated in the mesh markings with a special symbol, for example, mesh No. 3 has cells with a side of 3 mm.
This type of mesh is used to reinforce masonry walls and strengthen the foundation, as well as for installing thermal insulation and finishing load-bearing surfaces.
Shingles
The shingles are used in two layers. For the first base, thin slats of no more than 3 mm, 25–30 mm wide, are used. The second layer consists of wider thick strips. They are packed crosswise at an angle of 45 degrees relative to the floor.
Reinforcement of plaster is an important technological process that increases its durability and preservation of its original qualities. Various materials can act as reinforcing fabric - fiberglass, basalt, metal, plastic, shingles. The choice of the required reinforcing layer depends on the working mixture used, the type of wall covering, the scope of application and other parameters. Installation is carried out using mortar and hardware.
Main types of mesh
To make the plaster applied to the outside of the building less susceptible to cracking and peeling, reinforcement is used.
Special reinforcing networks are:
- metal;
- fiberglass.
Metal facade mesh for plaster can, in turn, be divided into 4 types:
- woven;
- wicker or chain-link;
- welded;
- expanded metal.
You can visually compare the types of meshes using the photo below.
This will help evaluate their density and effectiveness in a particular application.
Types of metal plaster mesh.
- A woven net is made from a thin but strong and flexible material - steel wire - by weaving. A similar mesh with 1 cm cells, coated with zinc, is often used. In construction stores, such material can be purchased in rolls, convenient for transportation.
- The chain-link mesh, as a rule, has a cell diameter of 2 cm. When using this material, the plaster on the facade mesh is strengthened most firmly, since large cells make it easier to work when applying several wide layers of mortar.
- The welded type of mesh is made by spot welding at the intersections of wires and has square cells perpendicular to each other. In this case, galvanized wire coated with a special polymer composition serves as the main material. During active settlement of walls, such a mesh is the best protection against cracking.
Welded mesh for reinforcing bases.
- Expanded-extraction facade mesh for plaster is made by pressing metal sheets with cut holes. In this case, the cells are arranged in a checkerboard pattern. This material is available for sale in convenient rolls 1 meter wide. Used when it is necessary to apply a thin and neat layer of plaster.
Expanded mesh.
Using fiberglass mesh
Another type of facade material for wall treatment is facade plaster fiberglass mesh. This material is made from glass filament and is aluminoborosilicate glass.
In this case, the density of this matter is determined by the thickness and size of the threads.
Depending on this, the scope of application differs.
Fiberglass mesh for facade.
- With a density of up to 90 g/sq.m. The mesh is used during painting work or when finishing interior walls.
- If the mesh density is higher than 90, but less than 220 g/m2, then this material is more suitable for processing concrete walls, aerated concrete blocks, when installing insulation and when working with shell rock.
- Meshes with a higher density, the price of which is considered the highest, have found their use in the reinforcement of those parts of buildings that are located directly in the ground.
Fiberglass mesh and plaster reinforcing facade mesh are used to create a strong load-bearing base for the plaster. If it is necessary to apply a thick layer of plaster to an external wall, care should be taken to ensure the strength and durability of the structure.
On a flat wall, the solution quickly falls off and delaminates after drying. This is due to physics, since there is simply nothing for the plaster to grab onto. The use of meshes can significantly strengthen the structure.
Tips for novice repairmen
To decorate the exterior of the building yourself, you will need a few instructions that will help you avoid the most common mistakes and make high-quality repairs.
It’s worth finding out the advice of professionals to get the most durable and long-lasting coating.
- Installation is carried out in dry weather at temperatures above 5 degrees and air humidity less than 80%;
- The applied layers of plaster must be protected from direct sunlight in particularly hot weather, strong winds and heavy rain;
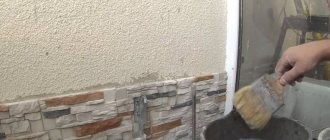
We plaster the facade using a grid.
- When using colored plaster, you should purchase materials from the same batch to avoid differences in color;
- Between the supporting structure and the thermal insulation there should be a distance greater than 45 cm from the thickness of the insulation;
Common mistakes that lead to defects when the plaster mesh for the facade does not help:
- Defect of uneven coloring (appears when layers of plaster of different thicknesses dry unevenly);
- Peeling of plaster in large pieces (occurs as a result of improper preparation of the walls or lack thereof, the same thing occurs when applying too thick a layer);
- The unevenness of the wall is visible (appears when applying too thin a layer of mortar);
- Peeling of plaster around the entire perimeter (often associated with the use of gypsum mortar, as it reacts with rain and promotes a more intense process of moisture absorption).
Fiberglass mesh for plaster: from selection to fastening
Due to its characteristics, the plaster composition does not always lie perfectly on the surface. To secure it firmly, it is customary to use a special fiberglass mesh. Unlike its counterparts, fiberglass mesh has many advantages. Those who decide to use this material when carrying out finishing work should know how to choose and mount it correctly.
Fiberglass mesh is designed to reinforce the plaster layer and has increased resistance to alkali. In addition, it perfectly withstands high tensile loads and temperature changes. The use of fiberglass mesh significantly improves the quality of the plaster layer and extends the service life of the finished coating (examples of working with fiberglass mesh can be seen in the photo).
Characteristics
Today, fiberglass mesh has become quite popular in the building material market. This is due to its chemical neutrality and strength. This option also has excellent technical characteristics, which include:
- resistance to aggressive environments;
- excellent resistance to transverse and longitudinal loads;
- excellent adhesion to binders and mineral mixtures;
- the ability to improve the characteristics of the reinforced surface.
Selection of reinforcing material
When choosing fiberglass mesh, it is very important to first of all pay attention to the price. In this case, you should not choose the most inexpensive offers, since a quality item will not be cheap. In addition to price, it is important to choose the right manufacturer
Modern builders recommend giving preference to foreign manufacturers
In addition to price, it is important to choose the right manufacturer. Modern builders recommend giving preference to foreign manufacturers
It is important to determine in advance the required level of resistance to alkali, and for this you will need to first view the table, which indicates the standard values for this parameter. If the label of the fiberglass mesh contains values equal to the data in the table, then you can not be afraid and purchase this particular option
If the level of alkali resistance does not meet building codes, the fiberglass reinforcing material may dissolve in the plaster and leave behind voids. This situation will cause a lot of trouble in the future and will significantly shorten the service life of the wall covering (the photo shows a finished surface made using fiberglass mesh).
Installation of fiberglass mesh
Fastening the fiberglass mesh consists of several stages. Before you start work, you need to watch the video tutorial and take into account that the plaster layer should not be less than 3 mm and exceed 30 mm. Before installing the reinforcing material, the mesh is cut to the size of the canvas, which depends on how the reinforcement will be located - along or across the surface.
After the preparatory measures, a starting layer of finishing composition must be applied to the surface, on top of which a fiberglass mesh is laid. After this, the reinforcement is pressed into the starting layer, and finishing plaster is applied on top. In some cases, it is recommended to secure the mesh with dowels (along the edges of the canvas). This is necessary to prevent peeling of the finishing material.
- Before starting work, you should make a marking along which the mesh will be attached.
- The mesh is laid overlapping.
- The final layer of plaster is applied to the middle of the mesh and evenly distributed along the edges.
- The reinforcing fiberglass mesh should be laid on top of the freshly applied starting layer of plaster.
Basalt reinforcement
The production of basalt mesh for plaster is carried out using one of two technologies:
- based on roving - an untwisted thread or tow, similar in structure to fiberglass;
- based on twisted basalt fibers.
Photo: basalt mesh for wall reinforcement
The weaving process is technically carried out using special equipment. Products made from roving are ready for immediate use; building materials made from twisted reinforcing threads are preliminarily treated with a protective mixture to prevent destruction in acidic or alkaline environments.
Advantages and disadvantages
Pros:
- tensile strength to withstand any deformation factors;
- resistance to extreme temperatures - withstands at least 25 freezing cycles without loss of strength;
- resistance to aggressive environments of the solutions used;
- no risk of corrosion and rotting;
- excellent adhesion to working surfaces;
- optimal flexibility, the ability to enhance complex geometric shapes;
- long service life - at least 50 years;
- ease of work;
- small weight;
- hydrophobicity;
- low price.
There are no downsides to this product.
Dimensions
Unlike analogues, basalt reinforcing products have a small range of sizes. The thickness of the threads is 2-4 mm, the perforation size is 25×25, 50×50 mm. Other options are rarely found on sale.
Application area
Recommended for strengthening the plaster layer when finishing facades and plinths of buildings, and for interior work.