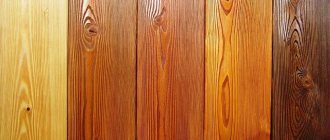
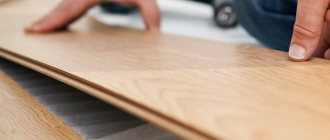
Lining is one of the most popular materials for interior decoration of baths. To a lesser extent it is used for cladding facades , but still this possibility of application also exists. Moreover, it is a thin profiled board, most often made of wood, which could use some protection. We will consider in this article whether, where, how and with what to treat the lining in a bathhouse. For those who are just planning to install this material in their bathhouse, we advise you to familiarize yourself with other materials on the topic of lining.
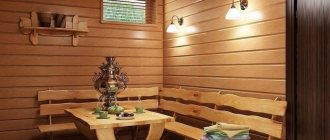
Processing lining inside the bathhouse
In addition, the wood in a bathhouse or sauna wears out and becomes dirty over time. What should you do to protect your bathhouse or sauna from external adverse influences? Some are ardent opponents of any “chemical” interventions in their steam rooms. But we hasten to assure you that today the technologies of various protective coatings for steam rooms have gone very far ahead, and a wide variety of products have appeared on the consumer market that will help protect wood in steam rooms.
So, in order to maintain the durability of your bathhouse or sauna and at the same time ensure it is in good condition throughout its entire operational life, you need regular maintenance, as well as special treatment. Among the simplest means and methods for caring for a steam room are regular ventilation and cleaning of dirty areas with a slightly damp cloth, without using detergents. Dirt stains from dry wood paneling can be removed very well using fine-grain sandpaper. And after such cleaning and subsequent drying, the steam room is treated with special oil.
But among the unfavorable effects on the upholstery of a sauna or bathhouse, there is also high temperature, as well as excess moisture. To protect this room from these negative influences, modern impregnations are used. They are made only from natural materials and penetrate deep into the wood without closing the pores of the wood. High-quality impregnating agents do not change the original appearance of the wood. In addition, these impregnations are absolutely harmless to the human body and health, since they do not contain harmful substances and do not emit any unpleasant odors.
Manufacturers
Bath paint is produced by domestic and foreign manufacturers. Its price depends on the material used and the quantity in the jar.
Belinka
The manufacturer's product range consists of paints, glazing compounds, varnishes, and impregnations. They have a wide range of colors, which allows you to bring any design idea to life. When using materials, the structure of the wood is preserved. Belinka produces polyacrylate paints that have water-repellent and vapor-permeable properties.
Tex
Paint from the Russian manufacturer Tex has protective qualities, which guarantees an increase in service life. The company produces soil and glaze antiseptics, drying oils, wax compositions, and fire-retardant impregnation. This allows you to choose an acceptable option for painting the bathhouse.
Saikos
The compositions of the German manufacturer are developed on the basis of natural oils and waxes. This ensures the preservation of the structure for many years.
Flaxseed oil for baths: features of use
Features of using linseed oil for baths
- Environmental friendliness
. Flax oil does not emit toxic substances and is even used to impregnate wooden utensils. - Reliable protection
. The composition is able to penetrate deeply into the structure of the tree. - Hydrophobicity
. Effective moisture rejection. - Maintaining appearance
. The transparent coating preserves the grain of the wood and prevents it from rotting and darkening. - Antiseptic effect
. Flaxseed oil protects the surface from the effects of fungus and mold. - Convenient application
. Processing is possible even in hard-to-reach places. - Relatively cheap
. Compared to special impregnations for baths from leading manufacturers, the composition has a low cost.
Internal bath treatment with linseed oil
Instructions for applying linseed oil inside the bath
In the process of internal treatment of a bath with linseed oil, we adhere to the following sequence:
- Sand the surface and clean it from dust. Never use a damp cloth for this.
- Stir the oil thoroughly. It is not recommended to dilute it with water. This will impair further polymerization.
- We heat it to a temperature of 50-60 degrees.
- Apply to the wood along the grain with a brush or cotton cloth. We try to make the layer thin and even.
- After complete drying, sand the surface and apply a second layer.
- We repeat the procedure 5-6 times with alternating grinding.
- Leave until completely dry for two to three weeks. To speed up the hardening process, you need to use not raw, but heat-treated oil. Then the operation of the steam room is possible after 5-6 days.
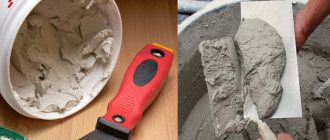
Treating a bath with a mixture of linseed oil and wax
We carry out the work in this order:
- We sand the wood and remove dust.
- Prepare a mixture with wax in a 2:1 ratio. To do this, add heated wax to boiled flax oil and mix thoroughly.
- Apply the composition to the surface using a foam sponge along the fibers.
- After drying, wipe off the residue with a waffle cloth and apply a second coat.
- We warm up the steam room and remove any protruding drops of wax from the surface.
External bath treatment with linseed oil
Cleaning linseed oil before coating the bath
- Rinse with salt water. For a high-quality result, this procedure must be repeated 5-7 times.
- Adding metal salt. The oil is mixed with lead salt and heated to 60-70%.
- Adding ethanol. The best option for removing contaminants.
- Exposure to light. The process is called photo-oxidation. Involves preliminary hydroflushing. To do this, the oil must be boiled with water, and then strained.
Instructions for external impregnation of a bathhouse with linseed oil
The procedure is performed in this order:
- Thoroughly sand the surface and remove wood dust.
- Mix flax oil with turpentine in parts of 70:30 and heat to a temperature of 50-60 degrees.
- Apply the first layer with a soft brush and wait for it to dry.
- We grind the surface and impregnate it a second time.
- After complete hardening, apply the third layer.
Impregnation
Having prepared the material, the lining should be impregnated. Which primarily has an antiseptic effect: prevents the appearance of black spots, mold, protects against insects
Please note that the primer label must indicate that the substance is intended for interior use; such compositions must only be water-based. If he advises you to purchase a primer with a different base, then ask for a certificate for this product.
It is preferable to purchase already impregnated lining, since processing under industrial conditions under pressure has a better effect. Having applied the primer yourself, the material must also be allowed to dry.
Why do you need to process the lining?
Lining made from natural wood requires further processing, the reasons are obvious. If, for example, lining is used for exterior decoration, its condition will be influenced by atmospheric factors - temperature, humidity, wind, direct sunlight. All this can lead to her deplorable state:
- The appearance deteriorates
- Mold and rot develop
- Color changes
- Material deformation occurs
Not even all the changes that can happen to your lining in a year are listed here, without additional processing. Of course, if lining is used for interior cladding of a room, the environment here is softer and therefore changes will occur more slowly.
Requirements for modern paints
With the development of technological progress, paints with a high degree of environmental friendliness, safety and quality have come to the fore in demand. The requirements for paints for a sauna, as well as for paints for a steam room, are no different.
After drying, the compositions should allow air to pass through well, which will help avoid the formation of condensation, which leads to the formation of mold and pathogenic fungi. Plus:
- The compounds must not decompose at elevated temperatures;
- Performing protective functions, paints should extend the service life of the material;
- Must have high decorative properties.
The paint is selected based on the technical characteristics specified by the manufacturer on the packaging.
It is advisable to give preference to water-based compositions that are well absorbed into the structure of the material. After painting, any room must be well ventilated.
After drying, the compositions should allow air to pass through well, which will help avoid the formation of condensation.
Impregnation technologies
There are different ways to oil wood. Some people prefer smearing and further rubbing, while others prefer soaking. True, the second method is suitable only for small objects - decorative dishes, figurines. The dish, by the way, can be used (as a container for bread, salt/sugar, fruit) because it is not at all afraid of water.
Preliminary stage
An important stage of work before impregnation will be the preliminary preparation of external/internal surfaces. For boiling, you will need to thoroughly sand the dishes or figurines. They are supposed to be freshly carved from wood and not covered with anything on top. Otherwise, you will have to remove both paint and varnish, and this is a very tedious task.
For large areas (walls, floor, ceiling) you will have to do much more:
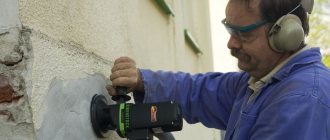
- Rip off the old coating. This includes varnish and paint. Use a wire brush or spatula for cleaning. If the paint does not want to come off, heat it with a hair dryer. When it bubbles, lift the layer with a spatula and remove.
- Sand the surface. Use two types of sandpaper for this – coarse and fine. You can stop cleaning when you feel a smooth surface without flaws under your hand.
- Remove dust. Brush it off with a soft (Vietnamese) broom or use a regular rag. There should be no dust remaining on the surface before oil impregnation.
Coating
The easiest way to protect wood from moisture and rot is to oil it. It's best to do this with a rag. But you can also use a brush with natural bristles. This is relevant for small areas (platbands). Impregnate internal/external walls, ceiling or floor with a soft cloth soaked in oil. This is done as follows:
- Stir the product and pour some into a separate container.
- Dampen the rag and start soaking. Apply the composition along the fibers.
- Leave the oil for 15 - 20 minutes. Then remove the residue with a rag.
- Allow the surface to dry, then repeat the treatment.
Soaking
This method is used for small products. Pour oil into a container and place the pre-cleaned wooden product in it. The holding period is not limited. Ideally, you need to hold a plate, figurine, knife or gun handle until air bubbles stop escaping from the wood.
After this, take out the item and place it on a table covered with clean paper, tilted, so that excess oil drains off. Then take a rag and polish. Pure linseed oil without additives takes a long time to dry - up to 3 weeks. This has its own advantage - the depth of such impregnation is great, and the tree receives excellent protection from moisture, rot, and mold. If you can't wait to see the finished product, add beeswax to the linseed oil. This will significantly speed up the process.
Recipe for oil/wax composition based on linseed oil (suitable for both external and internal surfaces):
- Heat the oil until smoking.
- Pour grated wax into it.
- Stir. When the wax dissolves, pour the mixture into a jar.
- To give the mixture a pleasant aroma, add a few drops of juniper oil.
The ratio of parts in oil-based formulations may vary. To get a thin layer (floor treatment), take 9 - 10 parts of oil and 1 part of wax. Treatment with this composition is carried out 3 – 4 times. Compositions based on oil and wax 3 to 1 or 4 to 1 are suitable for impregnating walls. Oil/wax in a 1 to 1 ratio is acceptable for ceiling treatment. The layer it produces is thick, protection against moisture penetration is maximum, but resistance to mechanical damage is very weak. But the ceiling is not threatened by any outside influences. Therefore, a composition based on linseed oil with the addition of wax 1 to 1 is the most suitable option for it.
Impregnating wood with oil compounds is an inexpensive option for protecting it from various adverse factors. Compared to industrial antiseptics, it is cheap, high quality and completely safe for health at all stages of work.
Classification of methods for surface finishing of materials
How to treat the lining depends on the condition and material of the walls. Most often you can:
- perform mechanical cleaning;
- make a primer;
- impregnate with varnishes;
- paint the lining;
- perform heat treatment.
Mechanical cleaning is performed only for linings of lower classes, and as an auxiliary means before other processing methods. This can be avoided if you do not skimp on finishing with the highest quality material, and also use sanding of the lining before attaching it to the sheathing. Sanding is carried out using a stiff steel brush, which is moistened in a concentrated solution of universal bleach. It is necessary to check whether the color of the surface will change.
Primer consists of pre-coating the surface of the material with various stains. The composition of stains is usually adapted by their manufacturers to specific types of wood, so the selection of the composition will be individual. Preference should be given to tinting stains, which, in addition to disinfecting components, also contain coloring agents.
The nature of the effect is similar to stains and varnish coatings. They also allow you to further improve the aesthetic characteristics of the walls.
Subtleties of applying protective compounds
If you don’t know what to impregnate the walls in a bathhouse with, then this article will be relevant for you, because special impregnations for a bathhouse are suitable for any wooden surface, but it is also worth remembering some subtleties:
- It is much easier to process an unassembled structure, so if you have such an opportunity, saturate the elements of the bathhouse before assembling them;
- Protective products can have a negative effect on the skin, so to avoid this nuisance, you may not treat the side of the shelf in contact with humans. You can process the rest of the wood in the bathhouse without fear for your health, because only the shelves can affect the skin;
- Carry out work in the summer to make it easier to dry the steam room;
- It takes at least 4 days to completely dry the varnish and impregnations, after which you can relax in your bathhouse;
- Under no circumstances use highly toxic products, such as stains, because they negatively affect your health not only through the skin, but also through the respiratory tract;
Do not skimp on protective solutions, because your health and longevity of wood structures depend on their quality.
Impregnation for wood for baths and saunas Tikkurila Supi Saunasuoja
A popular and high-quality impregnation for baths and saunas is SUPI SAUNASUOJA based on acrylic, which is characterized by its good vapor permeability and does not contain any solvents. This impregnation is manufactured by the Finnish company TIKKURILA. Impregnation SUPI SAUNASUOJA serves to protect the wood in the steam room from rotting and mold. It contains special components against mold and blue stains, and it also forms a water- and dirt-repellent surface. This protective composition has proven itself to be excellent when treating ceilings and walls in a bath or sauna, but at the same time it cannot be used for treating shelves.
The Finnish product SUPI SAUNASUOJA is characterized by a semi-matte shine and is diluted with water if necessary. When treating the wood surface with this impregnation, you need to know that the air humidity in the workroom should be less than 80%, and the temperature of both the air and the surface should be at least +5°C.
conclusions
Do not forget that the new, just installed lining must be treated with fire retardants that increase the fire resistance of wood - Biopiren "Pirilax"-Terma or Terma Lux-D (branded products produced by various manufacturers in Russia). The photo shows products from Siberian manufacturers, but in your region the product may look different.
The key word on the labels is “fire protection”
It is useless to treat a previously varnished surface with an antiseptic. The varnish needs to be removed - cleaned with sandpaper or a scraper. In conclusion, we suggest watching the video to reinforce what you have read.
Homemade impregnation
Probably the simplest and cheapest method of processing lining is a composition called “soap maker”. It is produced quite simply at home. To prepare it we will need:
- 10 liters of ordinary water;
- 10 pieces of soap, 200 grams each;
- 10 liters of regular drying oil;
- galvanized bucket 12 liters.
The cooking process is as follows:
- Add soap to water on a coarse grater and cook for 15 minutes, then let cool slightly.
- We heat the drying oil to approximately body temperature, and in a 30-35 liter plastic tank, quickly mix both liquids until smooth.
- For better and faster mixing, you can use special drill attachments.
- That’s it, the composition is ready, let it cool to 20 degrees, and apply it to the surface to be treated with a brush or roller, as convenient.
This option has a right to exist, as they say, depending on the taste and color... then we will still consider special impregnations for treating lining outside the house.
Ready-made impregnations
Impregnations of the TIKKURILA brand. As you can see in the photo, this manufacturer of impregnations has a large range of products to choose from. These impregnations have many positive reviews and are reliable and durable. Almost every one contains oils and antiseptics. The first component gives the impregnation water-repellent properties, the second prevents the appearance of mold, mildew and rot.
- VALTTI AKVABASE (Valtti Aquabase) primer composition that works with all types of wood. Contains oils and antiseptics. Well suited for exterior treatment of the house, it penetrates deeply into the wood layers, but unfortunately does not protect from sunlight. Usually this impregnation is applied with a brush as liberally as possible and, if possible, immediately after finishing. In the video you can see in detail about the methods of applying impregnations to the lining.
- VALTTI AKVAKOLOR (Valtti Aquacolor) penetrates deeply into the surfaces being treated and protects against UV rays. Prevents the appearance of rot, blue stains, and fungus. Before using it, it is necessary to treat the surface with a stiff brush or coarse sandpaper. The composition is applied to the surface to be treated 2-3 times.
- Azure TIKKURILA. Easy to use, diluted with water and has an oil base. Has good water-repellent properties. It is better to apply in two layers.
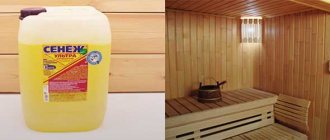
Impregnations of the SENEZH brand. Very popular in the construction market. The company specializes in the production of impregnations that protect wooden surfaces from moisture, rot, ultraviolet rays, and fungus. Let's look at the most common types of impregnations of this brand.
- "Aquadecor". Decorative antiseptic impregnation for wood. Its palette contains 16 shades. An environmentally friendly, odorless product protects the treated surface from mold and insects, ultraviolet rays and moisture.
- "Senezh Ultra". Representative of the class of economical antiseptics for external wood treatment. It is a hard-to-wash-out impregnation.
- "Senezh Bio". Belongs to the group of preservative antiseptics. Actively used in places with high humidity, with constant contact with wet soils and organic waste.
Pinotex brand impregnations. The Pinotex company has been in the paint and varnish market for over 50 years. It is one of the most popular brands used. The main advantage is the ability to prevent wood from fading and thereby preserve its natural appearance for many years. All Pinotex impregnations are used in combination.
- Pinotex Base (Pinotex Base);
- Pinotex Classic (Pinotex Classic);
- Pinotex Ultra (Pinotex Ultra);
- Pinotex Natural (Pinotex Natural);
- Pinotex Doors & Windows (Pinotex Doors and Windows).
All Pinotex impregnations have approximately the same properties; those listed by us are intended specifically for the exterior decoration of houses. They protect wooden surfaces from rotting, moisture, blue stains, fungi, harmful ultraviolet rays and aging.
So, we have looked at the most popular impregnations for lining, but what to use, of course, is up to you.
Painting a brick oven
Preparatory stage: If there are minor defects (depressions, bumps, potholes), first plaster and level, and cover the seams with a clay solution. You can learn how to prepare a good clay solution from the corresponding article, which is on the blog...
Plaster is made from clay and crushed asbestos. The resulting mixture is carefully applied to a well-heated stove.
How to paint: The two most popular proven folk methods are lime or chalk. The third method is again heat-resistant paint, which is also used for iron sauna stoves.
Cooking and painting with chalk
Stages:
- Pour the pieces of chalk into a container (bucket, basin), fill with slightly warm water so as to cover the surface and leave for at least one hour;
- In another container, mix animal glue with warm water in a ratio of 25:1. Animal glues include gelatin, casein, albumin, and bone.
- Mix both solutions and bring to a homogeneous consistency. “To check the quality of the solution, drop it on a piece of glass or mirror placed vertically. If the density is normal, then the droplet will slide down by 2-3 cm.”
- Apply two or three layers. Each subsequent one, only after the previous one has dried. “For a more “clean” whiteness, you can add a tablespoon of blue to a bucket of the finished solution. It will remove some of the yellowness.”
Cooking and painting with lime
Steps:
- Solution proportions: 1 kg of lime / 1.5 liters of water at room temperature / 1 tbsp. spoon of drying oil / 25-30 grams of blue / 1 tbsp. spoon of salt. Mix. “The most durable whitewash is made from freshly slaked lime, and salt is added to make the lime coating less dirty.”
- Apply in two or three layers. Unlike whitewashing with chalk, each subsequent layer of lime whitewash is applied to the wet previous one. “If the stove in the bathhouse was previously painted with chalk, and you intend to use lime (and vice versa), the surface must be thoroughly cleaned of old paint.”
Processing shelves and benches
Saunas and baths are impossible without shelves or shelves. Just like other parts of the structure, they are made of wood. It should be remembered that the same impregnations cannot be used for them as for the floor, walls or ceiling. As you know, steam room conditions require strong heating of all surfaces. If unprotected parts of the body come into contact with a hot bench, a person may receive a severe burn. Therefore, impregnations should not form films.
The wooden shelves of the steam room can be treated with oil compositions intended for saunas. A universal protective composition with wax is also suitable. Example: Supi Saunavaha product produced by Tikkurila. This impregnation is suitable for treating almost all sauna surfaces: window frames, walls, shelves, ceilings.
The process of painting a room
The process of painting the inside of a bathhouse begins with thoroughly sanding all surfaces to be treated - these are walls, floors and furniture, if necessary. After this stage, all construction dust or shavings must be removed from the room, as they will interfere with the quality of the painting process. You can wipe the surfaces with a cloth; it is better to leave it dry or vacuum it.
Paint can be applied with a roller or brush
Before applying colored paint, it is best to treat the wood with compounds that will protect against fire and mold. After they dry, you can decorate the room with the chosen color of the dye. Work is best carried out in a well-ventilated area with a constant air temperature.
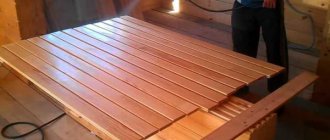
Processing sequence
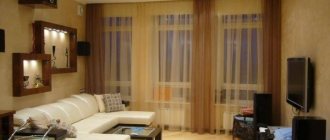
In the case when the bathhouse is transformed using lining, it is recommended to protect this material. To do this, you need to treat the product with the appropriate mixture and dry thoroughly. However, only building materials prepared for this procedure should be processed. Preparation includes manipulations such as drying and polishing with sandpaper. What the coating should look like after this is shown in the photo.
If the coating has any contaminants, they are removed from the surface of the material with a metal or hair brush.
When the sheathing has become a haven for fungus, you will need special substances that have bleaching properties and are designed specifically for treating wood with them. It may happen that these actions were not effective, then the building material must be covered with stain, which should lighten the product. In addition, this product will improve protection and the casing will last longer.
Next, the dirt road enters the arena. The composition is very important here, since the quality of the procedure depends on it. The main criterion for choosing a primer is its compatibility with a specific type of wood. Along with this, it is necessary to take into account the transparency of the substance with which the casing will subsequently be coated.
The next step is impregnation of the building material. It prevents the appearance of dark spots and mold on the product. It is also necessary to process the product in this way so that it is not disturbed by insects. Impregnation will also protect the building material from rotting processes, which means the bathhouse will remain attractive for a longer time.
Of course, it will be better if you buy already impregnated lining. Not because it is very difficult to process it yourself, but because in production conditions a better effect is achieved. However, if you decide to do this task yourself, then buy special products that are only water-based.
Thinking through the design
The first room of the sauna must be warm, which eliminates drafts. And the main question related to this is whether it is necessary to make a window in the waiting room? On the one hand, it can become a source of draft, but on the other hand, it can serve as natural ventilation and an additional source of light.
Equipping a dressing room with windows imposes a number of requirements:
- The absence of gaps, which can be achieved by installing double-glazed windows or double frames, in the case of wooden windows.
- Choosing triple or, in extreme cases, double glazing to minimize heat loss through the glass.
Stages of wood impregnation
Linseed oils are used for wood processing in two ways, it all depends on personal preferences and the size of the surfaces being treated:
- Soaking is only suitable for small items (decorative figurines, dishes, etc.);
- Coating (rubbing in).
The following steps will tell you how to treat wood with linseed oil impregnation.
Preparatory stage
Before you start coating wood at home, you must first carefully prepare the surface to be treated. If this is a newly manufactured product, then the surface is simply sanded with high quality using fine sandpaper. Impregnating wooden products with a large area, for example, the facade of a house or previously exposed surfaces, is a little more difficult.
Preparatory work algorithm:
- Get rid of the old coating, that is, varnish or paint. There are several methods you can use here. Try removing the old paint using a spatula and a wire brush. If it doesn’t work, then you need to use a hair dryer.
- Sanding the surface. For this process, sandpaper with varying degrees of abrasive coating is used. You should start with the larger one, gradually reaching the smallest one. The surface is ready if, after running your hand over it, we do not feel any irregularities.
- Remove dust using a soft brush and rag. The key to high-quality oiling with linseed oil for wood is a well-cleaned surface from dust.
Coating process
Oiling of prepared wood can be done using the oiling method. The oil is applied either with an ordinary soft rag or with a brush that has natural bristles. Although painting with a brush is only suitable for small areas. As for the facade of the house, ceilings and other things, you only need to apply oil to the wood with a rag.
Linseed oil for wood is applied according to the following algorithm:
- Pre-stir the composition and pour the required amount into a clean container.
- Moisten a rag and treat the surface with it. It is necessary to apply the composition along the wood fibers.
- After treating the wood with linseed oil, you need to let the surface dry for about 20 minutes, then remove the excess with a clean rag.
- The product soaked in wood coating oil is left to dry for some time, and then the wood is re-coated with linseed oils.
Soaking process
Processing wood by soaking, as mentioned above, is only suitable for small products. The process of soaking wood with oil is quite simple: oil is poured into a clean container, and then the prepared, dust-free product is placed there. You can hold it as long as you like.
After the product has been soaked for some time, it is removed and placed on paper in an inclined state. This will allow excess flaxseed oil to drain. When we have got rid of the excess, polish the surface with a clean and soft cloth. Next, leave the product to dry.
The technology for oiling wood with linseed oil is quite simple, but it will reliably protect it from the effects of negative factors. And, if we compare it with various types of industrial compounds, then it is possible to coat wood with oils without harm to human health. Processing wooden products is a process that should not be neglected.
Recommendations from experts
It is better to treat areas of direct contact with the skin with compounds that do not form a film. But there is a practical solution to this problem. After processing the wood, you need to heat the stove. This promotes deep penetration of the composition. And excess dry residue can be removed with a soft rag.
Shelf processing Source banya-expert.com