What tools are required?
To work you will need the following list of tools:
- a drill with a special mixer attachment for ideal mixing of the putty mixture, without lumps or other defects;
- a set of spatulas for accessing problematic hard-to-reach places;
- rollers and brushes for priming walls, this procedure will help increase the strength of the putty and ensure adhesion of the wall to various facing materials;
- long metal rule for smoothing thick layers of putty;
- level for leveling the starting layer of putty;
- sandpaper necessary for smoothing the finished surface after puttying;
- container for stirring the putty mixture.
When all the tools are prepared, it is important to decide on the type of putty for subsequent work.
Difference in physical properties
The main property of plaster is its high ability to adhere to other surfaces (adhesion). It depends on the composition and type of surface (wood, brick, concrete, etc.). The plaster also has good plasticity before hardening and high strength after hardening. If necessary, it can be applied in a thick layer without losing the hardness of the final coating.
One of the main properties of putty is maintaining the original volume after drying. The viscosity of such solutions is low, which prevents the material from spreading or peeling off at the time of application.
Starter putty is used to seal joints between slabs, hide grooves, and correct natural unevenness in wall materials (for example, when the surface is made of brick, concrete, or pre-plastered). Finishing putty is used for finishing as the final stage of leveling surfaces.
Classification of putty
To prepare a mixture for wall putty, it is important to consider the advantages and disadvantages of each composition.
- Gypsum is an inexpensive material, effectively used for leveling walls, does not shrink, but reacts poorly to contact with moisture.
- Cement putties are moisture resistant, but have a high degree of shrinkage.
- Polymer - guarantee high quality of processed walls, due to high technical characteristics they are distinguished by the high cost of the material.
According to its intended purpose, the putty can be starting for preliminary leveling of the surface, decorative, or universal. Today the market offers both dry and ready-to-use putties. The former can be stored for a long time, and significantly save on purchases. The dry mixture consumption calculator will help you quickly find out how many packs of mixture you will need.
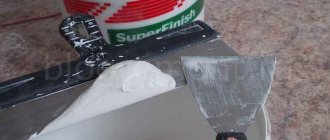
At the same time, it is much more convenient to use ready-made putty; you will not need to prepare the mixture, thereby you can spend less time on the entire work process. But it is important to remember that such mixtures are much more expensive than dry ones, shrink more, and do not have a long shelf life.
The advantage of the ready-made putty mixture is its very fine fraction and thanks to this, smooth surfaces are created. Technologically, they first putty with coarse-grained Vitonit putty, filling all the unevenness, and then the finishing layer is applied with ready-made Shitrok-type putties.
When everything is ready, we move on to the technology of puttying the walls for painting and preparing the surface.
Manufacturers' choice
The hardest part of choosing plaster is deciding on a specific company, and then choosing from all the products the material you need.
As for the choice of manufacturers, there are several leaders in this industry: Knauf (Knauf), Vetonit (Vetonit), Ceresit (Ceresit), Sheetrock (Sheetrock). All these brands have been on the market for a long time, produce products of consistently high quality, and operate in approximately the same price range.
If we talk about domestic brands, the most popular are Volma, Osnovit and Prospector. Moreover, Volma has the same prices as the brands described above, while Osnovit and Prospectors are significantly cheaper. There are many more smaller producers, but they are represented in certain regions and are little known in others.
Choosing putty by manufacturer is one of the main tasks
All of these brands have good reviews, each has its own fans, and you can choose any putty from this list. Professionals prefer to work with leaders. The customer pays for the materials, but the product is proven, the technologies are proven, and the result is known. Therefore, their choice is predetermined. Do-it-yourselfers who level walls with their own hands usually try to spend less money and not lose much in quality. They prefer to work with Volma and Prospectors. What your choice will be is up to you to decide.
Preparatory work
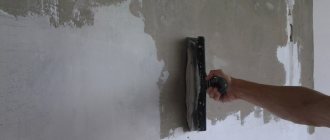
Before starting puttying, the walls must be perfectly clean and smooth. It is necessary to remove stains from grease and soot, remove old putty, apply a primer to ensure adhesion of the solution to the walls.
If there are irregularities, bumps, or other defects, it is necessary to eliminate them, knock out lumps, cover the cracks with the starting mixture, and prime the walls. One layer of primer will be enough, the main thing is to do it well, do not leave gaps, apply the mixture using a special roller.
Preparing putty for work
If the putty is dry, then take a wide container, pour water into it, add the composition and stir with a mixer. To avoid lumps and clots, it is important to do this procedure for a long time, then leave the finished material for 15 minutes to swell and stir for another 3 minutes.
It is important to repeat this cycle several times in order to be sure of obtaining a soft and elastic mass for puttying walls. It is important not to re-dilute the resulting composition, otherwise the putty will form clumps and “draw” stains on the wall.
Solutions application technologies
Since the mixtures are different, the methods of applying them are different. The first stage is to prepare the surface. The walls are freed from dirt, traces of previous finishing and dust-free. Further, the working methods differ.
Applying plaster
To ensure uniform application of plaster, beacons are placed on the wall surface. It is important to ensure that the solution is prepared in accordance with the instructions. If too little water is added to the dry mixture, it will not bond to the surface. When there is too much liquid, the solution will drain, which will lead to excessive consumption of material, and this is unprofitable from an economic point of view.
After applying the solution to the wall, it is stretched and leveled. To do this, take a trowel, a trowel (for a small amount of work) or a rule - a lightweight strip made of aluminum with a trapezoidal profile. The length of the latter instrument can reach three meters, but then it is used by two people. Usually the rule is no longer than two meters. Use a tool to level and cut the mixture.
If the project specifies that the plaster needs to be applied in several layers, then beacons and mesh for reinforcement are installed. The latter prevents delamination and shedding of layers. Beacons allow you to avoid differences in layer thickness along the entire length of the surface. The wall is divided by beacons into square sections, inside of which the solution is drawn out.
Plaster can be applied to walls by spraying with a mechanical tool. This significantly speeds up the plastering process.
If necessary, level the dried plaster by hand using a grater or trowel. This tool can be made of wood or metal. Used to give the surface additional smoothness.
Each layer of plaster should not be thicker than 1 cm.
Plaster allows you to correct wall blockages up to 5 centimeters. In this case, there will be three stages using different solutions:
- Spray (apply the first layer up to 5 mm).
- Primer (several layers of 5-6 mm to obtain the required wall thickness).
- Covering (the layer is made with a fine-grained solution no more than 2 mm).
Applying putty
Working with putty also has some nuances. Level and prepare the surface with sandpaper. If the amount of work is large (for example, you need to apply putty as the final layer on a previously plastered wall), it is preferable to do this with a mechanical sander. This will significantly reduce preparation time.
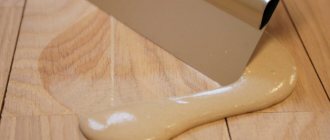
The mixture is kneaded in small portions, since it has a short drying time. The material is also applied in small parts using a spatula. The solution must be thoroughly spread and stretched so as not to leave grooves from the tool.
Sometimes a roller is used to apply the putty. But it’s not easy to level a wall with this tool. Choose a roller with a pile of 2-3 millimeters and dip it into the solution. The putty is applied to the wall like paint, and immediately leveled with a spatula, holding it at right angles to the surface. The first layer is allowed to dry a little and the next one is applied. This method is used when puttying surfaces as a top layer of plaster.
When reapplying, the spatula should move in the opposite direction. If the first layer was applied from left to right, then the next one was applied from right to left.
To putty the joints of drywall sheets and hide the places where it is attached to the wall, it is better to take a small spatula. It is easier for them to perform precise manipulations. There are painting and façade spatulas. It’s not hard to guess that they work last when finishing facades. Painting ones are smaller in size and more elastic. You can immediately purchase a set of tools.
A spatula is not used for grouting as this will damage the tool. Sand with fine sandpaper. After finishing work, wash the tool thoroughly.
Starting putty
Performed with a rough starting material, such putty is necessary to eliminate all defects on the wall, the layer thickness can reach 1.5 cm. Several layers need to be applied. The Vetonit series of mixtures is perfect.
The main thing is that each layer must dry thoroughly before applying the next one; this is the basic rule in repairs!
To get the best possible result, you can use a painting net over which you will distribute the putty. Thus, the surface will be more durable and smooth.
Calculation of the required amount of mixture
You should measure the parameters of the walls: height, width. We also measure the dimensions of the openings. We enter this data into a special calculator, as well as the approximate thickness of the total putty layer - we get the result in kilograms. Sometimes you can get information from different manufacturers in bags.
The starting putty is calculated taking into account the curvature of the walls, so we measure the deviations in level. Walls without defects can be coated with a consumption of 1.2 kg/m². It will grow 2-3 times if the irregularities are visually noticeable. If the curvature is very large, then the initial value of 1.2 kg/m² can increase by 5-8 times.
The finishing putty is applied in a thinner layer. They focus on a consumption of 0.5-1 kg/m² and a layer thickness of 0.5 mm - these are average figures.
Universal putty is something average in size fractions. For the top layer of the universal mixture, the consumption will be 0.9-1 kg/m².
When working on drywall, plaster and other materials, the consumption will differ!
Putty or plaster, when leveling the curvature of the walls
The materials needed for this type of leveling differ in composition. The main difference is the use of gypsum compounds to level the surface, which allow you to apply putty (for example, Fugenfüller) according to the technology, following the manufacturer’s instructions on the thickness of the application layer.
Basically, large differences are plastered with Rodband or similar compounds, but if the application layer disappears or less than 5 mm. then you must definitely use materials such as gypsum putties, they are excellent and will not disrupt the technology of plastering the walls.
The installation of beacons makes it very easy to level the walls. Beacons are installed strictly vertically and secured with gypsum mixture. Horizontal alignment occurs similarly. Here you also need a rule. By performing this procedure, you can achieve perfect leveling of the surface; the quality of the work is checked by a level. Read more about plastering for lighthouses. Most often, it is carried out in rooms where the initial leveling of the surface of walls that have a lot of shortcomings is carried out.
The main difference, how to figure it out for a beginner
Before starting interior decoration, you need to find out what putty and plaster are, what the difference is and the specifics of their use. Both of these mixtures are used for finishing work. The main purpose of this process, from the point of view of interior decoration, is to level the ceiling, walls and corners. In exterior finishing, such manipulations are needed to create an additional layer when insulating walls. Separately, decorative plaster can be used to decorate surfaces.
Beginners should remember the main differences between these materials:
- Putty is used to correct minor surface defects (small cracks, gouges, seams), and plaster is used to level the entire area of the walls or ceiling.
- Putty shrinks less. The layer of plaster application can reach 30 mm, and in cases of additional strengthening of the walls - 70 mm. The putty is applied in a thin layer, no more than 3 mm.
- The surface after puttying is smooth, and after plastering it is rough.
Features when performing wall puttying
- It is important to check the readiness of the material by the consistency of the composition; the mixture should not flow from the spatula or form lumps.
- Apply the putty to the general surface using a large spatula. To avoid transitions and bumps, it is better to overlap.
- It is necessary to mix the putty in small portions to prevent it from drying out.
- Unsightly stripes from a spatula can be covered with finishing acrylic putty, the main thing is that they are shallow.
- To form even corners, you need to use a special tool for puttying walls - an angle spatula.
- The thickness of the finishing layer can vary from 1 to 2 mm. depending on the initial condition of the walls.
- It takes about 12 hours for each layer of putty to dry; in a more humid room, the time increases.
- After the preliminary layers of putty have completely dried, final sanding is performed with special sandpaper or a sanding machine.
- To achieve an ideal result, it is necessary to prime the walls after each layer of putty.
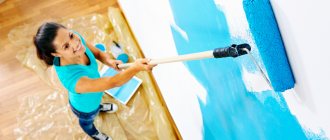
- The technology of puttying walls for painting is carried out in several stages, the putty is applied two or three times, after complete drying the surface is rubbed with sandpaper.
It is important to be careful, because the paint will not hide even the smallest unevenness and after it dries, all the “jambs” will be visible to you. It is imperative to follow strict ceiling painting technology.
Conclusions and wishes
The procedure for puttingtying different surfaces is complete, now you know what tools and materials will help you in this difficult task. Take care of your health and follow all safety rules when performing construction work.
Let the repair work be within your reach and your pocket. The website Made Repair will help with this.
Types of putties
There are many types of putty available on the market. She may be:
- dry;
- ready.
The cost of the finished product is higher, but in this case better quality is ensured. The mixture consists of gypsum and polymers, which make the material waterproof, durable and elastic.
When choosing a material, you need to pay attention to the type of room in which it will be used. For example, cement putty can be used not only in dry, but also in damp rooms. It is suitable for living rooms and bathrooms.
By purchasing more expensive and high-quality material, you get not only high-quality wall treatment. In this case, when renovating a country house, you will not need to re-treat the walls. It is safe to say that expensive mixtures are ultimately more economical than cheap options.
It is recommended to carefully select the material for the construction and repair of walls in the cottage, and beware of counterfeits, which are often found in the markets. To insure against such a problem, it is better to shop at branded construction stores.
To buy a good putty, you need to look at the exact release time indicated on the packaging. If you see the same time, then you can conclude that this is a counterfeit product. You shouldn't buy it.
Video description
Useful video about finishing putty:
If you know how to properly putty a wall with a finishing coat, you can achieve perfect smoothness. Special finishing mixtures are used: only they can eliminate scratches and gaps.
Since the wall has already been pre-prepared, the finishing coating will coincide with the main one. Therefore, a thin layer of the mixture is sufficient. However, before finishing, you need to make sure that the previous layers are applied correctly. The finish will not save you from remaining bumps or cracks. It is necessary to provide good lighting to see all small irregularities.