Videos about puttying
What do you see in the videos?
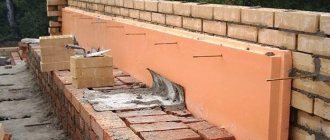
A person wielding two spatulas of different sizes scoops up putty from a bucket and spreads it on the wall in an even layer. From time to time, with a quick movement, he collects the putty from the plane of the large spatula with a small spatula and, barely perceptible to the eye, deftly, like a magician, returns it back. Next, you see all the same movements, and after some time, the wall becomes white and clean, covered with an even layer of putty. At first glance, everything is very simple, and most importantly fast. You can try to do the same. To start, for example, buy two spatulas, a bucket and putty. Let's say that you have a wall, a mixer, and you have a whole bucket of putty. You have started work. I guarantee that in half an hour you will be waist-deep in putty. And it won’t be easy to determine where the layer of putty is smoother, on your body or on the wall. The recently purchased spatulas will grow together with the hands, forming a single element of the “Woman with an Oar” statue. Well, or some other statue. Look in the mirror and decide for yourself.
I have already written before about the main mistakes when putting putty. If you haven't read it, I recommend reading about it first. Now I will write about the basic principles that you need to know. Once you understand them, you can experiment and train your vision and skill. It is up to you to follow them or retreat, inventing new ones. Over time, you will succeed. It is possible that you will add something new and original.
Putty walls for painting
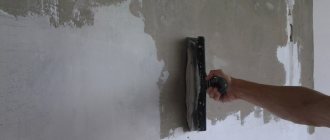
Cleaning walls with a float
More careful and careful work lies ahead here.
After all, the most important task when plastering walls for painting is that it is necessary to create a perfectly smooth and beautiful surface, without any flaws. Applying the finishing putty is an important step. If you make any mistakes, you can use water-based paint - it can hide some defects
But if you choose enamel for yourself, then you should try to create the perfect surface. This means only one thing - before painting you should carefully prepare the wall, that is, carefully and well putty the wall. And if the need arises, then apply a large number of layers, the main thing here is not to be lazy and not think that the paint will be able to hide the defects, because this may not happen and in the end all the flaws will come out.
The technique for applying putty is almost the same as preparing walls for wallpapering. The only thing that should be changed is the maximum length of the spatula - it should not be more than sixty centimeters. As for sandpaper, in this case you should take no more than P120, and it is best to choose P150. You will need to sand under a lamp, that is, bring the light bulb directly to the wall itself while sanding. An article on how to sand a wall will help you in this matter. This way you can see all the defects and not make unnecessary movements. Puttying walls with your own hands is not a difficult task, but it requires patience and dexterity.
If you need to partially restore any surface, then you should work only on the area where you want to do it. If the paint is swollen, then remove the paint, use a spatula to spread the crack, prime and putty. But a very important point is that the cracks should first be sanded and glued with sickle tape. All this is necessary so that this problem does not appear again after some time. See the video below for an example of how to putty a ceiling before painting, but this method is also quite suitable for walls. An online calculator will help you find out the amount of putty you will need.
Ceiling putty for painting video
Leveling corners with putty
In order to make an even corner using putty, you need to take a plaster or painting corner profile, which is usually glued before applying the first layer of plaster itself.
But this method may not be the best for further painting. In order to solve this problem, you can use another option - just leave more plaster on the corners, and after drying, sand this material thoroughly with sandpaper. Aligning corners with putty photo.
In principle, this is all you need to know when plastering walls. The most important thing is to understand how to do everything correctly, and, of course, try your hand. If you do everything according to the technology of applying and working with putty, then you can expect excellent results. Below is a video example from the program “World of Repair”
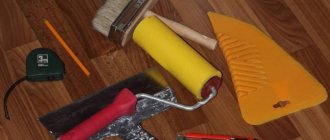
Required Tools
Puttying walls does not require a huge number of expensive professional tools, so this type of repair can be easily carried out independently. Most of the elements are available in every hardware store, and their total cost should not exceed 3,000 rubles.
- To apply the putty directly, you need a set of spatulas - three are enough. The average size - about 20 cm in length - is suitable for small areas around door slopes and window openings. A large fifty-centimeter tool is convenient to use when putting putty on the main surfaces of the walls. The smallest spatula in the set is simply indispensable for hard-to-reach areas and corners.
- A mixture for primer, as well as rollers and brushes for priming walls, because for high-quality preparation of the surface for putty, you cannot do without the above tools. The principle of the relationship between the primer zone and the size of the roller is the same as for spatulas.
- The rule is a special tool like a large metal strip with a grooved structure, thanks to which you can hold on to the protrusion and move the tool along the wall. The rule is used to level the surface when applying a very large layer of putty.
- Sandpaper or sandpaper. It is also better to take a set of two or three different sizes, because here the skins will differ in the degree of corrugation of the surface. Each layer of putty requires its own sandpaper to achieve the smoothest possible wall.
- For convenience, you can buy a sandpaper - a device with a handle into which a piece of sandpaper is inserted. This tool is inexpensive, but it is much more convenient for sanding large surfaces of walls.
- If you purchase a dry putty mixture, it is better to take care of a large container in which you can dilute the putty with water. You don’t have to buy the container specifically from the store—any old, unnecessary jar will do.
We advise you to study - How to choose a washing vacuum cleaner: from theory to practice
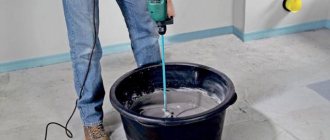
- A drill with a special mixer attachment for stirring dry putty mixture is not included in the minimum set of necessary tools, and it is not cheap. If you don’t have such a device at home, you can rent one. Of course, you can try to mix the putty manually using a stick, but you will have to mix it for a long time, and the result will leave much to be desired. For high-quality application of putty, it must be diluted to a homogeneous creamy mass without lumps.
- A laser level is also an additional convenience that is not included in the inexpensive minimum set. You can either borrow it from your neighbors or buy it for future use, as it will be useful for subsequent repairs. The device is installed in a corner like a beacon, and then the beam shows even minimal unevenness on the surface due to the application of a too thick layer of putty.
Padding
This is the last mandatory stage of preparing walls for putty; without it, reliable adhesion cannot be guaranteed. The composition is applied to the surfaces with a paintbrush (if they are relatively smooth, then you can use a regular roller), avoiding any omissions, drips, uneven application - accumulation of primer on any parts of the wall. In the most difficult to reach places, use a small brush. After completing the work, wait for the layer to dry completely.
The minimum time allowed for drying the layer is 4 hours, but complete drying requires 12 hours. In this case, follow the manufacturer's recommendations; they are usually on the product packaging. After the first layer has dried, priming is repeated. If further work is not planned to be continued on the same day, then the walls must be protected from dust with plastic film.
Surface preparation
The material cannot be applied directly to the surface. It is necessary to do certain step-by-step surface preparation:
- To begin with, the area is cleared. All errors and irregularities are eliminated.
- If there was old material on the walls, it must be removed with water. Wet the walls, wait a while, and easily remove the wallpaper or decor.
- There may be rust stains on the surface; they are treated with a special substance. It will eliminate imperfections so that they do not show through the putty.
- Next, we seal the cracks and recesses.
- Priming occurs after the repaired cracks have completely dried. Prime using a roller and brush. For a kitchen or bathroom, it is better to use waterproofing material.
- After drying, you can level the walls.
Practical advice
Following the recommendations of professionals will greatly speed up the learning process; do not try to invent new techniques. It is only at first that it seems that only you know how to putty correctly, and all the masters have worked poorly before. All students go through such a period, only then do they begin to understand that they still don’t understand anything about work, they need to study for a long time, and all the advice of professionals was correct.
- Movements should be from dry to wet areas. What does it mean? The first pass of the tool is always done on a dry wall, then from dry to wet. Puttying begins on a new area, and then the tool moves to the already leveled one. The distance between sections depends on several factors: the evenness of the wall surface, the amount of material on the spatula, the angle of inclination and, most importantly, on your professional skills. The technology from dry to wet makes it possible to increase the reliability of adhesion of fresh material to the existing one on the wall, and to more flexibly regulate its consumption. Do not apply putty directly to the ceiling. Step back 30–40 cm from it, make the first passes, and then begin to process the area directly at the ceiling.
- When working, use side light and mount a long LED lamp on the wall. Even light reveals all problem areas, they are clearly visible. Now you have the opportunity not only to see the defect in a timely manner, but also to correct it before the mass hardens - you won’t have to spend a long time rubbing the wall with sandpaper. Most often, beginners allow a ribbed mark to form on the wall. The reason is uncertain movements and too thick putty. The tool must move quickly; in this mode, it does not jump on small irregularities, but smoothes them out.
- The corner should always be puttied away from it, and not end-to-end. What is this connected with? The side edge of the spatula touches an uneven perpendicular surface and steps appear on fresh strokes. The correct direction is from the corner of the wall to the leveled plane.
- Always leave 2-3 cm from the floor: the mass on the spatula catches the debris and stretches it along the wall. Deep marks are sure to remain, and then they need to be smoothed out.
- For final cleaning, make a homemade pad on foam rubber with Velcro. It is very convenient to work with her.
As you can see, at first glance it is not difficult to putty, but this is a deeply erroneous impression; it is not for nothing that high-class craftsmen are worth their weight in gold. Study, don’t despair, master a new profession.
Calculation of the required material
material consumption is usually indicated by the manufacturer on the packaging:
When calculating the amount of material, it is necessary to measure the length and height of each plane, then calculate the area and sum all the values. The calculations are completed by subtracting the areas of door and window openings.
Let's get acquainted with the nuances of the calculation using a specific example. We need to putty two walls 3 and 4 meters long with a room height of 2.8 meters. The enclosing structures have two windows with a total area of 3 m2 and doors with an area of 1.7 m2.
First, we calculate the total surface area - (3+4)*2.8=19.6 m2;
We subtract the area of the holes from the total value - 19.6-3-1.7 = 14.9 m2.
Now we calculate the required amount of putty for these walls:
Putty is sold in bags of 20 kilograms, but the mixture is taken with some reserve. The remaining material is stored in a dry, ventilated area.
Removing whitewash from the ceiling
Not only the walls need high-quality treatment, so the preparation of the ceiling is also necessary.
- The surface is moistened with water using a roller or spray. Before the liquid evaporates, the ceiling is cleaned with a scraper.
- If water-based paint was used, then instead of water, prepare a solution of laundry soap and soda (1/2 piece plus 5 teaspoons per bucket of water). In this case, wait until the paint gets wet, then scrape it off with a spatula.
Another interesting way is to use a paste made from flour. This “jelly” is spread on the ceiling with a roller, then wait until it dries. The whitewash and paste are cleaned off with the same scraper.
How to properly apply the starting and finishing composition with your own hands
Wall putty is carried out in 2 stages. First, rough material is used, and only then finishing material is used.
For starting putty, coarse repair material is used. Usually 2 layers of this mixture are applied. After the first layer has dried, you can treat the wall with the second. The thickness of the layer is about 1.5 cm.
To achieve maximum surface quality, a special mesh is installed on the wall. And you can spread the putty mixture on top of it. This must be done as evenly as possible, distributing or removing excess material. The putty should be applied in a continuous layer, close to each other.
The thicker the gauze mesh, the more firmly the putty will adhere to the walls. And the longer it will serve you.
The finishing putty follows the rough or lighthouse putty. For this purpose, special “finishing” mixtures are used. They make the wall surface as smooth as possible.
With the help of such material, all defects and, above all, pores and cracks can be eliminated. But its plane must exactly coincide with the previously prepared surface. Therefore, it must be applied in small layers. However, it is worth considering that if the preparation of the wall for puttying was done incorrectly or carelessly, there can be no talk of concealing defects.
We advise you to study - Which ceiling is better, suspended or suspended - practical advice on choosing
Puttying corners is especially difficult. But this process can be simplified as follows:
- Apply the mixture with a spatula to the outer corner, along its entire length.
- Place a metal corner on the putty mixture. By the way, do not forget to purchase it before starting work, so as not to waste precious time later.
- Press the tool and remove excess mortar along the entire length of the corner.
This process of plastering the walls before wallpapering it is universal. But there are some nuances associated with the type of wall surface. Or rather, with the material from which it is made.
Applying putty to concrete
Concrete in its properties is not much different from brick. But in this case, it is better to choose a primer with a quartz additive, and then the wall surface will acquire some roughness. And this will greatly facilitate the process of wallpapering.
The entire puttying process takes place in several stages:
- Fill cracks and shallow holes.
- Allow the primary layer to dry. This process takes approximately 24 hours.
- Clean the surface and remove dust. Prime the wall.
During such work, you can determine how much finishing material will be needed to complete the putty. The best option is to apply 2 layers.
The material is placed on a large spatula very simply using a small tool. After this, it is applied to the wall in one approach using sweeping, cross-shaped movements with medium pressure.
Applying putty to drywall
For all work to be successful, you must follow these rules:
- Before puttying, several layers of primer must be applied to the plasterboard wall.
- It is not necessary to use starting solutions - you can only use finishing solutions.
- All self-tapping screw heads must be immersed in the drywall as deeply as possible so that they do not interfere.
- Painting mesh is used only when processing joints.
- The prepared surface is thoroughly rubbed and primed after applying the last layer of finishing putty solution.
As you can see, everything ingenious is simple, and it’s quite possible to putty the walls for further wallpapering yourself. Even if such work will be performed for the first time, there is no need to be afraid of difficulties. All that is required, besides materials and tools for repairs, is patience, a sufficient amount of free time and strict adherence to the above instructions.
Technology for applying putty to walls
Once the surface is properly prepared, you can begin to apply and level the putty.
Starting surface putty
The compositions in question are diluted with water according to the manufacturer's instructions. This applies only to dry mixtures; polymer solutions are already ready for use; you just need to open the bucket and mix the material thoroughly. Each user should remember that the putty hardens quickly (about 20-25 minutes), so prepare the amount of paste required for the job.
The finished putty should be applied to a pre-primed dry base. Let's get acquainted with the technology of applying putty to walls:
If there are significant differences in height on the wall, pour the solution into the holes; when it hardens, we go over the putty with coarse sandpaper until a smooth surface is formed. After this, we proceed to leveling the remaining part of the wall.
Light wall putty
When using beacons, the master can perfectly level the walls before applying the finishing mortar. Beacons are smooth metal or wooden products that are installed in a vertical position on a level so that they form a single plane.
Let's look at the sequence of work for plastering walls using beacons:
This method of wall decoration has not yet found widespread use. The main reason for this is considered to be the increased consumption of the mixture and the additional costs of purchasing beacons.
Which putty to choose for walls under wallpaper: polymer, cement, gypsum
Construction and hardware stores offer a large selection of different putties. Now we will not delve into brands and brands. Our task is more global: to determine what the difference is between compositions of different types, because they are all finishing.
Polymer putty
This putty contains polymers, which is reflected in the name of the material. The surface dries very quickly and does not crack, which is an excellent property.
Polymers make it possible to combine the features of a cement and gypsum mixture in a material, collecting only positive qualities. And you have to pay for this, so putty for walls under wallpaper has a considerable price.
The composition includes acrylic with latex, which gives a high result of wall treatment
This material does not deteriorate due to temperature changes, it does not shrink, but it has high elasticity. Moisture is also not the enemy of such walls, and the consumption of material is quite moderate.
Cement putty
The cement variety has different properties and qualities than the polymer version. Cement is named as the main material, which guarantees resistance to moisture and aggressive environments.
For such putty, cement grades 500 and 400 are used, and the filler is river sand.
Thanks to cement, the surface becomes perfectly durable
But this material shrinks. Sometimes cracks appear. It’s better to wait and not rush into wallpapering; besides, the walls will still take a long time to dry.
Gypsum putty
The third option is gypsum finishing putty. This variety is only suitable for treating dry, heated rooms.
Gypsum is an environmentally friendly material and does not cause allergies.
High air permeability is considered a good quality; mold does not threaten such walls - it is a natural antiseptic.
Related article:
How to choose putty
The most difficult thing at the first stage is deciding what to putty on the walls with. Building materials differ in components:
Each variety has its own characteristics, pros and cons. Gypsum mixtures are usually chosen for reasons of economy: the cost of the compositions is lower compared to other types. Gypsum putty does not shrink and is perfectly leveled. There is also a drawback: putty is negatively affected by moisture, so it is better not to use gypsum mixtures in the kitchen, bathroom or other rooms with high humidity levels. Cement putties do not have this disadvantage. They can be used in any room. But you need to be prepared for shrinkage.
Polymer putties are the most preferred material to prepare the surface for further finishing. They are not afraid of humidity, they do not shrink. After applying the putty, the surface is completely ready for further finishing. However, polymer mixtures are much more expensive.
Another method of classifying putties is based on the purpose of the mixture. All compositions are divided into three groups:
All starting coatings have similar characteristics. They are characterized by high strength and large grain size. Apply after plastering in a thick layer of 3-20 mm. The finishing coating, on the contrary, is applied to the wall in a thin layer of up to 4 mm. Using the finishing mixture, you can hide minor defects in the wall. However, the main disadvantage of decorative putty is its low strength.
If you need a product that combines the properties of both decorative and finishing mixtures, then it is better to choose a universal putty. They are a little more expensive, but they are durable and have a perfectly smooth coating. It is recommended to use universal putties for those walls where there are no large flaws.
Regardless of the purpose of the composition, the putty can be dry and already diluted. It is better to choose dry if you need to store the composition for a long time. In addition, dry putty allows you to save money: it costs less than ready-made putty. If you purchased a liquid mixture, you will not need a special mixer. The putty already has the required consistency. It produces less dust. Ready-made formulations have their drawbacks:
Source
Wall putty technique
You can learn how to putty walls correctly without any problems. The work consists of applying first the starting and then the finishing layer. We dilute the mixture to a homogeneous consistency. It is better to apply putty on the wall with a large spatula.
Starting putty
Irregularities on the surface larger than 3 mm are sealed with starting putty. This is a coarse-grained mixture, the purpose of which is mainly rough processing. The result is a smooth but porous surface.
Scheme for aligning plasterboard wall seams
First, using a level, we check how smooth the walls are. If there are no problems in this regard, then apply the solution in broad strokes, pressing the spatula all the time at one angle relative to the wall (adjusting the putty layer). If the spatula is strongly inclined towards the wall, the layer will be thick. If the angle is larger (60-750), then it will be possible to apply a layer of up to 1 mm.
In areas with significant unevenness (depressions, humps), the putty must be applied in a large layer, leveling the surface using trowels. We continue this way until we achieve a flat surface. When the starting layer has hardened, we sand the wall, removing splashes, sagging, and traces of tools.
Using reinforcing mesh
If there are large differences in surface level, you can install a mesh; with its help, leveling the walls is much easier. The base is reliable and strong. In addition, the risk of cracks is reduced.
We fix the mesh using glue, which we apply with a brush or roller. We press the mesh against the wall and coat it with glue on top. We give it time to dry and begin to putty. You can also secure the sickle by pressing it against the wet putty applied to the wall. Then we level it and strengthen it on top with another layer.
During puttying, special attention is paid to processing internal and external corners. We carry out this work using an angular spatula.
On the outer corners we use special perforated overlays, which are embedded in a layer of putty. When it dries, we process the joints, apply the solution to the sides of the corners, level it with an angle tool, without leaving a groove. In this case, we pay attention to controlling the plane level. Remove excess mixture.
We advise you to study - What are the types of double-glazed windows for plastic windows?
Reinforced mesh
Aligning the first layer
After the starting layer is ready and dry (the drying time is indicated on the packaging), we sand the surface with sandpaper, removing small imperfections (stripes and bumps). Sweep away the dust after sanding with a broom.
Applying finishing putty
This is the final stage of preparation before decorative finishing. On clean walls we apply a primer, and then a thin, no more than a few millimeters, layer of putty mixture. At this stage, fine-grained products are used that can hide microcracks and the slightest defects. Everything is done very carefully. The putty is carefully leveled to ensure a perfectly flat surface.
The applied layer must be dry. Then the surface is rubbed with fine sandpaper, using a good lightening agent. The work can be considered completed.
But the requirements for the surface that we prepare for painting are much higher. The paint does not hide defects at all, so you will have to bring the surface to perfect condition by applying several thin layers of putty.
A few secrets of finishing putty:
- Apply the solution in a thin layer (1-2 mm) from top to bottom, pressing the spatula against the wall at an angle of 20°. If the layer is too thick (more than 5 mm), it may crumble after drying.
- Each time you apply the mixture to the instrument, you must wipe it with a damp sponge, removing any dried residue.
- The finishing putty must be given time (36 - 48 hours) to dry thoroughly and only then can it be sanded.
- Irregularities left by the tool and stripes left by a spatula on the joints can be easily removed with sandpaper, so they do not need to be re-sealed with another layer of the mixture.
Puttying walls, although a rather labor-intensive process, is not technically difficult. Everyone can do this work on their own, the main thing is desire.
Procedure for applying putty
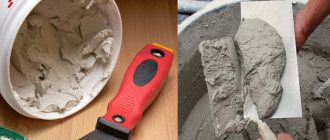
The first step in wall putty is preparing the mixture. If you use dry putty, you will need a container of sufficient size to mix the composition. A small amount of water is poured there and powder is added. First, you can mix the mixture with a regular spatula. But to get rid of lumps, you still need a drill with an attachment. It is necessary to knead the putty until it has a homogeneous consistency. The main sign of the mixture’s readiness is elasticity and thickness. Properly prepared putty sticks to the nozzle and spatula.
Types of putties
Today, the shelves of hardware stores are overflowing with putty mixtures. The first step is to decide which one you need. After all, each of them has its own pros and cons. First you need to start from the room that will be puttied.
| Name of putty | Characteristic |
| Cement | Moisture resistant. Therefore, it is used to level ceilings in rooms with high humidity: kitchen, bathroom, balcony. After drying it becomes white. Used for painting walls. This type has adhesion to reinforced concrete floors. Not afraid of temperature changes. The material is applied using a spatula. Apply up to three layers. The thickness of one layer does not exceed 0.7 mm. This figure is less than when plastering walls. It is sold in dry form; you need to mix the solution yourself. The prepared solution can be kept in the open air for more than three hours. It has one drawback - it is not elastic. |
| Plaster | It is used to treat ceilings or walls. Has environmental and safe characteristics. There is no vapor barrier foam. Apply in one layer, 60 mm thick. It can be purchased ready-made and does not require additional interventions. Universal, suitable for drywall and wood. Thanks to the fine grain, the surface is smooth, which can be painted or decorated with finishing. The universal type is used more often for apartment renovations and for painting walls. It is not moisture resistant, so it is not recommended to putty in rooms such as the bathroom or kitchen. Even a beginner can handle this material. |
| Polymer | This species contains polymeric substances. Latex and acrylic are polymer putties. They are universal. Moisture-resistant, suitable for any room or space. They are not afraid of temperature changes. It is characterized by plasticity and lack of odor. Produced in finished and dry form. High cost price. Long shelf life. Instructions, method of use, concentration, proportions are indicated on the package. To work, you need a special tool - a power tool and a mixer attachment. With this type, it is possible to putty walls for painting with your own hands; you can see the steps below. |
Craftsmen prefer polymer putties. They are easy to work with and this type is suitable for any room. You can watch how to putty walls with your own hands for wallpaper and for painting in a training video.
DIY wall putty
Types of putties based on materials of manufacture
Industrial companies use various components to produce mixtures; their composition has a great influence on physical characteristics and cost.
| Type of putty | Manufacturing materials and brief technical specifications |
| Traditional material is distinguished by the highest physical strength and resistance to moisture. It has a low cost and is recommended for use under heavy finishing wall coverings, including natural stone tiles. Can be start or finish. |
| Most often used as a finish for painting or wallpapering. In all operational characteristics it is much inferior to cement: it absorbs moisture and has very low strength parameters. Often used when sealing joints between plasterboard boards. |
| A more modern material, it has increased adhesion rates with wall finishing materials based on wood, chipboard, fiberboard, OSB, etc. It is characterized by high ductility, which allows it to well compensate for minor fluctuations in the linear dimensions of surfaces without the formation of cracks. |
| The most modern and most expensive. The main advantage is high technology. It is easy for builders to work with, it stretches well, does not harden for a relatively long time, which allows you to accurately follow the application technology. |
Prices for popular types of putty
Putties
Wall finishing with putty
A friend was interested in how to putty walls with his own hands to create a minimum of transitions. Specialists use professional tools. A 600 mm spatula will leave fewer grooves. But you need to know how to use it. The friend tried to press the blade against the wall with his free hand. As a result, zigzags began, and it turned out even worse.
I gave him some tips on how to putty correctly.
- The tool must be clean. It needs to be washed constantly.
- The composition is applied to the middle of the spatula in larger quantities, then less is squeezed out along the edges.
- The less mortar remains on the spatula, the more the tool tilts towards the wall.
- The remaining transitions are immediately smoothed out.
- To create a glossy surface, you can use a regular tool, depending on the composition, and keep sanding to a minimum.
- A special profile helps make the corners even.
After that, I noticed another mistake that my friend made. He finished applying the composition to the next area and when he was cleaning the instrument, he wanted to throw the remainder into the solution. This should not be done, especially if the putty is gypsum based.
The particles formed a film upon contact with air and became harder than the rest of the mixture. They will no longer dissolve, and the composition will not be homogeneous.
What are they and when to use them
Putty is the preparation of surfaces for final finishing. With its help, they ensure that the wall is (or looks) perfectly flat. It is applied to relatively flat surfaces. If you need to level the walls and make the corners 90°, do this with plaster or drywall. Putty is not intended for this.
An example of applying putty to a wall
Like plasters, putties consist of a binder, filler and additives that give them special properties. They are distinguished from plasters by the use of aggregates - sand - fine fractions. Two types of binders are used - cement or gypsum, sometimes lime and polymer additives are added to them. Accordingly, there are gypsum and cement putties.
There are also polymer putties - acrylic and latex. They are created on the basis of synthetic substances, the properties of which vary depending on the additives. They are not natural, but have a longer service life and can withstand a greater number of freezing/defrosting cycles. For facade work it is better to choose them. Indoors, they are not the best choice, as they have low vapor permeability, which can cause damp walls, the appearance of fungus and mold. They are convenient because they can be used on wooden and metal surfaces.
Brief description of the properties of polymer plasters
According to the type of application, all putties are divided into two types: starting and finishing. The starting ones use larger grains of sand - 0.3-0.8 mm. This results in a slightly rough surface. They are used at the first stage to seal depressions and cracks. In finishing compositions, sand is practically dust with a very fine grain of 0.1-0.3 mm. This allows for a smooth surface.
Cement plasters - scope, advantages and disadvantages
Cement plasters are cheaper than gypsum plasters and can be applied in a thicker layer - some compositions are up to 10 mm. After mixing (mixing with water) they can be used within about 3 hours. The plasticity of the composition is affected by temperature and humidity. Usually it is indicated for +20°C and humidity 60-65%.
Cement plasters are universal. They are used both for finishing inside and outside the building. Moreover, most facade compositions are made on a cement basis, as they can withstand more defrost/freeze cycles and create a more durable surface. They also do better in damp areas. If you need to plaster a bathroom or kitchen, it is better to use a cement-based composition.
Cement plaster can be white or gray
The color of cement plasters can be gray, white and ultra-white. This depends on the type of cement used. White compositions are more expensive, since more expensive brands are used, therefore finishing compositions are often made white.
The disadvantage of cement plasters is the long setting time - several days for complete drying is the norm. Several hours should pass before the next layer is applied. From 2-3 hours with a layer of 1 mm, up to 24 with a thickness of 6 mm. Since it is rarely possible to achieve a smooth surface in one layer - there can be three or more - puttying with cement plasters takes a long time. For this reason, their popularity is quite low.
Gypsum putties, their features
The layer of gypsum putty applied is 0.5-10 mm, depending on the type. They dry much faster, which has a positive effect on the speed of finishing work. On the other hand, the mixed composition must be used within 30-60 minutes, so such putties are mixed in small portions. This is not very convenient. If you are going to putty the walls with your own hands for the first time, start with small batches. Gradually decide how much you can produce at a time. Also keep in mind that the consumption of starting plaster is greater than that of finishing plaster - the thickness of the layer is different and you can’t be mistaken in the volume.
Gypsum plasters without modifying additives are intended for dry rooms. There are also formulations for wet ones, but this must be indicated on the packaging, since they contain hydrophobic additives.
Gypsum plasters are easy to apply
Despite the higher price and short shelf life of the mixed portion, gypsum-based plasters are now more popular. They are more flexible, it is easier to use them to achieve the required surface smoothness, and they are easier for beginners and professionals to work with. If wall putty is still unfamiliar to you, use gypsum compounds.
Why are walls puttyed?
Putty is applied to horizontal and often also to vertical surfaces so that the coating is uniform and free of depressions and protrusions. This is how cosmetic leveling is done, which cannot be achieved, for example, with plaster. The wall will be perfectly smooth and without roughness after sanding, which begins after putty. Such manipulations are performed, among other things, for the subsequent application of decorative plaster, painting, wallpapering, non-woven or single-layer. Usually apply 2 layers of putty and 1 primer. It is not necessary to putty the walls under textured wallpaper, but in the case of tiles the situations are different. Sometimes this cannot be done, under other circumstances it is possible, and sometimes there is a need for at least putty. The walls must be leveled before finishing with a glossy finish, as it highlights minor imperfections.
Types of putties according to putty quality
Taking into account exactly how the finishing coating will be performed and the actual condition of the surfaces, putty can be of two types.
- Starting. It is made from large fractions of sand, in most cases on a cement base. It is used for leveling walls with a difference in flatness of up to one centimeter. The special composition prevents the thick layer of the composition from cracking during drying. Such putties are recommended for wallpapering walls or ceramic tiles. The cost is significantly lower than the finishing price.
Starting putty - Finish. It is made from small fractions, the application thickness cannot exceed five millimeters. Provides the most even surface possible and is used only for painting walls. Can be applied to cement plaster or plasterboards, allowing you to hide the seams between them.
Finishing putty
The choice of putty is influenced by both the listed factors and the preferences and skill of the builders. Experienced builders can achieve ideal surface quality with starting compositions, while inexperienced ones will ruin the wall with finishing compositions.