Columns are increasingly rarely used for their intended purpose to support the vault of a building. Now they are mostly used for decorative purposes. Drywall columns began to appear in modern apartments and private houses. They serve as a decorative element, but sometimes their main purpose is not even that. What are they doing? And why is drywall used to create them? And how can you even create cylindrical shapes from flat sheets? Let's look at all this in order.
Functional purpose of a decorative column
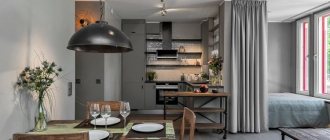
Columns look good in an elegant interior.
We will consider decorative structures, since creating columns from solid stone or concrete does not interest us (installing them in an apartment makes no sense). So why do you need plasterboard columns in an apartment?
- Decorative function is the first thing that comes to mind . It is clear that the design should be used in a spacious apartment, because in a small one-room apartment it will look stupid. However, this design gives the room sophistication and grandeur. If you also decorate it with marbled decorative plaster, the effect will be amazing. It is clear that in this case the entire apartment should be designed in a similar style.
- Concealment of utilities . In a toilet, a half-column can hide sewer pipes. The ventilation duct is well hidden in the kitchen. In some apartments there are layouts in which part of the kitchen is taken away by a garbage disposal pipe. Such horror must be hidden. Heating pipes and electrical wiring may also be hidden.
- In large rooms, the use of columns helps to visually increase the ceiling . This step is justified especially in cases where a multi-level ceiling was used.
- Sometimes plasterboard columns in an apartment are used to zone rooms . But this technique is only suitable for multi-room apartments and cottages, where the premises have a large area.
- Additional functionality. Sometimes niches or shelves are made in the columns for various things. This way the design becomes not only decorative, but also functional. The main thing is that this functionality does not come at the expense of decorativeness. This option is only suitable for rectangular columns.
Why drywall
Drywall is well suited for creating various decorative elements. Of course, other materials can be used to create a column, but they are not as practical and cheap as gypsum plasterboard. Moreover, there is no doubt about the environmental friendliness of the building material, which consists of 99% gypsum and cardboard.
The beauty of the column appears only after finishing
The big advantage of drywall is its lightness. As a result, the finished structure will also be light and durable. The created loads on the floor slab will be minimal. It is very convenient not only to work with gypsum board, but also to give it various shapes. Therefore, with its help, not only rectangular, but also round columns can be beautiful.
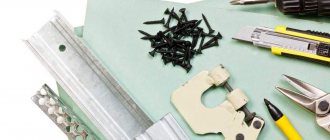
Drywall is a very clean material, and after working with it there is very little dirt left behind. To create a plasterboard column, you may need the following tools and fasteners:
- any drywall;
- wallpaper knife or hacksaw for plasterboard;
- drill and screwdriver;
- screws and dowels;
- grinder or metal scissors
- metal profiles;
- plumbs and levels;
- spatulas, rollers and primer with putty.
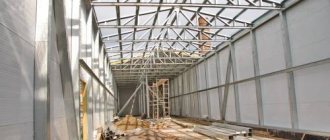
Installation of a rectangular column frame
There are two options for the column: with a rectangular and circular section at the base. The rectangular design option is simpler. Of course, a rectangular column is not as beautiful and elegant as a round one, but anyone can handle its assembly, even those who have never dealt with drywall before.
A rectangular column is rarely made because of its simple appearance.
The first step is to choose a place and mark it. A rectangle is drawn on the ceiling, and then using a level, all the lines are transferred to the floor. If you have a laser level, you can start marking from the floor and then transfer it to the ceiling.
The lines should indicate the internal or external contours of the profile, but not its middle. The thickness of the profile and gypsum board can play an important role in the final appearance of the structure. Therefore, these parameters should definitely be taken into account before making a plasterboard column.
The guide profile is cut to size and attached with dowels along the contour to the floor and ceiling. Using a square, you can easily check the correctness of the markings and installation of the base profiles. At least two dowels must be used to secure each profile. If the profile length is less than 60, then two dowels will be enough.
The rack profile is cut to the height of the room and the vertical ribs of the structure (racks) are made from it. You will need at least 4 of them. If the width of the column wall does not exceed 60 cm (and it should be smaller), then the rack profile is installed in the corners. A water level will help you level the rack profile. The rack and guide profiles are fastened with a cutter. In its absence, metal screws will do.
Horizontal jumpers are installed between the vertical posts at 60 cm intervals. To do this, the long profile is cut so that the short profile can fit into it. Additional stiffening ribs will add stability to the entire structure.
If the column hides water pipes, then you need to use soundproofing material, and then cover everything with plasterboard. When constructing a plasterboard column, you can cut the gypsum board in advance or do it locally, whichever is more convenient for you.
How to make a pill box with your own hands. 13 mobile tablet holders for medicines and vitamins
Not only seriously ill elderly people take various types of drugs. Many representatives of the younger generation take all kinds of vitamins, dietary supplements and medications in their system. Today we want to talk about such a useful accessory as a pill box or container for pills. Tablet boxes are designed for compact and organized storage of medicines or vitamins. They are made from safe, easy-to-clean plastic and are mostly comfortable and easy to use. A huge advantage of tablet holders is that they can easily fit and be carried in the smallest bags. In addition, they help you keep track of your intake schedule, and there are even containers with sound signals. We have selected several options from the simplest to the original.
Case with timer.
Designed for weekly consumption and divided into 4 doses during the day. It is possible to set four repeating timers.
Collapsible container.
Compact box with seven compartments for tablets. When you recover, you can keep the trinkets dear to your heart.
Round compact case.
Seven compartments, swivel mechanism.
Case for delicious vitamins.
A bright container in the form of a macaroon dessert.
Universal tablet holder.
Equipped with a cutter for preparing powder, a compartment for pills and a glass for water.
Box with two compartments and cutter.
Portable mini kit.
Divided into four weeks, seven days and four tablets with the ability to separate parts. Each week is highlighted in a different color.
Tablet box for the visually impaired.
People with low vision will be able to take tablets according to the scheme, since the inscriptions are in Braille.
Medicinal chest of drawers.
Allows you to sort medications by day of the week and time of day.
Creating a frame for a round and semicircular column
The work begins with marking the floor and ceiling, but first you will need a compass. You can screw a self-tapping screw into the center of the future circle and pull a thread from it, at the other end of which there will be a pencil. This is how a circle is drawn. You can also make a compass from the profile. In this case, a self-tapping screw will be screwed into one place of the profile so that it rotates, and a pencil will be placed at the other end. As an option, a pattern is made, and then two identical circles are drawn.
Top view of a semicircular column
In any case, it is necessary to mark the center of the circle on the ceiling, and then transfer the mark to the floor using a plumb line. Next, two circles are drawn. This will be the inner diameter of the column along which the profile will be laid out, and then the drywall will be attached. Before making a column from plasterboard, all this must be taken into account so that the structure does not turn out to be too bulky.
You can make two circles on each surface, and install a trimmed profile between them. In this case, the work will be more accurate.
The profile must be trimmed in increments of 5-7 cm so that it bends in an arc. To do this, the guide is cut crosswise so that only one side remains untouched, the one along which the bend will be made. Now the bending profile is applied to the surface and bent around the circumference. It must be attached to both bases with dowels in increments of 5-7 cm for greater reliability. After this, you can insert a vertical profile (it can also be a guide).
The frame for a round column is made in the same way.
The vertical profile is inserted sideways into the middle of two guides. For the best effect, it needs to be inserted into each section of the cut profile (you can do it through one). This may seem expensive, but then the column will have a round shape without flaws. The smaller the radius of the column, the closer the racks need to be installed to each other. It is clear that horizontal jumpers are not required.
It is best to fasten the profile together using a cutter
Radial plasterboard columns can stand apart from the wall, or they can rest against one or even two walls (in the corner). The last option is rational for hiding sewer pipes. If a semicircular structure is being made, then vertical lines are drawn on the adjacent wall, and then vertical guides are screwed along them. Otherwise, the process is no different from that described above.
How to make an oscillator with your own hands. Advantages of spinners (spinning spoons)
Oscillating baits are a metal body with a winding ring on one side and a hook on the other. To prevent the line from twisting and tangling during casting, the spinner is used together with swivels.
The advantages of oscillators include:
- the ability to use different types of wiring;
- penetration of oscillating baits into seaweed and other hard-to-reach areas;
- Possibility of use for catching pike, perch and other types of predator;
- Possibility of use on the surface and at depth of water;
- good flight properties.
- Easy to use.
- There are many varieties of spoons from which you can choose bait for any body of water.
- Spoons are catchy and work better than many baits.
- You can easily make spinners for pike and perch with your own hands.
Gallery: catchable lure for pike (25 photos)
TOP 10 best
It is not easy to choose a bait for catching predators from the large variety on offer. To help you choose, we offer you, according to reviews from many anglers, the 10 best models:
- The Russian-made Atom spinner has a “wet stone” color, which pike readily bite on. It became popular among fishermen back in Soviet times. Today, oscillating spoons have a texture that imitates scales, coloring like a real fish, and fin-like additions.
- The “Spoon” spinner was so named due to the fact that it looks like a cutlery – a spoon. It attracts the predator with its non-standard diving movement, which it makes after three or four oscillations during the retrieve.
- Blue Fox Esox is distinguished by its wide flattened shape, high-quality expensive coating and bright color. All this makes the bait catchy.
- Mepps Syclops is a good spoon bait with excellent quality that neither pike nor perch can bite through. It has a unique body, due to which during wiring it is very similar to a live fish. May have copper, silver, gold or bright colors.
- The Daiwa "Crusader" is a Japanese-made oscillating lure. They have an elongated body, a variety of classic colors and a wide range of sizes. The model was originally intended for catching salmon species, but it turned out that perch and pike are also readily caught with it.
- DAM EFFZETT TWIN is a very durable and reliable spinner. This is explained by the design, which consists of two vibrators and additional hooks. Pike are attracted by the unusual sound that the bait makes when interacting with water.
- Kuusamo Rasanen - a model made in Finland and very popular due to its ability to pass by snags and through algae without clinging to them. Pike and perch are attracted by its leisurely, smooth maneuvers. The bait performs well in reservoirs with weak currents and in standing water. Excellent results can be obtained with uniform wiring.
- Williams Vabler is a vibrating machine from a Canadian manufacturer. With its help, you can successfully catch a predator while retrieving at any speed. In this case, it is only necessary to maintain a smooth and stable ride. Works great in reservoirs with high currents and in standing water due to the existing special rib. Excellent for surface fishing for pike and perch.
- Kuusamo Professor - an oscillating spoon from a Finnish manufacturer has many models. These can be large but light baits that play equally well at different speeds. The company also produces special models for spinning fishing and for hunting in heavily overgrown reservoirs. The color of Kuusamo Professor spoons is the most varied, which allows you to choose a bait for any body of water.
- Abu Garsia Tobi are distinguished by a special bend of the petal and a unique shape, which allows the vibrating spoon to be used in reservoirs with a current or in lakes with standing water. You can choose it for any conditions, since Abu Garsia Tobi spoons have a varied range of colors and a wide weight range. You can successfully use a spinner to catch a small or medium-sized predator hiding in algae thickets or among snags. Due to its parameters, it is not suitable for hunting large fish.
Sheathing with plasterboard
Using ordinary putty, the column is leveled to the most round shape
. There are no problems with the cladding of a rectangular structure, because it is quite standard, as if the gypsum board is attached to a wall made of profiles. However, you will have to tinker with the round column. The problem is that the flat drywall needs to be bent somehow. Let's look at the most popular ways to solve this problem.
We use arched plasterboard . It is very thin and bends easily. The bending flexibility of this building material could make it ideal for use in creating a plasterboard column. However, it is somewhat more expensive than conventional gypsum board and is very fragile (sheet thickness 6.5 mm). Such a sheet is brought to the column and one edge is secured with self-tapping screws along the entire height. Then, along its entire height, it is attached to the second rack, then to the third, and so on. In the process of such fastening, the arched drywall will bend, taking the desired shape.
We use the wet method . For this method, ordinary drywall is taken, which is pierced to the middle on one side with a needle roller. Then it is moistened to become pliable and placed on a specially created form. The sheet is pressed, left to dry, and then simply attached to the frame. By this time, he will already have the necessary form.
The problem with this method is that you can give too little or too much water during hydration. You need two people to bend the sheet, and you will need to build a special device for this.
Dry fold . With this method, the back side of the drywall is milled so that it can be bent without fear of breaking. Grooves 2/3 of the thickness are made in a V-shape or U-shape. The smaller the radius of the column, the closer the grooves should be to each other. Then such plasterboard simply goes around the frame of the column, and it is screwed to it with self-tapping screws.
You can also make cuts along the entire length from the front side to later break the drywall. But you don’t need to cut the cardboard that holds the broken piece. This breaks the entire sheet, and then it is very easy for them to go around the frame for a round column.
How to make a site beautiful with your own hands. Reception No. 1. Use ready-made topiary shapes
In another way they are also called sheared. These are plants that experienced gardeners use special techniques and tools to give them bizarre, unnatural shapes. One of the varieties is Japanese nivaki. Designers often use them to add more expressiveness to an area.
True nivaki are grown from Scots or black pine. In nurseries, this takes not just years, but decades. That’s why the price of such trees is rather high - from €5000 to infinity.
— There are craftsmen who have learned to make something similar from juniper and thuja. Due to their rapid growth, achieving the desired shape is much easier. Hence the relatively low price - from 500 rubles. But you will have to take care of them not once a year, like pine trees, but at least three times. Otherwise, they will quickly turn into ordinary bushes. These are Chinese fakes,” Yulia laughs.
In addition to nivaki, she suggests adding karikomi - this is a mountain pine cut in the shape of a living stone. Also a Japanese idea. Outwardly it resembles a green pad.
But you can’t do without ordinary stones - they will perfectly complement the composition. These can be any large breeds that are in harmony with the surrounding space.
— Pieces of slate, which can be used to mulch the soil instead of bark, will also help to enhance the visual effect. They cannot be used in large quantities: they heat up quickly, which is why moisture evaporates from the surface of the earth just as quickly. But as accents this is acceptable.
Another ready-made topiary form is hedges. They are delivered from nurseries in the form of smooth parallelepipeds. All that is required from the owner of the site is to plant such a hedge and enjoy, occasionally maintaining this beauty in the form in which it was once brought.
Trees in the shape of roofs can be considered as a living gazebo. Usually this is an apple or linden tree, whose crown is not voluminous, but flat: it is stretched with special stretchers, due to which a kind of canopy is formed from the branches. It creates a pleasant shade, so feel free to install garden furniture under the tree and enjoy a slight coolness in hot weather.
The last pruned plant we'll talk about are espalier trees. They look like a high wall, in the center of which the trunk is clearly visible, and the branches diverging in different directions are somewhat reminiscent of the skeleton of a fish.
— Trellis are perfect for zoning a site and for hiding some unsightly things — a neighbor’s fence, for example.
Puttying for finishing
For a rectangular plasterboard column, the puttying process is quite standard. The main thing is to pay attention to the corners, which must be protected with a reinforcing plastic corner.
If arched plasterboard was used, then there is almost no work with it. Only joints and screw heads are puttied as standard. This is very good, because it is very difficult to putty rounded shapes. The situation is similar if a gypsum board curved by the wet method was used.
Cardboard after dry folding does not have a very smooth surface, so you will have to apply and smear putty over its surface several times. You will need to achieve a completely rounded shape, which is very difficult. Many at this stage may fall into despair, because a round column does not work out. It will work, but this requires practice and certain skills in working with the solution. If you don’t have them, then it’s better to use arched drywall. as a last resort, you can watch the video on how to putty such structures.