Interior Design
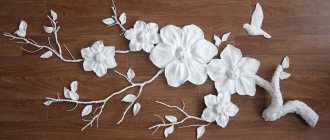
Decorating walls with bas-relief flowers is an excellent opportunity to create a unique design in residential and commercial spaces. This method allows you to completely transform the interior, make it more expressive, emphasize its advantages and hide its shortcomings.
Bas-reliefs in the form of flowers became especially popular. Floral themes are appropriate for decorating bedrooms, children's rooms, and hallways in apartments and country houses. Flowers on the walls are perfect for the interior of beauty salons, design studios, cafes and restaurants. This universal motif can decorate a brick or concrete surface.
BAS-RELIEF COMPOSITIONS GO TO CATALOG
Flowers for walls are made from various materials - from fabric to plastic and natural wood. One of the most common options in modern design is plaster decor. Floral motifs from plaster are made by applying an artistic bas-relief or installing ready-made three-dimensional images made in workshops and studios. Such elements are highly decorative and fit perfectly into interiors in modern and classic styles.
What it is?
Botanical bas-relief is a type of man-made art, the essence of which is to obtain three-dimensional impressions of plants on a plaster surface. The process occurs as follows: first, a blank is formed from raw clay, into which flowers, leaves or driftwood are pressed, as it were, to form an imprint. At the next stage, the clay mold is filled with gypsum mortar.
It should be mentioned that bas-relief botany involves the use of only natural elements in their natural form. If during the process the master corrected the resulting prints with his fingers or a tool, then his creation can no longer be called a botanical bas-relief. Without being able to transform technology, the artist can, however, create an unusual concept for combining plants. Before starting work, it is necessary not only to form a composition on the plane, but also to decide on the shape of the bas-relief itself.
What style does it suit?
Bas-relief compositions still evoke associations with the classics for some. Yes, this always exists and will be appropriate for art nouveau, modern, and rococo.
Traditional sculptures with smooth, streamlined lines and a huge number of small details and curls are a tradition that has already developed over centuries and cannot be eradicated.
The plot is taken, as a rule, from myths and legends. These can also be ornate ornaments that belong to a certain culture and tradition.
However, in modern times, bas-relief will fit perfectly into minimalism, loft, and hi-tech. The selection of images is simply amazing. So, for minimalism, a panorama of the city or a piece of nature, for example, the edge of a forest or other landscape, is suitable. This could be an abstraction in the form of swirls. For a loft, an imitation of cracked brick, old stone or old finishing would be ideal.
Attention! The subject should be chosen based on the style direction of the interior design. For example, when the “sea” theme dominates, images of corals, shells, fish, and algae are preferred. Bas-relief is in demand for decorating arched structures, doorways, fireplaces
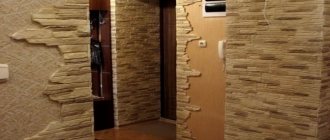
It perfectly helps to place the right accents in the room. And the lighting above the structure will advantageously highlight all the curves of the bas-relief. It is used to mask uneven walls, hide communication lines, and make the space larger or smaller, depending on the final purpose of the decor.
Bas-relief is in demand for decorating arched structures, doorways, and fireplaces. It perfectly helps to place the right accents in the room. And the lighting above the structure will advantageously highlight all the curves of the bas-relief. It is used to mask uneven walls, hide communication lines, and make the space larger or smaller, depending on the final purpose of the decor.
Bas-relief is always appropriate in ethnicity
And it doesn’t matter which country this interior came from. Here you can easily let your imagination run wild: patterns, ornaments, abstraction, etc.
Motives of elegant Italy will be emphasized by grape vines or columns. Oriental flavor – cherry blossoms, dragon. Design in the tradition of mysterious India - images of elephants and deities.
Materials
As already mentioned, to create a botanical bas-relief, in addition to the plants themselves, you will need clay for modeling, plaster for sculpture, a wooden rolling pin and, possibly, tweezers. A loop for hanging the composition on the wall can be easily made from a piece of wire. It is more convenient to create the bas-relief shape using a sliding baking dish.
Bas-relief on the wall
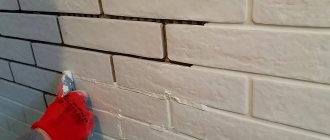
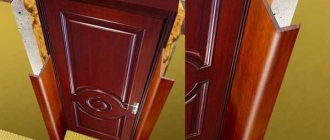
A bas-relief is a convex image on the wall, and the first bas-reliefs were made of alabaster, and on a solid base of stone, brick, and marble. But today, wall decoration in the form of a bas-relief can be found made in a different material and on almost any base, even wood, as well as glass and panels.
A wall bas-relief can be a narrative painting or an abstraction. There are no particularly strict rules for choosing, only the appropriateness of a particular stylization and harmony with the overall theme of the interior. It is unfashionable to limit fantasies today; besides, all types of finishing work and decor are in the hands of the home owners. As for stylistic restraint, modern designers play with styles and images of interiors, and remarkably subtly fit classic paintings and bas-reliefs into industrial and Scandinavian interiors. Amazing compositions of styles do not shock, but only emphasize the humor and taste of the interior owners.
Very practical considerations: under a convex relief and bas-relief painting of any kind, you can easily disguise an indelible defect in the base (unevenness, curvature, shells that have to be “pulled out” with a thick layer of plaster). And also use a wall bas-relief to hide LED lighting, wiring, and utilities under it.
How to do it yourself?
Only step-by-step instructions for creating a botanical bas-relief will allow you to master a not entirely simple manufacturing technique.
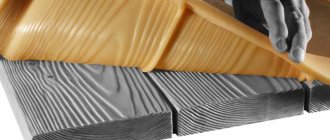
The work begins by rolling out approximately 2.5 kg of clay with a wooden rolling pin. The tool must move both clockwise and counterclockwise. At the end of the first step, a layer should be formed, the thickness of which is approximately 1.5 cm. Fresh flowers are placed on the clay, according to a thoughtful composition. It is important to remember that when creating a print, everything that was on the right will end up on the left side.
Next, holding the flowers, you need to use a rolling pin located in the center to press the botanical elements quite deeply into the clay surface. Once this is done, the flowers can be carefully removed using tweezers.
A springform cake pan, approximately 23 cm in diameter, is pressed into the clay. It is better to coat the edges additionally so that there are no gaps. About 0.5 kg of gypsum is mixed in a separate container with 0.5 liters of water. After stirring the mixture until completely homogeneous, you can pour it into the mold.
After about 10 minutes, a wire loop is immersed in the plaster. When the plaster has hardened, you will need to use a spatula to separate the edges of the clay from the baking dish. Its remains are washed off from the bas-relief using a sponge, after which the surface is cleaned with the hard side of the same tool. The plaster decor will have to dry out over the next week.
Read also: How to make adobe brick with your own hands
Types of bas-relief
When decorating apartments using bas-relief, any casting materials are used, that is, the base that can be poured into a mold and then used as a facing material. Other types of hand-made bas-reliefs are also possible. Most often, bas-reliefs are made from the following materials:
- Construction plaster;
- Decorative plaster;
- Stone;
- Wood;
- Metals;
- Polystyrene.
Classic and solid interiors are decorated with wooden bas-reliefs, matching the tone to the furniture. Laconic and not detailed, slightly abstract patterns will suit any style and will not be out of place even in an interior generously decorated with paintings and photo collages.
To complement the design of an apartment or room without remodeling it, it’s hard to think of anything better than a bas-relief: without bright colors and sharp textures, without special expenses, but only on inspiration - you can decorate walls or ceilings with voluminous bas-relief patterns. Floral patterns and ornaments are a universal theme for decorating a country house. Light ornaments fit perfectly into both spacious and small rooms, do not decorate the interior, without weighing it down. Typically, a botanical theme is used for wall bas-reliefs, less often for ceilings. Just one small bas-relief - and the room changes dramatically.
If you want to change the interior of the kitchen, make it brighter and more original, you can use a bas-relief in the format of a kitchen apron. For spacious rooms and combined studios, architectural stucco bas-reliefs with story lines, shaded with special lighting, are possible.
Beautiful examples
The interior can easily combine botanical bas-reliefs of different shapes and sizes. For example, miniature ovals, medium square structures and large round compositions can be placed on the same wall.
In addition, the finished bas-relief can be painted in any color you like, but it is better to leave the plant elements themselves white. And also we must not forget that the plant combination can be framed. To contrast with white plaster, it is better to use laconic wooden “frames” in natural shades.
To learn how to make a botanical bas-relief with your own hands, see the following video.
Summer is so fleeting that you want to admire every blade of grass! I would like to introduce you to the wonderful technique “Botanical bas-relief”.
Using this technique, you can immortalize your favorite flowers and create an unusual interior decoration.
We will need:
- Clay or sculpture plasticine
- Plaster for sculpture works
- A regular rolling pin for rolling out clay and something small and cylindrical to roll the flowers inside the box (I use a glass bottle of potassium permanganate)
- Fabric or burlap
- Cardboard box (I took a cheese box)
- A small piece of wire for a loop
- Small bouquet
- Water
- Any container for mixing gypsum mortar
- Plastic spoon
- Knitting needle or toothpick
1. Knead the clay and roll it out onto a cloth with a rolling pin. The clay layer should be 5-7 mm, because the box does not have very high sides, but our herbs? small volume.
2. Place the box on the rolled out layer and trim off the excess clay.
3. Place the resulting layer into the box.
4. Arrange your chosen flowers and herbs however you like.
5. Gently roll them, trying not to move them.
6. The stems should be well immersed in the clay.
7. You can additionally walk along the edge of the sheet with a stack or a knitting needle, then the print will be clearer.
8. Then carefully pick up and pull out the plants. We try to preserve the resulting prints as much as possible.
9. The softer the chosen plant, the more delicate the print. If the plant has dense leaves, the print will be more embossed and graphic.
10. Very important point? put a mark on the outside of the box if you need a loop. Otherwise, after we pour the plaster into the mold, it will no longer be possible to determine where the top of our composition is.
Read also: How to make a sauna stove from a pipe with your own hands - step-by-step guide
11. Pour the plaster into a container that you don’t mind throwing away. (I want to warn you right away: do not pour the remaining gypsum solution down the drain! The gypsum sets very quickly and will simply clog the pipes. It is better to throw away the remaining gypsum solution along with the container in which it was diluted).
12. Usually plaster is diluted 1:1, but it is better to read the instructions for your specific plaster and prepare exactly as much water as is required for the volume of dry plaster that you need.
13. Gypsum sets very quickly, try to quickly stir the solution until it has a homogeneous consistency.
15. We make a loop from the wire and immerse it in the not yet hardened plaster, focusing on our mark. To prevent the loop from sinking, leave it on a knitting needle or skewer.
16. In just half an hour the plaster will harden. But in order to gain maximum strength, it needs to dry, so take your time and wait a day before removing the work from the mold.
17. Remove the clay and see a miracle! Every vein, every stem stands out in relief.
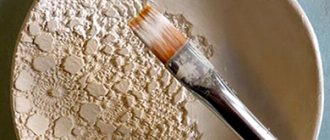
18. Clay residues are easily washed off with a brush and water.
19. The finished work can be coated with impregnation and tinted, or you can leave a more archaic version.
Lately, I’ve been doing things with my own hands more and more often—sculpting, creating imprints of plants that interest me, playing with the color of the final product. Today I invite you to a master class on creating a plate from sculptural plaster with a botanical bas-relief, which I use as jewelry storage
- old tablecloth/sheet/pillowcase (whatever you don’t mind, we will roll out clay on the fabric and pour plaster),
- natural vacuum clay,
- rolling pin,
- container/plastic bucket with the bottom cut out (to mark the boundaries of the plate),
- sculpture plaster (I don’t recommend construction plaster, I’ll tell you a little about that),
- color (optional, if you want to make a plate of a certain color),
- flowers (leaves, daisies and everything that grows around).
Now let's get down to business! We take the required amount of clay (I do everything by eye), wet our hands with water and roll out a pancake 1-2 cm high (approximately) with a rolling pin, then take a container/bucket with a cut out bottom and mark the boundaries. We take our flowers (I had statice on hand, but the bas-relief ended up being so-so), I advise you to take freshly picked leaves, flowers, etc. And roll it out with a rolling pin once (for an accurate and even design):
To prevent our plate from being flat, we place a small object under the bottom of our fabric, in the center of the rolled clay. I have concrete mini coasters. You can take a handkerchief/piece of fabric folded 4 times (the first thing that came to mind :)) It should look like this:
Read also: Beauty under your feet: making garden paths from a mold
Then mix plaster with water. I take the sculptural one because it is valued for its high strength, it works well with colors, and the finished products are ready in 30 minutes! The products feel incredibly soft to the touch! Cannot be compared with concrete and building plaster. I really love it in my work and the latest products in my store are made from this plaster.
Mixed. WE WORK VERY FAST. We added color (at your discretion, I want to go to the sea, so my plate is sea green) and pour it onto the clay:
We move (I don’t know how to say it differently) our fabric with creativity in different directions, evenly distributing the gypsum over the entire surface of the clay. Again I attach our bucket with the bottom cut out, marking the boundaries of our future plate. It turns out like this:
We wait 20-30 minutes, remove excess clay from the edges, take out the bucket and carefully remove the remaining clay.
We boldly wipe off the remaining clay with a damp cloth, use a knife to remove excess unevenness around the edges and voila—our plate is ready! Now it is still wet, which is why it has such a bright, rich color. Plus, I took pictures at night using a special filter, because the photos from the phone are very dim
And this is a photo of the plate the next day (and my stack of previous ones):
I cover the dried products with acrylic paste.
By the way, I also made the vase and the candle with a hexagon. And also with the help of sculptural plaster (but it’s a completely different story, read in the voice of Leonid Kanevsky :))
Find other uses for sculpture plaster in my store!
Thanks everyone for your attention! Still have questions? Write in the comments or in private messages, I will be happy to answer all your questions! ?
Popular posts
- DIY Easter egg for Easter 2022 - 5 best crafts How to prepare a hide for duck hunting with your own hands Cheburashka fishing weights How to make a cardboard car with your own hands How to build a stable for horses Papercraft for beginners, paper modeling, three-dimensional sculptures and simple paper figures for children How to make a bouquet in a box with your own hands: step-by-step instructions Drip irrigation in a greenhouse and in the garden with your own hands
Tools
The relief is created using tools designed not only for application, but primarily for the formation of the laid mass. Some of the tools will need to be purchased, some can be made from what is on hand.
tools for creating bas-relief
For example, half of a regular rubber ball is suitable as a container for kneading the mass. It is easy to clean it even from dried mortar, as you can lay out the whole mass by simply turning it inside out. Such a ball will reduce the time for kneading and cleaning.
For sculpting you will need special shaped spatulas called palette knives. Their narrow blades allow the formation of particularly fine patterns. You will also need spatulas with small concave-convex blades. These can be made from plastic or aluminum spoons (the sizes come in different sizes - tea, coffee, table or dessert). The handles bend and bend for convenience. For example, plastic utensils are heated near a scoop, after which the still heated handles are bent to give the required shape. The palette knife can be replaced with a shoe knife with a wide blade.
palette knives
For dosed or shaped application of the mass, confectionery syringes are used, and for fine work - disposable medical ones, with a capacity of 20 ml (without a needle). It is advisable to take chicken ones from confectionery shops.
Also prepare brushes that are used for oil painting (flat and round). There is no point in buying expensive ones. A small nylon brush is also useful for children's drawings. Brushes are used for plastering and applying texture. You will need a priming brush.
Other tools you will need:
- a metal trowel with a plastic spatula (the solution follows the plastic tool well);
- medium-sized spatula;
- stacks;
- chisels (for carving plaster);
- sandpaper or abrasive mesh;
- roller
Before applying each portion of the composition, brushes and palette knives are dipped in water so that the drying mass does not leave clots or scratches on the treated area. Upon completion of formation, the tool is lowered into water and washed. Dry before storing.
Safety precautions, tips and tricks
Before you start making a bas-relief, you must take into account that alabaster and gypsum (in the form of dust) are materials harmful to human skin
They provoke irritation and peeling, so while working, the master must follow some safety rules:
- Using protective rubber gloves
- Wearing safety glasses to keep dust and small particles out of your eyes
- Using a respirator while working with the solution
Such safety measures perfectly protect the bronchi and lungs from dust that appears when working with putty and plaster. Protective equipment must be worn by the person throughout the entire work process.
It is very important to correctly organize all stages of creating a bas-relief
To do this, it is recommended to adhere to the following rules:
It would be appropriate to install a good light source near the wall so that all the shortcomings can be seen, which are very important to eliminate before the material hardens. Compliance with the recipe when mixing the solution. Optimal consistency of the solution. If the mixture is too thick, add a small amount of water
But it should not be too liquid. Before working on the wall, inexperienced craftsmen should practice a little with applying gypsum to a wooden surface. All necessary tools and materials must be prepared in advance
For greater strength, you can add PVA glue to the mixture.