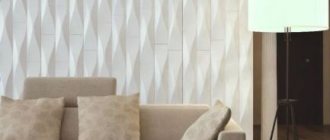
Plywood is quite often used when performing a variety of finishing works. With its help, ceilings, floors and interior partitions are finished. The versatility of the material has made it very popular.
Plywood is a universal finishing material that is mainly used for leveling surfaces.
And in order for all the work to be completed at the highest level, you need to understand the specifics of working with this material, in particular, know how to lay tiles on plywood yourself.
Possible problems
Structure of veneered plywood.
Before you understand the procedure for laying tiles on plywood, you need to study the problems that may arise during the work.
Firstly, veneered plywood can delaminate, so it is best to use adhesives that will not penetrate deeply into the material.
Secondly, if you are laying tiles on a large partition, keep in mind that plywood is a fairly flexible material and can be deformed under heavy loads. Everything must be done so that the tile does not come off when deflected or accidentally hit. Therefore, the most optimal composition for gluing tiles to plywood is elastic adhesives. However, other compositions can be used. Read a brief description of each of them and choose the most suitable option.
Basic provisions
Tile laying methods
When laying a tile covering, it is important to comply with and comply with the mandatory requirements, first of all, to know what types of bases can be combined with a particular building material. Often, tiles are laid on concrete, but experienced craftsmen are already moving away from conservative repair methods and successfully combining tiles with plywood.
- Due to the fact that tiles do not tolerate uneven bases, and with the help of cement you can easily level any surface, concrete screed still prevails today. However, the visible disadvantages cannot be avoided here: the base fabric has to be waterproofed and primed.
- Some people practice laying tile panels on old tiles. Experts call this blasphemy; not a single technology contains a description of such a procedure, but those who want to make repairs on their own without making much effort continue to experiment. How long does this finish last? Until the old layer of tile cracks and crumbles, taking with it all the memories of the new finish into oblivion.
- As an option, the tiles are laid on top of wood, but it is still more efficient to lay them on a plywood base.
Where is it preferable to lay slabs on plywood?
First of all, in wooden houses with frame construction. Here, ceramic tiles can line both floor and wall coverings.
Of course, you will have to put in a lot of effort, but the end result is worth it.
Material selection
Simple tile adhesive for gluing tiles to plywood will not work. The moisture contained in it will cause the surface of the material to swell and accidental deflection or impact will cause the tile to peel off. There are several options to solve this problem.
Marking diagram for laying ceramic tiles on plywood.
First of all, you can use drywall as an intermediate coating. You need to do the following:
- Cut drywall into required pieces.
- Attach it to the frame using self-tapping screws or directly through the plywood.
- Place the tiles on drywall using regular tile adhesive.
However, this technique has its drawbacks. Firstly, cutting plasterboard sheets is a rather dusty operation. Secondly, working with tile adhesive requires certain skills. In addition, this technique is not suitable for the kitchen and cases with small boxes.
When looking for a solution for gluing tiles to plywood, one should not forget about such a thing as liquid nails. This is a thick, all-purpose adhesive that can be used to lay tiles on plywood. It must be applied in several points in the center and in the corners, or in a continuous line along the perimeter of the tile. While the composition is setting, the tile must be fixed. Epoxy-based compounds are best suited for grouting. You should avoid using cement ones, because... When the plywood vibrates, such putties quickly crumble.
When choosing a composition for gluing tiles to plywood, one cannot help but pay attention to silicone sealant. It allows you to ensure exceptionally reliable adhesion of the tiles to the surface, and minor bends and vibrations of the panels will not lead to the tiles coming off. Transparent silicone is suitable for grouting. Such a partition will look very presentable. If you plan to use this method in the bathroom or kitchen, then before using liquid nails and sealants, you must treat the plywood with drying oil and prime it with a hydrophobic primer.
In order to prepare an adhesive composition for tiles, you will need acetone and polystyrene foam.
Silicone sealant and liquid nails are excellent, but quite expensive compounds. If you are on a tight budget, you can use the following method. You need to take polystyrene foam and acetone. The foam is crumbled, poured into a plastic container and filled with a certain amount of acetone. The resulting mass must be applied to plywood or tiles using an ordinary spoon or wooden stick.
Polyurethane foam can also be used as glue. You just need to apply a certain amount of material to the back of the tile and press the tile tightly against the plywood. You don’t have to worry about increasing the volume of polyurethane foam. Due to the fact that the tiles are laid without gaps, this effect will be absent.
There are also alternative substances. For example, you can use acrylic tile adhesive. It costs less than liquid nails, and if applied in a continuous layer, it is in no way inferior to them in strength. Instead of acrylic tile adhesive, you can use acrylic putty.
If you are working with fairly thick plywood, you can use PVA. However, it is important that the plywood has properties that would allow it not to deform if wet.
Types and requirements for glue
Since plywood is a flexible material, the adhesive must be selected with increased elasticity properties. The most effective is polyurethane glue. An example is Thomsit P 625.
This glue fulfills all installation requirements. The composition does not include water or solvents, so the surface layer of the building material does not swell or peel off. Significant adhesion and strength of the coating to the base is achieved after a short period of time.
Glue containing silane has also proven itself well. Its advantage is the ability to have significant adhesion even in a damp room. An example of such glue is Ceresit CM 9. It can prevent the formation of fungus. Has high adhesion. The seams are flexible.
Often, liquid nails or silicone sealant are used to glue such surfaces together.
Before using liquid nails or sealant, be sure to treat the plywood with drying oil and primer.
Preparation Guide
Plywood must be laid in a double layer. This will reduce the risk of the tiles peeling off or lying unevenly. It is recommended to use plywood with a thickness of 22-28 mm. It is better if it is glued in 2 layers: this will increase the strength of the structure as a whole. The plywood must be secured as tightly as possible to the base to minimize the likelihood of deformation.
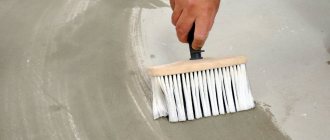
Before laying tiles, the plywood must be cleaned and primed.
After this, you need to prepare the base for the tiles. The plywood is carefully sanded and cleaned. It should be as smooth as possible. A smooth, flat surface is primed in 2 layers. The next layer can be applied only after the previous one has completely dried. If the tiles will be laid in the bathroom, then before priming the base must be treated with a waterproofing material.
Prepare tools and materials for work:
- Plywood. It is best to use sheets 2.5-3 cm thick.
- Primer.
- Waterproofing film.
- Self-tapping screws.
- Elastic glue.
- Crosses for seams.
- Spatulas.
- Building level.
Physico-mechanical properties of mixtures
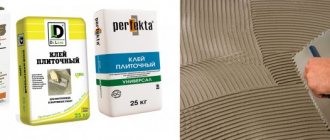
Most often, this type of tile adhesive is produced in the form of a dry powdery substance, which can be white or gray in color, depending on the composition. However, on the market you can find mixtures that are ready for use immediately after opening the package.
Average characteristics of mixtures:
- density – from 1400 to 1500 kg/m³;
- consumption of adhesive mixture – from 1.3 to 2 kg per 1 m² of area;
- adhesion level – from 1 to 1.5 MPa;
- the number of cycles of maintaining elevated temperatures is about 100;
- strength – from 3.5 MPa;
- maximum slip – 0.5 mm.
Thanks to these technical characteristics, elastic adhesive compositions can be used for cladding plinths, entrances, surfaces in industrial premises, bathrooms, swimming pools, etc.
Step-by-step instruction
The installation process will be considered using elastic glue, as the most optimal option. Once you understand the order of the work, you can do everything using other adhesives.
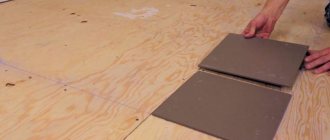
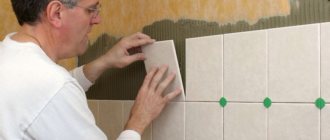
Start laying tiles from the second row. You will then trim the first one and place it last. It is best to start tiling from the far wall of the room. Constantly check the levelness of the installation using a level. The seam width should be 2-3 mm. In rooms with high humidity and unstable temperature conditions, you can make seams up to 0.5 cm wide.
Scheme for laying tiles on the floor.
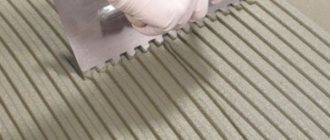
Prepare the adhesive composition according to the manufacturer's instructions. Keep in mind that it dries quite quickly, so it is better to prepare the glue in small portions.
The mixture can be stirred using a mixer or drill with an appropriate attachment. It is not recommended to simultaneously cover a surface with an area of more than 1 m². The glue begins to set after about 15 minutes. During this time, you must have time to complete everything related to the installation and further adjustment of the tiles.
If you use elastic adhesive, then buy one that is designed for porcelain tiles or ceramic tiles. However, pay attention to whether it is designed to work with problematic surfaces: there should be appropriate markings on the packaging. Be careful when choosing glue, because... The result of all work largely depends on this. Be sure to read the instructions. Check that it states that this adhesive is suitable for working with plywood and the type of tile you have chosen.
If desired, instead of conventional glue, you can use a special two-component polyurethane composition.
In this case, the surface does not need to be primed. But it is necessary to waterproof it.
Why are elastic mixtures needed?
Repair and construction specialists note that the tile mortar must be selected taking into account not only the strength, but also the ductility of the material. The elastic tile composition will not collapse during elastic deformation, so the finish for which it was used will not begin to peel.
When choosing such products, it is recommended to give preference to mixtures based on epoxy resins and polymer compounds. With their help, you can protect materials from cracking even if the base moves regularly.
Grouting joints
Lay the tiles over the entire intended surface and leave it for several days for the adhesive to fully set. The packaging may indicate that the glue dries in, for example, half an hour, but there is no need to rush. It's better to wait at least 3-4 days. Then you will need to sand the seams. Buy grout, read the instructions and rub it into the tile joints using a spatula. After half an hour, remove excess grout. To do this, just wipe the tiles with a rag.
Thus, laying ceramic tiles on a plywood surface is quite simple. You just need to properly prepare the plywood and choose the appropriate adhesive. Follow the given rules and recommendations, follow the instructions, and you will succeed. Good luck!
Is it possible to lay tiles on plywood? Laying rules
- Resins provide high strength to the board and also reduce its moisture absorption capacity. In some cases, you can even do without additional hydro- and vapor barrier, but this same factor also reduces the adhesive properties of the coating. Therefore, it is impossible to lay floor tiles on OSB or plywood in the traditional way.
- The material consists of wood components, which means it has properties similar to solid wood. That is, when air humidity increases, it swells, and when it decreases, it dries out. Thus, the coating is constantly in motion. This can affect the condition of the tile covering and even lead to its destruction.