Ceramic tiles are very easy to use, have excellent aesthetic and strength qualities, but at the same time they place high demands on the base on which they are laid. It is easiest to lay tiles on concrete, but what to do if the apartment has wooden floors or partitions? Is it possible to lay tiles on plywood if you choose this material to level the base?
Why is this necessary?
The combination of materials can be safely called unusual; such a choice of components for work is resorted to in several cases, namely:
- When the partitions of a building are built from durable plywood with a thickness of more than 10 mm, such sheets are an excellent replacement for plasterboard and are not always additionally sheathed with other materials before applying tiles.
- Laying this type of cladding is needed on boxes covering communications, hot or cold water, and heating. These frames are always made from rigid blanks.
- If the owner wishes to improve the appearance of the kitchen furniture, the base of which is created from the same layers of veneer, the tiles adhere perfectly to the cabinet doors, adding zest to the interior design.
Based on these situations, one can only imagine what grandiose problems will be solved. If you clearly understand how to glue ceramic tiles to plywood, even your wildest fantasies can be realized in a short period of time.
Grout
So, the last stage is grouting the ceramics. The process is the simplest, for which you will need the grout itself (ready or dry) and a rubber spatula. The material is applied with a tool along the joint areas of the tiles with slight pressure so that the grout fits tightly into the gap. The spatula should be held at a right angle to the tiled surface from above.
Pay attention to some points regarding the quality of grout.
- It can be applied over ceramic cladding only after the latter has completely dried.
- In the process of laying the tiles themselves, crosses are used that determine the thickness of the seam. So, if a large amount of glue accumulates in the gap, then you need to make sure that it does not take up much space. It is necessary to leave space for grouting. Therefore, excess glue must be removed at the cladding stage, when it has not yet dried and turned into stone.
- After the fugue has completely dried, it must be removed with a clean cloth or sponge. No brushes or other rough materials.
Where can you glue ceramic tiles to plywood?
If necessary or strongly desired, the owner of the building can afford to use installation technology on walls, floors and even ceilings.
If the work is not carried out by professionals, then it is important to familiarize yourself with all the features of laying tiles, although the method of implementing the idea is not much different from classic installation, but there are still some nuances.
Plywood is considered an inexpensive material, and the process of constructing partitions occurs quite quickly. Thanks to such indicators, millions of owners of private houses plan in advance the creation of support structures from natural veneer for further application of tiles to the base.
Preparing the surface for a plywood base
Before laying plywood, you need to perform the following preparatory measures:
- remove old finishing putty from the surface;
- clean the base from debris and dust;
- seal cracks and joints between the floor and walls using cement-sand mortar;
- in the case of a rough wooden floor, additional antiseptic measures must be taken;
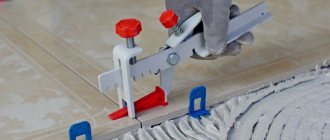
- install the necessary beacons using a building level.
You can replace the level with a line drawn on the wall along the entire perimeter of the room. It will indicate the level at which the plywood sheets should be laid.
Possible problems
When choosing adhesive for tiles on plywood, you should buy exactly the product sample that will not penetrate deeply into the structure of the material, otherwise the base may begin to delaminate or deform over time.
When working with large walls, it is important to take into account that plywood is quite flexible and under significant loads the overall level of the partition often suffers, this negatively affects the appearance of the room.
Professional builders carry out installation using elastic adhesives to avoid many problems, such as:
- Mechanical damage to elements.
- The slab falls away from the base.
- Cracking of seams between tiles.
Among the presented models of bulk powders and ready-made fixing compositions, you can choose the ideal option for a specific situation. Before going to the store, it is better to familiarize yourself in advance with the types of solutions, as well as the technical characteristics of specialized mixtures.
Step-by-step instruction
Floor ceramics with a thickness of 8 mm or more are suitable for kitchens, balconies, bathrooms, hallways and other rooms. To install it you will need the following:
- adhesive composition and elastic fungicidal grout on a cement or polymer (in the form of colored sealant) base;
- waterproofing (for wet rooms) complete with a special damper tape;
- primer;
- hydraulic level;
- tape measure, construction pencil and ruler or dyeing thread for marking (tapping cord);
- screws or other hardware;
- sanding machine and construction vacuum cleaner;
- notched spatula for applying adhesive composition;
- a spatula for applying grout, a sponge and a container of water to remove excess;
- tile cutter;
- crosses or any type of SVP (DLS, Litolevel, PLS, etc.).
Tiles are laid on plywood in 4 stages:
Surface preparation
We repeat - the base must be smooth, durable, dry and grease-free. Therefore, check the floor for:
- the presence of defects, damaged or poorly secured areas. If necessary, sand the floor or repair cracks, chips, pits and other defective areas using wood filler or acrylic sealant. It is undesirable to use silicone compounds due to poor adhesion with other materials such as cement glue, etc.;
Fixing a plywood base under a tiled floor.
- "walking" areas. The slabs must be carefully pulled to the base with self-tapping screws, and the caps must be recessed slightly into the floor so as not to damage the device during grinding;
- levelness using a hydraulic level. Differences between the plates can be leveled with a grinder;
- cleanliness Old paint coatings, bitumen or oil stains must be removed, the surface must be cleaned with a vacuum cleaner or a damp soft cloth to remove debris and fine dust.
It is advisable to prime the prepared surface. Plywood laid in damp rooms also requires additional waterproofing using mastics or special adhesive membranes.
Surface marking and tile adjustment
Professionals recommend preliminary laying out the flooring on a dry base. To do this, first select a laying method - standard, diagonal, checkerboard, offset, etc.
Layout diagrams.
Then you need to mark using a tapping cord, calculate the center of the room and tile the floor from the reference point.
Layout diagrams from the center.
The edge elements are cut with a tile cutter. If the remainder is too small (less than 5 cm in width), you can move the baseline slightly, as shown in the diagram below.
Tile layout offset pattern.
Some craftsmen prefer to work from the far corner, but in this case the overall pattern turns out to be offset.
Gluing tiles
The pottery items are carefully collected and set aside. Now you need to prepare the adhesive solution according to the instructions. When using a dispersion composition, you can simply stir it.
Using a notched trowel, apply a small amount of adhesive mass to the base, distribute it in a circular motion, lay the ceramic products in accordance with the diagram below, press down a little and install crosses or tile leveling systems. Periodically it is necessary to check the evenness of the coating with a hydraulic level.
Correct layout of tiles indoors.
Types and requirements for glue
If we glue tiles onto plywood, then it should be clearly understood that the material is considered mobile; to fix the tiles, a polyurethane composition is most often selected, which is distinguished by its elasticity; for example, Thomsit P 625 is worth mentioning.
This model does not assume the presence of water in the composition, so the base will not be subject to destruction, peeling or swelling. The adhesion of the two planes is at a high level; the coating does not lose strength even after several years of operation.
Ceresit CM 9 is considered an equally popular type of glue; one of the components is silane; this ingredient in the solution guarantees good results even in rooms with high humidity.
You can forget about fungus or mold in the joints; adhesion instills confidence in the owners of the building, and the seams are flexible and neat. Even when the frame bends due to seasonal temperature changes, the tiles do not fall off, and no mechanical damage was noticed.
Final stage
A special feature of the beautiful installation is the grouting of the seam joints. It can be done as follows:
- the grout mixture is prepared, it is recommended to do this in accordance with the manufacturer’s instructions;
- The cladding coating is cleaned of dust and dirt;
- Apply the mixture using a rubber spatula, and take a large portion, since this will allow you to fill the smallest gaps between the tiles, and after grouting, the excess will be removed.
Work on finishing the joints of the coating should begin the next day after the installation of ceramic products is completed. If you start grouting right away, this can lead to deformations in the adhesive layer between the tiles and the rough base. However, some types of mixtures dry quickly, which allows finishing work to continue within a few hours after the installation of ceramic products is completed. Considering that plywood, even after fixing, is not highly stable, it is recommended to choose fairly reliable but elastic mixtures as grout.
Suitable adhesive
When seriously thinking about solving the question of how to glue porcelain tiles to plywood, you should carefully familiarize yourself with the composition of the fixing mixture; it should include components such as: fiberglass, silane, microfiber, silicone or other highly elastic additives.
Experts believe that the following are ideally suited for the process:
- Liquid Nails.
- Polyurethane foam.
- Styrofoam shavings and acetone.
- Liquid glass.
But specialized tools were created for gluing tiles to plywood, so if you have an unlimited construction budget, you should purchase them.
Finishers advise using liquid mixtures so that when applying the elements, the fixing base can independently fill cracks or hard-to-reach places. The need to tap the tiles is eliminated, which reduces the risk of cracks in fragile components.
Plywood selection
Tiles are a rather heavy material, so it is necessary to choose the right plywood sheet that will have the appropriate density and thickness. It is one thing to purchase such a base for the ceiling and walls, and another thing for the floor. In this case, the instructions recommend purchasing material whose thickness is 28 mm or more.
The problem may lie not in the moment of laying, but in the consequences when insufficient sheet thickness leads to deformation. There is not much to say about the material itself. It is only necessary to note that it is environmentally friendly. Plywood can be moisture-proof, in this case we are talking about its veneered variety, which is not inferior to clay brick.
Don't miss: Studded parquet floors
Additional preparation of plywood
Due to the fact that it is almost impossible to lay tiles on clean, smooth plywood, it is necessary to take care of preparation. To do this, the surface should be given higher adhesive properties. To begin with, it is treated with an antiseptic, then a waterproofing mixture is applied. This is true even for moisture-resistant sheets. Then, to improve adhesion to the coating, a sickle mesh is fixed to the surface.
Plywood must be primed several times. This will not only improve the quality of adhesion, but also provide additional protection of the material from moisture. Since you already know whether tiles can be laid on plywood, at the next stage you can proceed to installation work according to the standard scheme. When facing walls, at the first stage, a support rail is installed so that the material does not slide down.
An important point that must be taken into account when laying tiles and installing the plywood itself is that the material will change in linear dimensions when exposed to the external environment. For this reason, it is necessary to leave small gaps between the plates, as well as around the perimeter of the room. This will compensate for the movement of the sheets. To prevent voids from forming, they can be filled with polyurethane foam.
Simple and complex solutions
To understand all the intricacies of the process, how to glue tiles to walls or floors, you can use the advice of professionals. These people had encountered many different house and apartment layouts and were kind enough to share their experiences.
Regular glue for ceramics on concrete or plaster will not work, you need to be realistic; it is prepared using water, which has a detrimental effect on the wood until it completely hardens.
But there are other difficult situations when a plywood frame needs to be pre-prepared for cladding; there are several time-tested recommendations to help achieve the ideal state of the structure.
Drywall
Many owners have long known how to glue ceramic tiles to gypsum plasterboard and that the work is not labor-intensive, and adhesion is at a high level.
In cases where the base frame has significant damage, plasterboard sheets can be used as an intermediate coating to level out depressions and cracks.
The material is attached in this way:
- Having the dimensions in hand, you should cut the workpieces.
- Using a screwdriver and self-tapping screws, fix the gypsum board directly onto the plywood.
- By mixing regular tile adhesive, you can begin laying the cladding; there is no need to fill in the marks from the screws; they will disappear under the layer of the mixture.
The method will help out in many situations, but it has several disadvantages: additional funds will be required for repairs, the work is dusty, and the technique is clearly not suitable for decorating kitchen furniture.
Liquid Nails
This method becomes relevant when it is necessary to lay tiles on plywood on the floor, because the solution has excellent adhesion between two planes.
The only thing you need to note is that the consumption of the mixture will be large; you will have to allocate quite a lot of money from the family budget to purchase tubes.
Thick universal adhesive is applied along the edge of each tile, after which the workpiece is pressed to the base; epoxy-based compounds are most often used for grouting joints.
Silicone sealant
When figuring out how to lay tiles on wood-framed walls, many craftsmen suggest that building owners resort to using silicone sealant.
The connection of the elements turns out to be very reliable, and if you don’t skimp and coat the entire area of the base, then you can count on the plywood’s resistance to moisture; damage due to the harmful effects of liquids or steam is completely excluded.
Transparent product samples are ideal for laying cladding; the joints can be filled with your favorite grout of a certain shade. But before fixing the workpieces, the walls or floors should be primed with a hydrophobic compound.
Styrofoam and acetone
When deciding how to stick tiles, professional tilers often create non-standard solutions; after visiting several forums, we were able to obtain the exact recipe for a mixture of acetone and polystyrene foam. The algorithm of actions looks like this:
- Having prepared the foam chips, they are placed in a large container.
- The contents of the vessel are filled with acetone.
- After a certain time, the two components will turn into a homogeneous consistency, onto which the elements are attached.
To scoop up the solution, they often take a large spoon; due to the increased fluidity of the mixture, spreading it onto a flat surface with a spatula is extremely inconvenient.
Polyurethane foam
By purchasing a bottle with a dispenser or a container for a special gun, you will be able to securely fix the tiles to a wood frame. The technology of the work does not imply the presence of joints between the elements, so there is no need to worry about an excessive increase in the volume of foam.
When implementing this technique, you need to have some skills in using a polyurethane base, otherwise you will not be able to save building materials and also maintain cleanliness in the room.
Alternatives
Tiles are also attached to acrylic putty; this solution is securely connected to both the veneer and the back side of the tile; the purchase will cost less money compared to liquid nails.
Epoxy resin is no less effective, but its price may seem high for such purposes; it will take a long time to completely harden, while ensuring sufficient ventilation of the room and maintaining the required temperature.
Useful tips for gluing
Helpful Tips:
- Ceramic products are quite heavy, which must be taken into account when choosing the thickness of plywood; at least it should be 22 mm.
- Ensure that the plywood fits tightly.
- When laying the base and tiles, use a level.
- The seams between porcelain stoneware and plywood sheets should be perpendicular to each other, this will add strength.
- Check the evenness of the masonry as often as possible using a level.
- If glue gets on the front side, it is immediately removed with a rag.
- If the layout takes place on the wall, it is necessary to secure the profile to avoid displacement of the slabs. Do not lay large areas in one go.
- Plywood tends to deform when exposed to moisture, even though it is moisture resistant. Therefore, the use of waterproofing is recommended.
Assembling and fixing the plywood base
All blanks are arranged in a checkerboard pattern so that the plane is as strong as possible; if we are talking about floors, then the logs are laid out as close to each other as possible, as far as the availability of material allows this, at least 30 cm per pair of boards.
The sheets are fixed evenly; for this, professional builders use a water level; it is better to take a tool 1.5 or 2 meters long in order to apply it over the entire plane. The joints are sometimes additionally sealed with sealant or wood glue to ensure the reliability of the erected frame.
Since wood can expand under the influence of temperature and increased humidity, in the bathroom or kitchen it is better to provide gaps between the sheets, as well as in the corners, 3-5 mm will be enough.
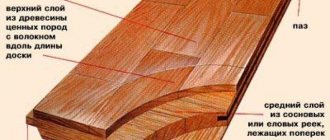
Features of wood-based materials
Plywood, as well as sheets of similar properties (OSB, chipboard) contain wood in crushed form. It could be wood chips or shavings. The raw materials are bonded and formed into sheets using resins. If you plan to lay tiles on a plywood base, you should consider the following features:
- The use of resins in the production of wood-based materials makes it possible to obtain moisture-resistant products that are characterized by increased strength. However, such plywood has significant disadvantages. A decrease in adhesion is noted. The more resins were used, the worse the adhesion of the rough base and glue. For this reason, the tile will be weakly fixed. In addition, some resins used in plywood contain formaldehyde, which can pose a health hazard.
- Considering that the material contains crushed wood, it is as easily subject to deformation as solid natural wood. This means that the plywood will swell and dry out when the ambient temperature changes.
Preparation Guide
To avoid problems, it is better to lay plywood in two layers, then the tiles will lie perfectly flat, and possible delamination of elements will be minimized. Before installing the cladding, the surface is primed, you can go over it several times with specialized liquids, and also use antiseptics.
If you immediately prepare the tools and materials, the process of implementing your plan will go much faster; to carry out the manipulations you will need: a ladder, self-tapping screws, a screwdriver, and adhesives. As well as crosses for marking seams, a spatula, a jigsaw and a level.
Materials, tools for laying tiles
To construct a ceramic tile floor covering with a plywood backing, the following is required:
- Wooden blocks with dimensions 50×40 mm, 50×50 mm, 50×70 mm, length from 2 m;
- Plywood sheets of appropriate thickness and size; to achieve the required thickness, the substrate can be multilayered;
- Fasteners - wood self-tapping screws;
- Waterproofing compound, primer, tile adhesive, putty for grouting joints;
- Set of plastic crosses.
The tile laying tool kit includes:
- Set of spatulas, rubber hammer;
- Marking tools: level, tape measure, pencil (marker);
- Electric jigsaw, wood saw;
- Electric drill with a set of drills;
- Screwdriver, tile cutting device
To obtain an adhesive mixture of the same thickness, craftsmen make a homemade device. Place a spatula in the middle of the rectangular tray, teeth down, at the height of the required layer thickness.
The tiles are placed face down in front of the spatula, and the mixture is applied on top. When the tile is moved under the trowel, a perfectly even layer of adhesive remains on the surface of the tile.