PVC tiles are a relatively new development. About ten years ago it appeared on the shelves, and during this time it managed to become in demand. In terms of its performance characteristics, it surpasses traditional laminate and linoleum. It is not inferior to them in the choice of colors and textures. Many people buy a new product for their homes, especially since you can install it yourself. Let's look at all the intricacies of laying vinyl tiles.
Benefits of tiles
- high wear resistance;
- moisture resistance;
- low sensitivity to impacts from blunt objects;
- resistance to chemicals;
- ability to absorb noise up to 19 dB;
- simplicity and ease of installation;
- possibility of replacing a separate section;
- resistance to temperature fluctuations, suitable for floors with heating systems;
- resistance to color fading from sunlight (provided you purchase a quality product);
- wide range of compositions and colors;
- anti-slip;
- ease of care.
IMPORTANT! When caring for vinyl flooring, do not use solvents or products with an abrasive structure. Exposure to acetone is dangerous, as it destroys the protective layer of the tile.
Sequence of work
Laying quartz vinyl tiles of different types has its own characteristics.
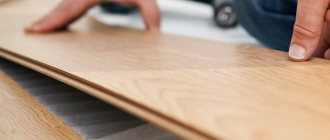
Laying tiles with a lock
Quartz vinyl tiles with a mechanical lock are installed in the same way as laying laminate flooring, only compensation gaps are not left, installation begins close to the wall (unless otherwise specified in the manufacturer's instructions). The tiles are laid with the ridge towards themselves, the groove facing the wall is cut off in the first row. First, the tiles are connected at their ends, and the first row is assembled. Then the second one joins him.
Important: unlike laminate, quartz vinyl tiles with a mechanical lock cannot be hammered. For a tighter fit, tapping the edge of the panel with your palm is permissible
- The new panel is brought to the already laid one from above and from the side, so that the end edges touch, and there is a gap between the adhesive layers. The panels should be located almost parallel to each other, and not at an angle
- After precise alignment of the ends, the panel is lowered down until it stops and pressed
- This is how the first row is laid out, you need to make sure that you get an even line, there is no displacement of the planks relative to each other
- The following rows are laid offset by half or a third of the length. The planks are brought close to each other with their sides, but the right edge of the new plank should be slightly raised.
- By pressing the top strip with gradual advancement from left to right, the adhesive surfaces are connected
During the process of laying tiles with adhesive locks, errors can be corrected by carefully disconnecting the already laid panels. But the more time has passed since the elements were connected, and the stronger the pressure exerted on them, the more difficult it will be to do this.
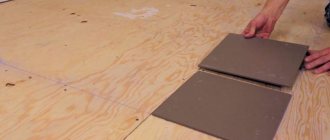
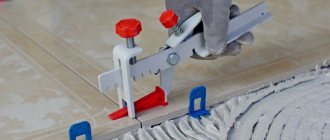
Adhesive installation
For adhesive installation, it is best to use glue recommended by the manufacturer of quartz vinyl film. It is applied to the prepared base with a notched trowel; it is necessary to maintain the same layer thickness. The optimal tool is a spatula with triangular teeth, marked A1 or A2.
Some adhesives last for 10-15 minutes after application, while others can be laid with tiles immediately, so you need to follow the instructions exactly. Adjacent tiles should fit tightly to each other, without gaps. Laying starts from the central axis and is carried out in accordance with the selected pattern.
It is extremely important that there are no air bubbles left between the tile and the base. For the best fit to the surface, removal of air and excess glue, it is recommended to roll the tiles with a special roller from the middle to the edges, in the longitudinal and transverse directions. Instead of a roller, you can use a cork board to perform grinding
Excess glue squeezed out is immediately removed with a clean cloth slightly moistened with alcohol.
Instead of a roller, you can use a cork board to perform grinding. Excess glue squeezed out is immediately removed with a clean cloth slightly moistened with alcohol.
You can walk on tiles laid using the adhesive method immediately, more serious loads are permissible after 1-2 days, and you can start wet cleaning no earlier than after 5 days.
Laying loose tiles
Art Tile Eco tiles are as simple as possible to install, and they are also easy to dismantle. The gummed rubber base provides improved adhesion to the base and allows you to do without glue and locking joints.
These tiles must be cured for at least 48 hours before installation. The curvature of the floor should not exceed 3 mm per 3 m, humidity - 3%, work should be carried out in the temperature range of 18-29 ° C.
Laying starts from the point at the intersection of the axes and proceeds towards the walls. The tiles are laid close to each other, cutting from the walls is carried out without the formation of compensation gaps. When laying free-lying tiles, the nesting technique is used - a new tile is simply applied to the already laid one and pressed from top to bottom.
Additional use of adhesive when laying Art Tile Eco tiles is recommended in the following situations:
- The base is very dry
- It cannot be completely dusted off
- Surface curvature exceeds permissible
- The coating will be subject to significant load
The glue is applied only around the perimeter of the room, and if its area is more than 64 square meters, an additional adhesive strip is needed every 4 meters.
You can walk on the tiles 12 hours after laying; during the day you should not move heavy objects on the surface, especially in places where adhesive is applied.
Disadvantages of PVC tiles
- low resistance to prolonged exposure to heavy weight (dentations from furniture);
- high requirements for preparation of the base before installation;
- deformation or cracking when exposed to low temperatures;
- If the gaps and seams of the tiles are not properly sealed, mold may appear under the covering.
Formation of a damper layer
The main problem with this type of base is its thermal expansion. Under the influence of external factors, it can change its size or curvature. Therefore, you cannot lay tiles on a wooden floor without installing an intermediate layer.
It must have a soft base to compensate for possible floor movements. Most often, rubber or a similar material is used for this. The upper part has a hard surface. You can correctly lay tiles on the floor on it without fear of possible shifts.
The technology for subsequent installation consists of performing the following actions:
- Fixing the damper base.
- Pouring concrete screed. Its minimum thickness can be 2 cm. Before laying the tiles on a wooden floor, you should wait until the screed has dried. This process can take from 7 to 20 days.
- Installation of ceramic decorative elements is in progress.
The advantage of this technology is the minimal likelihood of shifting the wooden surface. The disadvantage is the increase in floor height. If this indicator should be minimal, it is necessary to lay the tiles differently in the bathroom, kitchen or hallway.
Features of choosing PVC floor tiles
Self-adhesive tiles are suitable for replacing the coating in rooms where people are intermittent or where temporary events are held.
Choosing this type of vinyl laminate makes it possible to replace worn areas of the coating.
In public places, flooring is installed using a regular adhesive lamella.
Interlocking tiles are suitable for use in residential premises (apartments, houses), where the load on the floor is stable and relatively low.
When choosing products, you should pay attention to the class labeling of the tiles. The indicator means the wear resistance of the product at various load intensities:
- For domestic premises, vinyl slats of class 21-31 are used. The tile is characterized by a loose protective layer; the color range of the product is very diverse. For the bathroom, slats are chosen of a lower class, in the hallway and in the kitchen – of a high class;
- in retail premises, hospitals, offices and other buildings where the load on the flooring is high, it is preferable to choose vinyl laminate of class 32-41;
- tiles of class 42, 43 are used at production facilities, sports or concert complexes.
What is vinyl flooring
Polyvinyl chloride (PVC) tiles appeared on store shelves relatively recently. Outwardly, it resembles high-quality linoleum, but differs in its release form and manufacturing technology. The coating is cut into squares or rectangles, the type of connection is adhesive or locking. Thanks to its ease of installation, the modular coating quickly won the sympathy of consumers. The tiles are easy to install and more economical. Although the price per square meter exceeds the cost of linoleum, waste during installation is minimal. The repairability of vinyl is of great importance, because a damaged fragment is easy to replace, and there is no need to remove the entire covering.
PVC floor elements contain vinyl, resins, stabilizers, plasticizers and various fillers to give the coating additional properties. Hot raw materials are compressed, as a result of which the material becomes dense without losing flexibility and ductility.
Structure of PVC tiles
Vinyl tiles consist of the following layers:
- basic foundation;
- decorative layer;
- protective transparent film;
- wear-resistant polyurethane layer.
Manufacturers produce two types of linoleum tiles: vinyl and quartz vinyl (with the addition of quartz sand). The second option is more expensive, but has greater density and increased wear resistance.
Options for laying PVC tiles
“Square” is a simple method that can be used by a person who is faced with floor repair for the first time; All tiles are laid, aligning the side, top and bottom sides, one to the other.
“Ladder” or “Deck” - each new row of elements is shifted relative to the previous one by about a third. Laying along a straight axis begins along the shortest wall of the room or perpendicular to it, starting from the corner. You can also install tiles diagonally, starting from the center or corner of the room.
It is necessary to strictly adhere to the rule: the angle between the line of lamellas and the walls should be 45˚.
“Herringbone” - the dies are laid out from the middle of the room, perpendicular to each other along a straight or diagonal axis. The number of tiles that form the “branches” of a conventional Christmas tree varies from 1 to 4.
IMPORTANT! The method requires laying skills and is more suitable for professionals.
Carrying out pruning
Tile products must be trimmed directly during installation work. The sequence of actions should be like this:
- you should mark on the tile the line along which the cutting will be made;
- using a sharp blade, it is necessary to cut the product approximately half the thickness;
- you need to break the product along the line and finally cut it.
In some cases, it is necessary to pre-prepare a cardboard template, for example, when laying next to a column or protrusion.
Quartz vinyl tile coverings are usually laid without gaps, since such products do not expand when exposed to temperature. However, in some cases it is recommended to leave a small distance between the walls and quartz vinyl tiles, the same applies to thresholds. To fill this gap you need to use silicone sealant.
In this video you will find a master class on laying interlocking quartz vinyl tiles.
Glue selection
Compositions for installation are presented on the building materials market in two forms:
- one-component (ready to use; suitable for beginners);
- two-component (separate containers with filler and hardener, mixed immediately before starting to work with the tiles). Fastening the lamellas using this glue is reliable.
When choosing an adhesive composition, you need to proceed from the characteristics of the room in which the floor will be replaced: if the adhesive does not match the intensity of the load on the base, the coating will soon become unusable:
- reaction adhesive (polyurethane or epoxy) – for installing floors at railway stations, airports, and shipbuilding;
- dispersion adhesive (applied only to the floor) - has a wide range of applications, including used when laying tiles in residential premises;
- contact adhesive (adhesion of surfaces occurs immediately when materials are combined). It requires great care and accuracy in work, since it will be almost impossible to correct the result obtained.
IMPORTANT! The composition intended for ceramics is not suitable for PVC tiles, since vinyl products have a smooth back surface and their installation requires an adhesive that contains plasticizers.
A compliment from the Polov salon!
Free delivery throughout Russia by PEK transport company or glue as a gift when ordering more than five packages of some types of vinyl flooring (look for the corresponding tags on the products in the catalog)*.
* — “Free delivery” and “Glue as a gift” promotions cannot be combined within one order. Check with managers for details!
Preparing the base for installation
General requirements for base coat:
- strength and solidity - the coating must withstand the expected loads;
- evenness - according to building codes, differences in base levels should not be more than 2 millimeters per 2 meters of length, however, when restoring an old floor, a slight deviation in this indicator is permissible;
- cleanliness - debris and dust will disrupt the tightness of the bond, so immediately before laying it is necessary to very carefully vacuum the floor or treat it with a dry sponge;
- resistance to deformation - if you lay vinyl on old parquet, which is characterized by periodic swelling or drying out, then soon the flexible lamellas will repeat all the curvatures of the boards, the tightness of the connecting seams will also be broken
- dryness - the screed (or primer layer) must have a moisture content not exceeding 2%, which can be determined using a hygrometer.
ATTENTION! If you do not have a hygrometer, you can use this method: a piece of polyethylene with an area of 1 m2 is glued to the floor with tape for 24 hours. If moisture accumulates inside the film, the floor is not ready for installation.
Concrete floor
In addition to the requirements listed above, this type of coating should not have deep cavities, potholes, cracks, or grooves. If necessary, apply a leveling mixture or gypsum putty to the surface. For such a floor, tiles with any type of fastening are suitable.
Wooden floor
Initially, the varnish (paint) is removed from the boards and treated with an antiseptic composition or drying oil. Level with oriented strand boards, gypsum fiber boards or plywood (12 millimeters thick), leaving a gap of 2 millimeters between the sheets to compensate for the thermal expansion of the material.
Holes and joints between materials are puttied (it is advisable to use an elastic acrylic mixture) and debris is removed. For this type of base, tiles with interlocking joints are suitable.
If the wooden boards are in poor condition, it is necessary to remove the floorboards, pour expanded clay between the joists, cover with slabs or plywood and fill the screed.
You can also cover the base with a screed, the condition of which is within normal limits, but it is recommended to do this after 3 years of operation of the floor covering.
The last step in preparing the floor for vinyl laminate installation is applying a primer.
How to style
Some craftsmen start laying tiles from the wall farthest from the entrance, but this is fundamentally the wrong decision. Professionals unanimously say that you need to start from the center. To find the center of the room, pull two pieces of string from opposite corners. The point of their intersection is the center of the room. Then draw perpendiculars to the walls from this point (or bisectors to the corners if diagonal laying is planned). It is along these lines that the tiles will be laid.
Dilute the glue in the specified proportion. To stir it, you can use a drill with a spiral attachment. Then apply the adhesive to the floor using a notched trowel and lay several tiles in a row close to each other.
Using a mallet, tap the tile over the entire surface (pay special attention to the edges), and then remove excess adhesive with a damp cloth. We recommend removing the glue immediately, since it sets almost instantly.
It will be very difficult to wipe off dried glue.
Wait a few minutes for the laid tiles to stick and lay the second row.
Please note: think over the laying scheme in advance. Long tiles under boards need to be laid offset by half the size, square tiles under ceramics - seam to seam
As soon as you lay 2-3 square meters of tiles, roll the surface with a tamping roller. This procedure smoothes the material well and presses it to the base. You can walk on polyvinyl chloride immediately after installation, but it is still better to wait a few minutes so that it does not float under load.
Proper installation of PVC tiles guarantees excellent results
It is recommended to leave a gap between the tiles and the walls 5-10 mm wide. Subsequently, it will be covered with a plinth, and the surface will not suffer from thermal expansion. In the corners, the material is simply trimmed with a construction knife - this is very easy to do. Use of the surface is allowed after 24-48 hours, depending on the quality and brand of glue.
Now you know how to glue PVC tiles to the floor. As you can see, there is nothing complicated about this - the main thing is that the base is level. Try it!
Laying technology
Regardless of the type of product being installed, there are certain requirements for the room in which the work will be performed:
- the temperature of the main coating must be at least +15˚С;
- air humidity – up to 65-70%;
- air temperature in the room – from 18˚С to 24˚С;
- one day before the start of work, the tiles must be left horizontally in the room to equalize the temperature difference between the material and the air in the room.
Installation of interlocking tiles
- perform installation from left to right, start the first row from the farthest corner of the room, placing the tile with the groove towards the wall; the ridges of the next slats will be directed in your direction, which will significantly improve the illumination during work;
- cut off the lower lip of the groove and leave a gap of 10 millimeters between the lamella and the wall;
- connect the end locks of the tiles of the first row, reaching the wall, cut the last tile to size, leaving a gap and install spacers between the wall and the first row to avoid accidental movement of the tiles during further installation;
- check the evenness of the laying line using a level;
- placing the following dies at an angle of 25˚ to the tiles of the first row, connect them, smoothly lowering them until they are completely fixed;
- secure the next row, butting the end locks together using a rubber mallet to ensure complete closure.
IMPORTANT! Gluing or nailing tiles of this type is prohibited, as this can lead to breakage of the locks; The stability of the connection is ensured by skirting boards and thresholds. The coating needs to be fixed when mounted on the ceiling or walls.
Installation of tiles with glue
- use a cord to determine the center of the room, from there, moving along a line parallel to the longest wall, begin laying, leaving an expansion gap of 2-3 millimeters and paying attention to the guide arrows on the back side of the tile;
- Lay out the first row without gluing it, cut the dies to size if necessary;
- if the floor has convex or concave areas, heat the vinyl laminate with a hair dryer and give the necessary bend;
- apply glue with a spatula to the base and place the die, removing the protruding compound;
- To completely squeeze out the air, roll the tiles with a roller, repeat this procedure again after half an hour.
IMPORTANT! Install vinyl covering on wall areas every other day, when the main area is well fixed. Only 48 hours after completion of the installation work can you begin to arrange the furniture.
Installation of self-adhesive tiles
- mark the floor, start work from the center of the room or from the corner;
- glue the tiles, leaving a technological gap of 5-6 millimeters, since vinyl can expand with increasing temperature;
- remove the protective film from the back of the product and place the lamella on the base, pressing firmly;
- use a roller to remove air bubbles;
- cut the tiles to the required size, bringing the installation to the wall.
IMPORTANT! When using this type of vinyl product, very high demands are placed on the preparation of the base: it must have maximum evenness. The surface must be completely cleaned, even from fine dust, and preferably degreased. Check the production date of the tiles on the packaging: if the expiration date has expired, the impregnation may have dried out and the product may not stick to the floor.
Required Tools
Tools
- Ruler;
- Roulette;
- Notched trowel A2. An ordinary tile spatula is not suitable for installation;
- Stationery knife. The blades may become damaged during cutting. So it's worth having spare blades;
- Special roller. If it is not there, then you can use a heavy block instead. Just start by wrapping it in cloth;
- Pencil;
- The hairdryer is for construction purposes, but you can also use it at home. But you will not need a hairdryer in all cases, but only when there are complex curves. In this case, the material is heated with a hair dryer, it becomes more plastic;
- Paper cattle to avoid seams coming apart.
Recommendations from the experts
- when calculating the required amount of vinyl laminate, add 10% of the result obtained; if there is a shortage of finishing material, you may simply not find products of the required color and pattern;
- measure all walls, as they often have different lengths and the angle between them is not always exactly 90˚;
- first try on the tiles, only then apply glue to the base;
- to cut a product, always apply markings only from the front side; for greater convenience, secure the metal ruler with tape and make a cut with a knife;
- after gluing, do not move the tile; if it is necessary to move the lamella, heat it with a hair dryer - this will prevent the material from tearing;
- after installation, carefully check the adhesion to the base of each tile, especially in the wall areas of the room;
- debris and scraps of material from the floor covering can be removed within a day, unless we are talking about tiles with an interlocking joint.
With a little effort, time and imagination, finishing a room with PVC tiles will completely transform any interior. The key to success is the use of quality materials and a competent approach to work.
Advantages and disadvantages
We collected the main properties of vinyl floor tiles from reviews of the owners (and housewives) of such flooring. It turned out to have many advantages:
In general, almost everyone unanimously declares that PVC floor tiles are the best they have had so far. Moreover, “before” there was laminate, linoleum, ceramic tiles, some even had parquet. Disadvantages were also collected from reviews. There weren't many of them:
PVC floor tiles: one of the options with an adhesive lockAs you can see, this is a really good option. Suitable for any premises - technical, residential, with difficult operating conditions.
Overview of methods
Tile on a tongue and groove board
The technology of decorating tongue and groove tiles is very complex due to the following nuances:
- It is not economically feasible to decorate fresh flooring made of tongue-and-groove boards with tiles, since it will need to be pulled together after several months of use;
Therefore, in this particular case, it is recommended to lay the tiles on a wooden floor after preliminary leveling and strengthening the structure with a self-leveling floor.
Advice! A layer of self-leveling floor, glue and cladding will dramatically increase the structural loads on the wooden floor beams. It is highly desirable to make a new calculation for the deflection and load-bearing capacity of structural elements using the method of rigidly clamped single-span beams.
Revision and strengthening
Before gluing tiles to a wooden floor, it is imperative to inspect the supporting structures:
- add joists to reduce the distance between them and/or increase the thickness of the floorboards;
- eliminate creaking, tighten screws or add additional fasteners to the existing structure;
- replace vapor barrier and insulation materials if necessary;
- pull together the tongue-and-groove board to eliminate gaps;
- remove the paintwork completely with a sander;
- treat the tongue with an antiseptic or fire-bioprotectant (the composition additionally includes a fire retardant that increases fire resistance).
Initially, only the first, every fourth and last row of floorboards are attached to the joists. After tightening with self-tapping screws, all boards are fixed to the joists.
More information about laying tongue and groove boards was discussed here.
Self-leveling floor
To level the plank flooring in a wooden house, budget modifications of a cement-based self-leveling floor are used. They have self-leveling properties, which makes working with these compounds easier. The main nuances of the technology are:
- damper layer - the perimeter of the walls to the height of the finishing coating must be covered with tape;
- layer thickness - if there are differences in heights, place at least 5 - 10 mm of solution at the top point;
- mixing - according to the manufacturer's instructions, to ensure the specified water-cement ratio, the mixture is always added to water;
- application - the solution is poured evenly around the perimeter of the room, additionally leveled with a squeegee;
- creating a uniform structure - the surface of the uncured self-leveling floor is rolled with a needle roller to release dissolved air.
Self-leveling floor on wooden floors.
To walk on liquid solution, paint shoes with needle soles are used.
Unlike wet concrete screed, the minimum thickness of which is 3 cm, self-leveling floors can be leveled to zero. However, separating layers of hydro- and vapor barrier films, sound insulation and insulation are prohibited.