When independently arranging hygienic premises in a country house, in a house, in an apartment, we most often strive not to save money, but to remodel the space to suit personal requirements. That’s why we often choose not ready-made proposals, but install a shower drain in the floor under the tiles and build a unique shower stall. With all the desire to achieve an ideal result, not all of us know how this work is done. Do you agree?
We will share with you all the subtleties and nuances of installing a shower without the usual tray and standard designs. We will tell you about the types of plumbing drains, guidelines for their selection and the materials required to implement the idea.
The article we presented contains all the answers to the questions of independent craftsmen and customers of construction team services. The process of constructing a shower with your own hands is described in detail. Diagrams, photos and video selections will greatly facilitate familiarization with the information.
What is a shower drain in a tile floor?
The drain is part of the sewer system of an improvised shower stall. It collects the water used during the washing process and directs it to the general drain pipe.
The device can be mounted in the floor or pallet, and it works on the principle of a simple siphon. Thanks to the overflow system, the space is constantly filled with water, preventing unpleasant odors from entering the room.
The shower drain under the tiles performs another important function - it traps debris that risks getting into the water supply and causing it to clog.
The design of the device includes three main elements:
- a water inlet funnel with a flange into which wastewater flows;
- removable grid that filters large debris;
- a siphon that creates a water seal inside the system.
The ladder is placed in a specially created pit - the lowest point of the floor covering. Water flows here by gravity, ensuring the removal of liquid from the entire area of the pan.
Main advantages
A shower drain is a structure made of a decorative grille, a water inlet and a siphon that collects and drains water from the floor in a shower or bathroom. Each structural element performs its functions:
- Grate – filters water from large debris that can clog the sewer pipe.
- Water inlet funnel - discharges water into the sewer.
- Siphon - creates a water or air barrier to prevent the penetration of unpleasant odors from the sewer.
The main advantages of a shower drain are:
- You can make a shower of any size, rather than relying on offers in the store.
- A hand-made ladder will definitely fit the overall style of the interior.
- It is always possible to install additional options (folding chair, rain shower).
- Unlike industrial pallets, a drain made of concrete and ceramics will last for many decades without changes or damage.
- Can be built in any convenient corner of the room.
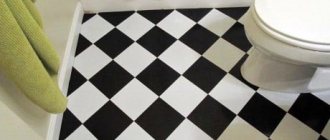
Appearance of a standard shower drain
Types of shower drains under tiles
Based on their design features and operating principle, drainage devices can be divided into two groups:
- with a water seal - a traditional option, where water plays the role of a stopper that traps odors;
- with a dry valve - equipped with a valve in the form of a funnel with a shut-off ball. When water enters the circuit, the ball rises to its level, opening access to the drain. When the liquid drains, the valve returns to its place, preventing the penetration of air from the sewer.
Models with a dry seal are considered more hygienic due to the absence of stagnation of moisture in the siphon. But all types of drains require periodic cleaning to remove dirt and plaque.
The devices differ in the diameter and height of the neck, the direction of liquid drainage (side/bottom) and the shape of the outlet (vertical/horizontal).
Assembling the drain unit
Before installation, you should calculate the location of the drain hole so that no difficulties arise during laying the tiles. Decorative elements of some drains have the same dimensions as the tiles. If the hole is positioned correctly, the grate will replace one of the tiles.
The outlet cuts into the sewer pipe; all joints and connections must be coated with plumbing sealant. If thermal insulation is required, then polystyrene foam can be laid on the concrete base of the floor, cutting out the contours of the structural parts of the plumbing on it.
As an option, you can make a warm floor by laying a special heating cable. Due to the small area and limited operating time, energy consumption will be insignificant.
Gangway placement
The location is designed even before the installation of the shower stall. A high siphon, which assumes a large slope of the drain channel, will increase the throughput of the system. If the siphon is located low, it will not cope with a large volume of liquid.
The placement of the drain largely depends on the location of the sewer riser. Accordingly, it can be located:
- in one of the corners of the shower - most often this is a triangular device that provides an angular flow of water, the most ergonomic model that does not attract attention to itself;
- in the center of the shower room there is a device of a rectangular or square configuration. To install it, it is necessary to ensure that the floor or pallet is sloped on all four sides;
- near the wall - an outflow of a narrow linear shape, located parallel to one of the walls, towards which the slope is made. This option also looks aesthetically pleasing, guaranteeing high throughput properties of the drainage system.
In any case, the question of which drain for a shower stall under tiles is better and the choice of its location is not of fundamental importance. The main thing is to maintain a slope in the right direction, otherwise the liquid will not be removed effectively.
Conclusion
In this article I shared my experience and opinion, which is very subjective. I have ordinary customers, so I rarely supply premium products.
I always try to balance price=quality.
You can safely choose products from a popular and well-known European brand and it will work for you for quite a long time.
Don't go for the cheap stuff. When you make a shower drain in the floor and water leaks somewhere under the tiles, dampness and fungus will appear. This will be quite expensive to fix. As I already wrote above, replacing a tray or drain costs several tens of times more than the cost of the product and the work to install it.
I wrote my reviews about ladders and trays and talked about the nuances. If you found the article useful, please like it and ask your questions in the comments.
Siphon selection
Siphons for drains differ from their analogues only in the absence of a plug covering the drain hole. There is simply no need for this in a shower stall, so simple cheap siphons will have to be abandoned in favor of more technologically advanced devices. These include:
- siphons with manual control. The adjusting knob is located on the wall, which makes it easy to control the drain hole by simply turning it;
- click/clack systems (open/closed). The plug in these devices is mounted above the drain hole and is simultaneously responsible for opening and closing it. The first press of the plug with your foot causes it to lift - the hole opens and the water is removed. The second press closes the plug, preventing liquid from draining.
The classification of siphons by engineering features looks like this:
- bottle - installed mainly in kitchens, not suitable for showers;
- corrugated - are a flexible, embossed hose that can be laid at any angle to the shower tray;
- classic pipe ones - they are bent in the form of the letters U and S, and the hydraulic valve is formed directly in the bend of the pipe.
For non-standard drain location options, a corrugated siphon would be a good solution. In other cases, a classic tubular system is installed.
Materials for work
Before starting work, it is important to stock up on all the necessary tools and materials. Anything bought in haste is usually not of good quality. And when constructing such a structure, there is no need to save. So, you will need:
- Shower drain.
- Materials for arranging formwork.
- A hammer drill with a nozzle for mixing mortar.
- Cement.
- Sand.
- Containers for solution.
- Guides for creating a slope.
- Rule.
- Tile.
- Tile adhesive.
Installation of a shower drain
Installing a ladder during the construction of a private house does not present any particular difficulties. Here you can initially calculate the wiring of communications and achieve a certain thickness of the screed. In apartments, everything is more complicated - the thickness of the screed here is not sufficient to form a slope, so the floor level has to be raised. You need to act wisely and step by step.
Tools and materials for work
Consumables:
- sand;
- cement;
- expanded polystyrene;
- damper tape;
- isoplast;
- tile adhesive;
- tile;
- sealant;
- construction tape;
- grout;
- plastic pipes;
- fully equipped ladder;
- screws.
Set of tools and accessories:
- level, ruler and tape measure;
- pencil or marker;
- grater;
- Master OK;
- putty knife;
- knife and scissors;
- tile cutter or nippers;
- screwdrivers and keys;
- rule.
Preparing the base for the ladder
Work begins with laying a drain pipe and inserting it into the sewer system. When inserting, maintain a slope level at the rate of 2 cm per 1 linear meter. The cracks at the insertion point are filled with sealant paste.
Then the height of the screed is calculated, focusing on the axis of the pipe embedded in the sewer. To the height of the ladder add the thickness of the grating and a few centimeters per slope from the calculation indicated above.
The base itself will be a rough screed - it should be at least 3 cm thick. The screed should be lightweight, so foam concrete or expanded clay concrete is used for its construction. A damper tape is laid along the walls and the concrete is allowed to dry completely - according to building codes, at least 14 days.
The dried screed is coated with a waterproofing layer of bitumen or mastic, overlapping the walls. At this stage, it is necessary to decide on the location of the ladder, taking into account the tiled cladding. The drain grate should be positioned symmetrically relative to the tile elements.
Floor insulation
According to the instructions, assemble the ladder into a complete structure. All that remains is to fix it on the surface of the screed and connect the pipe to the sewer outlet pipe. The thermal insulation layer is created as follows:
- Expanded polystyrene sheets are cut into pieces in accordance with the characteristics of the distribution of communications on the floor.
- The finished sheets are laid on the floor.
- The material is glued along the perimeter with damper tape.
- The joints between pieces of thermal insulation are taped with construction tape.
Expanded polystyrene has high heat-insulating properties and will prevent heat loss in the bathroom.
Installation of floor screed
At this stage, the main layer of screed is poured to form a slope. Work progress:
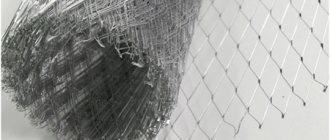
- Expanded polystyrene is covered with a reinforcing mesh.
- Beacon landmarks are installed to indicate the slope towards the drain hole.
- Prepare a solution at the rate of 1 part cement to 3-4 parts sand.
- Fill the surface with the prepared solution so that the drain device is completely covered with the mixture, but the flange remains open.
- Leave the screed to dry for at least 3 days.
Floor waterproofing
It is recommended to use isoplast as a waterproofing material. A hole for the drain is marked and cut out in the material and placed under the remaining open flange of the drain. Along the perimeter of the hole, a layer of waterproofing is fixed with screws. When laying waterproofing, special attention should be paid to corners and joints, “fusing” heated isoplast onto the surface.
The siphon with a protective grille is connected to the drain body using a rubber O-ring. The finished waterproofing layer is poured with another layer of screed prepared from sand, water and cement. While pouring the screed, it is better to cover or remove the decorative grille so that the solution does not clog the drain holes.
Craftsmen advise making a small margin in height, allowing you to slightly raise the floor level during the tiling process.
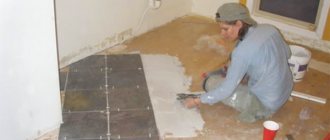
Laying ceramic tiles
They begin to lay the tiles only after the final layer of screed has completely dried. This stage will be the longest - at least 25 days, and better - 42-43 days.
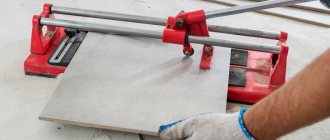
The cladding will look more aesthetically pleasing if the tile work is carried out in the direction from the drain to the shower walls. This will help avoid trimming elements directly at the drain. The only exception is a round or oval shaped ladder. You should work here very carefully, carefully cutting the tiles with a tile cutter and giving it the desired configuration.
You can lay the tiles on the screed using regular glue, leveling the layer with a spatula. Special crosses will help maintain the same distance between individual ceramic elements. The tiles near the walls will most likely have to be trimmed, but only after careful measurements, otherwise the cladding will not turn out neat.
Within a day, the tile adhesive will dry, and you can begin grouting the space between the tiles. Only moisture-resistant grout products are suitable for the bathroom. If all the work is done correctly, the end result will be an even layer with the drain grating located at the same level as the tiled covering.
What tools will you need?
The set of tools that will be required for the work depends on the installation method and the selected materials:
- A mandatory tool is a level. It is necessary to control the slope of the floor plane. You can use a regular building level or a high-precision laser device.
- To apply the markings you will need a pencil and a tape measure.
- You will need to purchase the ladder itself and plastic pipes of the appropriate diameter in advance (usually 50 mm).
- If you are going to install a podium, you will need blocks for the sides, a metal profile, and gypsum board sheets.
- You will definitely need waterproofing material. It can be rolled or in the form of mastic.
- If you are going to fill the screed, you will need a dry construction mixture, a container for preparing the solution, a mixer attachment, usually a spatula, and a grater.
- For insulation of screeds, extruded polystyrene foam is purchased. You will also need a damper tape, which is installed around the perimeter of the room before pouring the screed. To fix it to the wall, use masking tape.
- To install the front covering you will need: ceramic floor tiles, glue, PVC crosses, grout, tile cutting devices.
- Silicone waterproof sealant.
ceramic tiles for bathroom
Tools for work The set of tools required for work depends on the installation method
Useful tips
- When purchasing a drainage device, you should choose models with a throughput of at least 1.5 liters per second.
- You need to create the optimal tile layout in advance using a computer program or manually.
- The dimensions of the tile joints should not exceed 2-3 mm.
- It is better to choose a metal grate for the ladder rather than a plastic one. It costs more, but will last longer.
- It is recommended to periodically moisten the cement that hardens in the screed and level it with a trowel. This will make the surface smoother and stronger.
- Isoplast waterproofing can be easily replaced by liquid coating mixtures - “Tekhnoprok”, “Elastomix”, “Elastopaz”.
- If you plan to install a modern “tropical shower” system in the shower room, it makes sense to install a linear drain. It has the highest throughput properties.
A tiled shower drain provides an excellent opportunity to create a shower room within a limited space. It will be appropriate in small apartments and rooms where water getting on the floor is inevitable. With proper installation and construction work, the system will operate stably and serve for a long time.
Advantages of a shower with built-in drain
The variety of trays and drains for drainage water is explained by the fact that there is a need for shower stalls - not purchased ones, which are a single prefabricated structure, but stationary ones, without a tray and complex electronic “stuffing”.
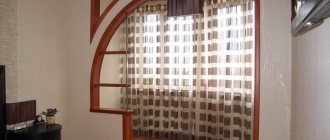
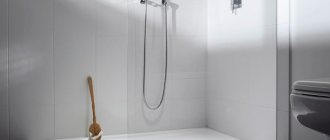
The design of the cabin is simple and convenient: a bar with a shower, smoothly opening plastic compartment doors, a non-slip floor covered with ceramic tiles. You can organize such a place for taking water procedures yourself by laying the floor and walls with tiles and correctly connecting communications.
Even without restrictive edges and borders, water does not flow out of the cabin if the floor covering is properly equipped - with a slight slope, ensuring the outflow of water into the drainage device
Why do owners of spacious bathrooms and cramped bathrooms choose this shower option? It has a lot of advantages:
- variety of sizes and configurations;
- possibility of placement in non-standard premises;
- creation of a unique design;
- ease of care and regular cleaning;
- comfortable use of the shower by older people.
One of the technical advantages is the presence of an emergency drain. During force majeure circumstances (water supply failure in your apartment or neighbors upstairs), water will drain through a drain built into the ceramic floor tiles.