Doorway, Metal doors
The installation of entrance doors is considered complete when the openings are framed with corner steel. This applies to finishing the slopes after installing the partition. The composition of the structure depends on their appearance. Metal slopes give the canvas an original look.
Door slope material
Today there are several technologies for forming entrance door slopes, both outside and inside, where different building materials are used. Let’s just briefly outline them, and also note the advantages and disadvantages of each.
Plaster mortar
This is an old method for making door slopes that is still used today. And here we take into account not only the low cost of the technology and materials used, but also the possibility of obtaining a high quality final result. Moreover, today, more and more often, instead of ordinary plaster made according to the classical recipe, ready-made mixtures of textured and decorative compositions are used. With their help, you can give the slopes an attractive appearance and match them exactly to the interior or exterior design of the house.
Slopes made of plaster mortarSource masterdel.ru
Drywall
This building material is becoming increasingly popular year after year among private sector developers. Simple, reliable, inexpensive, with high speed of installation work. The only drawback is the joints of the strips, without which it is sometimes impossible to finish the door slopes. This problem can be solved, but this requires additional manipulations.
MDF panels and laminate
Essentially, it is a more expensive replacement for drywall. But these two materials have a wide range in terms of decorative finishing of slopes. As for MDF panels, if the width of the doorway is greater than the same dimensional indicator for the panels, then they will have to be joined on the slope, which reduces the presentable appearance. In this regard, laminate is preferable because its joints are less noticeable.
Slopes made of MDF panelsSource dveri-komandor.ru
Natural wood
Slopes for the front door were made of wood before. As in the past, today this pleasure is not cheap. But the end result of the operations will amaze everyone. Wooden slopes have incredible beauty when combined with a wooden door. At the same time, wood can always be restored, which extends its already long service life. The only thing that needs to be noted is that the process of forming slopes from wood is complex and requires knowledge of some of the nuances of the operations being carried out.
laminated chipboard
For some reason, many people believe that laminated chipboard is used only for making furniture. Builders and designers appreciated this material. The only thing is that for finishing slopes they use a thinner grade of material (6-10 mm) than furniture material, which reduces its cost. All other characteristics can give odds to any other type of finish. You just need to understand that ordinary laminated chipboard is used for internal slopes, and moisture-resistant for external ones.
Slopes made of laminated chipboard source dverivmir.ru/wp-content
PVC panels
It should be noted that plastic panels, when they first appeared on the construction market, immediately became popular. The huge variety of design solutions offered was impressive. Therefore, designers immediately began to use them wherever possible. Door slopes were not left out either.
But over time, it became clear that PVC panels do not have sufficient strength, especially if they were exposed to shock loads. Under the influence of changing temperatures outside, they quickly failed. That's why they were abandoned today.
Stone and brick
Finishing the slopes of the front door with stone or brick is rare today. For some reason, many people think that this design option for front doors is unfashionable. But the point here is probably different:
- laying stone or brick is a complex and labor-intensive process that requires a lot of time;
- after finishing the work it will be difficult to finish the walls;
- This is not the cheapest option, because it is not the material itself that is expensive, but the work of the master.
As for the advantages, it should be noted the high strength of the structure and the unique individuality of the surface of the slopes.
Slopes made of decorative stoneSource kakpostroit.su
Extras
The appearance of these elements on the market has made finishing slopes simple. But craftsmen assure that the extensions are best used for interior doors. On the street, under the influence of changing humidity and temperature, this material quickly deteriorates, losing its appearance. But if the task is to decorate the front door from the inside, then there are no restrictions or prohibitions. Today, manufacturers offer entire lines of door finishing elements, which allows you to choose the desired option without any problems, both for the door and for the interior design of the room.
A huge variety of extrasSource oteplicah.ru
Sandwich panel slopes
A PVC sandwich panel is two thin sheets of plastic with a layer of insulation (sheet thickness 1 cm).
Materials, tools for installing slopes of PVC sandwich panels on the front door:
- PVC sandwich panel.
- Profile (starting, cover).
- Plastic is liquid.
- Roulette.
- Knife.
- Self-tapping screws.
- Screwdriver.
- Drill.
- Screwdriver.
Installing slopes from sandwich panels, or how to do it yourself:
- Clean the opening from dust and foam residues.
- Take measurements of the parts of the sandwich panels (length width): one top, two sides. For convenience, you can cut out a cardboard template so that there are no gaps between the parts of the PVC sandwich panels after installation.
- Cut the starting profile and attach it with self-tapping screws (10 cm margins) along the edge. You don’t have to use a profile: make an opening in the foam 1 cm deep, insert the edge of the sandwich panels there.
- Install the PVC top panel.
- Afterwards, cut the starting profile to the width of the slope, install it under the ceiling and at the base of the floor. This does not have to be done if there is liquid plastic - the cracks can be sealed with it. But do not use sealant - it will darken.
- Installation of strips of sandwich panels.
- Cover the sections of the sandwich panels with a “lid” profile. Cut and install. An overlap forms in the corners of the structure.
- Where there is an overlap, cut the profile at an angle of 45 degrees.
If desired, the space between the PVC sandwich panel and the wall is filled with polyurethane foam. This is done after installing the sandwich panels.
For more information about installing slopes with your own hands after installing the front door, watch the video
Some features
Decorating the front door with your own hands has some features, taking into account which will help you complete the work correctly. The basis of such processes is to obtain aesthetic appeal, although we should not forget about protective functions. It's no secret that the outer coating faces various mechanical influences, and therefore must successfully withstand them.
Any external door cladding cannot fully replace internal insulation; it acts only as an auxiliary link
There are nuances that will help you correctly decide on the type of cladding:
You need to decorate the front door from the inside so that the design matches the appearance of the doors of other rooms, if any. Of course, there is no need to achieve complete similarity, but designers advise maintaining harmony. One of the secrets to expanding a small hallway space is the use of mirrors. Indeed, the canvas can serve as the basis to which such an insert will be attached
The mirror overlay from the inside of the room looks interesting, but for these purposes you should use tempered or acrylic safety glass. It is important to take into account the facing of the slopes, which help to obtain the necessary individuality. Many people mistakenly spend a lot of time on decorating the canvas, but forget about the door slopes, which require no less attention.
The method of fastening the material used for decoration is also of great importance, because the coating should be as durable as possible.
How to work with different types of walls
In addition to the standard situation in which the concrete opening of a panel apartment building needs to be sheathed, there are other options. The wall can be:
- Concrete;
- Brick;
- Made from rounded timber;
- From laminated veneer lumber;
- From cinder blocks (and other types of blocks);
- Made from sandwich panels.
All these types of materials differ in their aggregate properties and size. For example, rounded timber is much more “movable” than laminated timber, and cinder blocks have a lower density compared to concrete. That is why you need to work with each type of wall individually.
The easiest way to install door trim is on a concrete wall. It is dense and thin, it is difficult to damage it with a handy tool.
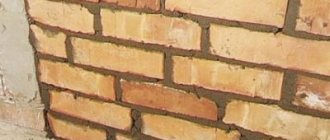
Brickwork is wider than concrete, so the standard addition that comes with the kit will clearly be out of place here. The width of a brick wall can reach 50-60 centimeters. A concrete wall is rarely thicker than 10 centimeters. Moreover, brick crumbles under strong mechanical stress from both sharp and blunt objects. You need to work with it delicately.
Rounded timber shrinks. Therefore, during the installation of the door, a support structure is pre-fabricated from bars. In this case, the sheathing should be attached to them, if possible. This is done to avoid the opening from deforming over time. Moreover, the width of the timber also does not allow the use of a standard extension. Glued laminated timber does not shrink, but is also much wider than a standard concrete wall.
Cinder blocks, sandwich panels, foam blocks and other materials with minimal density require gentle fastening of the sheathing. In this case, it is better not to get carried away with self-tapping fasteners and choose, for example, polyurethane foam.
Possible finishing options between doors
- If you decide to install two new doors, then the best solution would be to order a single unit. The design can be specified when ordering, and with this option you will immediately provide finishing between the panels - laminated, veneered, MDF and others.
- If funds are tight, install only one door, and the second will remain the existing one. The finishing between the entrance doors can be anything. When the foam gains strength, cut it off and fill the space between the doors with putty. Finishing is done after the putty has dried. The simplest finishing options are wallpaper, painting, even linoleum will do, ceramic tiles, just like on the threshold. Improve the old door - by covering it with self-adhesive film, for example. This is the cheapest example of finishing, and it will benefit from updating the interior.
- Having installed a new entrance door, install the second one in a single ensemble with the interior doors in the apartment. Finishing the space is the options listed above, plus it can be covered with plastic panels, clapboard, drywall and other materials.
We looked above at examples of installing two doors, the distance between which was not changed during installation, and it turned out to be narrow. You can correct this, and the result will be a small vestibule. I will give an example from my own practice and perhaps it will be useful to someone.
Initially, my door, like that of my neighbor living on the right, was somewhat recessed inward, and on the left side there was a decent slope. To reach the same level as the slope, a brick column was laid between our doors and our neighbor's. The post was plastered and served as one side for the front door frame. Thus, the space between the entrance doors in my apartment was increased. The floor (threshold) was made of parquet, and the sides of the original vestibule were covered with furniture panels. This was a long time ago - even when I received the apartment, but it remains so to this day. Everything is neat and my wife likes it. I am attaching a photo.
Nowadays there are a lot of design options, but 20-25 years ago the choice was not so diverse. You can finish it with the materials I wrote about above.
The task is more serious when it is a private home. The distance between the doors is an area of high humidity and temperature changes. Therefore, it is better to finish it from moisture-resistant materials. Decorative plaster, plastic panels, simple painting, but preferably with facade paints and other materials behave well in these conditions. The floor is porcelain stoneware, ceramic floor and frost-resistant tiles, linoleum.
When finishing, you should not forget about insulating the space between the doors, otherwise condensation may occur due to temperature changes.
- Firstly, you should purchase external doors with insulation.
- Secondly, it would be a good idea to lay a warm floor under the floor covering - this will always create a positive temperature between the doors in any frost.
- Thirdly, provide good seals on the door so that there is a tight seal and heat is retained in this gap.
As a rule, private houses have a vestibule, but this is optional. I advise apartment owners to think carefully, weigh everything before installing a second door, choose the optimal distance between the doors and the appropriate finish.
Tips for repairers: how to seal the front door after installation? Materials for work
The front door is the first thing a guest sees when entering a home, so appearance is very important. After installing the front door, traces of foam and slopes remain that need to be sealed. Finishing begins after installing the door block. Additionally, soundproofing or insulating materials may be needed to avoid noise and cold from the street.
How can I expand?
Widening a doorway is not the most trivial task, and if there are other options, it is better not to do this, but it is quite feasible if there is an urgent need. In an apartment, such changes require the consent of the BTI; in your own home, this is easier, but we must not forget about the norms and restrictions, otherwise, if the calculations are incorrect, the building may become dangerous for people in it. First, you should familiarize yourself with the characteristics of doorways. This is written above.
In order to remove excess, there are several ways:
Rough method. When expanding, various hammer tools are used, for example, a sledgehammer, a jackhammer, a hammer drill and the like. To apply the method, you first need to describe the contour, and then remove the excess with tools
When choosing this method, you need to pay attention to the microcracks that form during operation. Such cracks will require additional work to eliminate them and deteriorate the strength of the entire wall.
Dry cutting
With this method, a grinder is used, with which you need to cut off the excess; in addition, the grinder copes with fittings and other metal structures. Dry cutting generates a large amount of dust, so before starting work you should take care to protect your eyes and respiratory system.
Wet cutting. In this case, a spray bottle is used in conjunction with a grinder, with which the working surface is irrigated. The simplest method is to use a specialized construction cutter equipped with a large diameter diamond blade and a water container. There will be less dirt, but the cost will be significantly higher.
When reducing the doorway, the situation is simpler; there are also several methods for this procedure:
- Smooth cut. In this case, the shape of the opening does not change and global changes are not expected, it is only necessary to reduce the opening to achieve the desired size, the shape remains rectangular.
- Arch. A good option if reduction is required not only in width, but also in height. If you choose an arch to design the opening, you must remember to take into account the overall design style of the house. Now this is one of the most popular types of design. But everything should be harmoniously combined in style with the rest of the house. Bulky and bright parts should be removed from the structure, as they “weight down” the opening. In addition, the arch does not have to be left round; it can be made in an ellipsoidal, asymmetrical or trapezoidal shape.
- Complex design. In this case, a figured design of the opening is assumed. In this case, the best material would be plasterboard. Instead of a blank wall, you can make, for example, shelves.
Brick, plaster, plasterboard or wood are often used as reduction materials. The use of plaster is not recommended if the width of the doorway is significantly reduced.
How to prepare for work
Tip: In order for more light to penetrate into the room, the slopes should be plastered at a slight angle, which is measured with a special square.
The instructions for preparing slopes for work suggest the following procedure:
- The surface is thoroughly cleaned of dirt and dust.
- Bitumen and grease stains, salts that protrude on the surfaces are removed.
- Particular attention should be paid to preparing the corners.
- Existing concrete deposits are removed.
- The masonry seams are cleared to a depth of one centimeter, which will ensure good adhesion of the material to the main surface, and the plastered corners of the walls will become durable.
- The walls are primed with a special primer solution (see Types of construction primers and their scope).
Tip: When plastering walls with sand-cement mortar, their surfaces must be moistened with water using household sprayers, rollers or brushes.
- Galvanized plaster profiles are attached to MP-75 or Rotband mortar.
- Profiles must be aligned in two planes:
- relative to the wall;
- without shifting the selected position relative to the slope.
- If there are several doorways on one wall, you need to simultaneously install the profiles on the outer slopes, and after the solution has hardened, install the intermediate elements, aligning them with respect to the previously installed ones. Aluminum slats are used for this. In this case, the outer profiles will protect the corners from damage and act as plaster beacons.
After preparing the surfaces, you can plaster the doorways.
To do this you will need to purchase:
- Ironing iron.
- Spatulas.
Tip: For high-quality plastering of surfaces, you need to make a template. To do this, you can use available material, for example, a piece of plastic. The main thing is to ensure that the working part of this structure is sufficiently smooth and sharp.
Plasterboard finishing
This material is loved by many craftsmen, and it is readily used in construction and repair work. It is universal and easy to use, and therefore can also be used for finishing slopes. This option is also called dry plaster.
Plasterboard finishing
The main advantages of using drywall are increasing the speed of work and simplifying it. If necessary, drywall will perfectly hide all the shortcomings. In general, the work on using it to design slopes looks like this:
- The surface is primed after cleaning it of debris;
- a metal frame is formed from the profile;
- moisture-resistant wall plasterboard is cut into pieces of the required sizes and fixed to the frame, forming a box;
- after installing the sheets, the cracks and the sheets themselves are puttyed (it will not be possible to glue anything onto untreated sheets of drywall or cover them with some kind of decorative composition);
- when the putty dries, you can decorate the doorway.
Installation of plasterboard elements
Methods for making slopes
The outer side of the door is finished by master installers. But on the inside, everything is terrible. Before your eyes is a bare wall, bricks and a lot of possibilities for designing slopes.
The sloping part gives the doors a beautiful appearance, hides all fasteners and makes the entire structure stable.
Therefore, after the box is installed, you need to choose a finishing method, and there are not many of them:
- Finishing with platbands and additional boards;
- Plastering slopes;
- Gluing the material.
The division occurs according to different methods of forming the slope area, and choosing the material for cladding is not a problem. The most ideal option is to seal the slopes with concrete and then paint.
Finishing slopes with installation of finishing material on a special frame is beneficial when a decent amount of mortar is required for voids in the opening. Judging by the photo, using this method the slope will be flawless and even.
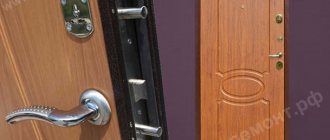
Faux leather
The use of leatherette is a method of decorating the entrance canvas that has been proven for many generations. Covering metal entrance doors with this material has been practiced for a long time. Current leather substitutes do not differ much in appearance from the natural product, but are much cheaper.
In addition to the low price, the advantages of this material are:
- resistance to external factors: ultraviolet radiation, high humidity, temperature changes;
- elasticity, ease of installation;
- ease of care and cleaning, artificial leather can be washed with non-aggressive detergents;
- excellent decorative properties: you can choose any color and texture;
- together with insulation, you can make high insulation from noise and the penetration of cold air into the room, and any layer of insulation can be made.
The main disadvantage of leatherette is its low resistance to mechanical damage. Pets can easily ruin such upholstery.
Also, for the upholstery you will have to buy an additional lining - foam rubber with a thickness of 1 to 2 cm or a more modern version - isolon.
The procedure for covering a metal door with artificial leather:
- Glue is applied to the door leaf. Apply the selected insulation to the surface and smooth it well. Excess material is carefully trimmed.
- The artificial leather is cut according to the measurement, adding 12 centimeters in width.
- When upholstering the inside of a door, the leatherette is first glued along the upper end, and then, slightly stretching, it is smoothed to the bottom. Be sure to check whether the material has shifted.
- Next, they paste over the door around the perimeter, starting from the hinges and ending with the doors with a lock and handle. The work below should be the final stage.
- If the upholstery is done on both sides, then it is necessary to ensure that the leatherette does not overlap, otherwise it will not last long in these places.
- All excess is cut off, and the necessary holes for the fittings are also cut out. They should be slightly smaller than the required size.
- Mount the fasteners and all accessories in place.
Plastic cladding
Quite often, interior openings are lined with plastic, but it needs to be chosen correctly so that there is no feeling of disharmony when you see a plastic entrance to a room decorated, for example, with wood. Otherwise, installing plastic is not difficult.
- Along the perimeter of the opening, wooden slats or a profile are attached to the wall. Their installation must be carried out using a level, but it is better to stretch 2 cords from top to bottom at the 2 vertical ends of the opening. The distance from the threads to the wall depends on the thickness of the profile. The sags are set level and attached to self-tapping screws, which are screwed into the upper and lower parts of the opening. Along these planes, base profiles are nailed to the ends of the wall with dowels. The plane above the box is built using horizontal threads.
- The starting bar is nailed close to the box.
- Plastic panels are cut according to the vertical and horizontal dimensions of the opening.
- Vertical sheets are installed and fastened with self-tapping screws to the slats.
- The top panels are placed and also secured.
- The finishing profile is installed.
- Corner joints are sealed with sealant.
To work with plastic you need:
- sander;
- jigsaw;
- impact drill or hammer drill;
- screwdriver;
- hammer;
- carpenter's knife;
- level.
The direction of the plastic panels can be parallel to the wall, but it is better if their joints with each other are located horizontally (from the door to the room).
You can choose the most suitable method for constructing slopes based on the availability of a particular material, economic or design reasons.
After installing the new entrance door, all that remains is to update them with brand new slopes. They can be integrated into the interior design in different ways; plasterboard, laminate, MDF, PVC sandwich panels, as well as non-standard materials (for example, imitation natural stone) are suitable for design. In order not to spend money on the services of a specialist, you can install the slopes yourself, following the instructions.
How to decorate a door with your own hands?
You can veneer a door yourself in different ways. Wallpapering is considered the most common. Any type of wallpaper, from paper to liquid, is suitable for this method. Before processing with this material, it is necessary to prepare the canvas: remove the paint, putty all the imperfections and sand it. You can cover the entire canvas or just the paneled part with a wallpaper sheet, cutting out parts of suitable size.
The decor can be fabric, which, due to its structure, will make the product unique. But it is necessary to choose the fabric, taking into account the degree of its shrinkage. You can use several fabric sheets of different designs. The patchwork technique is quite popular among designers: you can cover the entire canvas or just the central part with fabric. The product can be covered with unusual nails, beautiful laces, and baguette frames.
An unusual finishing method is mirror acrylic. Using mirrors you can visually enlarge the space and improve lighting. Since it is not always possible to cut out the desired part from a mirror yourself, you can purchase a ready-made panel with amalgam. The simplest option is shaped acrylic mirrors. They can be arranged into one whole and cover the entire canvas, or they can be placed in the center, leaving the rest of the space free.
Choosing the composition for the solution
Manufacturers offer building mixtures for each stage of finishing. They differ in the size of the powder particles: the size of the fraction has a direct impact on the characteristics of the prepared solution.
To prepare starting putties, a larger powder size is used than for finishing solutions. Starting putty is used for rough finishing of the surface, as it allows you to roughly level the surface. Preference is given to gypsum or cement composition, depending on the location of the door.
Rough solution
If the slopes are leveled in the bathroom, it is recommended to choose a cement-sand mixture. Such a slope is not susceptible to moisture, and from a financial point of view this solution is preferable. When finishing the living room, it is allowed to use a gypsum mixture, since the humidity level here is normal.
Finishing is carried out using the appropriate composition. You can use a dry putty mixture, from which a solution of suitable consistency or paste is prepared before work.
Attention! If the humidity level in the room is high, preference is given to cement and acrylic compositions. Such mixtures are not afraid of high humidity, maintaining the integrity of the coating under direct exposure to running water.
Design and shapes of doorways
A door frame is not initially installed in the opening between the rooms. But already at the beginning of the remodeling you need to choose the shape of the opening. It can be done in the form:
- arches;
- semi-arches;
- portal;
- any geometric figure.
If there are several doorless openings in an apartment or house, then they should all be of the same shape - this will create a feeling of a single space. Designing openings in this way is especially suitable for small residential premises. A swing door takes up approximately 1 square meter. m. area. If it is removed, this footage can be used wisely.
Arch
If you don’t know how to design an opening without a kitchen door, make it in the shape of an arch. It looks more interesting than a simple swing door, and decorates a room in any style - classic, Italian, rustic, ethnic, Mediterranean, modern.
Arched openings come in several types:
- round;
- trapezoidal;
- triangular.
These structures are made of plasterboard; different materials are used for their decoration. Round arches are a universal solution suitable for all rooms. This structure can connect the hall and the corridor, the kitchen and the balcony.
To make it look beautiful, do not forget about an important rule: the lower the ceiling height, the wider the round arch needs to be made
Semi-arches
In this case, only one part of the opening is rounded, while the second remains square. If the size of the wall allows, such a semi-arch is made wide and shelves or niches are installed on one side, and lighting is provided. An asymmetrical opening becomes a noticeable element of the interior, where two rooms are combined into one space. Such semi-arches are often made in order to hide defects in the interior wall or other flaws.
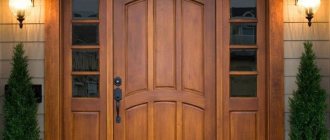
Portal
Conventionally referred to as arches, but in fact it has a rectangular shape. Basically, it's like a doorway, but there's no door in it. Portals in classic interiors are usually finished with natural wood, MDF and other similar materials. Beautiful carved platbands in a contrasting color are selected that stand out against the background of the wall. The hole is made wider than a standard opening, making the room visually more spacious.
Non-standard forms
Who said that interior openings should only be round, triangular or rectangular? There was no such installation! Therefore, the passage between the rooms is connected by arches with wavy edges or other non-standard shapes. Asymmetry does not go out of interior fashion, as do bold decisions. The metal profile on which the drywall is attached is very flexible, so complex structures can be easily made from it.
This is interesting: Finishing the door opening - let's look at it together
Wood-like slopes
The wood finish gives the doorway a sophisticated look. The role of wood when decorating door openings with your own hands is played by laminate or MDF. The first is used in cases where a minimum finishing thickness is needed, and MDF boards can close wider gaps.
Please note that the slope planes may not be located at an angle to the door leaf.
Their surfaces can be perpendicular to it. In many cases, this will help simplify the installation of the cladding if the end of the opening is fairly even.
The procedure for installing “wooden” slopes is as follows:
- The gaps between the frame and the wall are sealed with foam or other fillers.
- Excess filler is removed
- The wall surface is cleaned and primed.
- The base layer for the slopes (plywood, MDF) is attached to it with glue or dowels.
- The cladding is glued or screwed onto the base with self-tapping screws.
- The seams between the planks are coated with sealants.
It is important that all planks have the same thickness and are correctly selected in color. Finishing with laminate or MDF is the most preferable option for those who used them to renovate their home. After it, there will definitely be a sufficient amount of this material left, which will be enough to construct several slopes.
Doorway shapes
Finishing openings between rooms without a door is complicated not only by the choice of material used, but also by what shape this very opening will be.
The solution to this issue will affect the harmony of the transition between rooms, the lighting of the rooms, the combination of styles in the interior and the practicality of movement.
Rectangular
A common option is rectangular. Such an opening remains immediately after dismantling the door frame and it has its advantages:
- suitable for all finishing materials;
- no additional structures are required;
- clearly delineates two living spaces, for example, a balcony and a kitchen, while visually expanding both;
- Great for modern interior design styles.
A wide rectangular opening allows the slopes to be used as niches for interior items
Arched
The arch has an interesting ability: in rooms with low ceilings it visually raises them, and in cases with high ceilings, on the contrary, it lowers them. Moreover, the wider the arch-shaped opening, the lower the ceiling appears.
Many people prefer this option for its softness and lack of sharp corners, which makes transitions between rooms more invisible. The arch fits perfectly when exiting the hall; if it is wide enough, the movement between rooms will be imperceptible.
The absence of massive doorway decor emphasizes the beauty and complexity of the rest of the interior
A nice addition are ready-made solutions - arched extensions, prepared for installation in doorways.
Extensions and developed edging of the opening emphasize the complex shape of the opening, placing a visual emphasis on it
Trapezoidal
This form is used very rarely, due to the fact that in small areas such a solution has the opposite effect: the room does not expand, and the ceiling visually lowers. Especially in cases where the upper horizontal part of the trapezoid is too narrow. It may seem that when decorating the opening they wanted to make an arch, but did not have enough strength and skills.
Such an opening looks good when it matches the shape of the room located behind it, as in this picture
The polygon will fit well into the passage where double-leaf interior doors were planned or installed. Using drywall, you can easily and effortlessly turn a rectangular opening into a smooth trapezoid by securing it at the corners of the opening.
Asymmetric
A doorway that embodies the fantasies of the owners of a living space is an asymmetrical shape. Designers love it for its ability to bring the most amazing solutions to life. The opening ceases to be the boundary of two rooms, it turns into a decoration of the apartment, into an element that attracts the eye and emphasizes the given style.
An asymmetrical opening is the highlight of any interior
However, there are nuances here that many people forget about and encounter difficulties during the work process:
- you cannot undertake the expansion of the opening without creating a project where all the possibilities of load-bearing walls and ceilings will be taken into account;
- sharp corners and sharp shapes have a negative psychological impact on others; it is necessary to minimize the presence of irritating factors so that ennobled openings serve as an advantage and not a disadvantage.
Arch-shaped
The ceiling, recognizable by its graceful curve, is one of the most popular alternatives to interior doors.
The arch can be symmetrical or irregular in shape. Such unusual shapes can be achieved using plasterboard construction.
How to make an arch with your own hands, watch the video:
More ideas for decorating with different materials can be seen in the photo gallery below.
This is interesting: Doorway trim
Technology
Plastering the slopes begins after the surface of the main walls is leveled. The work ahead is dirty, so it is advisable to cover the door leaf, floor and door frame with film, oilcloth or other similar materials. You can cover the jamb with masking tape - it will be easier to clean.
Preparation
The first stage of work is surface preparation. First, poorly adhering plaster, pieces of brick, and other building material are removed. If the doors have been replaced, the old plaster may stick out a lot. In this case, even if it holds up well, it gets beaten up.
If the old plaster sticks out a lot, it is refinished
Then, grease or oil stains, if any, are treated with neutralizers. Old paint is also removed: plaster does not adhere well to it. Afterwards, remove dust and dirt.
If the cracks were not foamed when installing the door, you will need to do this now. Polyurethane foam is applied to the wetted surface in a volume of no more than 1/3 of the required amount. First, clean out all the dust, then moisten it with a spray bottle. In a few minutes it will greatly increase in size, filling all the empty spaces. After waiting for the foam to polymerize (harden), the excess is cut off with a knife. It’s more convenient to do this with regular stationery paper.
If plastering is to be done with cement-sand mortar, the surface is moistened. This can be done from the same spray bottle or using a brush or roller.
Setting up the guides
It is more convenient to plaster slopes with your own hands, as well as walls, using guides. On the outside of the doorway, to obtain a smooth and rigid edge, a perforated paint corner is usually placed. Once secured well, it can be used as a guide.
It is cut to the height of the doorway. The upper edge of the corner, which will be adjacent to the main wall, is cut down at an angle of 45°. It is better to do this, since during work this edge for some reason always lifts up and causes a lot of inconvenience.
You can fix the corner in several ways:
- Gently apply the solution inside the corner, then press it into the corner. You need to apply the solution carefully: the walls are made very thin and even with a small mass it breaks. Therefore, it is better to use the second method.
- The solution is applied to the corner, and the corner is pressed into it.
There shouldn’t be too much mortar, but there
shouldn’t be any voids either. Having pressed the corner in well, it is leveled so that its edge is flush with the main wall. The solution that protrudes through the holes is removed with a spatula. Then they take a level bar (you can use a building level or a rule), apply it to the corner, checking how level the corner is. They check both from the side of the main wall and from the side of the slope.
The procedure is repeated on the other side, and then on top. At the junction of the corners, the absence of differences can be checked by running your finger along the joint.
There is another way to attach the corners - with nails or self-tapping screws. This method is good when working with drywall, but it is not used when plastering: the caps get in the way.
When plastering door slopes it is convenient to use a template
The second guide is the door jamb. When installing the doors, they were aligned straight, so this is a good guide. But since the solution should not cover the entire surface of the jamb, a template is cut out of some dense material, which is then used to level the solution. It is better to cut it out of a piece of plastic: the edge is smooth, glides well, and is quite dense. You can use a piece of flat wooden plank. Only the edge that will cut off the excess mortar should be perfectly smooth. The part of the template that will slide along the jamb is made in the form of a step. This protrusion will remove excess solution.
You can work with a spatula or a rule, but then a beacon is installed and secured along the jamb at the required distance. The tool rests on it when cutting off excess mortar.
In this video tutorial on plastering slopes, the technology for attaching perforated corners is explained in detail, and explanations are given regarding the technique of applying putty during finishing.
Design ideas
The practice of a “built-in” doorway, or rather its illusion, is widely used. A similar solution is relevant for apartments where there is nowhere to put books. The home library is placed on open shelving that surrounds the doorway. In the nearest corner there is a place for reading: a cozy table with an armchair or a miniature sofa. In modern interiors, designers often experiment, and the shape of the doorway becomes the subject of design experiments. They can follow the contours of keyholes, vases, be completely round or have asymmetrical curved edges.
The original openings are complemented with decorative “windows” on the sides, illuminated voids that highlight the features of the contour, or shelves on one of the sides. An original solution would be to install forged elements with floral patterns above the vault. They will stretch the metal “stems” all the way to the floor. Forged “vines” are provided with special holders to which family photographs of equal size are attached.
Standard design
Standard design is usually made of plastic or MDF. These materials are available and have affordable prices. It is recommended to purchase a kit, which already includes platbands and accessories. All the owner has to do is install it.
A classic doorway may seem too conservative and a little boring to many. Typically, such options are chosen by adherents of traditions who do not like dramatic changes either in life or in the interior. However, a primitive open doorway is also used in a very “live”, colorful setting. It plays the role of a discreet element that unloads the space.
Arched design
Arches magically expand space. They create the effect of “freedom” and fill both rooms with light and air. In most cases (except for Thai versions), arched structures are symmetrical. They are designed accordingly, as if in a mirror image. In classical styles, arches are decorated with stucco, bas-reliefs and pilasters on the sides. An interior with a similar design will look elegant and expensive.
The arches with transoms are decorated with glass and thin slats that create a geometric pattern. Asymmetrical options are complemented by niches, shelves for decoration, and lighting. Arched structures connect any rooms; there are no restrictions in this regard. Although more often such openings are found between a cramped hallway and an adjacent room (usually a hall).
Accent design option
Open doorways themselves already attract attention, since there is no standard partition in their design. To enhance the emphasis, choose one of the design techniques and highlight the element using:
- Colors. The opening can have a bright shade and echo other accent details in the interior.
- Sveta. In arched structures of complex shapes, places are usually provided for the placement of spotlights.
- Invoices. Against the background of a “flat” wall covering (paint, wallpaper, plaster), the doorway can effectively stand out with the relief of stone, brick or stucco.
- Forms. The most common option, because you can think out the outline of the opening yourself. Then translate them into plasterboard or plywood and, as a result, get an original decoration.
Naturally, you can combine the above techniques to enhance the effect. An accent doorway is usually used to break up the decor, decorated in strict, restrained styles.
Non-standard solutions
In addition to the above standard methods using popular materials, you can use more original options that will highlight the interior, decorate the front door and surprise your friends:
- Artificial stone is a non-standard finishing of slopes. The main advantage is resistance to mechanical stress (if it is not a plaster model, it is fragile). Not a cheap option, requires the participation of a specialist.
- Tile. A type such as clinker (imitation brick or stone) is suitable.
- Plastic panels are an affordable but unreliable finish.
- Decorative plaster – in terms of aesthetics and durability, it has no equal. But you will need to work hard to find a good specialist in this field, because this work requires a creative approach and professionalism.
Materials can be combined if their properties are similar (sandwich panel parts + stone, laminate + tile and others).
How to plaster slopes
Plaster slopes for doors can be made using different compositions:
- Cement-sand mortar (CSM). For 1 part of cement, take 3-4 parts of sand and dilute with water (less than part) to a thick sour cream.
- To make the mortar “set” faster and increase its plasticity, you can add a little alabaster or other similar additive to the cement-sand mortar.
- Special mixtures for plaster type (Rotband) and MP 75 from Knauf.
These compounds can be used for plastering door slopes
Which plaster is better for plastering slopes? It is easier to work with Knauf compounds, cheaper - with cement-sand. What is preferable for you is up to you to decide.