Advantages of plywood
Plywood itself is a material consisting of several thin layers of veneer. It has a wide range of useful characteristics, which is why it is so widely used for laying on concrete floors.
The main advantages of this material are:
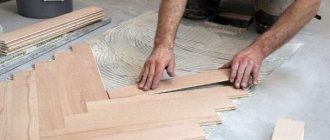
- A smooth and even surface is an ideal option for any floor covering. It allows you to completely hide the flaws of the concrete base. Subsequently, laminate and parquet, linoleum and carpet can be laid on plywood.
- The reasonable cost of the material allows it to be used by a wide range of consumers.
- Ease of processing and installation.
- The soundproofing properties of plywood enable the owners of the premises to isolate themselves from the penetration of excess noise from neighbors.
- Water resistance. However, for rooms with high humidity it is better to use special sheets marked FSF, which have high water-repellent characteristics.
- Leveling a concrete floor with plywood is a neat and clean job, unlike pouring the same cement screed.
- Environmentally friendly material.
- Excellent wear resistance and strength.
Useful tips
There are several tips that can be followed to speed up the gluing process:
- When laying sheets, maintain a level between them, which will reduce the time for sanding the material.
- Moisture-resistant plywood is used, especially in rooms with high humidity.
- Large sheets are cut into pieces.
- The concrete surface must be primed.
- When using cheap adhesive base options, additional fastening is done with dowels.
- When fastening with dowels, prevent the formation of an air cushion.
Types of suitable glue
There are many adhesive compositions on the modern market. To fasten plywood to a concrete floor, it is important to choose an adhesive that will glue the surfaces well enough, not be afraid of exposure to moisture and other factors, and will ensure reliable and durable fixation.
Polyurethane
This type of adhesive composition is characterized by the highest strength, excellent adhesion to all building materials, does not have a pungent odor, meets all sanitary standards and is recognized as safe by government organizations.
Types of polyurethane glue by composition:
- Two-component - consists of two parts (direct adhesive and hardener). It is used for fixing lumber on various types of bases, including concrete screed. Only this composition can be used for super-reliable fixation of plywood to concrete and without dowels. They are more expensive than other adhesives, they are used after preparation for 50-60 minutes (and then become unusable as the polymerization process is completed).
- One-component - not very plastic, polymerization occurs due to moisture in the environment.
Polyurethane can be diluted with different types of solvents, inorganic and organic. In most cases, it is the type of solvent that determines the environmental friendliness of the material and the permission to use it in residential premises.
Based on artificial resins
This adhesive for plywood on concrete floors can also be used and provides good adhesion. It does not require any preparation before starting work and is suitable for gluing different types of lumber. To increase the fixation strength, plywood is also additionally secured with dowels. One of the disadvantages of this glue is its strong unpleasant aroma, so work is carried out using personal protective equipment.
Water based
This type of composition is considered the safest, since it does not contain toxic or strong-smelling components. The price of the glue is relatively low, but the level of adhesion is lower in comparison with the above compounds. The adhesive is designed for use inside heated rooms, but the plywood must be moisture resistant.
The most popular example of a composition of this type is water-dispersed PVA glue. Its main advantage is that it does not lose its properties even if the substance is applied to a damp screed. The glue guarantees the plasticity of the connection, dries for a long time (within 5-7 days), but requires mandatory fastening of the material with dowels.
Mounting method
To lay plywood on the screed, you need to buy glue and dowel-nails. If you simply glue the slabs to the base, after a while the bottom layer of veneer will peel off.
It is impossible to press sheet material with dowels alone onto a screed with, for sure, unevenness on its surface. Therefore, dowels and glue in this case rationally complement each other:
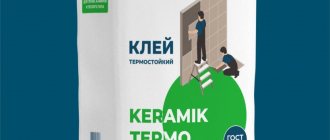
- inexpensive mixture of KS (universal construction adhesive) does not cause budget overruns;
- glue fills voids/unevenness in the base, ensures full support of the plywood on the screed;
KS universal construction adhesive.
- dowels attract structural materials to each other, providing a long service life.
Standard dowel-nail.
Expensive two-component mastics in this technology, apart from unreasonable cost overruns, do not provide any advantages.
Under normal conditions, a 6x40 mm dowel-nail is used. The fastener passes through the screed and is attached to the slab.
For plywood thicknesses greater than 20 mm, longer fasteners are used. If the slab under the screed is made of cellular concrete or with light fillers, anchors, including chemical ones, are used instead of dowel-nails.
Features of choosing glue
Depending on the finishing floor covering
When choosing an adhesive for gluing plywood to the base of the floor, you need to start from the material of the latter and the conditions for further use of the room:
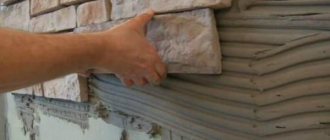
- When deciding how to glue ceramic tiles to a wooden floor, you will need tile adhesive for plywood that does not include water and is not aggressive towards wood.
- If you need parquet adhesive for plywood on a wooden floor, you should choose between epoxy-polyurethane or pure polyurethane systems containing artificial resins and solvents.
- To glue linoleum onto plywood, you need an appropriate adhesive that can provide a long-lasting, strong seam. It is affordable, safe and approved for use in residential areas.
Laminated plywood (with a film coating) cannot be glued. Therefore, before applying the epoxy compound to it, the film must be removed from the surface with sandpaper.
For unveneered plywood
After gluing to the screed, plywood can be either an independent coating or simply serve as an intermediate layer for the finishing coating.
For unveneered plywood, you can use any glue. The only important thing here is that its surface is clean and dry. The adhesive can be applied evenly with a roller or brush to both surfaces to be bonded. Long-curing adhesives require preliminary fixation of plywood sheets to the screed using dowels, nails or clamps after approximately 30-40 cm. After work, excess mixture must be removed along with unnecessary nails.
Suitable types of glue
What is the best adhesive for installing plywood on concrete floors? Let's look at several options that have their own positive and negative qualities.
Dispersive
Container with water-based adhesive solution
The components of this glue do not dissolve, but are located and mixed in a water-dispersion medium. This structure ensures the environmental purity of the solution, due to which only absolutely harmless and odorless water molecules evaporate during the solidification process.
But you should also be aware of the difficulties that arise when using a water-based adhesive:
- The need for additional fixation with steel screws and plastic dowels.
Advice: if communication elements are located in concrete, then without a detailed diagram of their location, you should abandon the use of dowel-nail fasteners. Because you can damage the wiring, after which you will need to cut reinforced concrete with diamond wheels to get to the breakdown and eliminate it.
Diamond drilling of holes in concrete for repair of underground communications
- A long curing period of at least one week.
Before use, the solution is diluted with water or a special primer. Consumption is approximately 1.2 kg of glue per square meter of concrete.
Alcoholic
Sample of alcohol adhesive solution
This glue is made on the basis of artificial resins or solvents. The presence of a specific odor forces you to use a respirator during work and thoroughly ventilate the room.
But you will also get many benefits:
- Drying usually occurs within three days under normal conditions.
- The cracks and voids are well filled, which allows you to achieve a higher density of the rough base.
- Remains elastic after hardening, which prevents cracking.
In the case of using this solution, additional fixation with self-tapping screws and dowels for concrete is also desirable. Its consumption reaches one and a half kilograms per square meter of cement surface.
Two-component
Polyurethane two-component adhesive for plywood on concrete floors
The cost of such a composition is higher than that of its analogues, but there are also more significant advantages:
- No additional fastening is required using the self-tapping dowel system. And this is a significant saving of time, money and effort.
- The shortest curing period is two days. That is, after 48 hours you can start sanding the wood-laminated board.
- Highest strength.
It is also important to keep in mind that before gluing plywood to concrete, it must be primed with a special solution to improve adhesive properties and create a protective polymer coating.
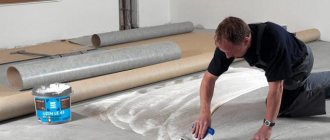
Why use plastic film
Polyethylene is a budget waterproofing material that has many disadvantages: wood rots and creates favorable conditions for the development of mold and fungi. Typically, film is not used in conjunction with wood. But in this case it is a necessity. It is due to the fact that concrete does not stick to its surface, which means it can slide when hardening.
Since the use of film is a prerequisite, it is necessary to take all measures to prevent the formation of mold and fungi. A wide selection of antiseptic agents with water-repellent properties will help with this.
What tools and materials will be needed
Laying plywood is in many ways similar to the process of gluing ceramic tiles, with the only difference being that you have to additionally cut and cut the sheets into blanks and fix them with dowels.
Therefore, in addition to tools for glue - a spatula, a container for diluting the adhesive mass and a mixer, you will need a small set of carpentry tools:
- A jigsaw, preferably with a built-in laser pointer;
- Sandpaper for manually sanding burrs and plywood edges;
- Construction level 70 cm and 150 cm long, tape measure, set of metal rulers;
- A screwdriver or electric drill with a set of drills, dowels with plastic plugs.
In addition, for installation you will need to make a template to control the width of the joints, buy material for sealing them, primer and the plywood itself. For priming under resin or bitumen mastic, a primer based on white spirit is suitable; in other cases, an acrylic composition can be used.
How to choose the right plywood?
When choosing a suitable material, you need to pay attention to a number of significant nuances that determine the key properties of the sheets and the possibilities of their use. For greater ease of perception, information on this matter is presented in table form.
Table. Plywood selection
FC – characterized by average moisture resistance. To glue layers of material, safe glue based on urea resins is used, which allows you to use the sheets when renovating residential premises without unnecessary fears.
E2. The average formaldehyde content is 10-30 mg/100 g.
How to choose the right plywood
Thus, FC plywood is most preferable for interior work. This material is further divided into 4 groups. The classification is carried out according to the following characteristics:
- external defects are absent or present in insignificant quantities;
- there are knots and veneer inserts;
- the material has a large number of cracks, knots and other flaws;
- the least quality plywood with a very large number of defects. Along with this, the sheets, as a rule, are glued together quite well, which allows them to be used for some construction activities.
Plywood of the last group is practically not used for interior work. Making a subfloor from the highest quality plywood is not financially feasible. Thus, the most optimal option in terms of the ratio of quality indicators and cost is the material representing the second group, which has a small number of knots and veneer inserts.
Types of suitable glue
Glue for plywood on concrete floors is produced with different compositions. Each of them is suitable for the job, but they have some features that are taken into account when attaching.
Polyurethane
The polyurethane series is more expensive, but has excellent strength and elasticity. Once completely dry, it is environmentally friendly.
According to the composition they are distinguished:
- Single-component. It is convenient to use, as it sets gradually during installation, which allows you to level the surface before the composition dries completely.
- Two-component.
Has multifunctional qualities:
- the composition is viscous, it is distributed with a combed spatula;
- rational use;
- the chemical has significant permeability;
- adhesion is not tied to surface cleanliness;
- hardening time occurs after half an hour;
- no additional fixation with dowels is required;
- after complete hardening, a layer stronger than concrete is obtained;
- withstands temperatures up to 50 degrees.
- toxic substances are released during operation;
- Use the prepared mixture within 30 minutes.
An example of a two-component polyurethane mixture is Berger Bond P2X. It is based on high quality polyurethane raw materials. No solvents or water are added to the composition. It is durable before hardening and can withstand heavy loads.
Based on artificial resins
A mixture based on artificial resins has universal use. No additional preparation is required before use. The use of dowels is required to enhance the fixation strength. When working with such adhesives, you must use personal protective equipment for the respiratory system, as it has a strong, unpleasant odor.
Wakol K450 adhesive is solvent based, has good strength, is used for heated floors, and is frost-resistant. When applied, the surface is cleaned.
Water based
This type of mixture is the safest, since the composition does not contain toxic substances available. Adhesion is lower than that of other species. Basically universal. Designed for work inside heated rooms. Requirements for plywood are moisture resistance.
An example is water-dispersed PVA glue. Its peculiarity is that it does not lose its properties when applied to a damp screed. Provides plasticity of the connection. Long drying time (can be 5–7 days). Fastening the material with dowels is mandatory.
Laying technology step by step
Installation of plywood on a screed under a parquet board is carried out in six steps. All operations are available for self-production. Minimum set of tools for this:
- markings - ruler, pencil, square, marker;
- cutting - hacksaw, hand-held circular saw, jigsaw;
- installation - spatula-comb with a tooth of 4 - 6 mm, hammer drill, screwdriver, hammer;
- sealing seams - a gun for sealant in tubes;
- finishing - an orbital, belt or vibration sander.
Usually all this tool is available in the arsenal of a home craftsman.
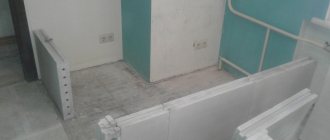
Preparing the base
Before laying plywood, the concrete screed must meet the following parameters:
- unevenness within 2 mm/m²;
- absence of dust, grease stains;
- humidity not higher than 4%;
- no cracks or delamination.
Treating the screed with deep penetration primer.
Before installation, the screed is vacuumed and thoroughly primed; it is advisable to do this the day before installation. When using a spatula with a tooth height of 6 mm to apply glue under the plywood in the following stages, the layer thickness will be a maximum of 3 mm. Therefore, irregularities larger than this size will remain unfilled.
Film screed test for moisture.
Humidity is checked using the standard method - for 12 hours, a piece of plastic film must be secured with tape around the perimeter of the screed for 12 hours. Work can only begin when there is no condensation under the film. Otherwise, the structure needs to be dried naturally additionally. Evenness is checked by the two-meter rule.
Cutting plywood sheets
At the slightest change in humidity in the room, the plywood begins to warp if it is rigidly screwed to the base. Therefore, laying this sheet material on concrete in large pieces is not allowed.
Depending on the size of the slab, you should use pieces with sides of about 60 - 70 cm. For example, a sheet of 122x122 cm cut into 4 parts will have a format of 61x61 cm. And for a sheet of 152.5x152.5, the pieces will have a size of 76.25x76.25 cm, respectively.
Installation of sheets
The prepared pieces of slab material must be glued, then additionally secured with dowel nails, taking into account the following requirements:
- the gap around the perimeter from the wall is 10 mm;
- seam width between sheets is 4 – 5 mm;
- displacement of transverse seams by 2/3 - 1/2 in adjacent rows.
Plywood layout diagram.
You can start gluing from any area, since you can walk on the rough plywood flooring right away.
Laying is carried out in rows, so before installing the first sheet, a line is drawn along its outer edge along the wall.
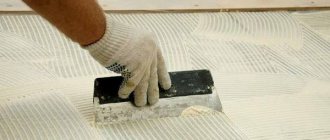
Then, using a notched trowel, glue is applied to the screed for one sheet of plywood or for a whole row, depending on the qualifications of the home craftsman.
Next, plywood is laid, the distance between its edge and the wall is 10 mm.
Installation of the first sheets.
Rows of holes are drilled for dowel-nails with a pitch of about 200 mm between them and between hardware in the rows. Under the fastener heads, a countersink is first performed to 1/4 of the thickness of the sheet material.
Fastening plywood with dowels and nails.
Less commonly used are self-tapping screws with a wide head and dowels without a flange at the top. This option is cheaper, but the labor intensity of the work increases.
The parallelism of the outer edge of all other slabs in the same row is controlled by the 2 - 3 m rule.
The heads of the self-tapping screws are recessed into the countersunk holes with a special punch.
Recessing nail heads into plywood.
Then the entire area of the room is filled with pieces of plywood of the same thickness using the same technology. The technique is described in more detail in the video below:
Putty of self-tapping screw heads
To smooth the base layer for laying block parquet, wood putty is used.
Two-component epoxy compounds are not economically viable for these purposes. And gypsum plaster and putty mixtures on wood are not used, in principle, as they conflict and are destroyed after just a week of use. You can mix small sawdust with PVA glue yourself to solve this problem.
Only the heads of the dowels and nails are sealed with putty, but not the longitudinal-transverse seams between the plywood slabs.
Sealing seams
On the one hand, the seams act as a compensation gap. That is, they cannot be filled with hard material - grouts, putties. On the other hand, leaving them empty is also a wrong decision. Since they will appear under the linoleum, after a couple of months, an uneven subfloor will cause accelerated wear of the carpet, laminate, and parquet.
Taking into account the seam spacing of 60 - 70 cm, the locks in the laminate will gradually break out, and individual planks in the parquet carpet will warp. Therefore, the seams are filled with inexpensive sealant. You can use a “liquid plug,” but this option costs at least two and a half times more.
Acrylic sealant for wood.
The cheapest is acrylic sealant, which is also considered the safest from the point of view of environmentalists. The composition is ideal for wood; it is usually used to seal the crowns of log houses. To reduce the consumption of sealant in the cracks, you can first lay a special cord for log houses.
You can use damper tape or sealant around the perimeter of the walls. In the first case, the tape must be secured to the walls before laying the first sheet.
About work in general
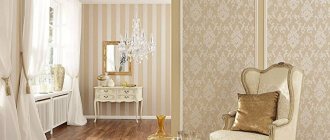
In modern floor installations, the base for constructing the covering is usually a concrete screed or slabs. This way you can create floors for different types of premises: apartments, houses, offices, garages, etc. The purpose of the room will determine what type of coating will be used as a base: linoleum, parquet, carpet, ceramic tiles or PVC tiles, laminate. The lifespan of the exterior coating, which is often very expensive, often depends on how level the concrete base is laid.
To create a strong and even base, ready for the final coating, a screed is made or the surface is filled with solutions of special mixtures that help level the floor surface. This preparation helps create noise and waterproofing.
Usually the final layer of the subfloor is a screed that levels the floor. Floor covering is placed on it
When choosing a method, take into account the difference between the height of the planned surface and the material of the old floor. When the difference between these values is not higher than 3-4 cm, the surface is leveled using a concrete screed. If the surface is smooth, but there are a small number of cracks, you can fill the floor with self-leveling solutions or tile adhesive.
Experts distinguish several types of screed, which differ in the installation method: it can be dry or with the addition of special liquids.
Even a person unrelated to construction can perform the dry method. This method is quite economical and insulates the room well. Expanded polystyrene, expanded clay and dry quartz sand can play the role of filler. On top of these materials you can put wood boards (for example, fiberboard, chipboard), plywood, and moisture-resistant gypsum fiber sheets. Dry screed is best used for residential premises.
The clean floor surface is treated with a soil solution, which protects it from moisture and makes it more durable. When the primer dries, the surface is covered with plastic film (at least 50 microns), connecting the canvases with an overlap of 20 cm and fastening them with tape. An overlap of about 12-15 cm is left along the walls, and then it is glued to the walls with damper tape.
The floor screed may be dry
If the person who took on the installation of the floor does not have enough experience, you can lay U-shaped profiles, turning them upside down with their edges. After the filler is poured into the resulting cells, it needs to be leveled, and the sheets of the planned floor should be laid on top. The joints need to be glued with PVA or GVL glue or fixed with self-tapping screws every 18-20 cm.
Along the walls, excess strips of gypsum fiber sheets are cut off. If at the same time the first sheets seem unstable, then when they are connected into one whole, a good, strong floor will be obtained.
When choosing a floor filler, most prefer the option based on cement and sand, which provides a strong base for the final layer
It must be taken into account that the thickness of such a layer must be thicker than 3 cm, otherwise its strength will decrease several times.
cement
The concrete base must be cleaned, primed and dried. Using a building level, beacons are placed. Instead, you can use T-shaped profiles, durable metal slats, wooden beams, metal pipes or edged boards.
Many people prefer to pour cement and sand screed
The slats are placed on a thick solution, every meter. The solution must harden, otherwise the even screed can be displaced, then the whole work will be ruined.
The following actions require not so much skill as endurance: pouring the mixture from a distant corner, carefully level the surface according to the rule. The solution must be distributed along the slats, performing movements in a circle. The mixture thus spreads from side to side, becoming denser and clogging the voids.