When the owners of an apartment or house decide to start a renovation, they certainly have to decide what kind of grout will be used to treat the seams of the floors or walls. The result of the work performed largely depends on the quality of the seams. Ceresit grout is invariably popular, the products are time-tested, they are easy to find on sale, and there is a large range of colored grouts.
Famous brands
Experts note that the best materials for processing tile joints include the following brands:
- Kiilto;
- Mapei;
- Anserglob;
- Baumit;
- Mira.
Among the companies producing repair materials, one of the leading ones is Henkel Bautechik. The company's product range includes a line of tile grouts called “Ceresit”.
Product purpose
German manufacturers, as always, are particularly scrupulous. Among the brands are mixtures for processing gaps with thicknesses:
- Up to five millimeters;
- From four to fifteen mm;
- Up to twenty millimeters;
- Silicate grout, ideal for filling joints between tiles and plumbing fixtures.
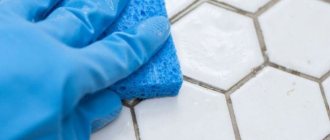
Using Ceresit grout in practice for the bathroom and other rooms
When using Ceresit grout, you must adhere to special rules:
- Before grouting, be sure to make sure the tile adhesive has hardened.
- The edges of the tiles must be wetted before cleaning.
- Be sure to get rid of the old mixture.
- You need to make sure that it does not leave streaks; to do this, use tiles without glaze.
- When preparing the mixture, the water temperature should be at room temperature. Remember that you need to pour the mixture into water and nothing else.
- Before using the mixture, let it sit for about 7 minutes, and most importantly use it within an hour.
Right choice
Ceresit grouts are on the shelves of all stores selling products for renovation and construction. In order not to make a mistake in choosing the appropriate composition, you should know and take into account some nuances.
- The widest color spectrum is presented in products marked CE 33 and CE 40 - twenty-six and thirty shades, respectively.
- Products marked CE 40, CE 43 and CS 25 are water-repellent and stain-resistant.
- It is possible to achieve effective protection against fungus by using CE 33 and CE 35 products in tandem with CT 10 impregnation.
Experts recommend using the same combination for external wall cladding.
Application area
The scope of application of Ceresit products is the widest. The mixtures are suitable for rooms with high humidity. The characteristics of the material are enhanced when used in combination with silicone or water-repellent impregnation.
Ceresit grouts are used:
- for narrow joints on the walls of kitchens and toilets;
- for wide joints subject to deformation loads, in particular for heated floors;
- for joints with high chemical resistance in laboratories and production areas.
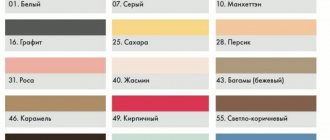
Color
Depending on the color of the tiles laid on the walls of the kitchen or bath, the shade of the grout also depends. Henkel Bautechik offers consumers the following basic range:
- Shades of gray and blue (four options each);
- Green (three shades);
- Lots of beige and brown.
Available in white, black, brick colors.
Specifications
- enhanced antifungal properties – Trio Protection “Micro Protect”;
- time for technological passage after application – after 8 hours;
- setting time and achieving complete hydrophobicity – 7 days;
- the amount of water for mixing the dry mixture is 0.6-0.64 l per 2 kg;
- operating temperature range – from -50 to 700C;
- density of the finished mixture – 1.75 kg/dm3;
- temperature of use – 5-300С;
- frost resistance - from 100 cycles;
- consumption time – from 2 hours;
- flammability class - NG.
The photo shows grout ceresit ce 40 colors
Color palette
The mixture's palette includes 30 colors, which allows you to choose the tone for any tile. Popular colors are white, blue-gray, dark blue, chili, caramel, anthracite, sugar.
The estimated costs can be found below:
| Seam width, mm | Tile size, cm | Consumption, kg/m2 |
| 5 | 20x20 | 0,5 |
| 3 | 15×15 | 0,4 |
| 3 | 10×20 | 0,4 |
| 2 | 10×10 | 0,4 |
| 3 | 5×5 | 0,7 |
| 2 | 5×5 | 0,5 |
Fact: the specific consumption of the mixture during work depends on the width of the seam, the size of the tile, as well as the general qualifications of the craftsman.
Rules for selecting shades
Experienced craftsmen do not believe that the colors of tiles and grout should be identical. On the contrary, a darker or lighter shade is visually more attractive.
When decorating a space with tiles with a bright pattern, it is recommended to use transparent grout, because... it will not distract attention from the main print.
Treatment with a protective solution
To create a coating on the tile joints that is resistant to water and cleaning agents, the appearance of darkening, dirt and fungal formations, it is necessary to additionally impregnate the joints with special compounds with hydrophobic properties. Impregnation for seams has the following qualities:
- provides a hydrophobic coating (relevant when processing tiles in the bathroom);
- prevents surface contamination;
- has an antifungal effect.
For such processing the following are most often used:
- water repellents, which, due to their liquid consistency, are easily applied to seams using a thin brush;
- polymer varnish that can penetrate deep into the grout (down to the base);
- sealants based on silicones or acrylic, which are used mainly in the most vulnerable places: in the corners of the bathroom or at the joints of the bathtub (shower) and tiles.
Nowadays there are protective coatings on sale that do not create a “glass” layer and do not affect the vapor permeability of the treated surface. Also widely used are two-component compositions, which, when dry, have high strength, durability and tightness. When grouting joints with such solutions, there is no need for additional impregnation.
Positive and negative aspects of the material
The undoubted advantages of the product include:
- A virtually unlimited choice of colors, which makes it easy to choose the desired shade.
- Simplicity in operation and reliability in operation.
- Possibility of choosing a substance for both external and internal work.
Disadvantages of Ceresit grout:
- Change in color after drying;
- Some models contain unstable pigments that leave marks on rags when cleaning the surface of the tiles.
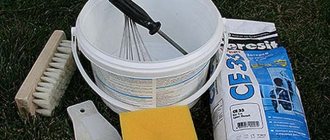
Preparation of the grout mixture
There are different types of grout:
- Cement ones contain Portland cement, additives, fine sand, and polymers. Such solutions are used for final processing of tiled surfaces in living rooms and bedrooms.
- Two-component epoxy grouts are made from resin and a hardener-catalyst. The paste can be used for no more than 1 hour, so you need to work with it quickly.
- Polyurethane solutions have the form of an aqueous dispersion. These sealants are similar in quality and properties to epoxy grouts, but they do not grout joints larger than 6 mm.
- Silicone grouts are suitable for fine work. The material does not allow moisture and air to pass through, fits well and does not require labor-intensive cleaning after completion of work. However, silicone is destroyed by chlorine, so it needs to be washed with special products.
- Latex is used as an additive to cement mixtures or as a finishing coating for joints. It provides durability and makes the seams waterproof.
Compound. To prepare the grout, a certain amount of water is used, which the manufacturer indicates on the packaging. Grout may lose its properties if the recommended proportions are violated. To prepare the solution, use water without impurities at a temperature of +15°C to +20°C.
Kneading. Water should be added to the dry mixture gradually, stirring the solution with a mixer and achieving a homogeneous mass without lumps. You can also mix the composition with a drill with an attachment at 400-800 rpm. In order for the mixture to ripen, it must be kept for 5 minutes and stirred again.
Holding time. The shelf life of the prepared solution is limited: cement mixtures can be used within 12-24 hours, and epoxy compounds are stored for 45-60 minutes. Therefore, 1-2 squares of tiles are grouted at the same time, removing excess mass.
Properties of individual models
Grout CE 33 is not afraid of frost and can be used for outdoor work. When hardened, this brand gives an even and smooth surface that is not “afraid” of water.
Experienced craftsmen combine this type of Ceresite with silicone when processing joints between plumbing fixtures and tiles.
The Ceresit CE 35 Super variety is recommended for grouting glass blocks, stone, and decorating swimming pools in open spaces. It is also used when facing materials subject to deformation.
The CE 43 Super Strong provides excellent strength and reliability when processing wide seams.
- The mixture contains antifungal components and special agents that prevent cracks in the facing material.
The best composition for problematic joints is the CS 25 brand.
- The advantages of the model include immunity to a wide variety of chemicals.
- The model is recommended for processing complex surfaces in corners and gaps between plumbing fixtures and tiles, glass, porcelain, and ceramics.
Containing an epoxy mixture, the CE 79 UltraPox model is impervious to moisture, temperature changes and aggressive environments.
- Used for processing joints of mosaic, ceramic, glass and stone surfaces.
The optimal choice for working in swimming pools and saunas is the CE 40 Aquastatic model.
- The very name of the mixture suggests that it has excellent water-repellent properties.
- Experts advise using it in tandem with antibacterial additives.
- The advantages of the model include a wide range of shades (about forty), including such unusual ones as jasmine and the neutral color of latte coffee.
Ceresit CE 43 SuperStrong
Ceresitse 43 SuperStrong grout is used for grouting strips with a width of 5 to 40 mm. It is highly durable and waterproof. The main characteristics and properties of the variety:
- Available in 9 primary colors.
- Developed based on the micro protect innovation, protecting the surface from harmful microorganisms.
- The mixture is not afraid of the effects of cleaning and aggressive household products.
- It is characterized by increased resistance to heat, frost and liquids.
- The elastic composition does not deform or crack during its service life.
The mixture is packaged in convenient 2 kg containers, as well as 25 kg bags for large finishing volumes.
Flexibility and increased strength allow the substance to serve in places where other analogues are subject to rapid wear. It can be used to provide tile moisture resistance without compromising the basic properties.
Best time to work
Grouting of joints, seams and gaps must be done after the mortar used to cover the surface has completely hardened. Each brand of Ceresit has its own shelf life, but it is at least a week.
Grouting work must be carried out in the following sequence:
- Clean the edge of the material from contamination.
- When working with an old surface, completely remove the previous grout.
- Better adhesion is achieved by wetting the edge of the material with a damp sponge.
- Prepare the mixture strictly in accordance with the instructions for this Ceresit model.
- While working, use gloves and goggles that protect your skin and eyes.
- Work in a well-ventilated area.
Preparatory stage
Grouting is the final stage of finishing work. In order for the seams between ceramic, glass, porcelain stoneware and mosaic tiles to look good and last a long time, special environmental conditions are required. Thus, work indoors is carried out at temperatures from +5°C to +30°C and at a relative air humidity of no higher than 80%. There should be no drafts in the room. The heat should be distributed evenly. If finishing work is carried out outside, it is better to choose a dry, warm day. Fresh grout should not be exposed to precipitation or direct sunlight. Wind can also damage uncured compounds.
For better adhesion of grout to tiles:
- after installing the tiles, remove the fixing elements,
- remove excess glue at the joints with a knife, spatula or wooden stick,
- Brush away any dust in the gaps
- vacuum, wash and dry the tiles,
- both the tile, its base, and tile adhesive must be perfectly dry.
If you are working with ceramic tiles and two-part mixtures, the adhesion will be greater when you wet the ends of the tiles a little. To avoid scratching the cladding when removing the adhesive, use a wooden stick rather than a sharp blade. If the surface is porous, the joints should be covered with masking tape on both sides so that the grout does not clog in the pores and stains remain. The joints should be grouted no earlier than 8-24 hours after laying the tiles. The drying speed of the glue is indicated on the product packaging.
Types of grout components
All the company's models are based on one main component.
It could be:
- Epoxy resin;
- Cement;
- Silicone.
When preparing a cement-based mixture, it is recommended to use water with a temperature of up to plus 20 degrees. The solution must be mixed twice with a short interval between processes.
- After applying the grout (ten minutes), it is necessary to wipe the surface with a damp cloth.
- After a day, treat the seams and joints with a dry soft cloth.
- The epoxy mixture should be prepared in tiny portions, because it quickly becomes unusable.
- The important point is to thoroughly mix the two components in strict accordance with the instructions.
- The solution is applied to the surface with a rubber spatula.
To remove the remaining mixture, use special mixtures and sponges.
When working with silicone-based grout, seal the edges of the tiles with masking tape. After a quarter of an hour, treat the seams and joints with a soapy sponge, smooth with a spatula and remove excess.
Instructions for use
To get the desired result, you need to do the work according to the rules. After all, only compliance with the working conditions and rules can guarantee a high-quality result that will last a long time, and the repairs done will be pleasing to the eye. For successful finishing, you must first prepare the surface, and only then proceed to the direct application of grout.
To get the desired result, you need to do the work according to the rules.
Surface preparation
You can start grouting tile joints only after the adhesive has completely dried. The period until the glue dries completely is indicated on its packaging. If a standard sand-cement mortar was used, then this work can be started only a week after completion of the laying work.
When installing, the tiles must be laid tightly together. The base itself and the adhesive layer must be dry, the edges of the seams must first be cleaned of residual adhesive solution and other types of dirt; they can serve as an obstacle to good adhesion to the grouting compound. If you decide to replace the old grout coating, it should be removed first.
If you used tiles with a matte finish, a rough or terracotta type of tile, then first check in a small area whether its coating is colored by the pigment contained in the grout.
When installing, the tiles must be laid tightly together.
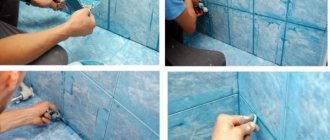
Application of silicone grout
When working with silicone grout, you should cover the adjacent surfaces with masking tape, and place a polymer rope in the expansion joints. The end is cut off from the grout, but the thread must not be touched, and a tip is screwed in, which is cut according to the thickness of the seams being processed. The cartridge must be inserted into the gun, and with the help of it the grout compound fills the seams.
After waiting fifteen minutes, wipe the surface with a soapy sponge, then smooth the mixture with a spatula to ensure uniformity. The spatula is pre-moistened in water. You can remove the masking tape.
Ventilation is provided in the room; you should not stay in it while it is drying; the silicone composition releases acetic acid into the air at this time.
If any shortcomings are discovered in the application of the grout, then the mixture that has not yet hardened is removed by wiping with alcohol or acetone. After drying, the grout can only be removed mechanically.
Tips for working:
- You should work at room temperatures from +5 to +20 degrees, humidity should not exceed 80%;
- To get the same color over the entire surface, you need to work with products from the same batch;
- The difference in shades of the coating may be affected by the presence of moisture in the base, different absorption of the side edges and the unevenness of the drying process of the seams;
- If the closure of seams is carried out outside the room, then the surface should be protected from environmental influences for the first 24 hours.
To get the same color over the entire surface, you need to work with products from the same batch.