It is often difficult to harmoniously fit the cornices on which the curtains are attached into the interior of the room. The problem becomes more complicated if you plan to make suspended ceilings: you need to think in advance and arrange the fastening of heavy curtains or curtains. In addition, all these elements will be reflected on the glossy surface of the ceiling, which does not look very nice. The solution may be to install a special niche for plasterboard curtains, which will not only hide unwanted elements, but also add elegance to the room.
Niche options for curtains
First of all, it should be noted that each project for the hidden location of a cornice associated with the construction of a gypsum plasterboard box is unique. When planning a niche for curtains, the characteristics of a particular room are taken into account:
- Window opening width.
- Wall length.
- Required distance from the window. It depends on the elements protruding into the room, usually a window sill or a heating radiator. The curtains should be separated from them by at least 2 cm, otherwise during operation they will constantly cling or rub against protruding parts, which can lead to rapid wear of the material or breakage of the fastening on the cornice.
Therefore, the dimensions of the box, especially its depth, are determined individually for each room. There are three main options for niche execution:
- Spotlights are usually mounted in a box 25–30 cm wide.
- The narrow design, 5–7 cm wide, does not provide for the installation of additional lighting, with the exception of an LED strip for illuminating curtains. For beauty and smooth transition, a baguette is glued from inside the room. The height of the structure should be slightly higher than its width or equal to it.
You can create beautiful lighting with any type of niche design. The LED strip is placed between the cornice and the plane of the box facing the window, which increases the width of the niche by at least 2 cm. The LED control elements and the electrical supply are retracted inside the box.
- Wide box decorated with baguette.
USEFUL INFORMATION: How to make a plasterboard ceiling with your own hands: marking, assembly, finishing
The ceiling box can have any configuration and size, the main thing is that it fits organically into the interior of the room and fulfills its main task: to hide the suspension elements. Curtains or curtains that fall directly from the surface of the ceiling look very impressive.
How to calculate the size of a niche and the distance from the window
Before installation, you need to determine the length and depth of the plasterboard box, as well as the distance from the wall. In this case, the dimensions of the cornice and the features of the room are taken into account.
When calculating the indentation, they first measure how far the battery is placed (or the window sill, if this part protrudes more). To ensure that the curtains hang evenly without bending, they are hung in front.
3 to 5 centimeters are added to the indentation - a reserve for the free movement of curtains. Then measure the width of the cornice. This setting is very different. Single-row models, on which Roman blinds or one tulle are hung, are narrow. And three-row ones, for different types of curtains and lambrequins, are much wider.
Then add 3-5 cm of reserve again. If the curtains are hung tightly, they will wrinkle and curl unsightly.
The length of the box can coincide with the width of the room if the niche runs along the entire wall. And when it is located only near the window, indentations are made along the edges. The size depends on the type of curtains. For a Roman blind that goes up, 10 centimeters on each side is enough. For thick sliding curtains you will need more - up to 50 cm. Then the open curtains will not block part of the sunlight.
The configuration of the window sill is also taken into account. It is better to hide the edges behind curtains. If they extend far into the walls, they increase the length of the niche.
To determine the depth of the structure, several parameters are also added up:
- cornice height (usually about 1.5 cm);
- the width of the tape at the top of the curtains, forming folds (5-15 cm);
- additive to compensate for the view from below (from a sofa, armchair, chair).
The optimal size is 15-20 centimeters. With a depth of more than 40 cm, it will be inconvenient to install a cornice in a niche, hang and remove curtains.
The calculated dimensions are plotted on the diagram. It is used during installation so as not to make mistakes with the dimensions.
Required materials and tools
To build a box with your own hands you will need:
- Drywall. The structure will not bear a significant load, so it is quite sufficient to use a 9 mm thick ceiling gypsum board.
- Guides and ceiling galvanized profiles. An exact calculation of the required number is made after drawing up a detailed drawing of the future niche.
- It is recommended to fasten the frame to the wall using dowel nails.
- Metal screws for fastening frame fragments together.
- If necessary, additional fastening elements, for example direct hangers.
- Reinforcing tape or serpyanka, putty and primer for finishing the resulting plasterboard surface.
Standard set of tools for the construction of gypsum plasterboard structures:
- A hammer drill with a drill of the required diameter.
- Screwdriver. It is useful to equip him with a special bat for working with drywall.
- Metal scissors for cutting profiles.
- Tape measure, plumb line, building level.
- Painting knife and hacksaw for cutting sheets.
- A spatula, brush and roller used to seal joints and apply primer to the finished frame.
The assembly processes for wide and narrow boxes have differences, so it makes sense to consider them separately.
Preparatory work
Before installing the base for the niche, you should cover up all the holes and cracks.
You should not immediately start installing the frame; you must first carry out preparatory work. Clean corners, walls, and ceilings from swollen old plaster, whitewash, and wallpaper residues. If, after getting rid of everything, holes appeared, the surface became uneven. Then you need to clean everything from dust and prime it.
Using putties and putties, remove unnecessary grooves and achieve a smooth surface. Draw all control points of fastenings, lines along which the profiles will be mounted.
It is required to apply points and lines evenly, without bevel. Because the profile will also lie crookedly, the design will not be ideal. Suspensions are pre-made from PP. Their size is equal to the height of the box minus 1 cm.
Marking
At the initial stage, markings are made:
- The distance from the box to the most prominent element of the window opening should be at least 16 cm. It is laid on both walls and connected by a line on the ceiling. This line will be the boundary of the niche. It is convenient to use painting thread for drawing.
- Parallel to the line, draw another one, which is the inner boundary of the box. The width between them corresponds to the width of the structure.
- Verticals are lowered on the walls, limiting the height of the frame.
USEFUL INFORMATION: Electrical wiring under drywall: laying wires in the wall, duct and ceiling
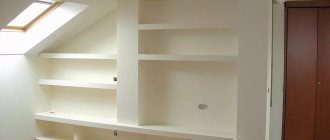
The following diagram shows a variant of a niche, which is provided in the design of a suspended ceiling.
Preparing the ceiling for a hidden cornice
Before any cladding, the surface must be prepared.
Neglecting this stage will lead to the appearance of the design looking ugly, defects will become more noticeable, and the service life of the materials will be shortened. Therefore, some measures need to be taken. They start by eliminating the previous design. The paint can be removed using a special compound or mechanically; just soak the wallpaper. Whitewash should also be treated with water. Defects, gaps and cracks are sealed with special compounds, such as putty or plaster.
If you do not plan to stretch the fabric or install a suspended ceiling in the area of the box, it is recommended to putty this free space and cover it with white paint. You can come up with a more interesting design, but this is a basic treatment that is best not to be neglected. This will allow the pocket to look more aesthetically pleasing and fit harmoniously into the design.
@passaz-okna.ru
Frame assembly
Before assembling the box, all electrical work related to the placement of cables and spotlights is carried out.
Note! The process of arranging a niche for gypsum plasterboard curtains has an important feature: due to the small distance between the window and the outer edge of the box, attaching drywall to it is problematic. Therefore, this wall is assembled on the floor, and then attached to the ceiling with drywall attached.
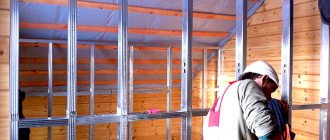
The frame is assembled:
- A guide profile is attached to the ceiling and walls along the marking lines. Fastening is carried out using dowels in increments of 40–50 cm.
If the ceilings are wooden, then the process is simplified: the dowels are replaced with wood screws with a wide head.
- Profiles forming the lower edges of the box are attached to the lower ends of the guides located on the walls.
The standard length of guide profiles is 3 m. This is not always enough to form a structure. In this case, the profile is built up using the overlay method, fastening it together with a cutter or metal screws.
- A cord stretched between the lower boundaries of the box on the walls will help control the deflection of the lower edges. Based on it, vertical jumpers made of ceiling profile (PP) are installed. They will also provide the structure with the necessary rigidity and will be useful when attaching drywall. Therefore, the step between these jumpers is 60 cm.
- If the box width exceeds 30 cm, horizontal crossbars are required. They are also made from PP profile. For strength, the elements can be attached to the ceiling using straight hangers or profile sections. In the latter case, the side walls of the profile are removed at the ends. “Tabs” bent at right angles serve to attach such a homemade suspension.
Innovative solution
Another way to create a hidden cornice is a new system of cornices built directly into the ceiling. Today, design solutions require minimalism and simplicity, both during installation and in appearance. Therefore, KRAAB-SYSTEMS successfully implements these requirements.
@kraab-systems.com
The company implements most solutions using a damper, gapless system, which visually makes the structure more aesthetically pleasing and makes installation more convenient. It is worth paying special attention to the fact that such a cornice system is an innovative solution in the field of suspended ceilings: thanks to it, it became possible to embed a cornice in the ceiling without the use of additional profile and installation of niches. Among other things, the cornice can be supplemented with an electric drive and the movement of the curtains can be controlled using a key, remote control or smartphone, since the “smart home” system is now gaining popularity all over the world and is becoming an indispensable attribute in every room
Paying attention to the design, it is worth noting that the engine itself is hidden behind the curtain and does not spoil the appearance of the structure, and the silent mechanism does not irritate or interfere. Another absolute advantage is that the engines are selected according to the client’s needs. If we talk about appearance, the cornice looks like a thin strip of black or white. But when choosing a cornice, a person is often faced with the question of the number of cornice lines. The classic quantity is three lines: for thick curtains, for tulle and for lambrequins. If we return, again, to minimalism and practicality, then the optimal solution today is a one-line solution - for blackout curtains.
Assembling the frame of a narrow box
With this option for arranging a niche for curtains, a single-plane frame is constructed. Drywall is attached to both sides of the profile, forming a narrow box:
- Guides are installed on the walls and ceiling.
- A thread is pulled, showing the lower border of the box.
- The bottom guide is screwed on.
- Using the thread as a guide, install vertical jumpers.
USEFUL INFORMATION: Soundproofing plasterboard "Knauf": soundproofing or acoustic plasterboard
Hidden curtain on a suspended ceiling (hidden cornice)
So, the curtain, which refers to the ceiling cornice, can be rod, profile, ceiling and hidden.
In this case, when installing the ceiling, the baguette must be attached to all walls, except directly near the window. In this zone, it must be mounted on a fixed beam (perpendicular to the ceiling) or a simple galvanized profile, the one used for drywall.
A hidden cornice is the best solution when you want to give the curtain the most aesthetic appearance
If you take a profile, you will need slopes
It is important to remember that a suspended ceiling will create a large horizontal load on the profile. You make a 10-20 cm indentation from the wall with the window, and you need to install a hidden cornice in this indentation
Then the cornice is mounted to the rough ceiling, and then the ceiling itself is stretched along the baguette. Everything is ready - you can hang the curtains.
Installation of drywall and preparation for finishing
When cutting gypsum board fragments, it should be taken into account that one edge of the box, usually the bottom, should be slightly wider in order to cover the ends of the two side edges.
It is recommended to drill holes for spotlights in advance, before installing drywall. It is also better to make chamfers at the joints of the elements. They will be useful for subsequent processing of seams.
The sheathing process looks like this:
- The prepared pieces of drywall are fixed to the frame with self-tapping screws in increments of 25–30 cm. A special bit installed on a screwdriver will greatly facilitate the process: due to its shape, it will not allow the screw to be driven too far and crush the plasterboard.
- As mentioned earlier, it is more convenient to mount the wall of the box facing the window at the bottom. The small dimensions of the niche will not allow you to “crawl” with a screwdriver to the fastening points.
- After the installation of the gypsum board is completed, the seams are glued with reinforcing tape or serpyanka mesh and sealed with a special putty for drywall. It also processes the recesses formed by the heads of the self-tapping screws.
- After drying, the seams are rubbed with sandpaper, and then the entire surface of the box is primed. The primer is applied in two layers. After it has completely dried, you can proceed to finishing.
Thus, it is not at all difficult to assemble a niche for curtains by mounting a box made of plasterboard. This design will definitely contribute to creating a unique design for your room. The process is shown in more detail in the video. Ask questions in the comments!
Problems of choice
Ceiling surfaces and recommended curtains
According to the methods of designing the ceiling space, it is usually divided into several types:
- reinforced concrete ceilings;
- tension systems;
- rack structures;
- suspended and mirror surfaces;
- false ceilings;
- raster or cassette coverings.
When choosing ceiling curtains, be sure to take into account the type of ceiling in the room. If you have reinforced concrete foundations that are standard for apartments, installing a cornice of any weight to the ceiling will not be difficult
But with tension or suspended plasterboard structures the situation is different. You will have to focus not only on the fasteners that come with the curtain rod, but also on the types of ceiling materials, because the curtain is attached not to the wall, but to the ceiling above the window
Types of designs and materials
Ceiling curtains help out when the window sill protrudes significantly into the room.
According to the type of material from which the cornice can be made, the following types of products are distinguished:
string curtains fit light curtains. Their design is represented by a string stretched between two fasteners. Under the weight of the textile, the cornice will begin to sag. Therefore, a hanging string curtain is suitable for a kitchen with a weightless curtain or a children's room.
wooden cornices will highlight styles such as Provence, classic, country, and rustic. The main advantages are the environmental friendliness of the material and the ability to withstand maximum loads.
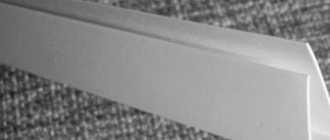
profile systems are simple and democratic. However, it is with them that most design ideas can be solved. The design of the curtain is represented by a long aluminum or plastic profile with several rows. This feature allows you to hang tulle, curtains on one product and complement the design with lambrequins.
The profile is equipped with elements that round corners and connect its individual parts.
metal curtain rods are the most durable and can easily withstand multi-layer compositions and heavy printed curtains. This is an excellent solution for high-tech and minimalist styles.
Dimensions
When choosing curtain rods, the question always arises as to what size the curtains should be. If we talk about optimal parameters, then for a spacious room in which the windows are located along a long wall, you need to purchase curtains 50-60 cm wider than the window opening. It is necessary to cover a section of the wall surface to prevent oblique sun rays from entering the room.
For a narrow room, the dimensions of the cornice should be slightly narrower than the window wall.
Useful tips
These recommendations will help you achieve the highest quality results:
- strictly adhere to the sequence of work stages;
- use only high-quality materials from trusted companies;
- think through all the nuances of the design at the stage of creating the drawing;
- make a box of a universal size so as not to destroy its structure when changing curtains and cornices.
Following these recommendations and instructions will help you make a niche for curtains with your own hands without any complications.
Learning to make plasterboard niches for bedrooms
Making a plasterboard ceiling in a nursery
Advantages
The niche is part of the design project; it is made in advance during the renovation.
If it is difficult to decide on such an opening in your ceiling, you should familiarize yourself with the advantages of this design:
- all the fastenings on which the curtain is held and all the mechanisms with whose help it moves are hidden in the ceiling;
- the appearance of curtains flowing from above without any visible support is magnificent;
- if the room has a glossy ceiling, flowing curtains look twice as long and seem to stretch the room, making it visually taller;
- the niche will suit any style, you just need to choose the right textiles for the windows;
- such types of curtains as roller, Roman, Austrian, Japanese; screens, when lowered, become flush with the wall and create the impression of a single whole;
- In the niche you can hide LED lighting, thanks to which the curtains will acquire a fabulous charm.